Fields
Get to know the 20|20's Fields setup menu.
Updated January 28, 2022
The Fields Setup page is the homepage for the currently active field as well as a jumping off point for adding and editing information associated with your fields in general, including prescriptions and boundaries.
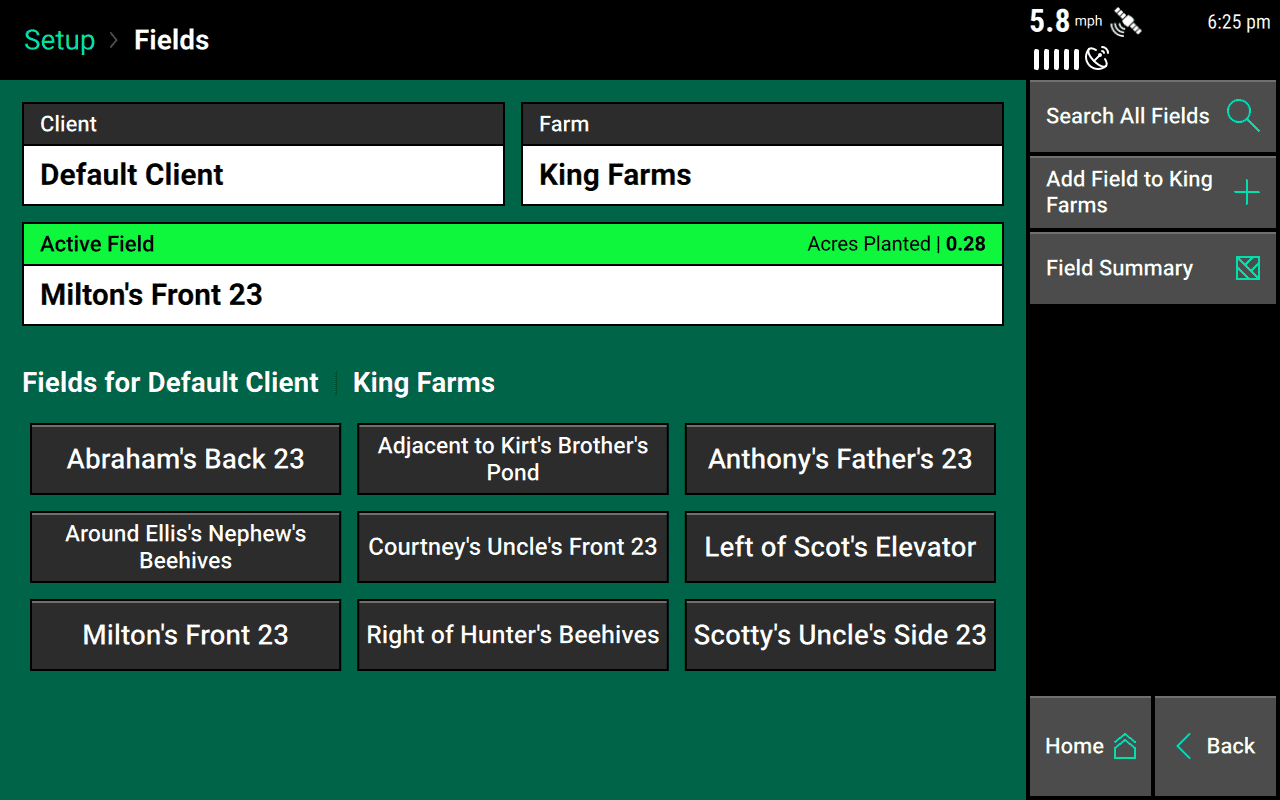
Table of Contents
Navigate to the Fields Setup Page
As its name implies, the Fields setup page is accessible from the Setup menu, which you can reach from anywhere by tapping Home (if you're not already on the home screen) and then Setup.
Once on the Setup page, tap on either the Field input card on the left or the Fields menu item in the sidebar. Either one will take you to the Fields setup page.
For quick access from the home screen, you can also tap on the field name at the bottom of any map widget.
Change the Active Field
Your 20|20 always needs to know where it's operating. Otherwise, it wouldn't know where to put the data it's generating; nor would it know which, if any, boundaries or prescriptions to use to control the implement.
To tell your 20|20 where you're working, you need to set the Active Field.
On the Fields setup page, you should see three input fields — Client, Farm, and Active Field — as well as a list of all fields that belong to the currently active farm. If the correct farm is listed in the Active Field box, then you're already good to go.
Otherwise, navigate to the correct field.
Navigate to a Specific Field's Setup Page
You can find the setup page for a specific field by following either of the following methods:
- Tapping on its name, if it is one of the farms already listed on the page. Note: you may need to scroll if the current farm has many fields.
-
Tapping on the Client input field, if it needs to change, or the Farm input, if the currently active client is correct. A menu will pop up that you can navigate by tapping the desired names. If the field, farm, or client you're looking for doesn't exist yet, you can create it using the Add button at the bottom of the pop-up.
If you have a lot of fields, you may find it easier to use the Search All Fields button in the sidebar. A scrollable menu will pop up with a list of every available field, across all farms and clients. You can filter that list by typing in the search bar. To access the keyboard, just tap on the search bar or the keyboard icon in the bottom right corner.
Activate a Field
Once you're on the page for the correct field, simply press the Make Active button. That will activate the field and take you back to the main Setup page.
Name and Organize Your Fields
Each Field within the 20|20 system belongs to a Farm, and each farm belongs to a Client. This organization helps you navigate your fields more conveniently, keeping related fields close to each other and unrelated fields out of the way.
In this section, you'll learn how to
- add a field to a farm
- change its name
- reassign it to a different farm
- save additional information about your fields for better record keeping
- delete a field when it's no longer needed
Add a Field to a Farm
To add a new field to the currently active farm, go to the Fields setup page and tap the appropriate button in the sidebar. It should say, "Add Field to [you farm's name]." Then type in the field's name, hit Enter, and you will go to the newly created field page. To use that field as the current field, tap Make Active.
If you'd like to add the field to a farm other than the currently active one, tap on the Client input field, if it needs to change, or the Farm input, if the currently active client is correct. That will bring up a pop-up where you can create new clients, farms, and fields, as needed, using the Add button at the bottom of the pop-up.
Change a Field's Name
Maybe you mistyped, or maybe you've found a better name. In any case, you want to change the field's name. To do that, navigate to the field's individual setup page (as if you were going to make it active — see above), and then tap on the field's name. That will bring up an alert, asking you to confirm your intentions.
After you've tapped Yes, you'll be able to type in a new name and hit Enter.
Reassign a Field to Another Farm
If you'd like to reassign a field from one farm to another, go to that field's individual setup page (as if you were going to make it active — see above). Then tap on either Client or Farm, whichever you want to change. This will trigger an alert, asking if you're sure you want to move (i.e., reassign) the field. Tap Yes, and then choose the farm you want to assign the field to.
Add Advanced Record-Keeping Information to a Field
On each field's setup page, you may notice a button in the sidebar. That button links to a page where you can enter information about your field for record-keeping purposes, specifically tillage, field number, and the number of acres in the field. Tap on whichever ones you'd like your 20|20 to keep track of. Each one will bring up a specialized dialogue box, allowing you to choose from options, type in a name, or enter a number, as needed
Delete a Field
Deleting a field from your 20|20 is easy. Go to the field's individual setup page (as if you were going to make it active, see above). There, in the sidebar, tap Delete Field, then tap Yes in the confirmation box that pops up.
If you delete the currently active field, the 20|20 will automatically make the "next" field active. Be sure to double check that this new field is the desired one, and update it if necessary.
Assign Prescriptions and Boundaries to a Field
If you have already imported prescriptions and boundaries onto your 20|20, you can assign them to particular fields on their individual setup pages. If you have not yet imported these files onto your 20|20, please read the about how to do that before proceeding.
Assign a Boundary File
Navigate to the individual setup page for the field that you want to assign to (as if you were going to make it active, see above). Then tap on the Boundary File box. This will bring up a pop up listing all available boundary files. Choose the one you'd like to assign and tap it. If you don't see the correct file, you may need to import it again.
Assign a Prescription
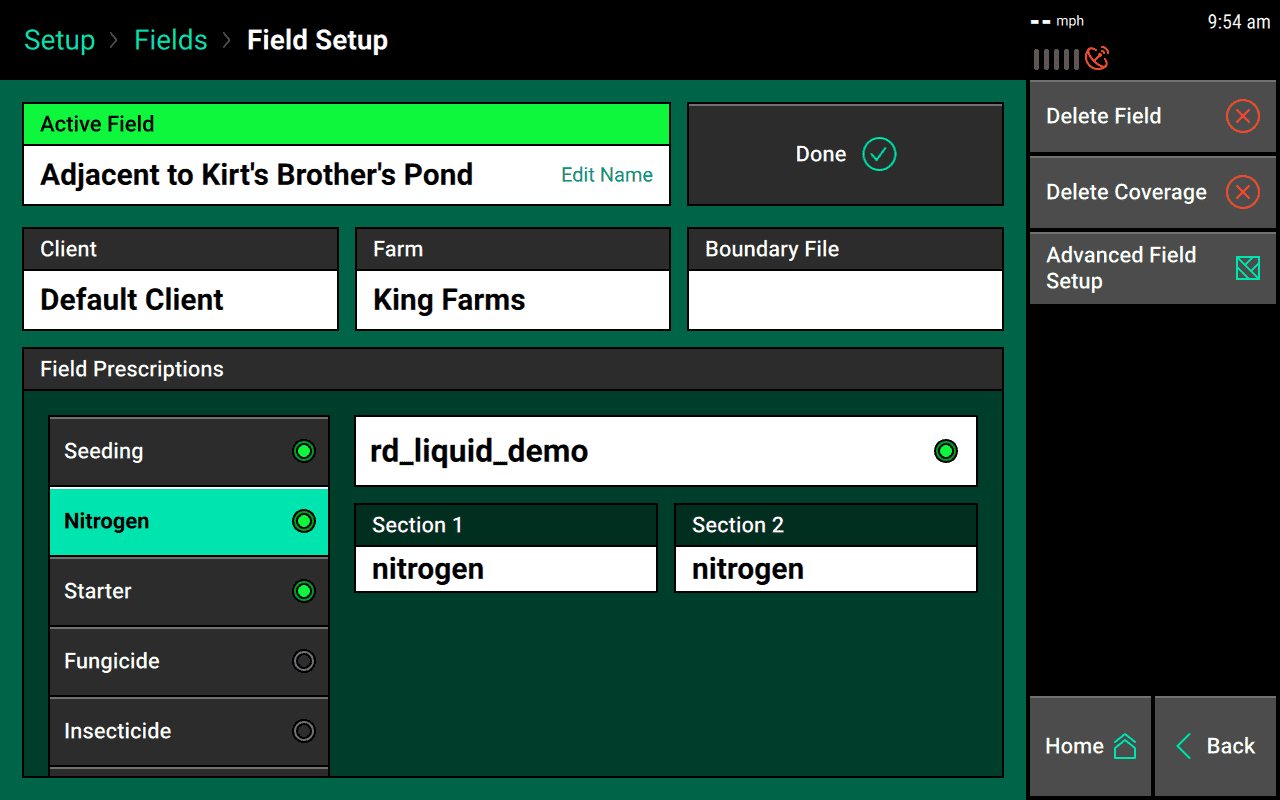
On the field's individual setup page, you should see a box on the left with a list of all products you have set up. Select the one that the prescription belongs to. Then tap on the box to the right, and a list of available prescriptions will pop up. Choose the one you'd like to assign and tap it. If you don't see the correct file, you may need to import it again.
Reset the Coverage Data Shown on Home Screen Maps
If you'd like to start fresh and reset your 20|20 to ignore coverage data gathered up to now (for example, when replanting), you can do that from the active field's setup page. From the Fields setup page, tap on the active field. In the sidebar, you should now see a Delete Coverage button. Tap it.
This will bring up a warning alert that says, "Do you really want to delete coverage for this field? All existing coverage data will be lost." Really, however, you are only losing the data from the display. The data itself remains stored in the system, but it will no longer be accessible to see visualized on the home screen maps or summarized in the Field Summary pages. The implement will also no longer swath based on the deleted coverage.
View Cumulative Data about a Field
The Fields setup page also links conveniently to the Field Summary page, which provides cumulative data about your field, including two counters that you can reset (independently) like car odometers to keep track of the tallies that matter to you. The data shown on these pages will vary based on the kind of implement you're using.