Seeding
Learn how to set up and use your seeding system.
Updated January 28, 2022
Table of Contents
Set Up a Seeding System
-
In the Equipment setup menu, configure your Seeding system.
- Tap Seeding in the sidebar.
- Press the Seeding System box to select your type.
-
Press the Seeding Sensor Type box to select yours.
- Note that we cover SpeedTube setup in its own article.
- Press to select your Meter Type.
-
In the Systems setup menu, add all hardware associated with the system you just created.
- In the Systems menu sidebar, tap Down Force.
- Press the Add Hardware button at the bottom of the page.
- Select the hardware type to add.
- Select the rows where you have installed that hardware.
- Repeat steps b-d for other hardware, if applicable.
-
Still in the same Systems setup menu, configure any settings that apply to the system as a whole.
- Decide which rows should be active for this system (Active Rows).
-
If using the 20|20 for control,
- Set Seeding Offset. These two values compensate for discrepancies if vDrive stops applying at the wrong time before reaching previous coverage or starts at the wrong time after leaving it. You can adjust the offset so that those line up precisely with the expected start/stop points.
- Set Coverage Pattern. (See the Swath Control Settings article for more details)
-
Optionally set Advanced Settings:
- vDrive Swath Output Mode lets you tie a third-party component to the seeding system, so that it turns on when you plant (and off when you stop planting) or off when you plant (and on when you stop planting).
- Quick Start Delay changes how long of a countdown you want when you press the quick start control widget on your home screen.
Two other settings – WaveVision Updates and Primary Speed Source – should only be changed after consulting with a dealer or product support.
-
In the Diagnose menu, make sure that everything is green.
- If not, troubleshoot using the usual color coding and other more system-specific diagnose information (discussed below).
- Still in the Diagnose menu, use the sidebar to go to Seeding, then tap Health Checks in the sidebar. Perform any health checks listed. (See below for more details about Seeding health checks.)
Operate the Seeding System
Add a Control Widget to Home Screen
To access the control page for Seeding, you’ll need a control widget on your home screen if you don’t already have one. Once you do, you can tap it any time to get to the control page.
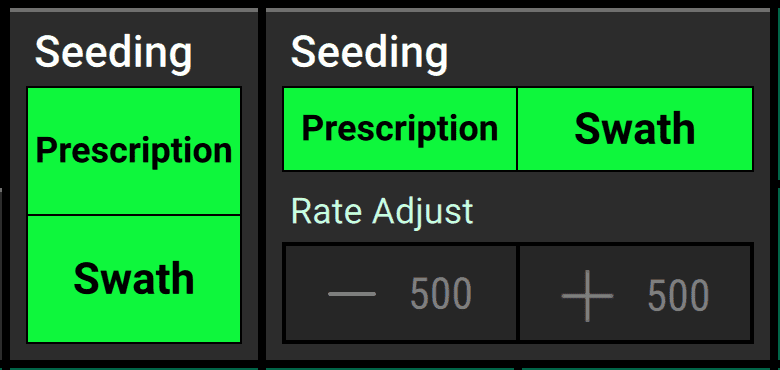
Control widgets are available in wide, tall, and large sizes for Seeding. The large size not only serves as a shortcut to the Seeding control page, it also lets you bump your target population up or down easily on the go.
When the Seeding system is enabled, the control widget will also show the system’s currently configured target population.
Enable Seeding Control
To enable control for your Seeding system, go to its control page by tapping on the Seeding control widget on your home screen. (If you don’t see that widget, you may need to add it first.)
Then press Enabled on the toggle button in the top right corner of the page.
Adjust the Target Population
You have two options for controlling your Seeding system:
- using a Prescription
- setting a Manual target
You can switch between these two modes by tapping on the toggle switch at the top right of the Seeding control page.
Plant to a Prescription
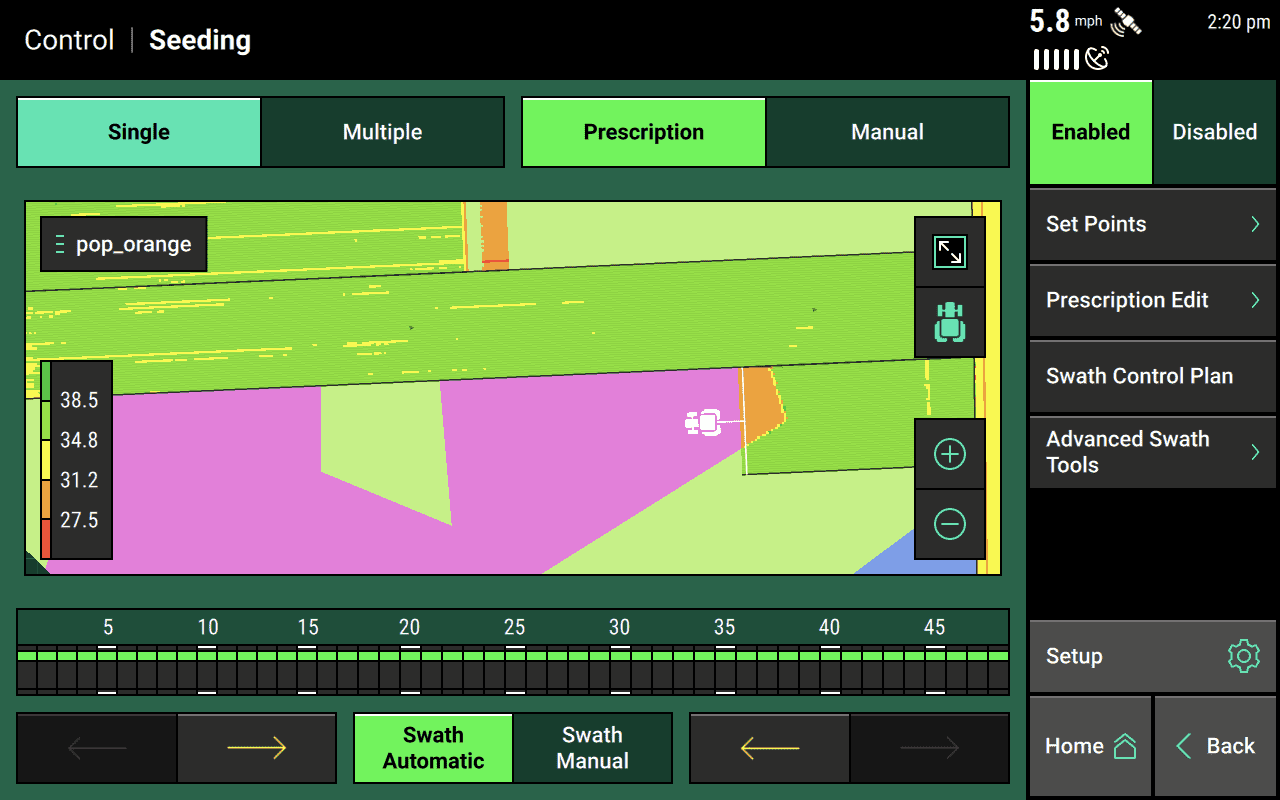
If you’re using a prescription, you can adjust the population for each part of your field using the Prescription Edit feature in the sidebar of the Seeding control page.
Conveniently, the Seeding control page also lets you see the applied population mapped on top of the prescribed population, so that you can see how the two compare, as shown below.
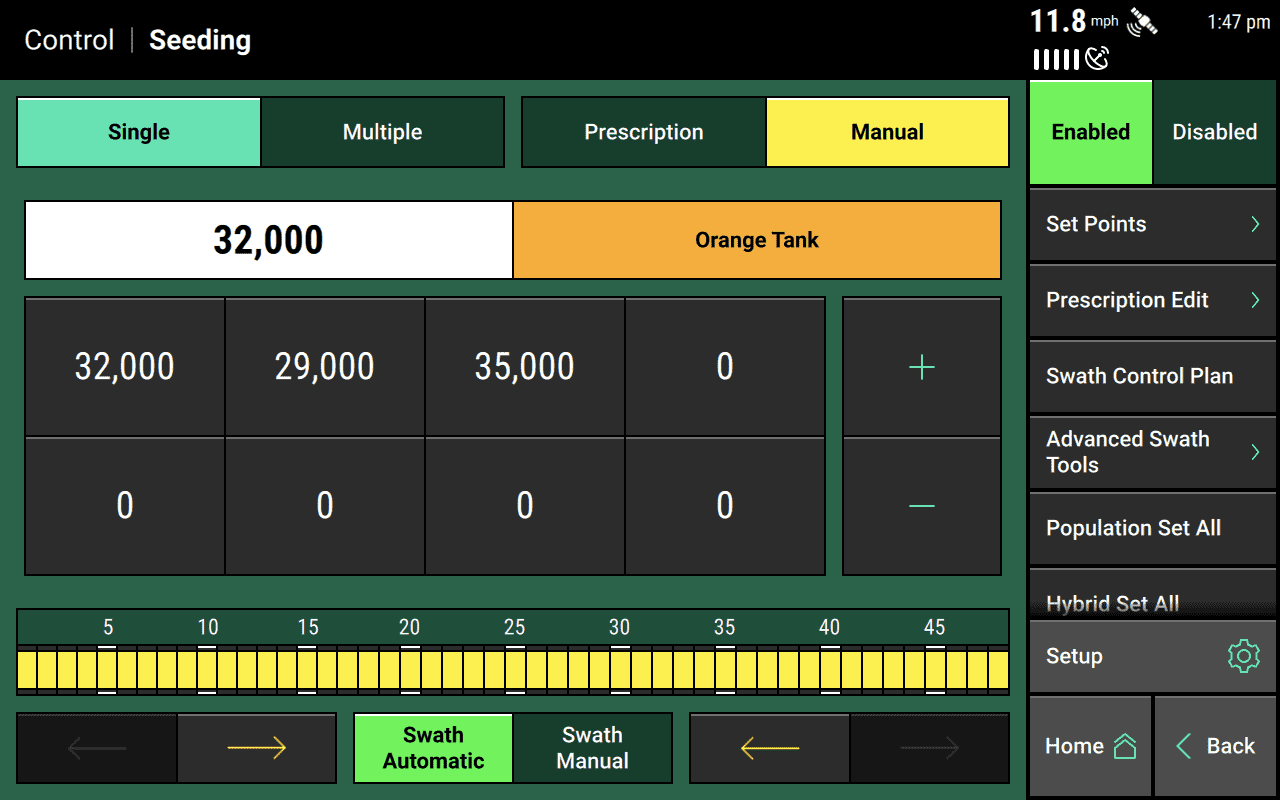
Plant to a Manual Target
To adjust the population target for your system, you can use the “set point” buttons in the middle (preconfigured favorites that you can edit using the Set Points button in the sidebar), the stepper buttons on the right, or you can tap on the white input field and enter a number directly.
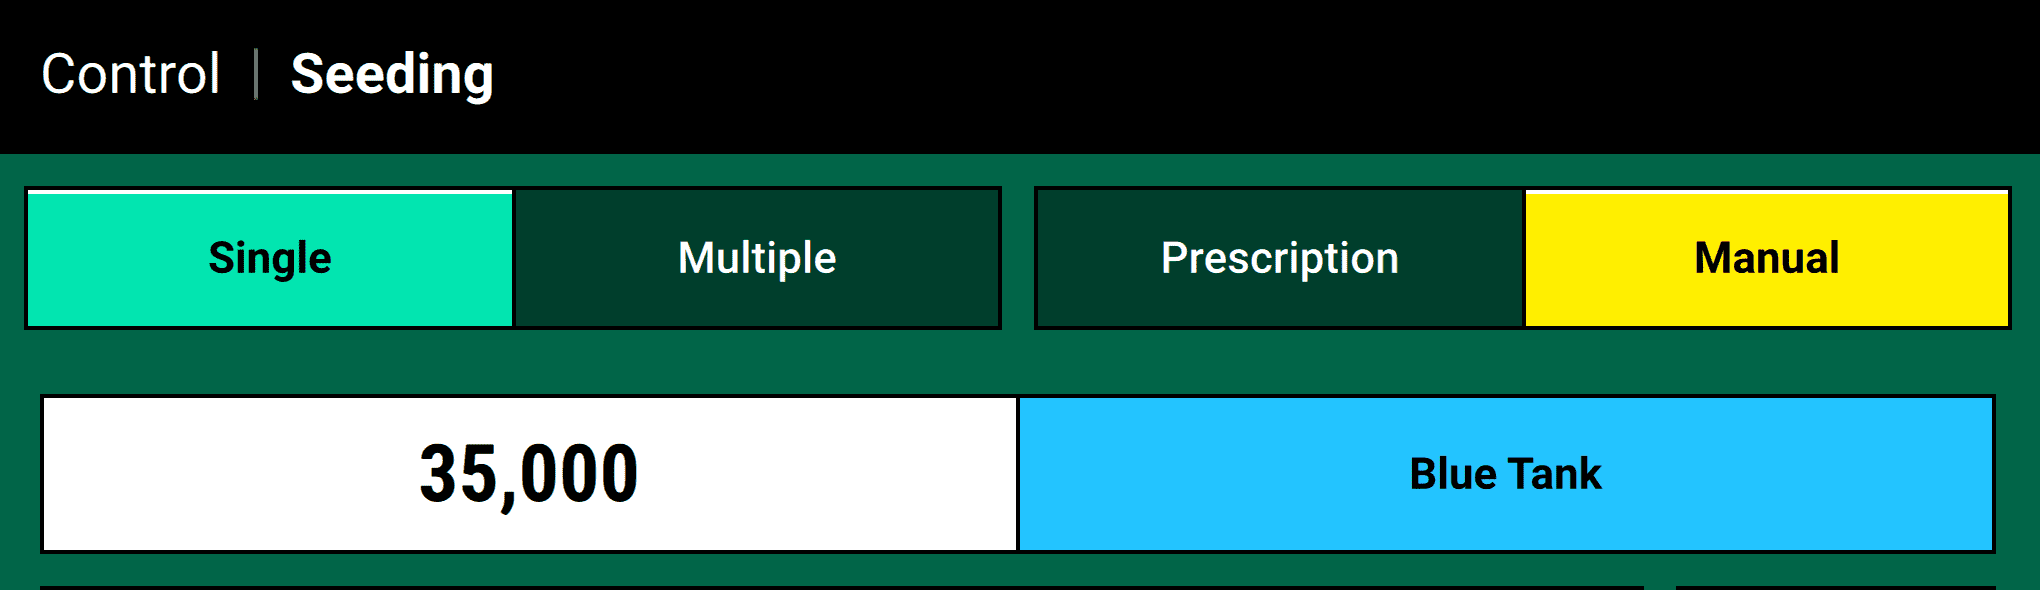
Switch Between Hybrids
If you are using mSet or vSet Select for multi-hybrid planting, you should configure your hybrids under the Product setup menu.
Then, on the Seeding control page (when in manual mode), you can switch between the two hybrids easily by tapping on the tank-color button next to the population target. Repeatedly tapping will switch back and forth between the blue and orange tanks.
If you are using a prescription, you can also change the map layer on your home screen map to view pop_orange or pop_blue, that is, the prescribed population for each tank color.
Monitor System Performance
Add Metrics Widgets to the Home Screen
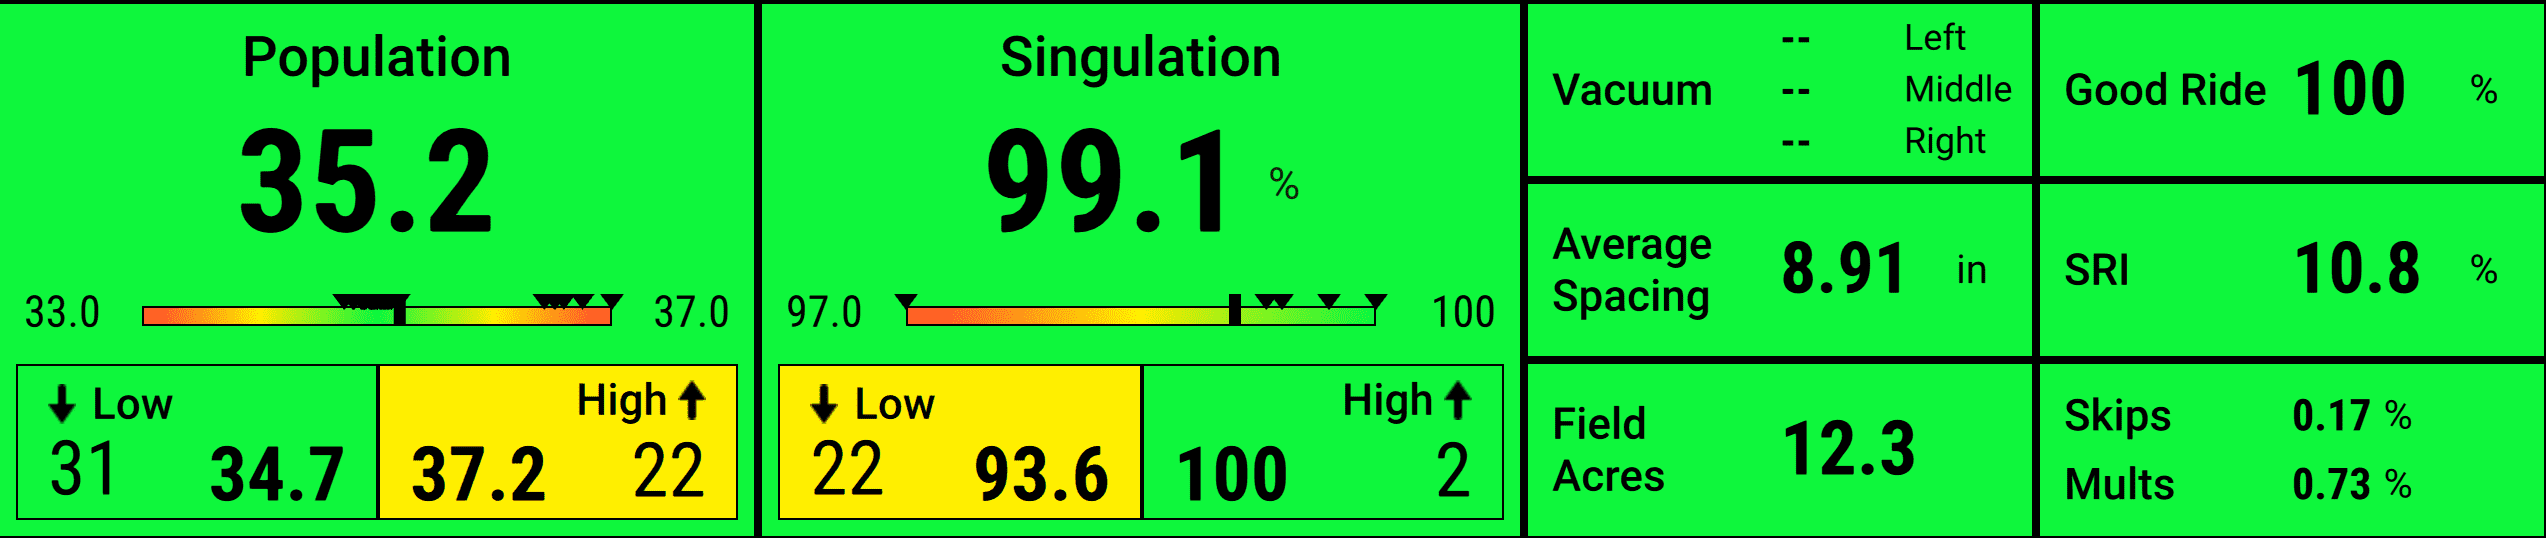
To keep an eye on how your Seeding system is performing, you may want to add metrics widgets to your home screen. There are many widgets available for seeding, and you can review them here. But a sampling of available widgets are shown in the image below.
View Seeding Map Layers
You can also use the map on your home screen to keep tabs on your Seeding system performance. There are many layers to choose from:
- Population maps the population rate for each individual row, in thousands of seeds per acre (K/ac).
- Singulation maps how well seeds are being singulated, i.e., planted one by one without missing a beat. Singulated seeds are mapped in green, skips in red, and multiples in blue.
- SRI maps the seed release index, which is a measure of how evenly spaced your planted seeds are, ignoring skips and multiples.
- Seeding Tank maps which tank is being used for seeding.
- pop_orange maps the intended population for the orange tank based on the current prescription.
- pop_blue maps the intended population for the blue tank based on the current prescription.
Diagnose and Perform Health Checks
Understand Diagnostic Metrics for vDrive and vSet Select
The Diagnose table for vDrive and vSet Select systems are the same, and they contain the following information for each row:
- Row — Row where the module is installed
- Tank — Which tank is currently planting on that row
- RPM Actual — Actual revolutions per minute
- RPM Cmd — Expected revolutions per minute currently commanded by the 20|20 based on target population
- Stability — Consistency of module operation
- Supply Volts — Voltage at the module
- Drive Amps — The module’s current draw in amps
- Duty Cycle — Percent of time the motor circuit is on
Understand Diagnostic Metrics for mSet
The Diagnose table for Load Sensors contains the following information for each row:
- Row — Row where the module is installed
- Tank Actual — The tank (orange or blue) actually being used for planting
- Tank Cmd — The tank expected based on the 20|20's commands
- Pool Sensor — How full the meter is of seed
- Supply Volts — Voltage at the module
Perform Health Checks for Seeding
Always perform a health check on the Seeding system after installation and at the start of every season.
Within the Diagnose menu, go to the Seeding system and then press Health Checks in the sidebar.