Update Software
Keep your software up to date easily with WiFi or USB.
Updated January 28, 2022
To ensure that you're getting everything your 20|20 has to offer, you should keep its software up to date. Check out the release notes to learn about the latest update and the features it offers.
If you're updating from 2021.0 software or earlier (2020.1 or earlier for Limited), you must back up prescription and boundary files first to USB, because they will be lost during the update process. After installing, you can re-upload those files and assign them to the appropriate fields.
If you're updating from 2020.0 software or earlier, you must also add and configure all hardware from scratch. To learn more about how and why, see the section below on upgrading from early Gen3 software.
Once you're ready to update, you have two primary options for how to go about it: USB drive or WiFi. This article will walk you through both processes, as well as a more advanced option for if the display itself is unresponsive or otherwise unable to update normally.
Updating software can take up to 15 minutes, depending on a range of factors, including how fast your WiFi connection is, how much data you currently have stored on the 20|20, what software version it's running, and how many Precision Planting hardware devices it's connected to.
Table of Contents
Update via WiFi
If you have a good WiFi connection, updating wirelessly can be a convenient option.
WiFi updates are also called Over the Air (OTA) updates, so if Product Support mentions that term, know that they're talking about WiFi-based updating.
- Before starting, verify that you're connected to WiFi by looking for a white WiFi icon under the time in the top right corner of the screen. If you're not, set up your WiFi connection.
-
Navigate to the software update menu.
- In the bottom right of the screen, press Home (if not already there) and then Setup.
- In the sidebar, press Data.
- In the sidebar, press Software Update.
- You should see a list of software versions. Press the button for the one you want to install.
-
Once the download is complete, a popup will ask you to confirm the installation. Press OK.
While the 20|20 is installing a software update, you must leave everything on and undisturbed. Prematurely powering off could cause serious errors.
- Once the process is finished, a popup will notify you that "DBM system software updated successfully." It will look like a warning, but it's actually good news. The update is complete.
- To verify that everything is working as expected, go Back to the main Setup menu, then check the Diagnose page for any connection issues (white or red systems).
Update via USB Drive
If you don't have a good WiFi connection, you can use a USB drive to update your software.
- On your computer, download the latest 20|20 software from the release page.
-
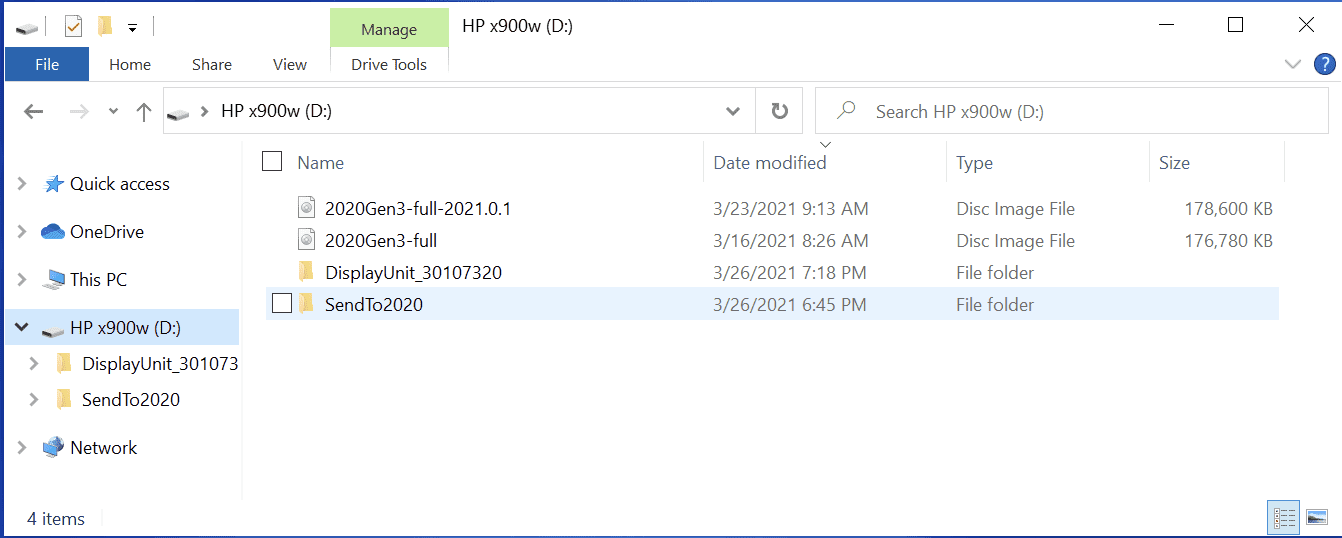
Once the file has downloaded, copy it to the top level (root) of your USB drive. Make sure it's not hidden inside any folders or the 20|20 won't be able to find it.
' width='1342' height='538' xlink:href='data:image/png%3bbase64%2ciVBORw0KGgoAAAANSUhEUgAAAEAAAAAaCAYAAAAHfFpPAAAACXBIWXMAAAsTAAALEwEAmpwYAAAHCklEQVRYhd1YS48jSRH2r%2bI/cODOiT8A/wBx5MIV7QFx5AgSQtpld2aXlWh2dtCoB6aZnrbdbbuqXO9n1vtd9aGIKj/b9jQrtIgO6XOmKyMjIyIjI6NqEkQ5TCfFWvdhmg5sS4Nhp7DcBK6fw2FkY7uPDNf6FV7JL/BKeonXypf4dv0CN9YbqIaApDpYyhZDNQKoZgA/LHeIqi0CQvxfRlTBDfJBflxDs0JYXgKRNHBFAc2K4EUVJnkaoO87VJlAl9tAJaNpWqBvcZl6vEt/jyvzt/hi9gk%2bv/sEV9ZvMCv/DBEEME0d0mqB1fIBlmnAdSye831SU1fbfpJEqMqC%2b13boC5T7k9%2b8qu/4me//hY/%2bsVXeHFt0DB8P0BZDpPTJEEQBKiqehAUx4iiCF3XISxtaN49NH8J2Z7BECvEtXdWITK/7z%2bG/gk8T%2bPjNam/p0PXsRZYGAleXhuY/PDnL/DjX36NH/z0T/jjKxloC2iajizLeEIUhTANHcXokDiK4DouK4AOEF6IwAvhuwFEEPOztm1Pgpx2CW3bjUqe56F199vL8h6v2bQt%2bq7GzdLDH65kTMgbdU3hPgjc7FRd1yxg8HSPNE0RxzGSJEHTNEiSmHl2ezu0TducdcAlVHU9yk1QVRX3ST71qd30i7LkNs9zbstq%2bP8frcd2DrZOIuGjKgcB9bgo7T6FuWlabDj1ZVmGJK3w4fYWiqJAliQU45naOImj4jsSOZfm67qBOE742cZA0sG0TPi%2bD8/3IUIB3TBgWRb8IECcJKeP3N5ROCY6Ck3bUQQATdujIwO6nSHM0DTb0DlHTwntp4TpVuOtgh2vfyrUdwbuxtoTck/peHwkJ6Ooswbu7yyFHSXEQISwXA9hnBzs/ilcos14mmUwbAdhlCAIIxiWDcN2UVZD3jmU1yOMYtiuz%2bf5cPxQZ8cLEI3RtC%2bDNntDE6DBvdtAtXzIyyUM04KhG1ivVeT5LsSJNseDzmucpCi3OeDjRl5yEF27SZohL0rkRcEOSbPi7EZQQmbnX9ywHmmWs8xLOk2oExU9chIqxPb803nbXH3HCmd5jixNmcc0THieDyFCbj3Xg2M7HCnH3j%2bnSNPUHF15nvH6ZVEwqB%2bG4TacWQ56FDReljyHkibN21zNx%2bs1tFlxzHKIZ3O7bXgm9GeqJQiiDHmWMXO557XjHSSKY3KQB13TsVbW3FLtYI3RY%2bg6XNeFENFZB%2bw/q6oSQSAghGDHkVGbW4eS3n6oE9G4CENuPc9jfQIhDh01RgE5i4ynzSIemnPogL7Bp/8KsdADrGUJsqxw%2bFMGPueAME7h%2bQLqWsVqJUFda3BdD6qqIc/yE4ZePgK0myFFXeCzA8hwUpieuZ7HyXBfl/jAAT7CUMBx3Uc5gaM1SyHCCJ7nwnYoz4SPI4Co5QrpkPaTy9AOIdbmBrJQg%2bNQyLuwbRuBH8BzHDi2Dd/z%2bDl5f5T0SPb%2b87qqODyjSPBukdJpmvAzckjXbTL6ziiqSOMk5rKbctPmxnhsA2V/yvoNWrrVjpw0oST4XgnwfqFjOZ9BkRUU%2bbiLBwIHB1QtUKUq0kiHojmYzhdYSmtIig5VM6HqJtaaBVnREEQp2h6o2/4smg7IihKOLzhru75AlOZIsgJuEPLzsm6Zj%2bdQ9RnRi5qA7Qm%2bDaqmv7AOeO4%2bdlGNIQLKuuMBMo6CjXzU9APKpmdQrUCFg2rHMLQP0EwFb%2bcmrm%2bXeDtV8eb9Ch8kD24B2Bng5ICVAHrUwYhPYxjroXgFZmsfs7WLuepjYUT8f64GuJNsaKJhPmOU9aCHzDdbe5gqLrSwPRg/QLQDrWclQxm9iYLJ35cC/1ALXN05%2bOJawWevH/DZ6wX%2b8k7Hl//UcGMDb40OkqDw7xFlFV9TSV7AFSk8QpjBDRKEaYWs6pFWHYP6Wd3v2mOMz5OihUhLhCPivOZ1orFlWXv8cd6MvBVEUjwaP4uqR173hw7Q4xZzxcLC8DDTYsy1EFNVYKqGmGkhlKDB0q1gx0Mi%2bjh9v6%2b835U2TpjQT1v46NM5NM3Ew3wOWZKhSBIcx4W0WmG1XMK27O3Ey3gKz/8eG1sm1KnLBG3hcvVFxRAVNZSNCd1e%2bbg/8bnQhH7qzEUTTaEoBu%2b2LK/xcL/ge35Dx557LjShH/4CdobhVCH0zBzQ4OtbF7fzFWZ3d/yer%2bvWNuSfgwNO2XFQCSb58MWlKEqu3qh/bOz/swOY%2bEVq95XkUSm8T/y5r%2bufJ8i27Re8nhzQ8QeGojh8iXmupHgx3qkBVEegaltMbqYGvvpmjqs3K9zMHMxWAtNlwO1cCnGvRIyH9ROgxlhoCRZautemWJ7AIU%2bChbrDwzo%2bKf9ejjBdDvrdLXzcLbyxdT%2bOBxfTpYdPv7nH715O8fnf7nF9q%2bPfNr9TM2T86bAAAAAASUVORK5CYII=' /%3e%3c/svg%3e)
Make sure to place your downloaded update at the top level of your USB drive, not nested inside any folders. -
On the 20|20 display, navigate to the software update menu.
- In the bottom right of the screen, press Home (if not already there) and then Setup.
- In the sidebar, press Data.
- In the sidebar, press Software Update.
- Press the Install from USB button at the top of the page.
-
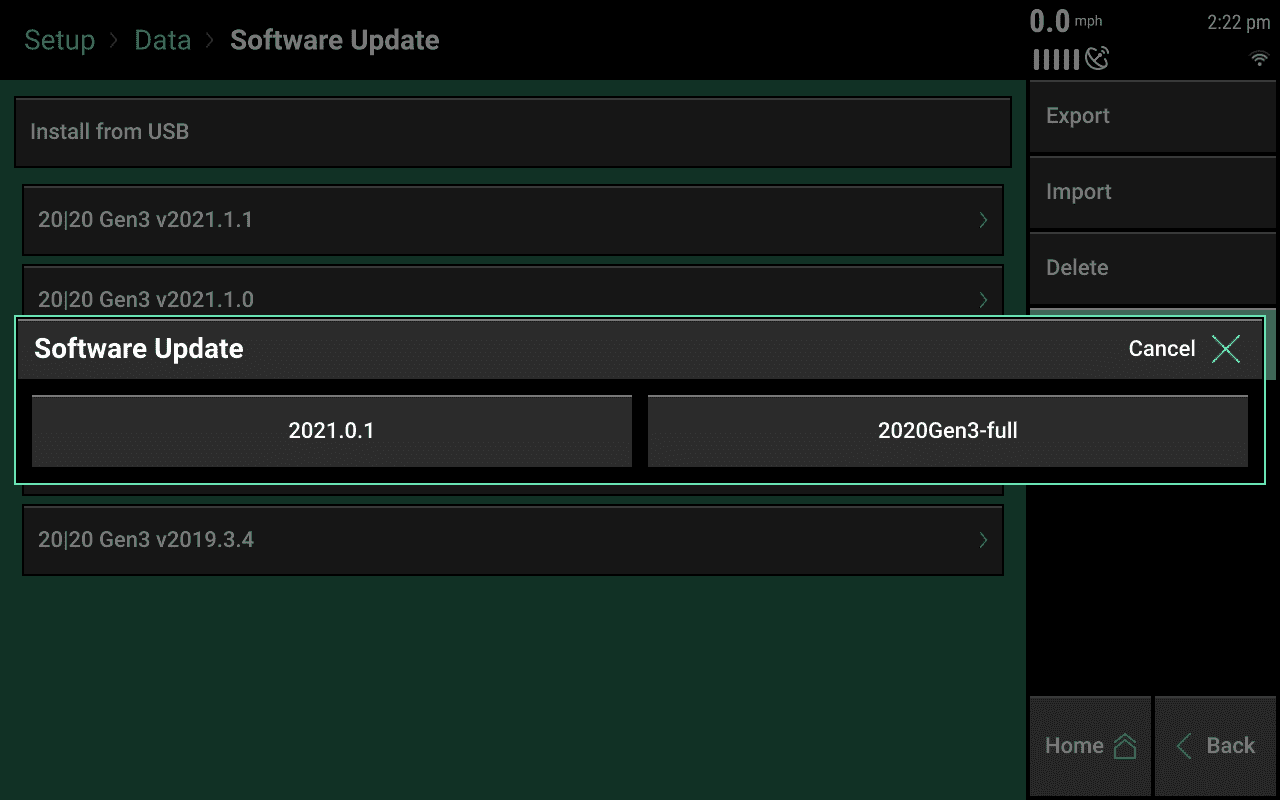
Select the file you want to install from the popup menu. If you don't see the correct file, take the USB drive back to your computer and make sure the file is at the top level.
' width='1280' height='800' xlink:href='data:image/png%3bbase64%2ciVBORw0KGgoAAAANSUhEUgAAAEAAAAAoCAYAAABOzvzpAAAACXBIWXMAAAsTAAALEwEAmpwYAAAHv0lEQVRogeVaWXPbyBGGvLJ4SCRxAyRIgAcAEodIgKRMWaIkV7yb7G5cfnBVKq544weXk8jlH5C9kq24Nr/7S3WD0GVZphRnxWgfvupGA4OZ6enumW5AEAQBdwWqqqLb7cIwDBQKBdy7d%2b%2b9Z4rFIqrVKsrlMjY2NkgmoCBVUFRFFMQK7m%2bVsCYIuL9ZREGqoqjUsLFV5sayonAHnu%2bj3mjANE2mmqah3W6j3ekwbTQaWFtbuzUFKIrCE71MATRxWZYZpVJpoQCxgrIho6RJKMhVfnC9VEBRrrK8IG6xrFarYdDv8yQ7NGEno5qqIQpD9Pt9eK6LbqeDNeGXV4AoinBd92QRKpXKB58lCykWixCEzy5oiVaOZBdXcP19bV4JescvhLX1z7hPRVUQhiF6vR7q9TqbOsnJEs6CrJMmXygUIIhxB3LQhhwSXfAn6LxHlbALJex8FOff879HLWyjYqiQRQnVWpWtgVyC3JRiwmWQZRmC2Lehazp0w4Cu6ycNiCdK13zP0FcUBgxNh%2bjUITZNDDwfw%2bEQ29vb7AoUD2guFKfOgmSSJEGouhbcXg9JkmA6nSJNU25MiKII8/kcvu%2bfvmgFoasaRLuOmmXAbrY4FlEssCzrZLJncU4BoteCoWqomyYaZh2mbjDqhplRsghqpKjQVDWjqwRVhS4rEFsmapYOVVYgLaI8LdrFlSeoCyqKYhYDxF4Tkttc0BbjMtnKotdCbWBDtDJ3OGvmlyngvAUkLpS2BdkyITdNKM06U7lZh9KqZ9eWmfGtBlS7Ad1pQnOsFcBiHLaFWtSG2DQQ9PsYj8eYTCbsBhQIL7pADokVMOxBMw2EgwBhEPA%2b3vd9%2bJ6HHh16XJf3%2bG67g47TRstqQqV4oGqZS9wydFpNw0C1b7MCTF2H1bTY/6%2bygFMXGPWg1UlzAwRBwAGRFBEMBnygoQAYBiHajsMHnyYFFu5Yzzq/bdBqmgsFWAbHgPykR6v/8RiQuJCaJkRDg2hqkEztlK/rTOmaeIJcN6A0TCgNY3VQN1ANHd4GrXrjxAJ4C/%2bA%2bZ%2beAxIXit3gF8n0MvL3C8jlKsUFy4TWaqwWmg0%2bCJEC4ijCeDLGzs4OnwgVstbFueZkGyRqGLxbCLXtLhRNReD1Efh9uJ0u/J4Lr9tD12nzddgfoGM7cJotpqokrw5khU19y7VQNVXotfef0c7gVKZA3KpCUB%2bEaI8CjOe7SOe7iGcTTI/2MTl8iOjBGMn%2bDJOjPQTThBHvTtCJB6uD7QDdJIQ1i9E7mGD42wPEX%2bwj/mLOiD7fP4eY6OM9DL88RHc/hdCYjzA72MPs4S7mR4fY3d/DaJwinU4w23uI6ewBJrMd5nd2ZximCd8fTdKM3iYujCHZmSDZ3TnFbIrJ/i6m84eMnfkeL/T48CHGh3sY/OFzCNpOgN8/eYJ//Pgjvv/uO7z71zv89M%2bf8O3fv8Wb42P88P0PLHv37h3%2b/fPPODw44B1iO47Z326Os%2b0/xbtixGGEOAyZbkcx%2bp6Pr7/8Cn/7y1/x52%2b%2bwZ/%2b%2bByjB1NMf/cI26Mh/KdHEBr7QwzCgLdA2vKIUh4QRhFfp%2bP0JC%2bIFjI6YHwKeL7H%2bFTvuwz5nAaDAfNeP8MgjuA%2bOYCgTAfYrGxBlmTISrZ/0gkp30tpr6TrXEbnawo6RPNniL8uaB/e3NxkEL9su7zPi/1eNY73npdlbNYqKOkSBGnsQTV0jIZDxHF8kgleBXpuNBpx5khZJPEEki8Lapfn5cQv04b6pj7zfvNx5MjHdrHNxbFTukyn3/tU6ZLHPhRdY1%2biasrHQG7geR6ePn2Kt2/f4tmzZ3j%2b/Dl%2b8/jxUu0JuZvl%2bzINKLiqTRRxG5r0mzdvcHx8zH2/fv0aL168wMuXL/Hq1SueHD13Zd%2bLOdCib0iVhQXoGoaknWjJFYwi1vg4TXnwaZJk7ZdcfRpAMhrB0A1GMkqyYLZEW%2bozTVJOeOiww3ya4SQYXokIw3g7U4C4BUHdCbApVrmeJqvqNaBAophxhl6nLSmdYg%2bB%2bOXaZ33lEGXp3LWsqZD1JaCp2JJFlFSRDkIBtLAL1XeWhrLAWf7a8Gxo/TaD%2bGXbfWg8cuqj3NJxv7aJDbnC5v1hbPHk18vFLBvkWgAlPKYG2dRPQEkGUcnQmFcWMs2qrxTUhgkx6vDkr11OFzkdNjkFpiBBdQCqqVFNgJIJCnjke1QbcHsuOp3O7afAl6TDYtDGfQpqeWn/egowuB4QXlIPIEUQT8WQ/KPH6ipg6wYWkLhcSKjpKoNyf%2bYNlWsBRFnOdYGMUnq8UqC6BbmAeFMFJC7E1IWUeswTzfns3hl%2bRUHb%2bY1igLSY7P81WAH%2bDYNgcvur92ks4IYKkG579f5LnHeBRQxY%2b1UqwMd6tfzrtAAp8ThQlzUJ5WIJ5c0y/wjB2Czzp/BSuXQqW6BI/wfcCQWkHqqjLsyew1Ug1/P4AMeHOt%2bH4zhcHCHey%2b8t5MJdU8CQUmJKfYMQfjBAfzuCY9twPZev82yUYNv23VPA7myG/fkcB/tzRJMEg9k4swAqhcUB3z969Aiz2QytVutuKaDeczDw%2b/wTV57TUC2QfpQgs%2b8v6oIEuufcLRfoQXUstG2bTZvRsuHYDv8v1Gw2T%2bW2zZOnT2f/Ae75MlZuXh0VAAAAAElFTkSuQmCC' /%3e%3c/svg%3e)
A popup will list all the software files your 20|20 could find on the USB. Press the one you want to install. -
When display is done pulling the software from the USB drive , a prompt will tell you that you can remove it. Do that and then press OK to begin the installation process.
While the 20|20 is installing a software update, you must leave everything on and undisturbed. Prematurely powering off could cause serious errors.
- Wait while the software installs. Do not be alarmed if the system goes through a full power cycle, turning off and on again. That's normal.
- Once the process is finished, a popup will notify you that "DBM system software updated successfully." It will look like a warning, but it's actually good news. The update is complete.
- To verify that everything is working as expected, go Back to the main Setup menu, then check the Diagnose page for any connection issues (white or red systems).
Update via Boot Image (Advanced)
If the 20|20 is preventing you from accessing the software update page, you can use a USB drive to install a boot image directly onto the Display Base Module (DBM).
- On your computer, download the latest 20|20 boot software and copy the downloaded file to the root of your USB drive. It is important that the file says
2020Gen3-full.imgotherwise the update will not work. - Locate the and the USB port on it.
-
Using the power button on the DBM, power the DBM off. The LED light will turn off when complete.
' width='2560' height='1920' xlink:href='data:image/png%3bbase64%2ciVBORw0KGgoAAAANSUhEUgAAAEAAAAAwCAYAAAChS3wfAAAACXBIWXMAAAsTAAALEwEAmpwYAAAgAElEQVRogWWaZ3SWVfqvg0pPQspbkrf39jxv7296LyQhoSYBRKqKjSI6dgUdxz7j6Dij4FhAQFBsKCA99E5CEmoolhn/Mx/O%2bXK%2bXmc9O8DMOufDvZ4QWKx1X/t3//a9772zsgv05BTqyVUZyFUrYaTYImF2RdCafaiNXqJlHbTPepxJXUtJljQTTdYRitcSyzQSSdbij5Qjh0uRAhmkQBqvnEQOZPDJKSR/evj3oVJ8wRKiqToyFS1EU7UEwmXIgRT%2bUBrJH8cnR/D6QrjcMh6vH68vgCQFkOUAfn%2bQQCCI3%2b8nmUwSkpx88fdX%2bNeV/Vw4tpn%2bgxu4dm4Xg8e/4Z%2bX99MxsZk5D7/OG2v2EElOJBiKM7WjlYHjW7l4%2bnu2fPIGXa2VZI3P1w0DKDQICDkqA0VmHxZ3FK3JR5FZJlE5lY5ZjzNx%2bkOkylqIpRuQQxUEopXI4TI8/hReOYXHlxDhlZIiRPL%2btIAhB0uQgiUEYpWky5oFiGCkHH8wTSCcwStFcLtlkbzb478NQQDwDwMIBhUIAVKpFCGfg/V/e5F/XdnHlVNfc/7oF1w7t5vLp7fSd/BL0ul67l3xVx564gMiqWaisRJmTO3g9MEvGDj2NZ%2bveYWZbZVkjcvTkVMwDGCC2kh2gQ61wYXNl0Bj8lJsCZCu6aR95mO0dy%2bnrHYqqfIW/JFK/MoKKgCkxP%2bXvBK3FOC7BSNYQjBeRaKkgXCiGr8CxZ/CI0VxewIi6eGQRLg9Ml6fXyggEAjdjCApRQE%2bOx/96Sn%2b59Jerpz6hvNHhgFcObOVY7s2kilpoXHKoyxY8hbBaC2xWCld06dyqmcTl898z0fvPE93WwVZ4yb8FwCVgey8Ygp1DqzemCgFnUUmmGyioWMxk7qWES9pJpSoEZIORCqE/KVgBl8gLRJWQg7eXPFARsg8FC0nFCknHK8UySdLGwknqgiES5CDKTzeEE6X9F8AFBUMh8fzHwDB4DCATDpDPOhhzVuP86%2bh/Vw8voXBI5sY6t3JxZPfcrrnC8Khckrq5/H8m18SCJUTi5cyZ/Zseg99yeCxr/nzy8uY1V5J1tjcotsAlFAAqPRObL44eqtEfoEBT7CKiqZ7qGtbhMuXwulLYHdFsTlCOD1RnO4oDncEqz2A1e7H5vBjdfjF31nsQayOEDZnGLsrgsMTw%2baKYnEqvwthd/qxWDxYrB4cTgmrTfn6BBCny3cTgowkD5eCzyeRTqVJhHy8//rj/OvKXvoPfiYgXO3bxcCxb7h48jvikRR2uYqZi1YRCKZIJDMsnD%2bHc0e30Hf4C1579n5mtVeRNSaniNz/AjAuV4ta78QVzKDSWjHZQlS3zGXijCVMuXsFybJWQvFqfIEMXn8KXzAjFKCYoPg5VIIUUgwwKWrcFyjBJSVxehO4FYUES7C7Y9jcUTz%2bJBabTyRud3ix2tzY7J7bXyUUGHaHB5fbh8fjw%2bv1EQqHkRw2Nn34Kj8P/EDv/k%2b4cHzLTRP8ll/O72LqpFZsnlLmP/CcKK9oNMHyhxdxbWAnJ/asY9WKe5jdUUnW6GzNbQCKEsbmaIT0re4ommInDm%2bS8vqZ1LQspGnyYuH8cqQCWUkuVII3mMYtJ3BLSTxyUiSlfN2%2bhAilVDxyGpcvIWAoniGHywUslxTF4fKLhBUASrL/XQa3dgIlZFkxwTB%2bf4CysjJK4mFWv/kkV05%2bzskf/8b5o5u5dm4n545s4R8Xd/PYQwsJJVt48tm3cDh8hEMRVj29jJ8v7qVn6we8uGIud08WAFQ3S0BPToGO8ROKKDJ6BQBlxYp1LlJl7ZTXdlNR1004UYs/WiES8wYzBGIVhBJVQgXeQGoYgpwUCVtdEUy2ACZ7AIPVfzsUBShlYXXIWJUVt7ux2NwChJC/MEA/PimM1xcUABQYPp8s/KCyspKQz8X7b/yOCwc/5sh3b3OuZy1Xzv7AhVNb%2bWXwR55cch%2bRkincs/BxvB6ZaDjCR%2b/9geuDOzm8/e%2b88uRC5igAxmarb8tfUUJOXjH5agv%2beA0uXxJVoYFgsFS4ajLTiF2pYUcYtzeB5M/cLIU0Tm8MqzMkkrX7UpgdYfSKiZoltHo3BVo7%2bRobhVo7BWoLOTlacidoySsoplBjJF9lQF1kRm%2b0YzQ5sFhdIsxWpwA0XBIusR1WVVfhNBSx/fO3uXL8M87sWi0AXDq5lUunt/Hz4A4eWngPdrmaWKoJWQpSmorTs/1TLp/dyul96/nTyge5u72crLE5auH%2byhY4QWVk9Ng8ik0%2bgok6XN4EGpUeq9lDIlmHwSaj8wVwVNdiTKbRRROYpBjaYicqtQWVxopKJGkTSRYqobEIL1EXWSnWO9BoTeRO0JCfr0WtMZCXX0xegU6AGJ%2bjYXy2muxcFeNyChiTnUd2dj45uYXk5avR6UxEo1EcViuVYSfX%2b7Zz8dgGBno%2bpf/AZ1w4/jXnT3zL9d4fqK2swewpJRSvw%2buVmdLWwODJbVzp3Ubf4U289cIDzJpUqihAJRqg/CIL2bkaxo4rxB0oEXXrdEUwmzwUaU2o1RayVFqa33uDGd%2bsw/bkfTgeXUDDgsX4PHGsipk5AjicIRyuEA53CIdTFpL%2bf11d1LUURJJDyP4IshzC7w8TCISR5CCSP4TX68ciSRgnluGoyWAOy6hUGoqKiwg7DHy//i3%2bff0wZ/d8SP%2bBdVw%2buYVrfdu4fGYbV059RyyaxBmsJhgrx%2blw8eCimfxy%2bSCXzvxA36HPefmJhcyaVEbW6PGF5KmN5GuMjB6TR77KhMsbE4lYLF4sZreQ6l2jJ5AleWnc9BFtG9dge/pB3M88QPO9DxDyl%2bLyRPHcKgvRFcbF/u7xKiYWxOHw4nR6CYRThKIl%2bKSgCEWegUAEvzy8x4fDUWLxJPFonHB5KYGV9xNfOpP07FaysrJEbP38Xfg/F/n3jSMMHvqMyyc2c%2bPcVq73b%2be3ocOcP/4toUACb6hadJgup4tVTz7Er5f3c%2bH0Vk73bOCF5fcwZ3I1WaPHFZKrmF%2bOity8InJztWg0ZgwGB1aLB73ewai8Yu6yOMgKh6j9bA0TN3yA7ZkHkFYtoeOhRwj40jjdEdEJ3mqGLLYABSoz%2bYUmClQm3FIcv9L4hEvxR8vxh9MiglGlWUqTLKmmuX0GDa1TqJvYQU1jG9Wt7dQuXkDFPV1Ud07F5Qvhk2X%2b/t7L9B79nl8u7%2bPq2e8YOr2FSyc2c/n0N/w2dIBjuzcSCpXhj9bjUhopycvqt1fyr%2btHGTz1HUd2fsJTD3Vzz5QaBUA%2bd40cL5LPy9cxZkwO2ePz0ahNGAxuxuYbuCuW4K5whKxQkLqNH9Gw7j1czz1MYNUyaucuwOOM4XBFREOkhFdKUax3cceofEaOVeNP1lI3eS41bXdT3jSDsvqplDdOp6K5k9LGaUycvpAZ85bjDnWgczajdzagd03E4p2Ezd2C1dOIzVtHJNVIuqSGWDRNQ00j773xDId3rGH3V3/ih/W/58fNb3J050e8%2b9rTuH1lBKLVuD0%2bIiGZrze8w8/n99J3YCM7Pv8jD8xqZP7USrLuHDmOMePyUGnNjB%2bXx9gxOYwbm0tBfjHjstVk2d3c1VjHyGiUrFiY%2bg1raFn/Ab5Vy/G/sJTMtNk4bUryMZG48nV6Ymh0LrILLJhccZqnL6J52r20z1rC5NlL6Zi9hPZZD9M280Eapi9i/iPPEa96nDHOl1Al3kVX%2bhH2mo2Yyj7CVrUWS/mHGDJr8GVWUF/fTktLJ83N05ndNZvu9ipaa6I8MLOaR%2bc38cT9bTTW1OAJViMF40g%2biZJEhL3f/p0ze9dydu%2bnfP3xH5g3uYzl8yeRNXJ0tnBhxZnHjs5hzOhsAWH0yPGMyC1kRDrF2OZmxsaTjEjGaN70ERPXvY/7haXILyyjatY8bFalrY2IsDrDosvTFLsoNoeRog20di6mfdYjdC96is4FT3L34ueYvfgZpi14jHm/e5nFK/5Aads7dD8ziK/tK9KzdmOq2IClYh2O2k04az/HUL4Bd%2blKSssnUVs/jabmTrq67sXpkLjzzjHUl/hYNK2EzpYMNnecQKJWGKpflmiqreTXyyf59fJh0Qds%2bvD33DMpw0sr5pI1oVBH9vhCxo/LF/JXAIwcOY47RoxkhEbH6MoqJrS2kpNIMzKTpG79Gmo/fhfXs0uIvfIENXMWCgAWRwiz0vO7IqLX1%2bpc3DmyAClSy/wlqwSE7nufYsb83zHz3qeZef/TTJu/gnmP/Z6Zi56mfPLfiM/aSXj6t1TP3Y468THminXYq9djrVqHvmwdnpJnSaRbKauYIiBMn76AcCjJ6NHjaCiVua%2bzgoAUxOxIUlHdguSVkHweltw/l//92yC/XD5K74EvePnxecxpT7P6rSfJcoRSwgDHjM5h1F1juevO0Yy4YxQjRo1ltNXOhLp6ClvbyEukGVuWof6Lj6j45M94nl9K6JUnKJ%2b1QAC4lbwCwuIIi93kjjuz0VuDtHTdR33HPNpnPsik7geZNPNhUQYLlr7E3CUv0jVvBXL122irNmFt%2bhK5bTu6kk8xlK3FXLkWY/nH6MvX4c48ixSsxR9qJBJror6xUzRId941mpaqALWZMGPGFBPPNJDOVInV93vd/OWNlfyvf/ZzuXcvG/%2b6ivu767i/u5YdWz4gS8pUY/XHUBvsFBZbGJenYkyeirFaAxN8flQNTRR1TKEgmWFsZTkNWz6hZu27OJ99hPCrT5LunIvFHMBsD2G2B0UoLXCh2nSzqdHjlJTzxFRSVZNI13RQWj%2bVqondtHXdT2vn/Uyf8zDVk55Bn3qLotS7WGu%2bwFT5JUWZ9ZiqNmEoX4%2bhfBOW2FOYHCV45Vr8wUZKS1vQ6w3k5ebQUR/BaXVSUGgT8wmnw0Mo6CcVDbJ/%2b3r%2bMXSUHZv/xvJ5rdwzuZRnH%2bmm/9gPZDljJTiiGZzxUqyRNHp/hGJfAK1LRh2IoG1qobhjCoXJDGPKy6jf/CmVH7%2bD8/klhF97kpLu%2bVisQUz2oOj7FQBGa0B0fUajHbXGQl6%2bEbtDpqKqjvKqOoLRNMG4sh2WkShppKJ2Cm3TFlDbsohU3UKSdY8QrXsWueIpglVPI5U9jrdkBfbgdJy%2bMtKpcspLq6gujZIMmqiI25hYFUKrtWN2RLArx3O7C9nj5OGFM/n3T6foPfSdOADNm1LKgmmVfPinp7lx4SBZtnAKSzCBORDHIEUo9oYo9vrRurwCgKZxIkXtHRQk0oyrKGfiV%2buo/OQdYYIKgOSU2ZgtAczOEEbl4CMiiE7vRKO1kF9oJr/AiMFgJxqNYzBayM1TM2bsBLKyxmN3ROieOReHO4xbShNN12K2BcWswOVTJkXK/%2bslGFcGKqWYDHqiARtlcSfpsJnSqJnu9hKCcogicxCnnMHqCCB53SSDPnZ9u47frp1g4/u/5/6uGhbNqGD5gkn0bFvLjfMHyLKGkgKAyR9DrwDwhSjyymicPtTBKOqGRrST2imIpxhfWUnjpjWUrX4N36plRF57mtIZc0QJWN0RjFY/JmtAJFBU7CA/X0/OBD0j7pqASm1FZ/KSp7Zi8aZwBsqxeVNMKBw%2bQ%2bhNPgo0DnIKzIzN0ZFbYMEhKYPWUopMMlUtC6idOIvx40ZjKsohFTZTlXaSiTrFQEVnC2HxJIa9yOpAdpj58yvP8D83zrB1wzssmzuRezurWDS9ivdff4IrfXsYOreXLHMgJpJXVl8nkg%2bg8UgUOjwUyiEK6%2bvRtk2iMJFmfFUFzV99QtVHb%2bFbuYzo609T3jUPm3l45fVmCb3Bi8niR6O1inPFiLtyuXNUITpbBIMjTp7aTm6hGYdcRrS0nVC6BXegmiJDCFWRl3y1izyVjTyNnUKtk7xCMxq9B7snQSCUxuPxIPscJMJ2PA4DEwqMFOp8GBxhzM4IRrOToNfJ6y88ym/XT7H727/zxH2TmTeljEUzqnly8TSO7d7E9cEezp/4gSyjHEHvC6PzBtF5/RR5JFQuLwV2NwVyiIL6BjStrRTGU4ytqqD1q7WUffA63pXLiPzhcUqnzcJilCmv6qCp9R7iqWYBQKU2c%2bdd2WTdkY3RESdSNoVI2WTc4RrG5xlQ6yV8kXrcwWqSlVOJpFuRw7X4grU4vOWY7HFs7hRGW1QcrdUaG9oiK2aLi0KV0rqryVVZKbaGxU6jt/jRGZzEgj6efHgWx/d9wSfvrhLNjpL8/KkVLJvXxvcb/sjV/n1cG%2bjhggJgOPEAxV5ZJK9xeVE5PRTYXeTLAfJvAYilxC4w6eu1lLz/Ku7nlxJ95QkSk7sIBStZ%2bMBzLF7yMl1zHiNT3k7uhCJG3DGWkWMKSVTOYNLs37Fw2VtMX/A8JiUxexQ51ogrUE26ehqBWCNOXyneQCVuuQKntwyntxS7txSDxU9%2bgYkCjY3R4zWMz9OjNcno7WEMtiBavRO12kBVSZy5UytZML2KB%2b9po7s1I468c6aUs3hmPV9%2b/AaXT29jqG8P1wYOcPHkNgVAgGKPTJFbQuuW0DglVE4vhXYXeVJAKEDbOummAiqZ%2bPU6yla/jvO5R5BeepRM5zzcziSNrfOY1rWUtsn3E0s2iu5yxB1jGDVWRSg1iabpj3Dfirfpvu8FXIEqbJ6UUIACIVE%2bmUiqhXCimWCiiWC8kXhpO/5oA1K4VviKMlTR20MU6NxoTBJFRh9FBq/wD5PRSGNVlNkdGSbXBuioDTK5PsyMlrSA8NDsJtavfpnLvbsZOrudS6d3cOPiYa707Sar2KMk7hPbntY1DEDt8FJodYo%2bIL%2buAW1Lm1DAuKoK2r/bQPnq1/GsWkrg5eUkO2Zj1MtYHREiceX0lURn8KI3WMnJVZE1IhujPU5I6eAaZ1PaMAuzK4nRFsHkSmL1loh2OZppo6RqBtF0G9F0K8nSDkKJZkLxBjFhNtr8mFxRCoocqIqdwh%2b0WhupiERXW4rOlijttTKT64NMa4oyvSnBjKYUv3ugi6/Xv8Plvj1c7d/Dtf49XOndxY0Lh7l8didZWpdPOL7GKaN2yKgVBSgGqAAQCmhEM3G4BHKqK%2bj%2bbiOZv/wB9wtLiLy8jJL2bqyWCFZlBGZUDFCZ8wUxm524XC4x8RmTXYTeEsBgi6C3hsgvcmJxJ9BbI8IfvOEavHKFkL5HrsDlLRXyd3oyOD3KhUsUi81LYZGDQrVV%2bIvT7qahMsr0iTGmNCgrHmRqY4hpTWGmN8WYO7mSN1cuZ9/2jVzs3Sv2/BsD%2b7lxvofLp3dwbfAAl84IABK3QklehMODyuoiTw5SWN9IceskVNEkE2oqmbxtM6m/vop35aPCBOOtXdhsypBTgRASySuhTHmVa6xwOIzV6sRgtBMMRtEZvWhNAVzBKtyhKhz%2bcpyBCjySUvNpPHIpDncKuzuFSyrB6koSCpcSiSo3TGFsVo%2bYIFVVJKnJeJlY5Wd6c4RpTRHx7agL8ODsZjaufoUzR7YxNHCYS717%2bOniIa4P9PDT%2bQNcObODG%2bcPcfXc/mEF/Ef6yldGZfdQaHGSJwVRNzZhmNSOJpYgv7aaKT9sJv7e7/GtfJTU608Tae7EZApQrLNjNLrQ6WyYzG7cbp8AEIlExIVmIh5jWlsTXVNaKSmtEvcNVmcEp1yCzZvB5lBWOSS%2bJmsQiz2MwxXD6Yrh84TJpEuprKqmrKyc5sY66ssi1KScTKr1090WZ87kNAumlXBfZzV/fXUF545uZWjgENfOH2Wov0dse9f69/PzhYNc7d0pfh7q3U2WRpTAcPJqUQqKAbrJt1jJ9cmoGhrRt01CE02gqa9j%2brYvib3zItKLK4j%2b4XckJ06nWOtAb7Cj09lxecKie1NucGRZEpcYCgAFhtfjJRoJE41GxJ%2bHI4xfhAIqLFQSDEaIRNLEyqsJNlQQqi0jmIxiMZvwuUysfvNxPn77Cd54/l7eWnkvf311Cevff47PP3iW7ze8yan9mzl//Hsund3Dpb59XD9/iGuDPaIEfrl4WAC42rdHlEKWkrD6Zgx7gQ%2bVAsA8DKCwrp7illa04Tj6%2blpm7thM/N2X8D2/lPBLj1I2uZtirRW9XgFgEzc9ciCBx%2bNFkiRRAkqiyoWGMtGNxxMiYrE4kUiUcDhCKBS6Hcq/Va7AYvEqamd14V3YRvCeFhypAHfekYXXVcy%2bb/7Cyb2fcnLvOk7tW8uJPZ/Qf2wLZw9s4NzhLVwb2MfFU9u4eGYnQwMH%2beXKCbHv3xjs4ZdLwwCGzu7isuIBAoBDAeARoXF6bgPI8Umo6uspbm6hKBjB2FDDnB%2b/JvrWC/hXLiP52lOE6loxCdd3UKyzDc8SbV6cLg9Op5PiYpsYkFqsPqESjdZIkdaAxeLCanVjsSjhxGZziROcXm8Vx2l/oIKyaVPwLmwnvLADV2mI0aPuQPYZ2ffte5zt%2bYzeg59zep8C4hMGjn1F/6ENDB7dwlDfbob6dnG5by9Dg4f5degUV/v3c71/H79cPMTQ2Z1C/lf79gwDUJIWxudwi0ao8JYCJEUBteiamykORTA31jBnxxbif34J%2bbmlZF59imhDOyaThNWhmJ8fi90nLjpdLg8Gg3LhYaOsqp1QKEk0WoLbLWE0GvB6JPxyeDj8SkSE/JUbIbM9jE8qpax7Br7FU4gtnioAjBo5gpDfTM/W9%2bg9sJ4zPRs4ve8zDm/7gN6e9Qwe%2bZzBY1uE4ysQrp7bx7XzR/jteq%2boeSVhRQVXe5XV//GmB9xcdQXArSi0ucgz2Zgg%2bVHV16JrakIXimBpqqH7h03E//gCkZceEwBSTVOx25WRmB%2bD0YHZ4sHhkHA6Xej1RrR6H5myRvz%2bKMFQUpij2WzG41amNSEkZTR%2bE0QgGMXplMSRVtkVMjOmId/fQfyBqTgzAUaPGkEsaOHAd%2b8KBZw9sF6AOPjV65ze/aG4Ih889hU3LhwQe76yz187f5h/Xjsr9n1FAdf694mvAuD6wH6y/pO4W3wVGAqAfLMCQLqpgCaKg2HsrY3M2v4libdXEXrpMVIvPU66aRpajZncCQUUF%2bvJzi5Ap7cKE9TpDOjMQUrKm/H7Y4TDaVwuLxaLWdzXyVJoOPlbCggpri%2bLkZrHV0qmczqBxR0kHpqGIy0zelQW8ZCFg9//RSTed/Azzu7/iINfv06fcjt0aKO4%2b//16jFuXOjhwqltXDm3n58vnxCheIOStGKGQ727hCqEAm4lfqscCu1O8i3/BaCpiaJAGFtLA907NhH64/N4Vj1KYtVyAplaRmSNJC9fhcFgQKfTMW78BGGCer0JtU4iWdJwWwHDACzi5mcYwM24CcDlkrE4FQBllHTPIPhgB6lHZmBPSowaqQAwc3DrXxg4somBoxs5d3g9A0fW09vzCecOrOXCiW/59aqS8GEund3Jlb59/PNaL79d7xOrryT/k7IlntvD9f8G8B8IbgrtDrENDpdAHcUKAH8Ic2sT3bu%2bIvDGM7hfXEHyxcfR2iUKCorE/F2j0WCzWTCabAJAkbYYjV4mma5HkhSJJ3C5ldsmMz6fsjNEBIRhHxj2AJcrgNkRw%2bPJEJ/WRuChyWSWdmJP%2bIQCEmEzB75TFPAZA0c2cvn01yLxEz%2b%2bz7kDn4rHET9dPsr1iwe5fr6HS2eUtvcY/7h6hp8GD3BjoEcYoVIGQ0orPCx9JVyo7C7xFQow24QJKgCKGhtRSwEsk1vo3PkV8itPIr/8BPHnV1Ds9DF%2bXC7FOj1GoxGdrliUQMDvR63WoDX4SaYbkKTIMACX4gEWJCXxQARZkf9NDwgFlSs5vzjaul0pUrOmEnhkKplHOrHFvIwalUU6ZuPYjtX0HdxA/%2bENXDn7rXghcmb3avoPfsr541/x85VjXFda3wsHuXhqh1DBtcGD/HT%2bID%2bfP8g/rxzlev9ehs7%2bqAC4lbhTgFA5nMMKENugTH5dDer6egrlIObJE5m1ZwuB157CvepRws8sQU5UoFFpKFSpyMsrYPSYXAoKi8Q5QKPRojMGSKTr8MtxgsGkuB80mxWPUPb78P8DICoAGKzKg6kUqa7JhB6eSnpJF9aoRyigLOnkxI%2br6T24nvPHNnPp1FdcOPEF/YeUG%2bKPRWlcHexhqH8v1wb2c%2bn0TvG9dnPlFQDKV%2bkFbgwKE3Sicji49VWSL7DZyTNbyJFkcmurxVQoXw5S1N7MjB83E3ztaeTfryD87FKkZBUatY6CQi05E9QUqo1iN3A4HGg0RWh1HmKJKmRZ6fAStwGIVx83kw/4I7cBuD1BMVt0u1OU3zODyNIZlCybiSXsZuRdWdRXBujrWUtvzzrOH9/MpZNfcvHkl/QfWsvZ3R8weGQzNy4cEkfdq%2bf2cunUdtH7K67/84VD/HrpkNgKldX/SZkJqu2Om4nbh782%2bzAAk4VsSSantoaC%2bnrhB9opbczYuRn/q08RfvMZvI/dT7isCW2RGZ3BjtHsolhvEwcfm90mABQbfMST1chyjEAwidXipKjIIK7MxTW59z%2bhbInKNbvVpXhBgvL5M4gs76RkSRemgJM7RmTRVh/n4vHPObl7DZdOfsH5Y58z1PsN549toHfParET/Hz5qJj3KYOPiye/Z/DwZq6c3s7P5w8Mx4VD/KTsCOf2kaWy2UXSCoBbkW%2b1kms0M06Sya5TANSRK/nRTO%2bg44f1%2bF5egXPlUvyPLSaQaUBncKM3edAZFABOTBYvdrsDq9WK3e7B5wuJBki5IjebHZjMDtH9KX%2bnhHg/IN4HSeJnjxTG40lRuqCT8LJOSh7pwijbGJGVxeTmtLgNVgBcPPEFF09sEjFweB1ndv3tNgBl9a%2bd28vVPuXx5A8Mnd0hTE%2bUwYWDwgN%2bGuwhq9Bqo9BmE4kX2GwUWO3kWWzkGiyM9cnk1NUKANmKAjo7mLFrswAgvbyCyFNL8CVqMJllTFY/RouMweTDbJUwmWxipS0WBwajFYPBIn5nMikAXNiUZy82N0aTHWyglRAAAANFSURBVJPZjtXmElCUo7Pys88ZIDN/OpHlXZQ83InBaxUKaG9McO7gZ5zY9aHwgIEjG%2bg/tI5zBz/lzK736T%2b0np8vH%2bFq/16untsjACjJXj%2bnTIN%2bFIchpQRuDOzjJ8UDFADDidvItyjbn4M8s51cg1UAGF9XQ359rVCDpquDads%2bx/vicjERCj31MHKqDuNNAMowRPnZYpMx25ThyM0nb45bz928otX1eJT3fkGxI4TDcTKZMjKZUhKJFMlkmlQ6Q1gOULKwi/DymZQ81InObeaOrCymTMxw7tAGjv6oyH09/Yc/o%2b%2bA0gStFSXQ17NOHH2vD%2b4fBqC8Hj27g%2bv9u8VLUmX1b/UDQ2d3/QdAvkUxPsftyNErCpAYV1/NhLoaRvt8qGZOpnPnF/hefBTPyuVEn1qKJ1qFwSxjsMi3R%2bNanRNNkRW11iJmA8MHJTs65bbI5BJhtnpJpqtwOGRxMFLe8cRiSeLxJIlkmoBPpuy%2bu4ks7SK9eCrFDuOwAppT9B/eyPGdaziz/xP6DnzMuQOfCBX07vuQ3v1rhesr9a%2bcB5S3g%2bL42/sj18/t4tdLh/n10hGGlJPi2V1kFVit5FmsYtVvJT/BZCdbZ2aMT2JsXTU5ddWM9HopmjtDlIDr%2bWW4Vy4n8PiDuCOVFCt3AfYQ6mI7OXk6UpVTiZe2YXVGyZRPpKSyVbwbUJ7OKu%2bDg%2bEyovFqJk%2bdSzJVhc3hw2C0CflLkh9JlpHcHgItlYTmNhOb04TKpBVngVTYyvuvP8zur96it%2bdjzu75gLP71jBwaB39PR8zcGgD1wf2iYOP0u0pU%2bArZ7ZzQyhgF79ePDTsDWd38s9Lh8gqUJK3WMgzKxBsTDDZyDFYydaZGCP5GKMAqB0GUDy/k86dG3E%2btxTPiyuQlyzCISXR6r2YnWHGjNPQOm0xv3vp7yxa9gqd8x%2bjbuJMyiqUKVA96Uwt5eWNVFRMpL5hCo1NU%2biYejdTZ8xl1uyFzLr7XmbOXkRX9zxSsSSmuBf/jCoCUyrI1eSRO34kDlMe5WEjq5ZP5/TuNZzZ/QG9ez%2bkr%2bdj%2bvZ9SP/B9cMAlJfjZ3fclr8SNwb28Mv5A9w4t49/Xz3OPy4e4v8CmmYOOvGuk5MAAAAASUVORK5CYII=' /%3e%3c/svg%3e)
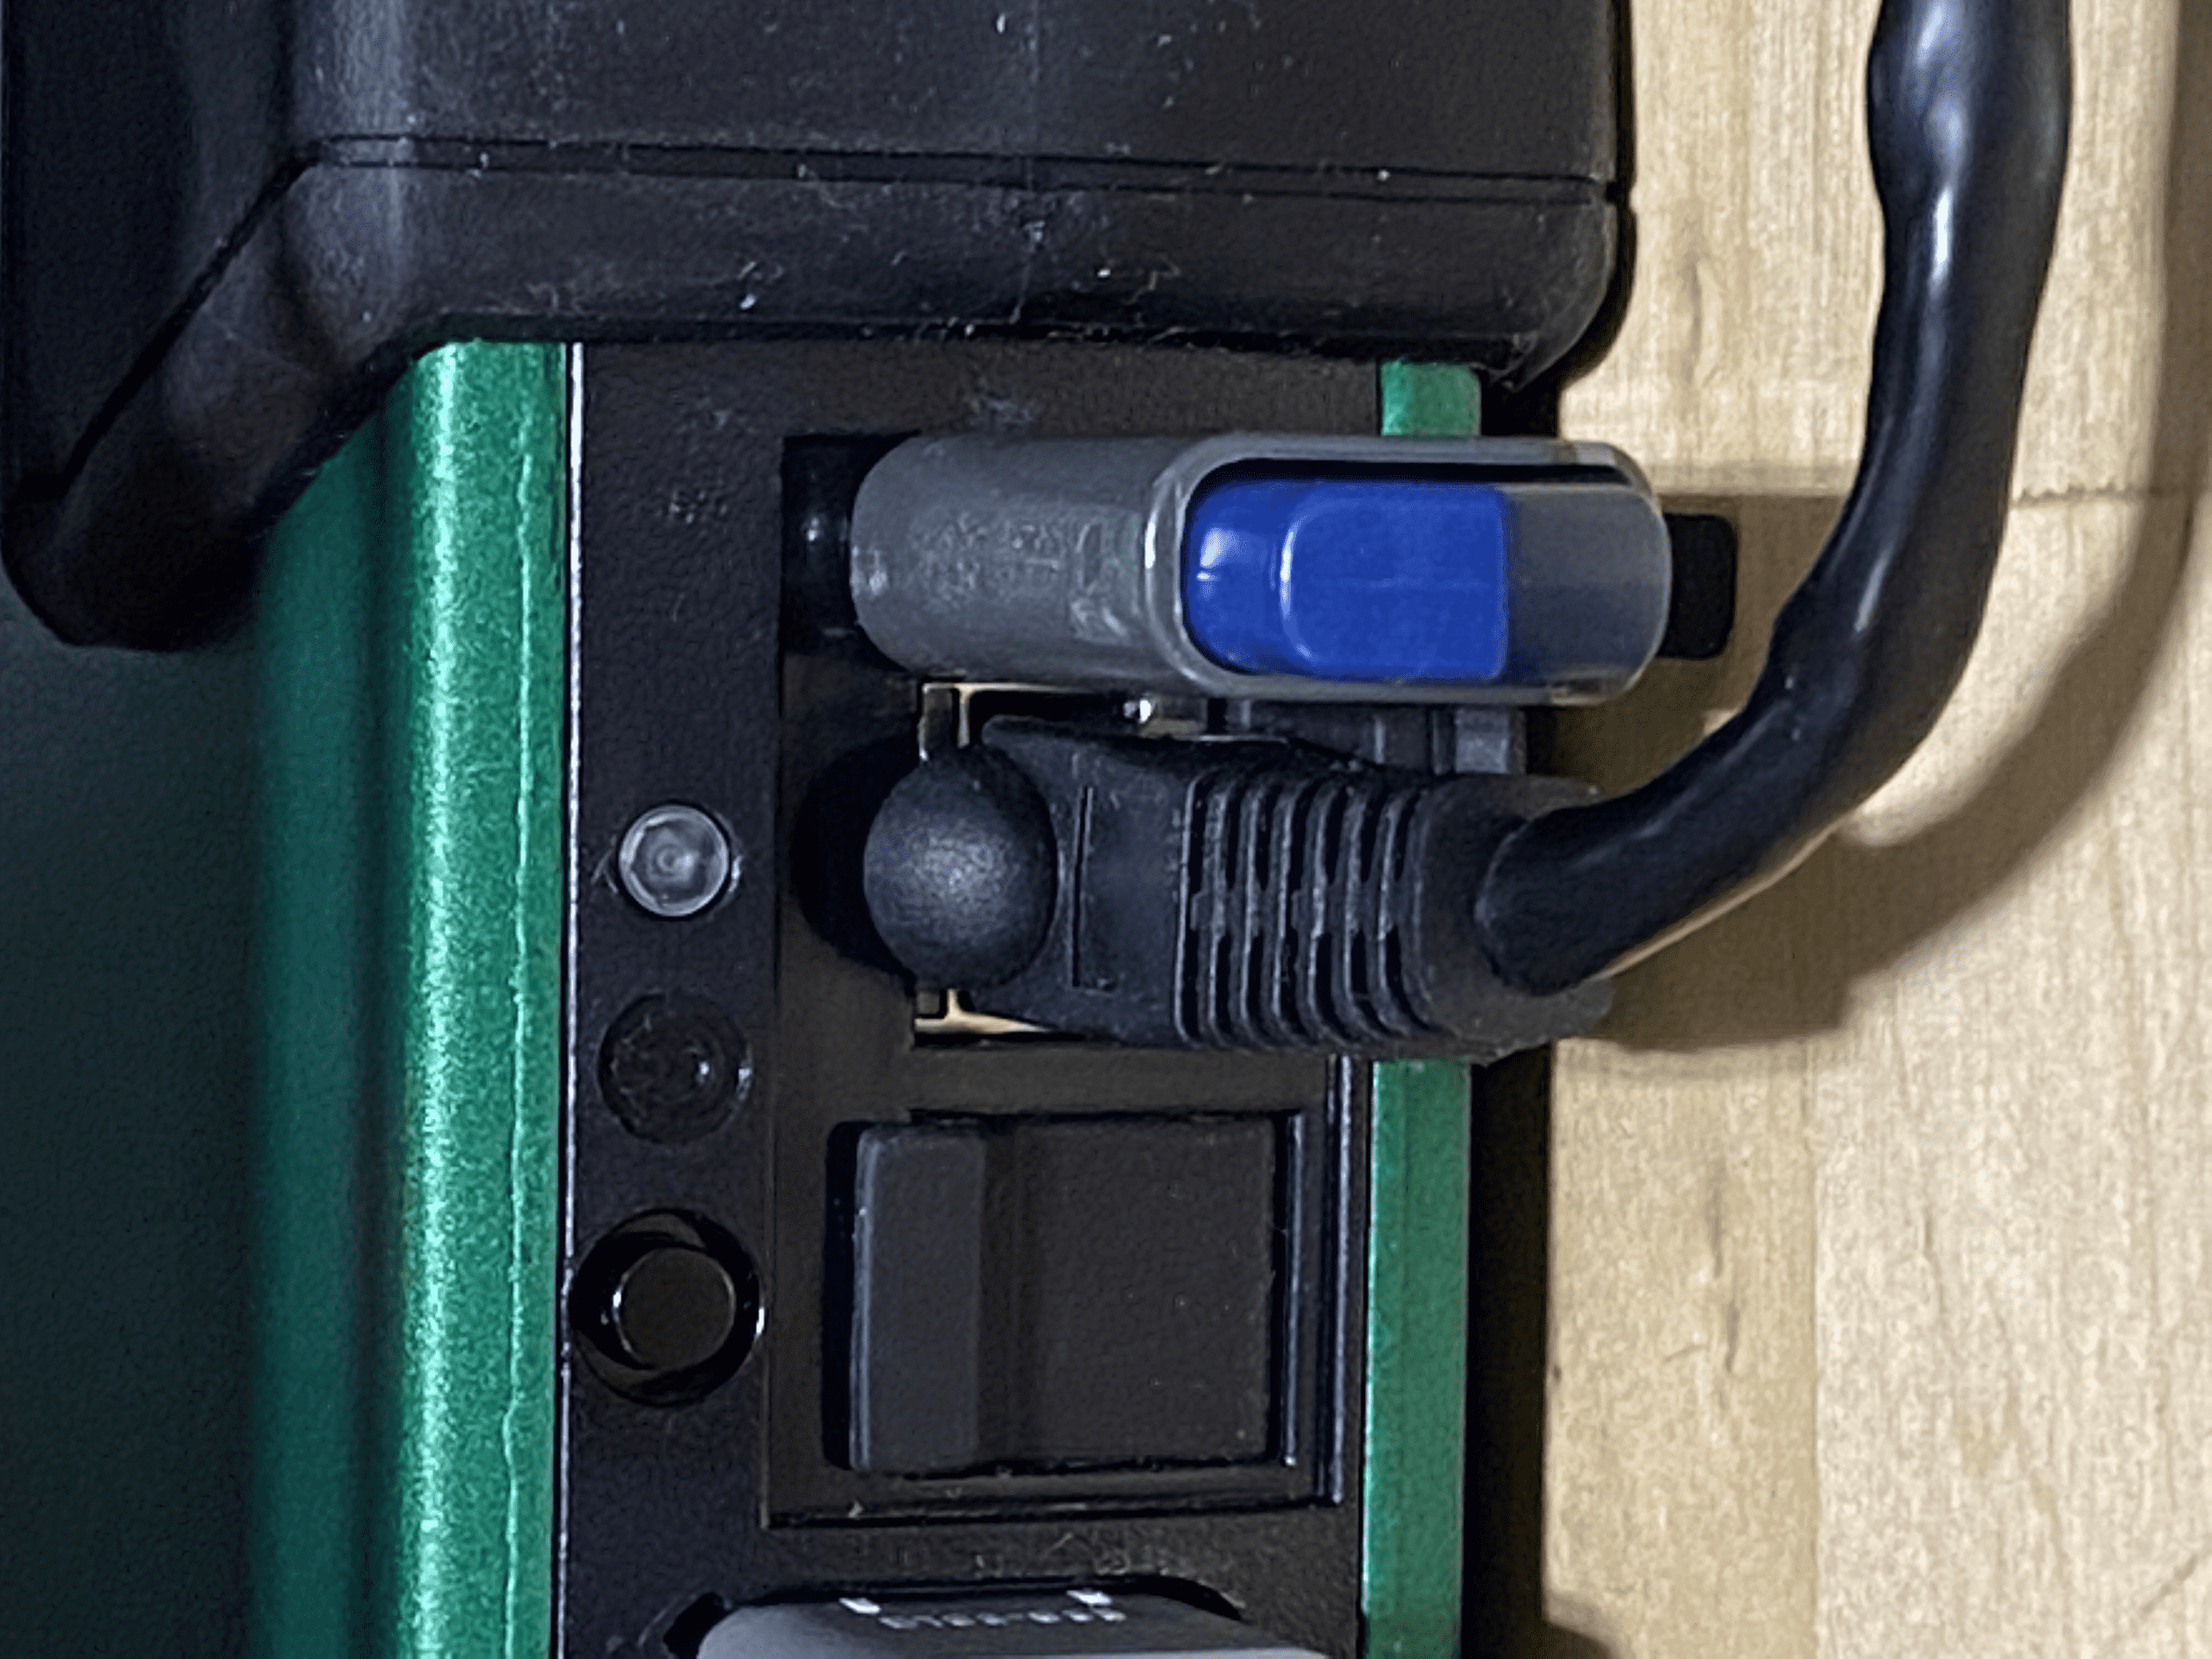
USB drive (top) inserted into port on DBM. Before inserting the drive, press the power button (black circle on left) and make sure that the LED is off. - Once the DBM is powered off, insert the USB drive into the port on the DBM (next to the ethernet port and the LED). It's covered by a protective rubber flap that needs to be pulled back to insert the drive.
-
Press the power button on the DBM to turn the DBM back on.
While the 20|20 is installing a software update, you must leave everything on and undisturbed. Prematurely powering off could cause serious errors.
- The DBM will automatically check whether there is boot software on the USB drive. When it finds the boot image, the LED on the DBM will flash yellow. This means that the installation process is under way.
- Once the software has been installed, the display will turn back on and show a popup that says "DBM system software updated successfully." It will look like a warning, but it's actually good news. The update is complete.
- To verify that everything is working as expected, go Back to the main Setup menu, then check the Diagnose page for any connection issues (white or red systems).
Upgrading from Early Gen3 Software
With the release of 2021.0 software, the 20|20 became a lot more customizable. It offers support for more new modules and greater flexibility in how many of them you have installed (and where and how you install them).
But that added customizability means that you, the user, have to do more customizing than you did on earlier software, and your old settings won’t necessarily transfer over.
Here are some guidelines to help you transition more smoothly:
-
Before upgrading,
- Write down your vDrive Start/Stop Offset and your liquid Calibration settings. You will need to re-enter them into the new software later.
- Export all prescriptions and boundaries onto a USB drive. You will re-import them into the new software later.
-
After upgrading, you will need to add all your hardware into the 20|20, like you’re just setting it up for the first time.
- First, go to the Equipment menu, and press the Add System button in the sidebar for each system you have installed on your implement (Seeding, Liquid, Down Force).
- Then, go the Systems menu, and go through each system in the sidebar. For each system, you’ll need to press Add Hardware at the bottom for each module you have that belongs to the system.
- While in the Seeding system, make sure you enter in the vDrive start/stop offset you had written down earlier. Likewise, when in the liquid systems, make sure to enter in the appropriate calibrations.
- In the Data menu, Import any prescriptions or boundaries you have saved to your USB. Then go to Fields menu to reassign them to the appropriate fields.
If you need more guidance, please consult the articles in the sidebar on the left. We have articles on how to set up each system type, as well as more general overview articles on the 20|20 as a whole that will familiarize you with how the new software is organized and why.