Prescriptions
Prescribe implement behavior using maps that you can adjust any time
Updated September 13, 2021
Your fields are not uniform, and neither is your treatment of them. By adding prescriptions to your 20|20 system, you can let it know which parts of your field need to be handled differently.
Keep reading to learn how to
- Upload prescriptions to your 20|20 device
- Assign them to specific fields
- Use them to control your implement
- Change them to suit your needs
- Save and export them for later re-use
- Delete them when they’re no longer needed
Import Prescriptions onto Your 20|20
If you have external prescriptions that you'd like to use on your 20|20 system, you can import them with a USB drive.
Before you begin, make sure that each prescription is saved on your USB drive in either .2020 format or as a set of three shapefile-based files (.shp, .dbf, and .shx).
All files must be saved at the top level of the USB drive or in a folder called SendTo2020. If they are hidden in other folders, the 20|20 will not be able to find them.
Once you're ready,
- Insert the USB drive into the port on the left side of your 20|20 monitor.
-
Navigate to the Data page.
- From the Home screen, press Setup (bottom right).
- Then press Data (bottom right).
- Press Import (top right) and then Prescriptions (top center).
- Select which system the prescription applies to: Seeding, Liquid, Granular, or Depth.
-
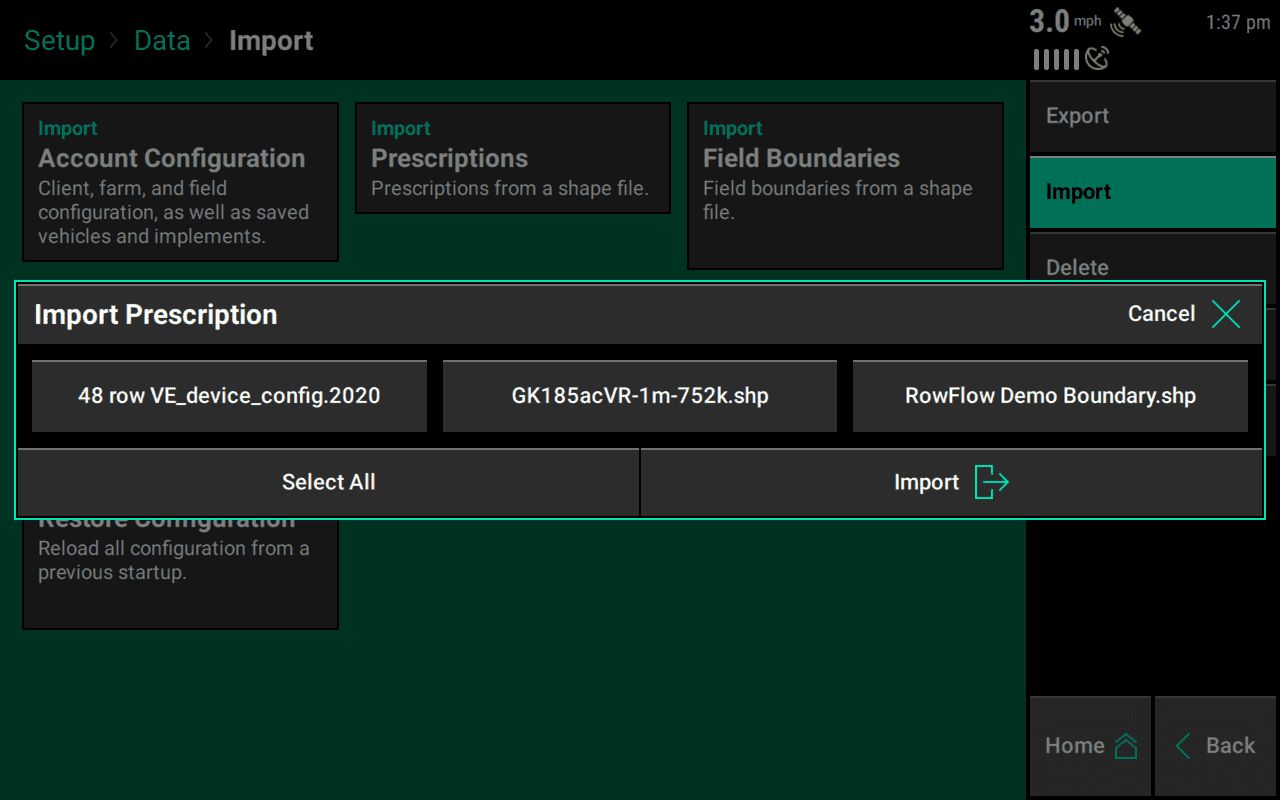
A popup will appear, listing available files. Select which ones to import by tapping on them, then press Import.
' width='1280' height='800' xlink:href='data:image/png%3bbase64%2ciVBORw0KGgoAAAANSUhEUgAAAEAAAAAoCAYAAABOzvzpAAAACXBIWXMAAA7EAAAOxAGVKw4bAAAMNUlEQVRogd1a%2bVMbxxJegTkldK2k3dW12tVeuleSAYG4bG5x2RgwYDB2Kk7lJZXEyXPy6v3136vulWQZYxvbeUXFP3w1sz09PT29Mz09vSsIgoBvBeFIBFouB1mSMDIyglAwiEQi8Q7P6OgopqamMDExwXWBGyJTEMQQhEgAQmACPqJNjkOIBj26f5w7R6IicrkcC81kMhDF6J1PehChsGeAeCzGBiD9bNuGz%2bfr84yPjyMUCiEajcLvnxwwgBSFIEV4wmyAiTEIsRAERYQvFODOUTEGx7ZgWzZMw0AkHL7zSQ8iEonANE3kVBXJZJLf9Kf7Db21DsMngGlUDtKHh24WQHTip/JLMdTF18jgFySiUCggn89DURQEg0GmDw0NfRCCUNMhVDUIFa1b5t7WB9Gl%2bbr8vfJte%2b5d9Pp8DIPjvidjoP02cqoaxmUR0XCYJx4OhxGLxSDLMiRJeg9EF0URglDPI5CSEEkrCKdkhNMKIop0O8gJTKUkDDsZhJOeDEZKvoE/gbB8DUoC0UQco/kUxvQUokn5VjoMyoh0S6GYhT%2broGDZqNZqqFSr0DSNjZCQEogn3kVCkhCJkg%2br6QgrEqbKJgIVC0FTZQchRiKIRUWIkShEfvZo0QEkxBgrMGKkEFXT3N9fMRHOJCGGwohynyjzxsUYpHgCiXgcUjzOZSKegByNYTyXxKSqIGLrCFQtTBV0NowYjvTH9eDJG5TBZSwOXyGDyWQCqpyEbRgwchqSkoQ48UdFxK8hIYqIBEOeAWIpBdVqFU6piEKxiHK5zCiVSiiWSqjX63DrdW6rVitoNBqoVCrIptMIS3EMGUkYpoX6/SaqrgunUEDNraHmuqjVaihXKlDVLMRYDPF4vI8YTUCMYVxT4NdScKs11JoNNO83UecxyigWi305LKtU4iUciw/ISsThs9Pwm1kotoGYqSFu6pBsA7JjQnaM96AULIi5jGcAMaXApWVT8SZOEy4Vi3CcgjdouYRWaw6u66JSLrOxiK9ngGEzBTWXQ7FIxnLZaGQkUpyWI/Hn8zpPWFZkSLIESZYhJxXIsTjGcp4BbMPi8Vy3xsanft7EXdaJnukF9Pd1t4xLCQxpMoROC0N/XWDo91MM/XGGoddPMfT7DSD6m3P4zjcgCK6OqCLBsSxYlg01m4VpWqywqubYo9LRQm8ilUryGUrHHzkZOm9pbw8bKajpDAq2jbymo2BZKFgOTF2Hoekw9TysvMFtJceBW6nCNm1UikWosoIxVWYDmJoOy7JgEkyD647jcF3XddaFQLEIvSAybl7XEUvEMawpEDqzEK62IXTmIOzOQ3jRgfDvMwivn0L4fQCvTyD8eQ6hb4CkDNuy%2bK3S8qXJ0nFi0F7qghShoIIUsG2H31Be0xBKxDBcUBFIS5jKKAhmk9eg9EHtzKMmMZWREcjICKYk3DPT7APKThF5I8/L%2bkPem0CBGKFXpxUwTCtgdw7Cfy8h/HwI4ddjCG/OIPx1/j5o8sT3fKu3AmQUbIcNQHub3jhN2LFt3gbsC8gojsOGSSWTHGgoksTOSnDzEBoGhAaVedDJ0q/fhPfaDfbgSdoWisJ7%2brrX/ihoC1hpjNQMBBbqmGy7DH/bReAmzLsILDYwUbM8A4SkONLpNIe3mWwGqW49lUohk80im80inUl7PNkM72UKOuiICcdj3jlMk3L1L0NdRyCVgBSKeF47In4mohDICcoxZMIi0mKcoYSjkIJhyMEwl4OQQxGIAYoUmyaGGiaGXAPDdQNDBHqjVZ3rTHN7yHN5r2Eyvcfvm3W%2bGqNlHX5LxaT9%2bfDbKny0ivQMKs0GGvMtTC%2b2YZQK7OAlNcNIZNNIZFIeshlE6OWNrNRhrS5AazWRmXGRazWQb8%2bg8HAB%2bvx9ZGfr0OaayM01oben%2b3V7eQ72yjzs5XnYS3NfDWtlHtaDLwfp4yy2UBgAPy/NId9qQp9pwJyf5mdnoQV7dQFhR4fgmy1gq7ODX3/8CW9%2b/wPfX13hx%2b9f4fUvv%2bHnH37AL//6CS8uX%2bDNb7/hz9ev8Z83f%2bHq/Ay1Uhllp4BKofj3geQ5vbJww/NNbV1aV0a5i0qxBMe00dnq4NXLlzg/PcXZ4SGKrWkYnQco1aoIGyqEe%2b0y7s/PodPZwfOrK%2bzu7mBzaxPthQWsra/jydERtnd28PTpUzw%2bfIxHjw%2bxubmBUrnM5/1N%2bFjbl%2bJzZZLjpsCNAqrFxUW0FxfQmp2FU6/Bnm2i2HARMXPeCpgITmF8bIzv0HRfpmRBIBDoJw2oHBsb47bx8TFMTExyPECgi8d1%2bP1%2bvooO0gZ5B/v26j3%2b3vMgP7WRzJvkDfJTbHKd3tOHQHMKTk0hNOmHPxKGP5eCQEcQHWV1itqq1f6RR2c%2blUSj0ukegb0YgdqJRtFfL2ymI5QiN1KELiIcOVYq3E79iIfQk01vlWQRemNTnQKg3tgkg2SRTJJN8oiPeYifjmungGK3n6eTp38fzOOB%2blPUS3eY0RRli5omolKCY2xaLi9efoeDg308efIER8fHODk5xv7BAS4uLpi2tbWJ7U4H52dnuLy8xONHBzh/doGr55f9EJYSExSt0QRIgZWHq/jh1Svu//z5cxwfH%2bPZxSVOnx5jb28f%2b3u7ODo%2bweXlczw62MfVi5dYXlpkxUkGySIDsKHLZRyfnODk6SkuLy5wcfEMe3t73Pfs7BSPHj3C%2bbNnODo6wunpKW9rknl2do4nTw7ZOBTOR2UJY54BDIiyhHrNZWuvrq7iwYMH2NzYwMrKClZX17C1tcUgn0DlxuYm1tfXsL9/gJ1OB2tr69jYWOdVRDKi0QhHjBS/02CtuTlsbW5iaWkJGxsb7G8ePHyIpcUFLC%2bvYGlpEYuLS9jc3MTa2ioODh5xG024Ua%2bzLDIqyaZVsLy8zHqQfiTv4cOH3Jd1XFtjPTudDra3t7Gzu4vO9jY/E8igpKeoyF0D3LcwGZxCUlE4/Ozf1AZublTvPXvlYD3uhaPd8JUiRPIZdKXmaFFRvNsb3csTiXdkeSFtr0z06ZSooGfqSzJIFsnsyeuN1%2b8To5tl7EadSVavTmCZioLJcBATGdk7BbK6hkw3%2bqOo7zagyfYmTEIJHElmMlBVlXl6zx%2bSS5El4UNjDPYlmb3olMbtj6lmkcmpfDO9jd4sk3iNPAJaGsLoQhXlRveqSVfXWvUDqPWvtnTN7ezuYXdvF6tra%2bjsdLDd2e5nYgievA%2bgOxbtZ0JP7sf5qyhXypibb7MP2tzawub6OirLbdibKyjNz6JaqbyV9TGQY27WPSdIBigRgW54dPHpolx4W78OCjSODo/wkpzW3j4O9w9wuL//eUFPsYiiZTOo/mn%2bEvO2W3M4PznFd1dXOOzsoLjQQv5gHc7CLKqWgwqdRsVPgIKlWhWjyTiEe8suh7j2/DQLIdjtWVjz01za7RkuKay0qa0LtVlFslZEpl5GqlFhUDh9W%2bhzTagzdQbVb9/HRaoxMOb8fWjtaegzdWizDWhUfgL6tItcexr30pKXFI2oaRSqFRRqVYZdKUN3LNjVMuxKCValjEZrBla5hELN48sXHciZNCdBfdMWX2iEaev/jxkbvhmnD3LiDBo/HvJS5KMjEEbvfQIjXjpfqGl8JNCSNw0TtmnC0PMw8nlYpsVZHgoyKGFimSZ0TWceXdOgZbMIx0Rwap2uw3cJykcE%2bUvPZ8LVISYVTjH14mfLMrlOuUCKtshrDmZguKTsTCKBCCdEdE%2bBOiVF7gBkgKYJIez/MgNEFMk7XpIKlGSSszIK1enMTKV4sjdlacgYEWnQAPm7mTwbwPhSA%2bQ5MSBRZiV6A5ge4/T1dVBOP0pb4B9tgHqev8xMaClM6LfHOJVakr/o9Cf%2bjzRAw4Bw3/w63NXkP2QA32euAOHv8sJ3ugJMCKEvOQUad/DW/nYDePWReBj%2b8QlM%2bicxOfkWvSTPIK1HF74JA1DpahDzWTimBcM0%2bdsGxS30xYsuUvRxh2IZolOdkifZbPbbM0CVskxFL3NlFhzkKyX%2b3Jc3DRgF7%2bNPseTFPNlv0QBzM7OYm5/HYrsNp%2bki1arzCtBsC1q5yIlRSszMzszw1fgbM4DKP0jQx1Va4hblAwsOp9TonyZKsTHdsjhVp6rqt2QAHSE1CS2r9j/ncSIlq3IC5XrihSZP9P8BgmGJBTuJDKgAAAAASUVORK5CYII=' /%3e%3c/svg%3e)
Screen for selecting which files to import - Optional – If you want to use a single prescription file for multiple systems, repeat steps 4 and 5 for each system.
Assign Prescriptions to Specific Fields
Once you have prescriptions imported into your 20|20, you will need to assign each one to its intended field.
-
Navigate to the Fields page.
- From the Home screen, press Setup (bottom right).
- Then press Fields (top right).
- Select the appropriate Client, Farm, and Field for the prescription you want to work with.
- Select which system the prescription will be used for: Seeding, Liquid, Granular, or Depth.
-
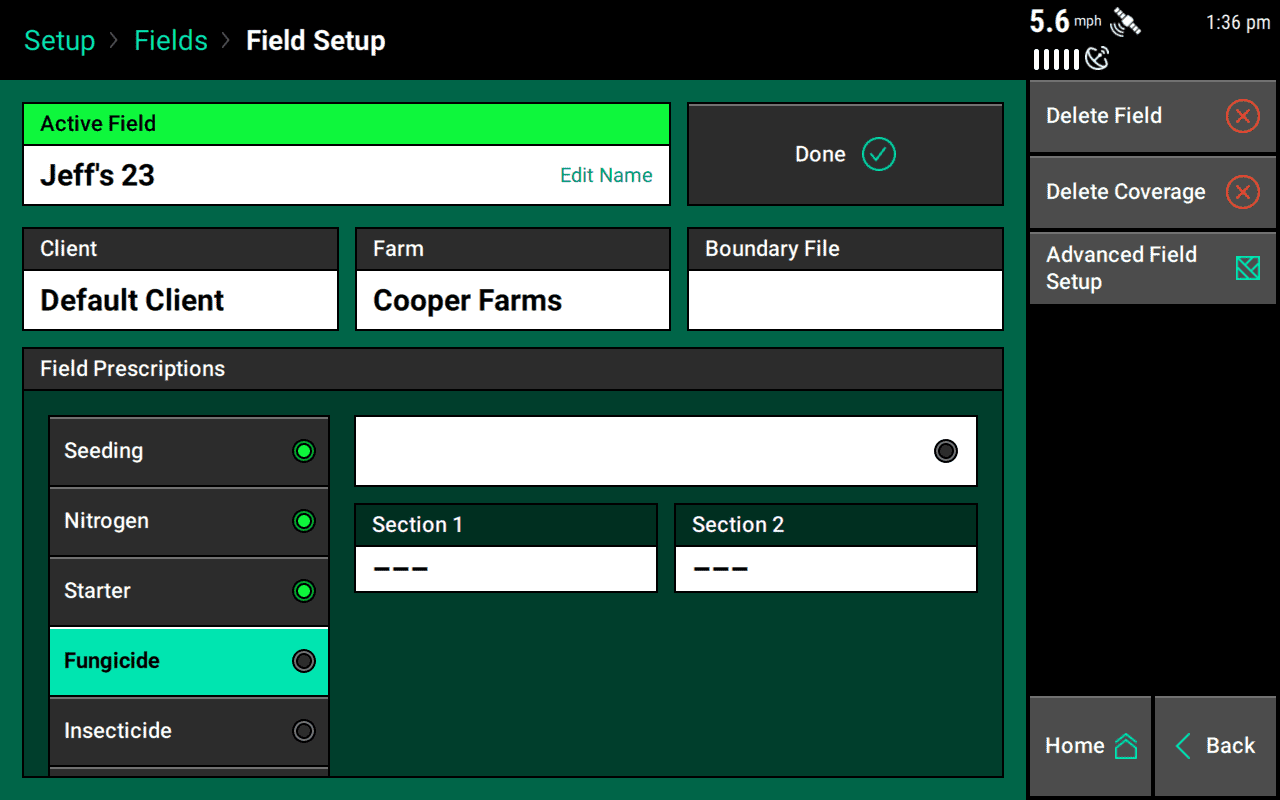
Find and select the prescription to use for this field by tapping on the prescription file box to browse existing prescriptions.
' width='1280' height='800' xlink:href='data:image/png%3bbase64%2ciVBORw0KGgoAAAANSUhEUgAAAEAAAAAoCAYAAABOzvzpAAAACXBIWXMAAA7EAAAOxAGVKw4bAAAPmUlEQVRogdWaB3RVVbrHd0ISNCQRQk8gpN3eS9q9yU0lvdyEBAKkkICGJgk1CCpigdCkiyiIDUdH0RnFhqhI08GFCsqAvqWOvrG8eQ%2bd8YkzAvp76%2bx7Q0CQJ0V576z1W98%2b%2b%2bxvn7P/a/d9hBCC/%2b8EBARIq9XpSXO5MOh1hIWFETN4MGaz%2bYy04eHhREVFERkZSXh4GEIozgnRCHUMIiEKMSCSbgEBBPS%2bBpE4yBdviiegZw8CRABWu528vFw8Ho98WYYnk3S3G6vVSq9evXwvCrgyAgyJiyc7O1sKENqjBxq1ivKKCroFBp5KGxERgU6nQ6vV0rdvXyVOIBKjERYVwpqI0MbQTck0PBShHowwJ8r4gD4RBIoANBot3vJySgoLcTrslJWVU1xUSE1VFYOjo30f9FvXAL%2bNj4ujuLiYrKwskpKSiIryfc/5Ce52ZoSiZlA3xGmqSQIDEMFB589MSRMS5Et3wXS7eLoHy/ertRpqamooKCjA6XQSExMja0dISAjBwcEEBQVJG6zch4TIeyEa8xANuYjmPB9NuT4675VnCvU5iLocAupzCWzMI7Ahj4CGPF%2b4UQl3pblg6nNRvkPJ77woac5K5/seUZfFEE8SOeke0twuMjIyyMvLo6ioiPz8fFkzSkpKKC4pobS4GG9ZGe70dIQYV8DVj6fQ45UkQp9zEvpyMqHPJxH6jIPQZ52E7XcR9vavQ4/9bsIPpRG4PJ0%2b6akYUuxoUh1oUrrQpjrQpTml1SbbJWc89yOq3aiKs5g5pY322bNpnzWLqVOnSma1t1NTPUyKUFpayoTifGaXFeDJUARozif4DRtB%2bzQEblcT/JqWoLf1BL%2boIXiXju7fOen%2bz6TLx3dOQvwEf%2bukO3bEplT6W%2bxYdTqMej1GnQ%2bTTo9OpUYVn4BercFgs2KwWjBpdWekURAVqSQWZdJc10BTczPjxo2joaGB0XV1MlxZ6ZWFLysrY0xpERMrSvBkZCgCDGXBK%2bt56dhenv/HTh7//Hme/fo1nvjyBbZ8%2bSJ/%2bOs2nrqMPP3Zdp75bDtbP3%2bZrZ9tZ8fRXZSum0moQ4fNYEJvMmI0mdDqtGRmZdHQ2EhdXR3pmR5iS3NILM3BYDZhMBgwGI0YjUYZFpUuhuSlkZeRSXpGhmwCykiloISzsrPJycmRo4QnO5vs3DwcTidCjMnjvX/7kL8c%2bIB7V6zjyc1PcXj/n9m7bSe7t%2b3mcl8ff/0VX3z7HR/%2b/e98cPSojLvhkXvpZk3AYTRjMHUVymqzkeHxyI93OB2oMtPQZqTK5zKN3yoIbxoJBRl4i0spKCyksLBQtn8FpVMsLCiQfYHyrLIwnxHFRbhcLl8T2LH/DT46cpjXduzg3z/9hMOHDnHo3YO8f%2bQIP5w8wckTxy%2bZH04c58Tx7/nim6McPfYNX37zFZ98/TcpQNsDqwk2x%2bPUGs%2bo2gatTjYBbaIKg0aLSe3D%2bNMmoO1qAnOmz%2bTmeTczb948pk%2bfLvuCG%2bbMYc6cucyfP5%2bG%2bjrGF%2bYxt7yQTNkExhVgaG8ic%2bF0shfNwH17K56F03wsmErqLZNIvWXyz%2bB75rplMinzJpLsJ%2bWUz%2bm%2bvnD6rVNw33q9tAqe21oZ0DocUZ1OSFkaIRUugsvTJJ3hkHIX3b3uLipOx8VVXrccBRLz06mpqKRq2DCqq6up9FZSWVlJVVUVw6qrqRs9mtKyMmqKCmgsK8btdiPE2HzCs2z0z3TSJ9NB30wHPV1mrkkzcY3LTE%2b35WeJdFkI9VgR3hTp2y87iX5ZTiLTrfJ5r9PSdoXNZ9jIVBPBZamEeTOIL8xgUKGbmMJ0hhR7GFzgJq40i9hiDwPzUs9JlB9R6yE2N5U8TyYut1tW704yMzNlYZWw0pyUviUnK0fOFYRoGsqgxHhGlHmprarBW1BIXNQghvQfSOyAKIYMiPLZ/lHEDYyWzzqJ7x9NdEIcwfkOUix2RniH4S0swqRSM7jvAGIHRp/Ko5O4gV3%2bcdGDSOw9gDC3iYhkAzX5JVSXVzC8opK66uFUFZfiLS6juqSUxEExxPQbeEZekv6%2b7xNlycQXZDDp2vFMnzGDtrZWWltbaWtrY8aMGbS3t9PePouyklIKKisY2jxadpZyFBg/ezr33L2e1WvXsnrtGlasWsnKVatYvmIFK1etZMWqVaxes4bFSxazoGMhCzs6pF22ZAkTbphBVGMJHYsXs2btWlatXu1nFcuWL2fFSl9eSh4rV6%2biY/EiFnR0yDzu6FjIqiXLcLbUkjm5kbV3rmDR0iUsWbpUsnTZMplu0eLFLFzk8zkdJZ%2bORYu4Y8EdhNfnEzvUzbTJU2SbnzVrJs1NTTQ2NjJ8eA319fXUN9RTXlRMdmMt5jtn48rORASMLWDPe%2b/w5r597HvzDV5%2bdQeHjhxhz949HDz4DtteeZX3Dr3H3tdf518nfzirV9//4RFc8ybz%2beef8dY7b3P4/fc5cPAAbx04yF8%2b%2bZjde/dy4N13Zdw7Bw%2bec2S4bv1ibnxswyWNLrFtIxmUnczka1tomzqVadOmUVFRfmoWqIwKCqUlJZSUllI6rNJXAxQB9h14i7d37WXPS9vZvvV5tj/7Ivt37%2bXIW2%2bzY9sr7HpxGzu3befEse/PevE7R/6M%2b6aJ/Nenf%2bXNXXv5047XePrRR9n65Fa%2b%2bOhj9u95nZ3bXuHAG/t49bkX4PiPZ%2bUx/q5FzNt8z8WX/kdQTa8jQB1Nz9AwQsN6yGWvsjpVlr2dtjMs73v2IiI8wtcJjlhxC/OeepAbntjInC33MeeJjdzwxH20/34Dc%2bX9fczdsonpm%2b%2bi7cE1TH1ojbSzHrmbEStvofekSqZvXseNT26SaWc/voGbnrqf9sfulf6KrxJ/45P3M%2b3hrjxaH1zNnEfvRdfehOOm8cx9bANTHlhNm5L/L0Hms5brN62k5%2bRKxODeF7GaHJtPUJqe0CQdVyVpCU3Rc3WyjmC7ihCHmu5ODd2dahkOsiWegTJ5ucqpobfbKsOB5ngCLT4CzHGnwp3xSpyS7vQ8Aq3xcsSJSDXKND99x/%2bKVSEBMTobkTCwa1X6iwUYk4fZbmNSXRMzWiYypelarhvVwMS6MYwf3cjsSa1MGTOWifVNFLoycGoMpOjNpOhN0ibpjDi0BlINlosizWAhWWeSpF1kHklaI91rMhEJAy5iQ6Y5nwiHlkirhj5JRnrZtPS0aeibZKRPkoG%2byUb6OA0yHOnQyWc9/WkUIm1aelnUhBriCNX/tlytjyXMmECkRU3giEsQQHgMdHMbCHUZCXWbJFfLsPGU9WGiR7qJ0HTFmglzmxFuPSF5doz1Fb8ppgYvtuZq4mryEek6xMhMRPzFCpChZ4BFi9NswWgwYrVYsJhMmAxGzEYTZqPxLIwmI1ajgat1saRcV8vJf33PyeMnOPG9Muf/dTl54gTHvv2W49/9k51/eh2R5hegsw%2b4GAH6WrTUjxxNy/gWWlrG09LSgjstFa2yRvevznxLUANmjZFBWYn0GxnLVQlDSJ0wCn48e3j7Na4f/O/Zs3cvrVNa2bV/H8KlQ9ResgAaku0OUlJTcDgccu5st9tkoTuXnJ2YjEZ0FgNGm57uulhSW0bKsfi3vL779hj/OPo1e9968/LUgP5Wrdx1SVQlotFoUKkS0ev1cl/9p5jMJixGC06VhWtsasILUxg6oYGcCfXkTGgg10/%2b5CYKJjdJez4Krm8mb2IjOePrT/kqDJ005mf9C6eMpWLGBJIbhyHcl0GAflYdlWUVeCsrKcjPp7S0DFdaqtxD/2kTMOmMxKeoGZwbT2%2bLDpGUIMdjZQ4RkqQh2KEi2KlG6JTzhv4IzYBzo/Zb/UC62br8gxwqQpwahCnm5/0VX1V/hDbK1wQutRPsZ9FQVe6lqrqa2tpampqaSHelnVsArZFYl5qoojifAPZYORlKb6whta6S1FEVxBS4/QIoHzzw3CjPdIMQliFEptukf1pdJSkjy0ksySLEluAr5M/5yzwGXiYBrFoMag0qtVqemmg0alngczcBMxaDBafaQpg5kfjqoazf/ACrHtjA6gc2svbh%2b7nn0YfZ8PtH2Pj479j4eKft4t7HNrP5j1uY2jEflTePu6X/xlP%2byvOf8%2b30f%2bgPTzB76YIuAS6pCVi0OG12zMoQaLX6CmoyndUBdqI3G7GYjQRrY8hpbfb1TCd/hBMnL6gzO/j%2bYdnW5fXDhft/9Oknl6cT7GPRUlffyITrJzG2pYW8/DzUOi16s2%2bnthOdWdm3MxGdraL3qFjCNAkMqs6lY%2bM6Ft2/no5NCnez8L515%2bWOjXdx50MbaZ4/myEV2TJu0f33XJD/0oc20HL7jZehBngMDNSrcKsMuA0WXDoTKSod9jgVjgTNObGqVNgT4uhn0iAydAjzoDOx/ALM0QhHLMKl9d9fpL9bfwl9wLhChDOBXhOGkbjlTmIfvI24hxcQ/8hCEn7XQfymW88i4b75xG1eSPyTy4kYU4JI1RCUY6VbtuWCCMq2EJhlRniMF%2bzb6d9N8b8kAa4tRJhjEXdOQnzwCOL1uxFvrEfsXovYtRZx9FnE188hvvKj3B97iW671tHj0dsRt49F2OMRWSZZkIsi4yL9OukU4KKWw9f6BVg6EXH4YcQfOxBb7kC8sAyxdTHii6cR/7kV8Tc///EM4r%2b3cdULy4m8azbitssggOcyCRDX/wIKfnoTsMfTfXotEbvvIeLFlYQrbF8tidi6jIhnTkO5f3opYS%2bsIGzneoLHexHJKkTmFRQgXY8YkUGoKYF%2bPSPp06%2bv/PmhT58%2b0ipbYL1795bh0%2bnZs%2bdpw6BZg0NvlCcwFr3hFCYF5fRFfybKqYwlUSP3EUSWUo0NV0yAAOXdVWmoizLl0VhRcbHvJLikBG9pmTwXKCospLysTMYrx2XKIWmGb1u8ayI0snYUY8eNo76xgcYxjUycNAmvtwK1Ri0PLJVZoA8jOoNeiqVsoPxfEqB%2bxEiqqodRU11NSZWX/NHD5SlwfkkRRVVeRtWOpGZ4DSNGDCdd/h/QuRgya0i22klJSsJpt%2bOw2UlyOHHYbJiUGaGyD6DsD8g9AqPcK7Bo9PS2ahGZfgGuEAHpigCpUoBpk1uZNnMmc2e14x3fRErbWHlCnFtRSu7IGqZOaeWmm29myvWT/UdjigCZBno5dKisJmItBuKtRkmc3ybazSScA7XVRIRT5xfAeAVrgBFR7UJTlElVablv31/5F6C8nIqqSvnPUHFREeVer6z6ChUVFVIYeTgqRWge6ucc4abzcCrdlWIoAdLmEeP/RcadkS7bt1LFPRkebDYbaWlpp%2bJkvMcj/2z7H3CVhgX2E3FiAAAAAElFTkSuQmCC' /%3e%3c/svg%3e)
Prescription Field -
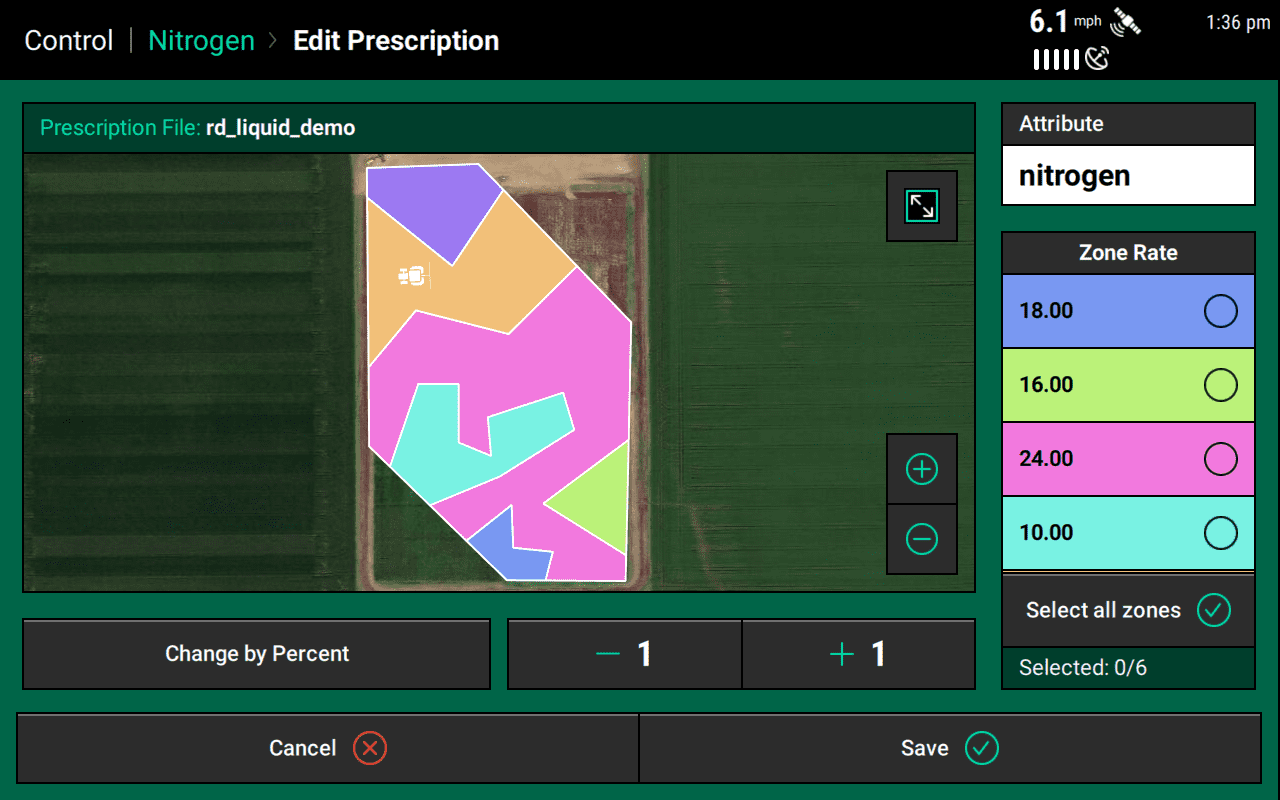
Confirm your prescription choice, and if necessary, adjust the target zones before making it active on the field (for more on this adjustment, see steps 3 - 4 in Edit Prescriptions).
' width='1280' height='800' xlink:href='data:image/png%3bbase64%2ciVBORw0KGgoAAAANSUhEUgAAAEAAAAAoCAYAAABOzvzpAAAACXBIWXMAAA7EAAAOxAGVKw4bAAAXQ0lEQVRogdWaB5iV1bmof1DQEwWM1Nm9zOz9t93bML3tMntmQGAoQ2cAAVGRNjAD2IJijOVolCOWm6hXPeq1nBhBBSkCaowmmuSYGHqzIQhDUSznPXf9e1NjTvQ%2b99znufM87/Otf9W9vvV931rr/0eSJIn/3%2bnSpYshFVVHUWQKCwvp0aMHVqsVv99/Vl2RbzKZuPTSS%2bnR42Ik0djlduNwOI3KRR4vVpuVC7p2pYu1P1JURnIOQLL2Qyo0IxX0NjqyO5w0Ng0iWVdLJBqnsqKMcCSCT9cpKS2jurqa0rIyAn4fXbt2/X%2biAM0XQNcUTGYzPXr2xOMpYtDgwXQ97/T4PXv2RFYUZFmmb9%2b%2bIk/C7XShyCqRUAif7sPpcNBddFzQBymhIblNSGEvUomGZDYaYbPaGTJkKJlkHX5fgIqyUhrqsxTHojQ2Dmb40CGkU2lqKsr/%2by0gL512O4Mam6ipqiYejWExmc8q/266nffdBd3PR%2bpyxnPXnJaNvHPL/hHdzs%2b1%2be%2bg2/l06d7NGKdQUxg8vJnqdAp/NMIAmxWpq/i93c5q0%2bWCbkiCbucjSRPq6DK%2bli5jq%2bkyribH2BqkMdVIQp5CPFfl5OjKnByXLxNtxtfR1egr31/%2buev4unP6%2bb%2bM%2bA0TapHG1SINSSBlg0hNYaTL4kijyo3fcqreScbm24wQ1jk5jVTtR0pHkOqCSDUBpNrg6bSRH6J7XZiLMgkuTEa4KB0z5I/SMS5Ox%2bleG6JLlY%2buVf6/w98r8yFVCvS8/K/Qz5D5dIWOlAwhTUpiSwSpaKqnvClDaUOK4kwt3ngYV9iHO%2bI/hSvipyjko395GGlMFZJoLFX5kSZmkFozSOOTSFMbkC5vQBotNJZEmpgmMHUENXMvZ/DiWQy7bh5V17SSbb%2bKxvYrCU8dgTRQQSqWz8CbR0YaKMg/n5RGWkYq05DK9f8zRFuxSONrcKkyLc0jGDU8x9iW0QQ0DbfDibewCI%2b7MEdhIbLDjSmoIrVUIkmtKbrF3HT327gg7OTCqJsLom66R1x0Dzm5IOjggpCTC8MufhRx0yPm4eKYhx5xD70SQhZhqQkQHBanpKWM8tGVlIysoGRkJWUt1ZSMKKN4WCXFw6oYOLzaoGREDWUja4leVkb/Kp2LSzz0KpfpKSiTz0h7DXqUCjy5dLmXnhU5flwuc2GVRpdJKe75xYOse3Utq156idVr1rDm1TVs3LTJSL%2b48kVWrlrFylUreeHFF1m/5lUW3XsH0vDSnAIsCRfemB1P3JEj5sCbyKW9CSdywmlIbzyHUuxGHehGLXZTFLYzalQJv1rxDM/d%2bXv%2b7c53ee72P/Lsz97n%2bdt3sOr%2bh/n18nms/%2bX1vPqLa3nloSU8f898nv35fB68fhrp5jjemiKCWR1fvYqeUfEJ6hX0tIyWUVDSMmrKi5Ly4C0uxON3ogbdaBE3BSmV8yZn%2bPPu7Wxev5Ynn36GzW%2b8yfp1a3nyqafZ99HHfNffi79/A2nYQKGAJAUDXcilLtTyIpSyIuSyQpSKQtSKIvSKIrTyIrSyIvRy8exBL/fgq/SilhVhjzgY1lLMk3e8x8%2bvhhVtR1nR9gUr2o6zfM6XPHHLQV544EZunzWO5QtbuXvRJDqmDGXuuEbmTL6MmsExPHUygUY/vkYfeoOOT9CoozdqBmqjjtagIWcV3AEPamkJ/XwqHtWDKa3TdXKa3773e95/53dsWv8av9n8Bs8%2b%2bRQvv7iKD3fvhW%2b%2b5ZsvvuSbL09w4vgXhgKe3rD6pAJS9Is6sQfN2EJWbEEb1pDFSNtDVhxhG46wSNsMxLMz4sAZdVAYc%2bGOOilpDLHh8WWsXbGFe%2bZ%2byYPtB3mo4yDL53/JO0%2b8yuHXFnHzxNHMzKZpHz2YK7JppieTTG3OkLwsgSfpJdDgQ89qZ6HWqyj1Clq9gprNpQtjCqZIAHtZHDmkYk6qiEDuX3I5tXe2U3PHQqpvX0DNne2k7l5M%2bS1zKF56NQNvmmXIxNKrKb35Gjztk07HgL4RJxafFbPfhiUgsGIVBHMKsYVsWIVignZsITuOsANH2ElhzE1hzEEsG%2bHNf53N128uYeMvf8OKhV9y7%2bwv%2bPXd2zmycTHHNrRxYN0N3LdoGvPHDGHOiCamNySZPryebHNZTgGNPvxNOYzVb9AMtLxUBVkFb8iL069RVBxB0T1YUjpGHEtFOb8qyPnVQbrVhA0plaicXx0y0l0r/UZ%2b99ow3UVeYzHS6KrTFuCI2LBG7diiNgN7TGDHEc9hi9mxR%2b04Yk5cCReuYhfuhMtQQLwxwqbHFnBi4wKOvTaLPz79Ao/f3Mm%2bl/%2bFYxvm8PnaDo5uWMDnG37C/TdMZc6YBtpGDmHWuEHUN5fgTcqGBfjzpq9lVWP1VbHy9Yqx8sZzVsVb48FbWURRuRtvpRtzRkecZQo9TvwuJ6rTTkSVuWpKKzMmjGPK6FHMmTGNGRPG4i90orkdBBx2bEH5pAUk6Rd34hQTjDtxxB3GhO2JHM6EA2exC7tQQlTUEeVOnImcAoriDuINUTY9Np8Tm5dwbMtLfPHbWzm47hY613dweF07nevbOfRqO8den8Nnzz7J8oUdzBqZ4crRg2gYXoacdwF/VifQoKNlVDRDASpqRiBcQDEUYyinQbiDagRJk1DAxCShuuFUZlopT0%2bkIjOJ9JAraBw5i/SQGWSbryTbfBXl6QmUZyZRnZmCUj8UqaUi7wJRJ7agFWvYhi2Swxq2GtIhVj3qMGKCNZSvE7Zhj9iNOOCO2UlkImx6dD4nNi2m85276Xx9MZ3rZnN43UI613ZweG0HnZvn0Pn8Exzr2MfBZR9w09TLaR1RS9PICrx1XsPn/fUa0awPNa2cQsnIyBkZJZuzBIFcr%2bAV%2bSkvBRkNaVKa1pvepuNfjjL/ngO03XuQtnsPM%2b%2bez2m79xDz7/ncoP2%2bo1xzx24W3HWAodevQhpRkjsImYsLKYo7ccccFCYETooSTjwDXRQV52XCiVvUibsojLty6VjOdaK1QTb/YgEn3pjLoZW3c%2bT5R%2blc91M6N3bQuWkuna/P5shzT9LZsYdDbVs5vnA3u5e8y9Irp5MZWnxKAb4GjWCjnpu82P7EJMWEM3IuEIqVb1DwNuSUoKa9mE4q4ObfMLHtJYZO%2byVj569i8UPHWXT/4TydLH7gCAuX72fmLX9i7m07uGzJc0gjjXNAkr4xp7G65qAVS9CCVSB2BBH5jV3AbkgRFE8GR0vQijNqxxW1EagJ8Nojs/h60884vGwrnQv20XnjVo7c/TuOPPYrjjzxazoX7eLwgu10tm/j4MK/8m37p7za8QQ1Q8PIdTJ6vQh0Klqjltv7Mwp6vWpM1FMvGxgTFwrI5vLUehlzvXCBNGOXvMOc244xc9knXP3Tg8y%2b/ch3Mu3GnVy19FMaF65EGiksoDWFLVGII2DFHDBj9VuwB63YAzbDLexBG86wHYdQRjC3FZ7EJbbDsFCAj42PXMfXy9/j8zm7ONy%2bhcNt2zk8bxed8/bR2baXwwu3cbhjG4fbt/P5wi181f4RqzoeoWZICLk2rwCx1TXkfF0EP6EAkWcEQqNMnAlyeBtELFAwZ33GXWDBozfxwOaHWb7hfxjctfp%2b7j6XNfdz15oHeWDjI0xesQhpeFnOAuwDPbiidsxhK9aIDXtU%2bL4NV8xhmLpwCeEaYlcwdgkjRtiMGOAIOfDVFrL%2b2sf5qv1jDi/cwtGO7RxZtJ1OMeGOrXy%2baKuhgGNzt3GkbZuhgK87PuaVJY9SNSiIUutFT4tgJ%2bfJu0A67wLC/0/GgQYVWewGWQW9QcFUr9OlNckDf5zMyk9m8OSWyTyz83Je%2b2YeG76aexbrT8zhuT3TeOXAFdy4YQJSs7gNtqYMBYjDjzlkwS4UELHiEAglxO3G5F0xO9aIFUvYgiUsZC5ICuvQ69ysbnuc/5j3ITvu3cGKnft46t/3ceja7Rybs42vZm/j6KLt7LpvN58t28mh%2bX/lq8Ufs3rxw9QIBdTI6Cnh07KBkhLmnYv8YrKGFWRVZLH6TRrqIA2lUeTJFNT7DAUsf%2bcKHnxzCsueb%2bHn61tZfXQxrxzu4JXOHKuPLGLlgYU88qeZPLNtFu2rWpGG53cBU8yFyWein28AJr8Ji9%2bEKWCiwG/CHBSnQgsFolw30U8z0V830083Y/abDQX46op4acEjMOcjVq3bxTR289PP9hoK2PPPO1m9dg/3b91L29d7Wf/SHr64ZgtfXPsRG5c%2bTv3Q6CkFaPnJG2d/YQX5qG%2bQyfm%2b3KgiDxJoaE0KBcICJiW5583prO3sYOX%2bBbx0YAErPzmXNlbtX8BzO%2bfyyidtLH5p8mkL6BOx01/uS2%2b5L32VfgzQBjBA609fdQD91ALMegH9lQL6ygX0U0TazADFhNlnwRVyoNa5WT//Cb5d/Al37d7F7OO7uX3/Ppi3gzWv7mEGe7jm%2bG7mfbWXjS/v4di8v/LVws/YtOxx6pujqGcoQMtP/OSeL0zeoFEzLKCoyotnYBHegR7kcg%2bmrE6XiSmeu/p/8uF1b7NtyetsW/w677ev488d60/xfvt6/tKxgT%2b0r2Hnok3cfeW9J3eBFH3CdkyaiYI8YmImn5kBukibsfgsmDWzUccsVl4XecICLNhDwgU8PHrVUnY8tZ%2bFx/aw4NAuFh/Zw4ub9vDku3u5%2bts9LN%2b1lw8e2cWx%2bds4cs0ePnnhLZ559ickmxJoKRlffus7ufJnngIN38%2bqeBoUPIEi5FgUT2kxiuJhQL3GeZMybJjxMr9rXc268b/i9daXOd6%2bj6MLd5/iWPseDrft4M9XvMmHV/6Bh6c/gTTqpAJCdgYoBcZq91dNFOgWCjRzHgsm1UKBamGAajakScuVi/uD2A0SySCjh5Uy4baF3PDFfto69zD76C5msoefdO5jzat76bx%2bBydm7uTI4t28v/EZ1rGER5%2bfS202gVYvE0irxurnyPt9Y/4uYJz%2bNLxZGU9Epihbg2tUI2pAoSCrGwrYPP0l/jx5LW%2bOf4F/n7qerxbs5su2Hac40bbTUP62GW/w2cx3eWza42coIGzHLFZfN2EyfNti%2bLfFb8mtvu/kpC2YdAtm3YbZZ8MWEMHSRlkqyKSWFNbEAEb881xuOv4p9%2b7ax8Zf7%2bbAsp18M2crnfN28Ml97/Gbnfew6vgc1p1YwmNPLSDTUIxerxDK6sa7AC19WgHGHSB/JhCHI29aNixACYeQYxEUzZOPASkebnuGP/3sL7x9y3sGm5e%2bxealvz2Dt3jjprfZsPRNfnfLeyyb%2b2DeBSan6Bt20F820Uc100%2bzMECzGsror5mNdH/VQh/ZTF/ZTD/FQn9V5IlDkTgI2SlLh5g2vgG9VsGdtDKjYxbHfroPZm7j0%2bt28Keff8jRBbvY/b9eZ13nDaw8Noe1X%2bYU0JgtNU55pYPCxBr8xssQMVlxMjQUkT8RKmnFOPoW%2bdzIHhnZK%2bNVCo1tUGpNM/6tV5h/aAezP/2AOfv/yrwD25h7YOtpPtvKvIPbuWrHu8z7%2bAMGr/5XpOb8Qah/1IXFb8MsrsJ%2bmzExcQ22BG2Yg478sz13VTbyxd3AiSvqMrbHskyI6eMbCNaqhDI%2bXFVW5k2awd67PuLWB4/y9Ir9sGgLx6/eyee3bOEPv32cNd8u5pGn5jJkUAVFaS/FTSGKs370/B3AeCdgXIFzShCWIadlvGEv3mQFhY21ORdIa3SZnGbiW6uZtPbfuOwX9zL6xafoOPoh7Yd2naZzD237tzLjj5uZveX3DF752OmDkLm4iMKIG2fYhSvsNF5yuCNOXBGXgVtwZl5U5LkpirlxRR2UJIM5C6iS8acU41pbVGVl2FVXMv%2bBTu687ygv3rOf92/bx/G5Ozgyey8fPvE2jz10A5cNLacoIxNq8FHaEDJei6liR8ifAo0dwNgRxN6v4QkreMtK8NSUo/iU3GWoNc3Uv7zJkm8PMv/QLhYe%2b5DF/3GQxd%2beywFmf7KF9s59NG/61WkLsISd2BUTVtWMTTNh95lwCHQzdt1kYNUHYFVP17FqJgr9FtSwnaoaH3MnNFGa8lFa76NiSICqpgjFSReTZszk5oc%2bZf7Dh3ljxT6%2bufYDOq/7gK8W7eW5G%2b6keUiCcFolmtWoqPcTy2gEUzKBesXAnxUKVQg0KvgHKSiJQtSAByXkRQ06sdSrxnU4tegaWu5YyojbbjQYfuv1f8OIW69n5K3XM/bOmylZMANppPFdIMWlmRD9kn76pPz0TQXomw7SNy1kgD4pgZ/eST%2bX1vroXZdPJ330SfrpV%2bfH3hSjemKW%2bKQkkQk1DJyYJDGhjoGtGWJjyim/YihV17RQe%2bVIUle1kLq6hcw1o0lOHYI6ogxLU4SCprAhrU1R%2bjeF6d8UYsCgMP0Hh%2bl3WYh%2bQ8IGfYaE6DM4QO/BQfoODtBjaBRpYh1OtxOfU7wQcaLl0V0u41l1OAxkh4PCgIbidmPxefJvhKakkcbW0mV0DV3G1OTkOXQdU8t5Y%2bs4b2wtXQVjcnlGemwt0uhqpJEVSKOqzmZkJdK4utybl2EludfQgua8HFGGNKoSqaX6b%2bhyFjUGRp/i%2beTvEnnj6oyjsHhNNqplNDNnzWJi6yRGjxtH65QptIwdx4TJrUyePBlfZSnO4VmU2gps8WDuC5dwgaJYkHAoRCAcIngG4jkUCaP7fciqiqprRtoXDOAL%2bI1ngT8UNOqdbGekI2Fi/iC9UwkG1BUTC4YJRiPGF%2bRwJGyMF4lGicZjZ4wbJhAKGmOc2V8wFCQYDBKJxwhHI0Z9QSQYwlESMSxAfBcMqjrhYJCQ30/Qd5pwIEgsKD786shlxfgCAexR/2kFOIM6Pi03Gc1AR9NycsjQoUy9/HLGTxjPpNZJjGppYVTLKMZNmMiIEcOZPGUKyWQdXtmL7tPz7TVUn47fq3BJbZQ%2bVRECslBgrl816McdC1FaUc648eNwFxai%2b3zGeKqm4pXl3G8QKCrKwBj28jhNTYNpbMxS5PGg%2bXz4VA1rPGAo4OKYQv%2bSIH0H%2brk0odOn2EfvhI9%2bAwNcElO5KOShZ0SmZ9BDr6CHfyrz5d8JTkpSqMqECmX8RTKBc4j7glTGB5IqryJTUW2kK6JxSsMxKmPF1AwsI%2b4L4Cv0ntXO75GJOIq4tDJMv7IQEafHyDPKPQo%2b8Tle1amIJtDdHgL5MtGP5iw06hh1C734ldxiJHwhSoJhfO5cXyG3F0dINz6NnVemU3x5C8VTRxKe1EyktRm5pYHI5OH0yQ5ESniQShSkUiX3SU58XxwlFDAlzY8aiumVTtAz87f0SMX4UV2Ef6oNG1xUF%2bWiZJSLk1EjLcp6pOL0%2bo62lyTjnDeigm7N5Ub6VFk6kRsvneDiZIxemeKzykR/Z/WVjtMrFTfyLzbGytUXfVw4uARpWgZpcHGeBNJl%2bbQhE3/LoHguDo2pQhKfr388rIofD6/mx83fgcgfXnMWlzRXc8mwKi5prsrLai5urqbXyfr5tpcMr6b30CouHVplpM/tt9ewynz/5473Xb/hNKJdr/z4lw6ppG9TGX2GVdN7WPUpeSZ9voPezTV0EZ/Huw8tN3w1KKuGn/5DvAoR3W8EuKgvQCwQIqFopDWVuKLi/579BIVZF3qMsb/XuGe0iwdCxHwBwqqOFouglibwK3%2b/jf8cRJ6uanQdVIzUvbkcVdPQTwad/wIRqESwy2QbmD5jOuPGjWPU2DFUB3xMjOhUB3RkUe979yUbY2tG8PzHiLr%2bQICJrZOZIoJvOokjXUHhkBRqwH8qcP/DsXUdRfzv0iChgGHlKIqSi85iq/seiA7EP1T58pHbp6mU%2bVRDft8%2bxHger/cHj22ML3YAvx9dVZGjIbyJyA9qr4l2et4CpIlJhBJ%2bCN0EQ8voNkyQez4vL39oPz907Fy7svz45XQfWkb3IWU/vA/xPvB/H97%2bE/ecKqfG%2bA6BAAAAAElFTkSuQmCC' /%3e%3c/svg%3e)
Prescription Edit - Once you have the prescription adjusted to suit your needs, assign it to the field by pressing Save.
- Finally, select which attribute will be used for each drive section.
- Optional – If you want to assign prescriptions to additional fields, repeat steps 2-7 for each one.
Use Prescriptions to Control Your Implement
After you have assigned a prescription to an active field, you can use it to control the implement.
- From the Home screen, press the control button for the system you want to control, such as vDrive, mSet, Nitrogen, Depth, and Granular.
-
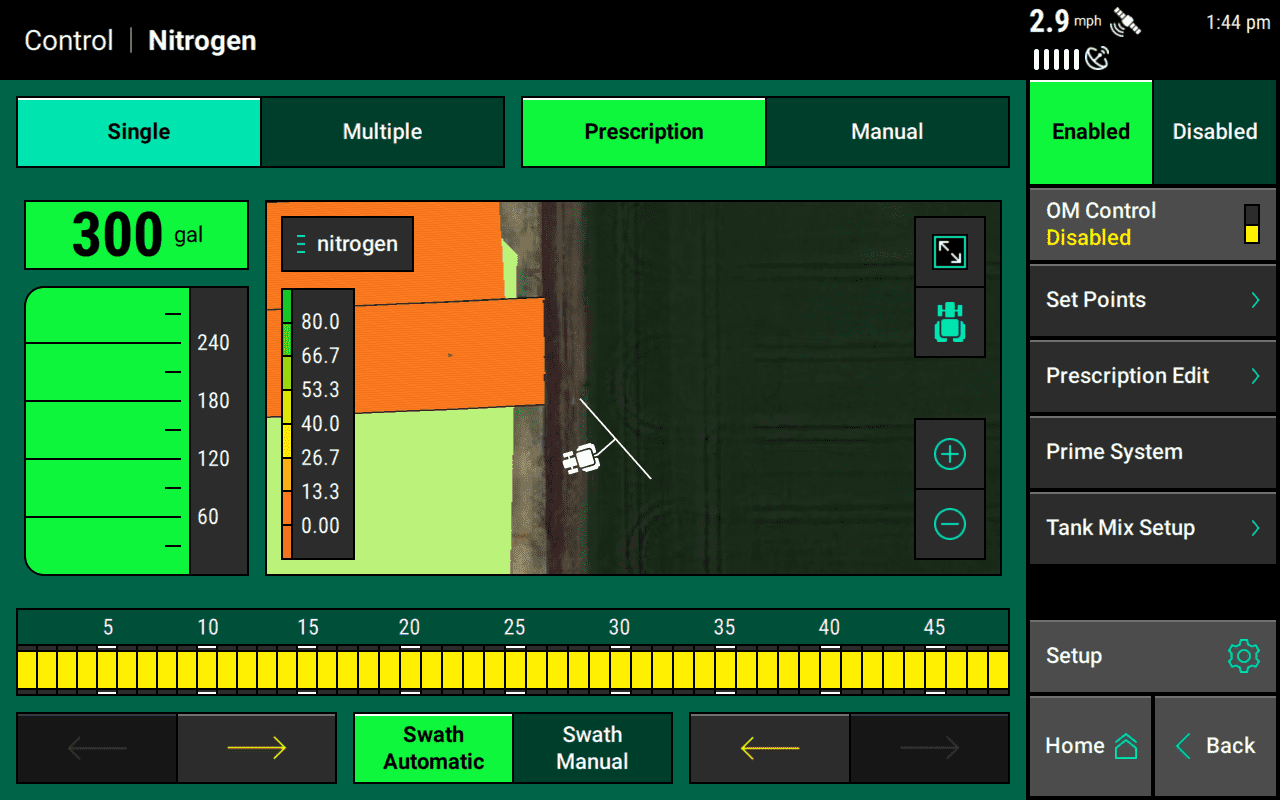
Toggle the system from Manual to Prescription control at the top of the screen. When Prescription is selected, the system will be controlled by the assigned prescription.
Below is the screen. Notice the active Prescription toggle on the center right
' width='1280' height='800' xlink:href='data:image/png%3bbase64%2ciVBORw0KGgoAAAANSUhEUgAAAEAAAAAoCAYAAABOzvzpAAAACXBIWXMAAA7EAAAOxAGVKw4bAAAXb0lEQVRogdWad3Tc13XnHypRWYQyDRi06RUzmF4xgzLohSAIgiQaQYEdICmSACWRVKHiEifynjgn0rHsPbZiS4kdyZKdqCtWdpPNbrIl53idEydZyyVSJEVWs0SKkvzZ836/AQjKcta7f2X/%2bJ573/39fq/cd9t7M0IIwf/vKCgoUGhLq4lkMkF7u5fKykqMjY14PJ4b3q2urkav13NTTQ3V1VUI%2bXFrWxvNzS3Ky2aLlaYmIwVC4PZ4mdw9RTQSxulyEYlEcDjs/2YVYLJY8Xf4sdttVFZVYrWaGRkdpbCocOPdbdu2YbPZsFqt1NXVIeRC21rbcNgdBPw%2bPG43bS0tigIcDhcz%2b/aTTacYHh5lYW6OoN9P4b81BeRpW0srw4NDpBJJgh0B9Fr9r/F9SdEnPyhStfqJ2FKCKCtR6Tq/GVs%2bhtJihNyFwv8LyG8%2b3tcn9b2lhILyLcq8rE47u/dP0TcyQDAeosncTHFFCSXlpWqfcg5FRRQUqxBKe64bzbEJtMcnN6A5Pkm9ItuF7sRudCcm0RzbhVahExSMxxBjUcR4VKWbMb5Jvk73dlJzeADt8WE0x4bRnBhGs84f34RN7dKpFGI0cmN/Sp8xFZvHmogicnEq7w2ifS1N/T%2bk0P84i/EnPZivDlP7QBThtSASDkTMrkLynhaEWBmn9Ad/QOmPH6X0xT%2bi9EePUPq/vqlSKZP0xUfY8uIfseUn36L0%2b19HZLxqBymXgoK0G5F0UpByq/KkE5FUn4m4A7Erzva/SVJ7pZOaNzupeT1N7TsZFW93UvtW543822lKjroRQSci7VL6K5RjKP3ZFRRIXo6jULmoDkofjLCVBFXXElR9GKfyaoxK4pQ%2b1E5BwIXI5vtIOREZD8JvQojlMcSL30C8/Bjip48i/uU7iO98BvHAKuJ3TyO%2b%2bwVV9tNHEK88jvj7hxFZ78bghRkvPWeP0Hf2EKO3LSu0rNuvPpeTTjgREzEqvh%2blijhV78Qo/66bsscclD3uoOybNrZ8xULZt%2bxUvhym6oMEVVdjFB13IUIuCjJuRNSCfXaUiYuniR3dT9ctS2hGEoiEHdEpF2VHRP1s%2bVqU6r/zU/H7Nsq/aqP8PjNbv9dB0UMemgdy5M4dpv/sIYZWj5FZmaeow4wQJ8YQP8wr4J%2b%2bhXjpMcSL30T87dcQ/%2b3LKv9SXjn//DjiBw%2bruxuxqqYUtVGeaacy62NbT5Ct3QEK5a5HbepuhW2InVGq/meYbR9F2fpulK3vRKh%2bLaTipSDVr6i8lG%2b9GmPr1QjFh%2b0In01dZNRGcdJFVVcHVVk/1V0fGyNiQUR8bPlKhG0kqH45ytZXowrdRpKyh/wUBd1U9gep6gtRlQtRkQsifG0IcXM/4q4FxD0HEXcvIu48gLj7IOKemxG/saTKLy%2bqkPyd86oPjkQQo1EVw2HEkERIxegmn5V%2bPJOh8K4Uxb%2bVoug3VVp8b/qX8bkUxfL551IUzMl%2bN/m/7GckpGI4dGPc2RlB5BKUPBCgkgjlb0eoeC9Kxc8jVBKj%2bCtuhMeMiFvzypK8DeFtRoiDOcR8BjHXiTiYQRztQhzpQhzOUiD5%2bU7EbKf6juTnshTd3MfWIzm2Hc2x/WjfBnYc66P6SI7SpRtRdDBHwUwOMd1Lwd4cYm%2bvwn8i9uaxkEOZ2yYUbIK4OY%2bDvRQs9SHme9DtChJfyRA%2bkSF0LE3waIrgcpqOqSTtiRjt6RjtKRW%2bzjgWnyyS5nop%2b0aYqpeiVHzXT9kX7ZQ96KD8IRdlv2ej8m/DVP04RtXfRdj6j0HEPQkuTdl4bI%2bOL0008MC4li%2bN6/jyTh1fHNfx2P4Gvn%2bske8dMyr0rw43cfzoMNP7%2boh5HSSzPoyBJupsWrR2HbVWDfVOLRq3jnqXVoXknTo0edTnofVoMbTr0Tr11Ju0aM0SOurtesTuGObuFKuHVrl822c4cfAM505c4PbTl1g9eYbx0THGhkcYGxlldGiYUCBMIhZHiNleyl%2bIsY0U1S9FKD2qo/SYnpKDWkqWdFT%2btZ/K/%2bGn%2brUY24kjPp/kvv02JqJm3B0%2bhrrS9KYT9KaiRCJRTmdb4dZGfnG%2bCc4bubrWzMWVEU7OjtHv85HrCmDqaEJv1dAolWCtR%2b/Q0ujSY3Dq0Du1KnVpMbgk1WFw69C5tejdWhratTTa9NjbPbQE22mz22i0NSAmY5j7U5w61s3KSpZzZ1PcdmuaI0dyDI%2bMMzQ0yKCCIfoHBjh7soGurhBCzPRS8UKIbTJC/72Pst82Un5fC%2bX3tyh89Yt%2bqn/oZ9u7UXYQRtwb59/ttREOOtBGMoxMzTI8vcD8kRXSY/uYjZv4YK2Rd1ebeO%2bskfcutvL1P9zP8ZlxerxecpkAJp8RnVWDQSrAVo/OqaXBbUDv0Cm83pmncuEuCZVvaDdg9BlothloCXfQHAvQ2OHBKBWwO4Ypl2RxXxeLB5IcWUqwdDDBvukMvb0DDAz009%2bvoq%2bvj%2bk9KZLJKEIs5ii6kKTk83GKPxOj%2bDdjlPxWnJJ74yp/b4Li%2b5MU3Z%2bg5P4Y4lQn9y3Y%2bMqQkTv6W7irx8Cl7gZu62niVKeRByeb%2bFDZ%2bSaunjPy0cUWnvpPC%2bze30/W5WagK4jF36TuvE2Lxlq3oQCdVIBDq7R1Do1iDettvVOjWIrkjVYDjXYLTaF27B0%2b9CY9Yk%2bS%2bogXa4uVphYrzS02Ba2tVuX84nK5cDqdG3DYPbS2yiww30fhhTSl34hT%2bnCc0j/I04fjbHkoTsnjCbbeHMDg6MDg8yH6EvzOSTtfOKTj9oyBi71GvjZphPMNiunL3X/nrJGfnzPy9hkjb55r4tGvD7OwP0XO61IsQFWABoNdd4MFqIuVu69agNahRevSKr6vdWvRuLRovDp00gWsNhw2O1aTGb3NgJhOUhN2M9SbY3znGKOjI4wMDzE2NkY4FMJul0rIK8DhwBnw0WqWhdD%2bXsr/Q1hxga0KYjegggiGe1w4NSY8VhOVmRCXT1uxH2ilIzGIM97NrpiNV1YMvHLKyCunGnn1VOMGfeOMkXfWmnnzTBP7wyZS8Q6cgeYNBWisqgL0br1qAesKUExfh9atQuPRKqj3ajFYtFgTYWo/f4tCG8w6VQEhqYA%2bJicn6enpZWxslPHxnSTiMRwOB263G5fbhcvpxBXsoM0iC6HZXsqeClP9bpSqV6NU/ct1VL8SpfznERou%2bxmI50glYpSkA/zOWRsTS0Z6ugfp6s1xKGvj2moD18438f5aE9ckzqtUbRt5f9XIfMREZyKAL9imLtwqXaBe2XmDW5%2bPATp156X5SyuQCvCoGUDn1aH162hsq6N1Zx8Vz32Btp19NLTUI/amqAm6MBmbaGpuprW1leaWFpqbmzGZTFitFiwWFWazGavFgtFozCvg0SBVLwep/McglT%2b8jqp/CFL2ZoiGe/zs7p2gN9tJUbKD3121MX3IQCY7SCiR5EDawtVzDVxZbcrDyLvnjNfbMh6sGlmKmcjGg/jDJjSWvAIsahYwyCzgkFngugsoFiADoEfNADqnBp1bg86iodVloyXqo81lQ2fVKTFAE2unw%2b3F7nQoJq/4ukPl12OAtAKv14uvvR2Led0CXohSLUvIqwmqr23ClQQV70fR3eGm5aYmrKZWtmQj3Ldm5egJHfFkL/5wlIWUhatrRq6cb%2ba9881cuVXFVYnzEqolLEXbSIf9eENtiguoQVBVQINbTX9y0VIJMgDq19OgR4feq8YCncwM8rlDi17GD4cGrVsNgnVRLzuHRpjeO82uXZNMTOxifn6eXRMTjI%2bPs7S0RFdXFqvZgjMcyMeAdRe4kjf9n11H9WtRyq9E0N3lZaxzmJ5MioJkgH9/zszasoZs7xjZXB9LnVZ%2bcVLDL07p%2bMWKlg%2bXtVw7ruHqCS1XlnVcPW1Q3OBwzERnLIAz0orWXEejTY0B0uQbpAus7750AYdmwwoUV3Bp0EgryMcGvUePzqPPu4ceMZWkPtpOtCNId0%2b3kuq6e3qU/N/V1UU6nVZSYCQcxmG3KzVMm2ldAY/8ahcofz2E9k7PdQUkOvjCXR4ur9YTinWTSHWyr9/L9x%2bI872vZvibr3fz3/8wx399ZID/8vgwf/X8Lh796iB3HowyHPbQkwiQHgwru99g0aK3q9G%2bwWXYUICyu4561RJcGmWXFXneIhQFWTVKLSGp1qm6QG3YjcNkoc1sUvxcQvq/pNL31VhgU9xCZoKWlpZ8JfhnUeUcrZj9h5vwfoKKa1F0d3porWlWXSAV4rbnprn7DhPJVD89mW52Lmb5zru38p33LvDtKxf44/cv8cSHd/DEtUs8x5188a9XmFkaJd3hJeo14wi34u/00WDToZOxwK5RgmBDfveVmGDXYbDrMdi1SmwwbLIMvUWHXfq2v11ZjN4qXSBBXcSD3%2bXB7XEr/v7x3L/RdjiVbNDa2vrrWYD%2bLi%2bjncNKECyM%2brj03Rku32YilughGoqycyHNs2%2bv8uxbazz75qqCZ95Y5enXz/Gn753n9//iGOeWp0h73Vw4d5oHvno/vpQXb9ytFERSAdIF5GJ1EnKhdo1iGWpRlKeKK2iVtGdNRGiZGcWmpEFVAdIFJsd2Mn9ggbm5Wfbv38/SoUOK78/OzhIJBRWFSUXIYNjW1vbrxgAPfZFeMqk4hXE/l56b4bOnbMSSPUQCEcbmUzzzzhrPvHWep99au44313j%2b/Vt58M9PcPuJvXT72vnsnRf59G/fTb25DovfhC1kod5ap6bBvDtIaPJUpkMJjcwAeQUYLDpsPi%2bm7iS2di96WQfIIBjx0O5w0e7z0dHRoUDeZEvq93coC5cKUFzA6bzuAv%2bnLKC9w4W5vg2nzUJpOsiFp2a4vGgjkuxWXGDXYoan317lmbdVBUgq8dQba/zptdt44PnDLC9NkA36SHnttMoTn0x/Fk1%2b1zUbaVDZ7c3InwV064qQvFWvVIB2kxmbyYzOasjHAA9OswXzpny/DtmW1%2bHrafFGBTz6r9UBQZo/G2ayexy/10VxKsDFJ2b5jf0uvB1RUrGU4gKKBfwKBXz52SOcXpgg0%2b6lJ9KOJ2ZWor%2bMAXqrPBDJOl9Hg12nuoD0e7saINWSWLqDDIbSMjQYzDrsAT/W7qR6FrDk02DES8QfIBQOEQgEiEajBDo6CIXDihW0t7er1aDLhafduykLPJmvBF%2bLUvX6dVS/KivBMA33dNAV6KTd7aSkM8Dtj89webidaCrHSP8oo7OdPPnmKk%2b%2bucaTb6zy5BuSrvHE66s8%2b/6tfOlPDnNy76iigFTIgz3aqiigSQmCGjRysTITyPa66csYkFeACjVDaORx2aTDFg/TtqsfWyyMXsaA6RQ7Ak6lFD6%2bvMzU1B6Wl5fZPbkrHwcOsW/vNA6nA5fdgSMSpFUphWfkWUDepsap/kWcaq5j60dx5Sygv9uFS2PBZ7dRmurg8lMHuHdPAE/QRcDvZOZEhr/48Hb%2b/FoeH6j4j1dv5y%2b5yLeeO835%2bV30hf3kQl6c4RZ0plrazFoaTHXoLHU02DQ0KUdkDTpZ4MhTorVOKXYkDDL622XxVI/BpMFqNmGzW7GZTOhN2o0s4LU7cHncGzu9seMej2IB6xnhehCc66P4s0nK/yxC2XNRyp6PUP58nj4bYct/jrLjlI9ml5emoJuSXJiR%2b3Zzx5/MceaRGc4%2bOsPat%2be4%2bOwiF59Z5FKeKnj6AHe8sMgtvzfD5PwIHdkQvnQHxqSdHf5m6v2t3ORrZntHM9sDLdT4W9gRbFV4BYo8j6Aq26G0m9je0cKOjha2%2b%2bX3LYiZLCXWRipLtlBeWUFFxY0oLy9XsFlWVlaGEPI%2bbTaH2NeDmMljf/cmvke5bxML3YgDPcj7AzHXk4e8M8zzM10q9mXyfPd12UwWMS%2b/l3d9PdepxGKv2l6n6883Y/3bzVDms%2bm7wwMIY93/w09rM1mKdkUomoxSOBmlaDJG%2bXRKaV9HjOp9GYonYxRORCnapULKSiZjansyqjzfLndidyzfVuXyvbKpJIUTEeXdgokIFdNpKqfTCi9l8tmWqQTV%2bzo3%2bpco3hVj2/6sOnZeJmnVXtlnQpWNhxH70hSaDZSKAkq3bKG0tJSSkpJfidLiEoqLixFiMo1IRxDZGCITQfSk2LFnJyIbVSFl3SnMSwcQPUlEp5RFEd1JWhfnVJl8Jy/zHD%2bC6E0hOmWf6rvNi3OUjfUj0iFEVxyRCKDdvwfD3F6FV2SpECVjA7QdnLven%2byjO0n78jFlXkpbkUdpPbhA%2bfgAIh1GJCOIvjCWgRSj/YPKWaC7u0e5%2bxscHLwRAwMMSDo%2bSiIeR2yfj3FgpZbFk3UsrNSydEbLqUttSvuAhJTdouXkxV%2bWndosO1nLoTP1nLts4eCpeqW9LpfvHTlnYGGlJv99DacuNrNyezPzyzUsnpJj13D4nEF5d/O3S2fqOXu3eaNPZbyVWlYutHJk1cDcci3HT%2b/AtminobuTU0ePcW5tlVOnTjGxc6ey6KGhIRXDQwz3D5A8PEvk9uMkUkmE80yQD34s%2bOingg9/IhT%2b6g9VXmJd/v6LKr8ORSbfk%2b1/Enz0koDXBfyz4MN8ex1XfyS4lh/jg58IeFnAK/nx5Dj5PtfH3jwOrwp46ca5SCrHvvYjtW/eEJy838CORBdLs/tZvPkgR48eZee4vA0eYmRkhOHhYQUjg0N0z%2b6h88QiyWQSsf1gkvnzBhZuNSj04MUmVj7jUNrrssXbG1n%2blI2583oVazpFduJTNubX9Cyc0TK7rOHAaS2n77Qxf0LL7PF65pY1zJ6oZ/kOC0cutbCwqmNRjnFez%2blPWVi5x8L8OR2La3rmz2mVsWWfsv/r4xg4/TkHC7c13DCn5U/bOXRnKzNrBo5e0GE76kGXjtObTpNIJkgkEnR2dpLNZpWFSj6TzSrtbLqTnkxWKZaE2JtFRELXEQ0jErEb2qVdGSpyPZRkM5RkMhRnMpR2ZanKdSO65C9HfVRdHKPqwjjbL%2b%2bm%2btMTVF3eSeXFcarv2kmJjNCdMdXXpQ/HO1S6HlMG0oiBLsqz6jiyfzlOSaaT0myGyr5eRDKGCAcR0fy85BxjEbUdDCEGY5j6Ekoh1JvLkcvl6MvlGOrrJxaP093dzUBfPz29vQrk3UAsFkMUjUXR1d6Evq4GQ30throa9Pm2pFLW7rTjczoIeu2EfHZiARuBdjt%2bhx2T203Z5QTaD5JoSVP7l%2b3UPuel9gkPmp8l0JFh69faKWg3U5i24VsYI3ZoisThKSqybgqjFsSgD21XBwGrlXaXg2iHnbDPTqjdjs/lwO9y0NZoQFuzQ5mfMsf8fPX1tTRu3UZx2Ip5JMvc1DQTk7vYPTnJ0MQ4uf1TpFMpcoMDDEyMs3d6mt1Tu5naM6VYiSgai1FXX0ddfT06vR6dXodWp6Veo1FkGo0Gh6yeXC6CQQfxmJ1cr4VY3I7T4aLJ7aXw7gRVV6JU/CBA%2bbNu9WfvP3ZS/oKHKhKUPexXfumtHIyQXlkgtTxH8sQcmrEUImZDDAapzQZwWx14fS4G%2b80k4jZiMTsut1q1NRqN1NbWKvOS89PqdOgNBuq1WrTbb6IwYsM8nOWW48ucPnuW286tMnZ4gfDJRVKpFF2jQ3RNT3JqeYULFy%2byfOK4mgWkAmTH8g9Dn4T6%2bvqN05Pd7sRmU6nd4cTtsGN0eSi6I8HWn0WofMFLxbedVDzrpuJpNxWPOdn6VpSyB30Ij4WtAxHCS3vwzo0TunkK3UgKEbIgBgLUZAK4LTZF2fLEJseRWD%2b/NzY2UlNT88tzrK9Hu20HhWGbYgETg8PKz18y%2bA2PjDC6c1zx/4H%2bfkbGxjaC4ejoqKIYIassqYR/DaUTSRW7PoaJJMW704ibuyg8maZwLUPhrVkKz2dUSP5MJwUHU4jJpPJPETEaRIyFEaMh5Y8TinxfhsJ9WUp3Jjb63TyGpMXjcQp/xfyKR2PKadDYGSKbSBJPJpTAJ008lUzh8/mUk%2bG6TJGnUsrZ4H8DUkkV2FCqeCIAAAAASUVORK5CYII=' /%3e%3c/svg%3e)
Control Screen Prescription
Edit Prescriptions
You get a first opportunity to modify a prescription when assigning it to a field. But you can also change your mind later and modify it from the system control screen.
To edit a prescription already assigned to the field,
- From the Home screen, press the control button for the system you want, such as vDrive, mSet, Nitrogen, Depth, and Granular.
-
Press Prescription Edit (right).
' width='1280' height='800' xlink:href='data:image/png%3bbase64%2ciVBORw0KGgoAAAANSUhEUgAAAEAAAAAoCAYAAABOzvzpAAAACXBIWXMAAA7EAAAOxAGVKw4bAAAXb0lEQVRogdWad3Tc13XnHypRWYQyDRi06RUzmF4xgzLohSAIgiQaQYEdICmSACWRVKHiEifynjgn0rHsPbZiS4kdyZKdqCtWdpPNbrIl53idEydZyyVSJEVWs0SKkvzZ836/AQjKcta7f2X/%2bJ573/39fq/cd9t7M0IIwf/vKCgoUGhLq4lkMkF7u5fKykqMjY14PJ4b3q2urkav13NTTQ3V1VUI%2bXFrWxvNzS3Ky2aLlaYmIwVC4PZ4mdw9RTQSxulyEYlEcDjs/2YVYLJY8Xf4sdttVFZVYrWaGRkdpbCocOPdbdu2YbPZsFqt1NXVIeRC21rbcNgdBPw%2bPG43bS0tigIcDhcz%2b/aTTacYHh5lYW6OoN9P4b81BeRpW0srw4NDpBJJgh0B9Fr9r/F9SdEnPyhStfqJ2FKCKCtR6Tq/GVs%2bhtJihNyFwv8LyG8%2b3tcn9b2lhILyLcq8rE47u/dP0TcyQDAeosncTHFFCSXlpWqfcg5FRRQUqxBKe64bzbEJtMcnN6A5Pkm9ItuF7sRudCcm0RzbhVahExSMxxBjUcR4VKWbMb5Jvk73dlJzeADt8WE0x4bRnBhGs84f34RN7dKpFGI0cmN/Sp8xFZvHmogicnEq7w2ifS1N/T%2bk0P84i/EnPZivDlP7QBThtSASDkTMrkLynhaEWBmn9Ad/QOmPH6X0xT%2bi9EePUPq/vqlSKZP0xUfY8uIfseUn36L0%2b19HZLxqBymXgoK0G5F0UpByq/KkE5FUn4m4A7Erzva/SVJ7pZOaNzupeT1N7TsZFW93UvtW543822lKjroRQSci7VL6K5RjKP3ZFRRIXo6jULmoDkofjLCVBFXXElR9GKfyaoxK4pQ%2b1E5BwIXI5vtIOREZD8JvQojlMcSL30C8/Bjip48i/uU7iO98BvHAKuJ3TyO%2b%2bwVV9tNHEK88jvj7hxFZ78bghRkvPWeP0Hf2EKO3LSu0rNuvPpeTTjgREzEqvh%2blijhV78Qo/66bsscclD3uoOybNrZ8xULZt%2bxUvhym6oMEVVdjFB13IUIuCjJuRNSCfXaUiYuniR3dT9ctS2hGEoiEHdEpF2VHRP1s%2bVqU6r/zU/H7Nsq/aqP8PjNbv9dB0UMemgdy5M4dpv/sIYZWj5FZmaeow4wQJ8YQP8wr4J%2b%2bhXjpMcSL30T87dcQ/%2b3LKv9SXjn//DjiBw%2bruxuxqqYUtVGeaacy62NbT5Ct3QEK5a5HbepuhW2InVGq/meYbR9F2fpulK3vRKh%2bLaTipSDVr6i8lG%2b9GmPr1QjFh%2b0In01dZNRGcdJFVVcHVVk/1V0fGyNiQUR8bPlKhG0kqH45ytZXowrdRpKyh/wUBd1U9gep6gtRlQtRkQsifG0IcXM/4q4FxD0HEXcvIu48gLj7IOKemxG/saTKLy%2bqkPyd86oPjkQQo1EVw2HEkERIxegmn5V%2bPJOh8K4Uxb%2bVoug3VVp8b/qX8bkUxfL551IUzMl%2bN/m/7GckpGI4dGPc2RlB5BKUPBCgkgjlb0eoeC9Kxc8jVBKj%2bCtuhMeMiFvzypK8DeFtRoiDOcR8BjHXiTiYQRztQhzpQhzOUiD5%2bU7EbKf6juTnshTd3MfWIzm2Hc2x/WjfBnYc66P6SI7SpRtRdDBHwUwOMd1Lwd4cYm%2bvwn8i9uaxkEOZ2yYUbIK4OY%2bDvRQs9SHme9DtChJfyRA%2bkSF0LE3waIrgcpqOqSTtiRjt6RjtKRW%2bzjgWnyyS5nop%2b0aYqpeiVHzXT9kX7ZQ96KD8IRdlv2ej8m/DVP04RtXfRdj6j0HEPQkuTdl4bI%2bOL0008MC4li%2bN6/jyTh1fHNfx2P4Gvn%2bske8dMyr0rw43cfzoMNP7%2boh5HSSzPoyBJupsWrR2HbVWDfVOLRq3jnqXVoXknTo0edTnofVoMbTr0Tr11Ju0aM0SOurtesTuGObuFKuHVrl822c4cfAM505c4PbTl1g9eYbx0THGhkcYGxlldGiYUCBMIhZHiNleyl%2bIsY0U1S9FKD2qo/SYnpKDWkqWdFT%2btZ/K/%2bGn%2brUY24kjPp/kvv02JqJm3B0%2bhrrS9KYT9KaiRCJRTmdb4dZGfnG%2bCc4bubrWzMWVEU7OjtHv85HrCmDqaEJv1dAolWCtR%2b/Q0ujSY3Dq0Du1KnVpMbgk1WFw69C5tejdWhratTTa9NjbPbQE22mz22i0NSAmY5j7U5w61s3KSpZzZ1PcdmuaI0dyDI%2bMMzQ0yKCCIfoHBjh7soGurhBCzPRS8UKIbTJC/72Pst82Un5fC%2bX3tyh89Yt%2bqn/oZ9u7UXYQRtwb59/ttREOOtBGMoxMzTI8vcD8kRXSY/uYjZv4YK2Rd1ebeO%2bskfcutvL1P9zP8ZlxerxecpkAJp8RnVWDQSrAVo/OqaXBbUDv0Cm83pmncuEuCZVvaDdg9BlothloCXfQHAvQ2OHBKBWwO4Ypl2RxXxeLB5IcWUqwdDDBvukMvb0DDAz009%2bvoq%2bvj%2bk9KZLJKEIs5ii6kKTk83GKPxOj%2bDdjlPxWnJJ74yp/b4Li%2b5MU3Z%2bg5P4Y4lQn9y3Y%2bMqQkTv6W7irx8Cl7gZu62niVKeRByeb%2bFDZ%2bSaunjPy0cUWnvpPC%2bze30/W5WagK4jF36TuvE2Lxlq3oQCdVIBDq7R1Do1iDettvVOjWIrkjVYDjXYLTaF27B0%2b9CY9Yk%2bS%2bogXa4uVphYrzS02Ba2tVuX84nK5cDqdG3DYPbS2yiww30fhhTSl34hT%2bnCc0j/I04fjbHkoTsnjCbbeHMDg6MDg8yH6EvzOSTtfOKTj9oyBi71GvjZphPMNiunL3X/nrJGfnzPy9hkjb55r4tGvD7OwP0XO61IsQFWABoNdd4MFqIuVu69agNahRevSKr6vdWvRuLRovDp00gWsNhw2O1aTGb3NgJhOUhN2M9SbY3znGKOjI4wMDzE2NkY4FMJul0rIK8DhwBnw0WqWhdD%2bXsr/Q1hxga0KYjegggiGe1w4NSY8VhOVmRCXT1uxH2ilIzGIM97NrpiNV1YMvHLKyCunGnn1VOMGfeOMkXfWmnnzTBP7wyZS8Q6cgeYNBWisqgL0br1qAesKUExfh9atQuPRKqj3ajFYtFgTYWo/f4tCG8w6VQEhqYA%2bJicn6enpZWxslPHxnSTiMRwOB263G5fbhcvpxBXsoM0iC6HZXsqeClP9bpSqV6NU/ct1VL8SpfznERou%2bxmI50glYpSkA/zOWRsTS0Z6ugfp6s1xKGvj2moD18438f5aE9ckzqtUbRt5f9XIfMREZyKAL9imLtwqXaBe2XmDW5%2bPATp156X5SyuQCvCoGUDn1aH162hsq6N1Zx8Vz32Btp19NLTUI/amqAm6MBmbaGpuprW1leaWFpqbmzGZTFitFiwWFWazGavFgtFozCvg0SBVLwep/McglT%2b8jqp/CFL2ZoiGe/zs7p2gN9tJUbKD3121MX3IQCY7SCiR5EDawtVzDVxZbcrDyLvnjNfbMh6sGlmKmcjGg/jDJjSWvAIsahYwyCzgkFngugsoFiADoEfNADqnBp1bg86iodVloyXqo81lQ2fVKTFAE2unw%2b3F7nQoJq/4ukPl12OAtAKv14uvvR2Led0CXohSLUvIqwmqr23ClQQV70fR3eGm5aYmrKZWtmQj3Ldm5egJHfFkL/5wlIWUhatrRq6cb%2ba9881cuVXFVYnzEqolLEXbSIf9eENtiguoQVBVQINbTX9y0VIJMgDq19OgR4feq8YCncwM8rlDi17GD4cGrVsNgnVRLzuHRpjeO82uXZNMTOxifn6eXRMTjI%2bPs7S0RFdXFqvZgjMcyMeAdRe4kjf9n11H9WtRyq9E0N3lZaxzmJ5MioJkgH9/zszasoZs7xjZXB9LnVZ%2bcVLDL07p%2bMWKlg%2bXtVw7ruHqCS1XlnVcPW1Q3OBwzERnLIAz0orWXEejTY0B0uQbpAus7750AYdmwwoUV3Bp0EgryMcGvUePzqPPu4ceMZWkPtpOtCNId0%2b3kuq6e3qU/N/V1UU6nVZSYCQcxmG3KzVMm2ldAY/8ahcofz2E9k7PdQUkOvjCXR4ur9YTinWTSHWyr9/L9x%2bI872vZvibr3fz3/8wx399ZID/8vgwf/X8Lh796iB3HowyHPbQkwiQHgwru99g0aK3q9G%2bwWXYUICyu4561RJcGmWXFXneIhQFWTVKLSGp1qm6QG3YjcNkoc1sUvxcQvq/pNL31VhgU9xCZoKWlpZ8JfhnUeUcrZj9h5vwfoKKa1F0d3porWlWXSAV4rbnprn7DhPJVD89mW52Lmb5zru38p33LvDtKxf44/cv8cSHd/DEtUs8x5188a9XmFkaJd3hJeo14wi34u/00WDToZOxwK5RgmBDfveVmGDXYbDrMdi1SmwwbLIMvUWHXfq2v11ZjN4qXSBBXcSD3%2bXB7XEr/v7x3L/RdjiVbNDa2vrrWYD%2bLi%2bjncNKECyM%2brj03Rku32YilughGoqycyHNs2%2bv8uxbazz75qqCZ95Y5enXz/Gn753n9//iGOeWp0h73Vw4d5oHvno/vpQXb9ytFERSAdIF5GJ1EnKhdo1iGWpRlKeKK2iVtGdNRGiZGcWmpEFVAdIFJsd2Mn9ggbm5Wfbv38/SoUOK78/OzhIJBRWFSUXIYNjW1vbrxgAPfZFeMqk4hXE/l56b4bOnbMSSPUQCEcbmUzzzzhrPvHWep99au44313j%2b/Vt58M9PcPuJvXT72vnsnRf59G/fTb25DovfhC1kod5ap6bBvDtIaPJUpkMJjcwAeQUYLDpsPi%2bm7iS2di96WQfIIBjx0O5w0e7z0dHRoUDeZEvq93coC5cKUFzA6bzuAv%2bnLKC9w4W5vg2nzUJpOsiFp2a4vGgjkuxWXGDXYoan317lmbdVBUgq8dQba/zptdt44PnDLC9NkA36SHnttMoTn0x/Fk1%2b1zUbaVDZ7c3InwV064qQvFWvVIB2kxmbyYzOasjHAA9OswXzpny/DtmW1%2bHrafFGBTz6r9UBQZo/G2ayexy/10VxKsDFJ2b5jf0uvB1RUrGU4gKKBfwKBXz52SOcXpgg0%2b6lJ9KOJ2ZWor%2bMAXqrPBDJOl9Hg12nuoD0e7saINWSWLqDDIbSMjQYzDrsAT/W7qR6FrDk02DES8QfIBQOEQgEiEajBDo6CIXDihW0t7er1aDLhafduykLPJmvBF%2bLUvX6dVS/KivBMA33dNAV6KTd7aSkM8Dtj89webidaCrHSP8oo7OdPPnmKk%2b%2bucaTb6zy5BuSrvHE66s8%2b/6tfOlPDnNy76iigFTIgz3aqiigSQmCGjRysTITyPa66csYkFeACjVDaORx2aTDFg/TtqsfWyyMXsaA6RQ7Ak6lFD6%2bvMzU1B6Wl5fZPbkrHwcOsW/vNA6nA5fdgSMSpFUphWfkWUDepsap/kWcaq5j60dx5Sygv9uFS2PBZ7dRmurg8lMHuHdPAE/QRcDvZOZEhr/48Hb%2b/FoeH6j4j1dv5y%2b5yLeeO835%2bV30hf3kQl6c4RZ0plrazFoaTHXoLHU02DQ0KUdkDTpZ4MhTorVOKXYkDDL622XxVI/BpMFqNmGzW7GZTOhN2o0s4LU7cHncGzu9seMej2IB6xnhehCc66P4s0nK/yxC2XNRyp6PUP58nj4bYct/jrLjlI9ml5emoJuSXJiR%2b3Zzx5/MceaRGc4%2bOsPat%2be4%2bOwiF59Z5FKeKnj6AHe8sMgtvzfD5PwIHdkQvnQHxqSdHf5m6v2t3ORrZntHM9sDLdT4W9gRbFV4BYo8j6Aq26G0m9je0cKOjha2%2b%2bX3LYiZLCXWRipLtlBeWUFFxY0oLy9XsFlWVlaGEPI%2bbTaH2NeDmMljf/cmvke5bxML3YgDPcj7AzHXk4e8M8zzM10q9mXyfPd12UwWMS%2b/l3d9PdepxGKv2l6n6883Y/3bzVDms%2bm7wwMIY93/w09rM1mKdkUomoxSOBmlaDJG%2bXRKaV9HjOp9GYonYxRORCnapULKSiZjansyqjzfLndidyzfVuXyvbKpJIUTEeXdgokIFdNpKqfTCi9l8tmWqQTV%2bzo3%2bpco3hVj2/6sOnZeJmnVXtlnQpWNhxH70hSaDZSKAkq3bKG0tJSSkpJfidLiEoqLixFiMo1IRxDZGCITQfSk2LFnJyIbVSFl3SnMSwcQPUlEp5RFEd1JWhfnVJl8Jy/zHD%2bC6E0hOmWf6rvNi3OUjfUj0iFEVxyRCKDdvwfD3F6FV2SpECVjA7QdnLven%2byjO0n78jFlXkpbkUdpPbhA%2bfgAIh1GJCOIvjCWgRSj/YPKWaC7u0e5%2bxscHLwRAwMMSDo%2bSiIeR2yfj3FgpZbFk3UsrNSydEbLqUttSvuAhJTdouXkxV%2bWndosO1nLoTP1nLts4eCpeqW9LpfvHTlnYGGlJv99DacuNrNyezPzyzUsnpJj13D4nEF5d/O3S2fqOXu3eaNPZbyVWlYutHJk1cDcci3HT%2b/AtminobuTU0ePcW5tlVOnTjGxc6ey6KGhIRXDQwz3D5A8PEvk9uMkUkmE80yQD34s%2bOingg9/IhT%2b6g9VXmJd/v6LKr8ORSbfk%2b1/Enz0koDXBfyz4MN8ex1XfyS4lh/jg58IeFnAK/nx5Dj5PtfH3jwOrwp46ca5SCrHvvYjtW/eEJy838CORBdLs/tZvPkgR48eZee4vA0eYmRkhOHhYQUjg0N0z%2b6h88QiyWQSsf1gkvnzBhZuNSj04MUmVj7jUNrrssXbG1n%2blI2583oVazpFduJTNubX9Cyc0TK7rOHAaS2n77Qxf0LL7PF65pY1zJ6oZ/kOC0cutbCwqmNRjnFez%2blPWVi5x8L8OR2La3rmz2mVsWWfsv/r4xg4/TkHC7c13DCn5U/bOXRnKzNrBo5e0GE76kGXjtObTpNIJkgkEnR2dpLNZpWFSj6TzSrtbLqTnkxWKZaE2JtFRELXEQ0jErEb2qVdGSpyPZRkM5RkMhRnMpR2ZanKdSO65C9HfVRdHKPqwjjbL%2b%2bm%2btMTVF3eSeXFcarv2kmJjNCdMdXXpQ/HO1S6HlMG0oiBLsqz6jiyfzlOSaaT0myGyr5eRDKGCAcR0fy85BxjEbUdDCEGY5j6Ekoh1JvLkcvl6MvlGOrrJxaP093dzUBfPz29vQrk3UAsFkMUjUXR1d6Evq4GQ30throa9Pm2pFLW7rTjczoIeu2EfHZiARuBdjt%2bhx2T203Z5QTaD5JoSVP7l%2b3UPuel9gkPmp8l0JFh69faKWg3U5i24VsYI3ZoisThKSqybgqjFsSgD21XBwGrlXaXg2iHnbDPTqjdjs/lwO9y0NZoQFuzQ5mfMsf8fPX1tTRu3UZx2Ip5JMvc1DQTk7vYPTnJ0MQ4uf1TpFMpcoMDDEyMs3d6mt1Tu5naM6VYiSgai1FXX0ddfT06vR6dXodWp6Veo1FkGo0Gh6yeXC6CQQfxmJ1cr4VY3I7T4aLJ7aXw7gRVV6JU/CBA%2bbNu9WfvP3ZS/oKHKhKUPexXfumtHIyQXlkgtTxH8sQcmrEUImZDDAapzQZwWx14fS4G%2b80k4jZiMTsut1q1NRqN1NbWKvOS89PqdOgNBuq1WrTbb6IwYsM8nOWW48ucPnuW286tMnZ4gfDJRVKpFF2jQ3RNT3JqeYULFy%2byfOK4mgWkAmTH8g9Dn4T6%2bvqN05Pd7sRmU6nd4cTtsGN0eSi6I8HWn0WofMFLxbedVDzrpuJpNxWPOdn6VpSyB30Ij4WtAxHCS3vwzo0TunkK3UgKEbIgBgLUZAK4LTZF2fLEJseRWD%2b/NzY2UlNT88tzrK9Hu20HhWGbYgETg8PKz18y%2bA2PjDC6c1zx/4H%2bfkbGxjaC4ejoqKIYIassqYR/DaUTSRW7PoaJJMW704ibuyg8maZwLUPhrVkKz2dUSP5MJwUHU4jJpPJPETEaRIyFEaMh5Y8TinxfhsJ9WUp3Jjb63TyGpMXjcQp/xfyKR2PKadDYGSKbSBJPJpTAJ008lUzh8/mUk%2bG6TJGnUsrZ4H8DUkkV2FCqeCIAAAAASUVORK5CYII=' /%3e%3c/svg%3e)
Control Screen Prescription -
Once within the Prescription Edit page, you can
- Change the Attribute (top right).
- Select any combination of zones on the right side of the page.
' width='1280' height='800' xlink:href='data:image/png%3bbase64%2ciVBORw0KGgoAAAANSUhEUgAAAEAAAAAoCAYAAABOzvzpAAAACXBIWXMAAA7EAAAOxAGVKw4bAAAXQ0lEQVRogdWaB5iV1bmof1DQEwWM1Nm9zOz9t93bML3tMntmQGAoQ2cAAVGRNjAD2IJijOVolCOWm6hXPeq1nBhBBSkCaowmmuSYGHqzIQhDUSznPXf9e1NjTvQ%2b99znufM87/Otf9W9vvV931rr/0eSJIn/3%2bnSpYshFVVHUWQKCwvp0aMHVqsVv99/Vl2RbzKZuPTSS%2bnR42Ik0djlduNwOI3KRR4vVpuVC7p2pYu1P1JURnIOQLL2Qyo0IxX0NjqyO5w0Ng0iWVdLJBqnsqKMcCSCT9cpKS2jurqa0rIyAn4fXbt2/X%2biAM0XQNcUTGYzPXr2xOMpYtDgwXQ97/T4PXv2RFYUZFmmb9%2b%2bIk/C7XShyCqRUAif7sPpcNBddFzQBymhIblNSGEvUomGZDYaYbPaGTJkKJlkHX5fgIqyUhrqsxTHojQ2Dmb40CGkU2lqKsr/%2by0gL512O4Mam6ipqiYejWExmc8q/266nffdBd3PR%2bpyxnPXnJaNvHPL/hHdzs%2b1%2be%2bg2/l06d7NGKdQUxg8vJnqdAp/NMIAmxWpq/i93c5q0%2bWCbkiCbucjSRPq6DK%2bli5jq%2bkyribH2BqkMdVIQp5CPFfl5OjKnByXLxNtxtfR1egr31/%2buev4unP6%2bb%2bM%2bA0TapHG1SINSSBlg0hNYaTL4kijyo3fcqreScbm24wQ1jk5jVTtR0pHkOqCSDUBpNrg6bSRH6J7XZiLMgkuTEa4KB0z5I/SMS5Ox%2bleG6JLlY%2buVf6/w98r8yFVCvS8/K/Qz5D5dIWOlAwhTUpiSwSpaKqnvClDaUOK4kwt3ngYV9iHO%2bI/hSvipyjko395GGlMFZJoLFX5kSZmkFozSOOTSFMbkC5vQBotNJZEmpgmMHUENXMvZ/DiWQy7bh5V17SSbb%2bKxvYrCU8dgTRQQSqWz8CbR0YaKMg/n5RGWkYq05DK9f8zRFuxSONrcKkyLc0jGDU8x9iW0QQ0DbfDibewCI%2b7MEdhIbLDjSmoIrVUIkmtKbrF3HT327gg7OTCqJsLom66R1x0Dzm5IOjggpCTC8MufhRx0yPm4eKYhx5xD70SQhZhqQkQHBanpKWM8tGVlIysoGRkJWUt1ZSMKKN4WCXFw6oYOLzaoGREDWUja4leVkb/Kp2LSzz0KpfpKSiTz0h7DXqUCjy5dLmXnhU5flwuc2GVRpdJKe75xYOse3Utq156idVr1rDm1TVs3LTJSL%2b48kVWrlrFylUreeHFF1m/5lUW3XsH0vDSnAIsCRfemB1P3JEj5sCbyKW9CSdywmlIbzyHUuxGHehGLXZTFLYzalQJv1rxDM/d%2bXv%2b7c53ee72P/Lsz97n%2bdt3sOr%2bh/n18nms/%2bX1vPqLa3nloSU8f898nv35fB68fhrp5jjemiKCWR1fvYqeUfEJ6hX0tIyWUVDSMmrKi5Ly4C0uxON3ogbdaBE3BSmV8yZn%2bPPu7Wxev5Ynn36GzW%2b8yfp1a3nyqafZ99HHfNffi79/A2nYQKGAJAUDXcilLtTyIpSyIuSyQpSKQtSKIvSKIrTyIrSyIvRy8exBL/fgq/SilhVhjzgY1lLMk3e8x8%2bvhhVtR1nR9gUr2o6zfM6XPHHLQV544EZunzWO5QtbuXvRJDqmDGXuuEbmTL6MmsExPHUygUY/vkYfeoOOT9CoozdqBmqjjtagIWcV3AEPamkJ/XwqHtWDKa3TdXKa3773e95/53dsWv8av9n8Bs8%2b%2bRQvv7iKD3fvhW%2b%2b5ZsvvuSbL09w4vgXhgKe3rD6pAJS9Is6sQfN2EJWbEEb1pDFSNtDVhxhG46wSNsMxLMz4sAZdVAYc%2bGOOilpDLHh8WWsXbGFe%2bZ%2byYPtB3mo4yDL53/JO0%2b8yuHXFnHzxNHMzKZpHz2YK7JppieTTG3OkLwsgSfpJdDgQ89qZ6HWqyj1Clq9gprNpQtjCqZIAHtZHDmkYk6qiEDuX3I5tXe2U3PHQqpvX0DNne2k7l5M%2bS1zKF56NQNvmmXIxNKrKb35Gjztk07HgL4RJxafFbPfhiUgsGIVBHMKsYVsWIVignZsITuOsANH2ElhzE1hzEEsG%2bHNf53N128uYeMvf8OKhV9y7%2bwv%2bPXd2zmycTHHNrRxYN0N3LdoGvPHDGHOiCamNySZPryebHNZTgGNPvxNOYzVb9AMtLxUBVkFb8iL069RVBxB0T1YUjpGHEtFOb8qyPnVQbrVhA0plaicXx0y0l0r/UZ%2b99ow3UVeYzHS6KrTFuCI2LBG7diiNgN7TGDHEc9hi9mxR%2b04Yk5cCReuYhfuhMtQQLwxwqbHFnBi4wKOvTaLPz79Ao/f3Mm%2bl/%2bFYxvm8PnaDo5uWMDnG37C/TdMZc6YBtpGDmHWuEHUN5fgTcqGBfjzpq9lVWP1VbHy9Yqx8sZzVsVb48FbWURRuRtvpRtzRkecZQo9TvwuJ6rTTkSVuWpKKzMmjGPK6FHMmTGNGRPG4i90orkdBBx2bEH5pAUk6Rd34hQTjDtxxB3GhO2JHM6EA2exC7tQQlTUEeVOnImcAoriDuINUTY9Np8Tm5dwbMtLfPHbWzm47hY613dweF07nevbOfRqO8den8Nnzz7J8oUdzBqZ4crRg2gYXoacdwF/VifQoKNlVDRDASpqRiBcQDEUYyinQbiDagRJk1DAxCShuuFUZlopT0%2bkIjOJ9JAraBw5i/SQGWSbryTbfBXl6QmUZyZRnZmCUj8UqaUi7wJRJ7agFWvYhi2Swxq2GtIhVj3qMGKCNZSvE7Zhj9iNOOCO2UlkImx6dD4nNi2m85276Xx9MZ3rZnN43UI613ZweG0HnZvn0Pn8Exzr2MfBZR9w09TLaR1RS9PICrx1XsPn/fUa0awPNa2cQsnIyBkZJZuzBIFcr%2bAV%2bSkvBRkNaVKa1pvepuNfjjL/ngO03XuQtnsPM%2b%2bez2m79xDz7/ncoP2%2bo1xzx24W3HWAodevQhpRkjsImYsLKYo7ccccFCYETooSTjwDXRQV52XCiVvUibsojLty6VjOdaK1QTb/YgEn3pjLoZW3c%2bT5R%2blc91M6N3bQuWkuna/P5shzT9LZsYdDbVs5vnA3u5e8y9Irp5MZWnxKAb4GjWCjnpu82P7EJMWEM3IuEIqVb1DwNuSUoKa9mE4q4ObfMLHtJYZO%2byVj569i8UPHWXT/4TydLH7gCAuX72fmLX9i7m07uGzJc0gjjXNAkr4xp7G65qAVS9CCVSB2BBH5jV3AbkgRFE8GR0vQijNqxxW1EagJ8Nojs/h60884vGwrnQv20XnjVo7c/TuOPPYrjjzxazoX7eLwgu10tm/j4MK/8m37p7za8QQ1Q8PIdTJ6vQh0Klqjltv7Mwp6vWpM1FMvGxgTFwrI5vLUehlzvXCBNGOXvMOc244xc9knXP3Tg8y%2b/ch3Mu3GnVy19FMaF65EGiksoDWFLVGII2DFHDBj9VuwB63YAzbDLexBG86wHYdQRjC3FZ7EJbbDsFCAj42PXMfXy9/j8zm7ONy%2bhcNt2zk8bxed8/bR2baXwwu3cbhjG4fbt/P5wi181f4RqzoeoWZICLk2rwCx1TXkfF0EP6EAkWcEQqNMnAlyeBtELFAwZ33GXWDBozfxwOaHWb7hfxjctfp%2b7j6XNfdz15oHeWDjI0xesQhpeFnOAuwDPbiidsxhK9aIDXtU%2bL4NV8xhmLpwCeEaYlcwdgkjRtiMGOAIOfDVFrL%2b2sf5qv1jDi/cwtGO7RxZtJ1OMeGOrXy%2baKuhgGNzt3GkbZuhgK87PuaVJY9SNSiIUutFT4tgJ%2bfJu0A67wLC/0/GgQYVWewGWQW9QcFUr9OlNckDf5zMyk9m8OSWyTyz83Je%2b2YeG76aexbrT8zhuT3TeOXAFdy4YQJSs7gNtqYMBYjDjzlkwS4UELHiEAglxO3G5F0xO9aIFUvYgiUsZC5ICuvQ69ysbnuc/5j3ITvu3cGKnft46t/3ceja7Rybs42vZm/j6KLt7LpvN58t28mh%2bX/lq8Ufs3rxw9QIBdTI6Cnh07KBkhLmnYv8YrKGFWRVZLH6TRrqIA2lUeTJFNT7DAUsf%2bcKHnxzCsueb%2bHn61tZfXQxrxzu4JXOHKuPLGLlgYU88qeZPLNtFu2rWpGG53cBU8yFyWein28AJr8Ji9%2bEKWCiwG/CHBSnQgsFolw30U8z0V830083Y/abDQX46op4acEjMOcjVq3bxTR289PP9hoK2PPPO1m9dg/3b91L29d7Wf/SHr64ZgtfXPsRG5c%2bTv3Q6CkFaPnJG2d/YQX5qG%2bQyfm%2b3KgiDxJoaE0KBcICJiW5583prO3sYOX%2bBbx0YAErPzmXNlbtX8BzO%2bfyyidtLH5p8mkL6BOx01/uS2%2b5L32VfgzQBjBA609fdQD91ALMegH9lQL6ygX0U0TazADFhNlnwRVyoNa5WT//Cb5d/Al37d7F7OO7uX3/Ppi3gzWv7mEGe7jm%2bG7mfbWXjS/v4di8v/LVws/YtOxx6pujqGcoQMtP/OSeL0zeoFEzLKCoyotnYBHegR7kcg%2bmrE6XiSmeu/p/8uF1b7NtyetsW/w677ev488d60/xfvt6/tKxgT%2b0r2Hnok3cfeW9J3eBFH3CdkyaiYI8YmImn5kBukibsfgsmDWzUccsVl4XecICLNhDwgU8PHrVUnY8tZ%2bFx/aw4NAuFh/Zw4ub9vDku3u5%2bts9LN%2b1lw8e2cWx%2bds4cs0ePnnhLZ559ickmxJoKRlffus7ufJnngIN38%2bqeBoUPIEi5FgUT2kxiuJhQL3GeZMybJjxMr9rXc268b/i9daXOd6%2bj6MLd5/iWPseDrft4M9XvMmHV/6Bh6c/gTTqpAJCdgYoBcZq91dNFOgWCjRzHgsm1UKBamGAajakScuVi/uD2A0SySCjh5Uy4baF3PDFfto69zD76C5msoefdO5jzat76bx%2bBydm7uTI4t28v/EZ1rGER5%2bfS202gVYvE0irxurnyPt9Y/4uYJz%2bNLxZGU9Epihbg2tUI2pAoSCrGwrYPP0l/jx5LW%2bOf4F/n7qerxbs5su2Hac40bbTUP62GW/w2cx3eWza42coIGzHLFZfN2EyfNti%2bLfFb8mtvu/kpC2YdAtm3YbZZ8MWEMHSRlkqyKSWFNbEAEb881xuOv4p9%2b7ax8Zf7%2bbAsp18M2crnfN28Ml97/Gbnfew6vgc1p1YwmNPLSDTUIxerxDK6sa7AC19WgHGHSB/JhCHI29aNixACYeQYxEUzZOPASkebnuGP/3sL7x9y3sGm5e%2bxealvz2Dt3jjprfZsPRNfnfLeyyb%2b2DeBSan6Bt20F820Uc100%2bzMECzGsror5mNdH/VQh/ZTF/ZTD/FQn9V5IlDkTgI2SlLh5g2vgG9VsGdtDKjYxbHfroPZm7j0%2bt28Keff8jRBbvY/b9eZ13nDaw8Noe1X%2bYU0JgtNU55pYPCxBr8xssQMVlxMjQUkT8RKmnFOPoW%2bdzIHhnZK%2bNVCo1tUGpNM/6tV5h/aAezP/2AOfv/yrwD25h7YOtpPtvKvIPbuWrHu8z7%2bAMGr/5XpOb8Qah/1IXFb8MsrsJ%2bmzExcQ22BG2Yg478sz13VTbyxd3AiSvqMrbHskyI6eMbCNaqhDI%2bXFVW5k2awd67PuLWB4/y9Ir9sGgLx6/eyee3bOEPv32cNd8u5pGn5jJkUAVFaS/FTSGKs370/B3AeCdgXIFzShCWIadlvGEv3mQFhY21ORdIa3SZnGbiW6uZtPbfuOwX9zL6xafoOPoh7Yd2naZzD237tzLjj5uZveX3DF752OmDkLm4iMKIG2fYhSvsNF5yuCNOXBGXgVtwZl5U5LkpirlxRR2UJIM5C6iS8acU41pbVGVl2FVXMv%2bBTu687ygv3rOf92/bx/G5Ozgyey8fPvE2jz10A5cNLacoIxNq8FHaEDJei6liR8ifAo0dwNgRxN6v4QkreMtK8NSUo/iU3GWoNc3Uv7zJkm8PMv/QLhYe%2b5DF/3GQxd%2beywFmf7KF9s59NG/61WkLsISd2BUTVtWMTTNh95lwCHQzdt1kYNUHYFVP17FqJgr9FtSwnaoaH3MnNFGa8lFa76NiSICqpgjFSReTZszk5oc%2bZf7Dh3ljxT6%2bufYDOq/7gK8W7eW5G%2b6keUiCcFolmtWoqPcTy2gEUzKBesXAnxUKVQg0KvgHKSiJQtSAByXkRQ06sdSrxnU4tegaWu5YyojbbjQYfuv1f8OIW69n5K3XM/bOmylZMANppPFdIMWlmRD9kn76pPz0TQXomw7SNy1kgD4pgZ/eST%2bX1vroXZdPJ330SfrpV%2bfH3hSjemKW%2bKQkkQk1DJyYJDGhjoGtGWJjyim/YihV17RQe%2bVIUle1kLq6hcw1o0lOHYI6ogxLU4SCprAhrU1R%2bjeF6d8UYsCgMP0Hh%2bl3WYh%2bQ8IGfYaE6DM4QO/BQfoODtBjaBRpYh1OtxOfU7wQcaLl0V0u41l1OAxkh4PCgIbidmPxefJvhKakkcbW0mV0DV3G1OTkOXQdU8t5Y%2bs4b2wtXQVjcnlGemwt0uhqpJEVSKOqzmZkJdK4utybl2EludfQgua8HFGGNKoSqaX6b%2bhyFjUGRp/i%2beTvEnnj6oyjsHhNNqplNDNnzWJi6yRGjxtH65QptIwdx4TJrUyePBlfZSnO4VmU2gps8WDuC5dwgaJYkHAoRCAcIngG4jkUCaP7fciqiqprRtoXDOAL%2bI1ngT8UNOqdbGekI2Fi/iC9UwkG1BUTC4YJRiPGF%2bRwJGyMF4lGicZjZ4wbJhAKGmOc2V8wFCQYDBKJxwhHI0Z9QSQYwlESMSxAfBcMqjrhYJCQ30/Qd5pwIEgsKD786shlxfgCAexR/2kFOIM6Pi03Gc1AR9NycsjQoUy9/HLGTxjPpNZJjGppYVTLKMZNmMiIEcOZPGUKyWQdXtmL7tPz7TVUn47fq3BJbZQ%2bVRECslBgrl816McdC1FaUc648eNwFxai%2b3zGeKqm4pXl3G8QKCrKwBj28jhNTYNpbMxS5PGg%2bXz4VA1rPGAo4OKYQv%2bSIH0H%2brk0odOn2EfvhI9%2bAwNcElO5KOShZ0SmZ9BDr6CHfyrz5d8JTkpSqMqECmX8RTKBc4j7glTGB5IqryJTUW2kK6JxSsMxKmPF1AwsI%2b4L4Cv0ntXO75GJOIq4tDJMv7IQEafHyDPKPQo%2b8Tle1amIJtDdHgL5MtGP5iw06hh1C734ldxiJHwhSoJhfO5cXyG3F0dINz6NnVemU3x5C8VTRxKe1EyktRm5pYHI5OH0yQ5ESniQShSkUiX3SU58XxwlFDAlzY8aiumVTtAz87f0SMX4UV2Ef6oNG1xUF%2bWiZJSLk1EjLcp6pOL0%2bo62lyTjnDeigm7N5Ub6VFk6kRsvneDiZIxemeKzykR/Z/WVjtMrFTfyLzbGytUXfVw4uARpWgZpcHGeBNJl%2bbQhE3/LoHguDo2pQhKfr388rIofD6/mx83fgcgfXnMWlzRXc8mwKi5prsrLai5urqbXyfr5tpcMr6b30CouHVplpM/tt9ewynz/5473Xb/hNKJdr/z4lw6ppG9TGX2GVdN7WPUpeSZ9voPezTV0EZ/Huw8tN3w1KKuGn/5DvAoR3W8EuKgvQCwQIqFopDWVuKLi/579BIVZF3qMsb/XuGe0iwdCxHwBwqqOFouglibwK3%2b/jf8cRJ6uanQdVIzUvbkcVdPQTwad/wIRqESwy2QbmD5jOuPGjWPU2DFUB3xMjOhUB3RkUe979yUbY2tG8PzHiLr%2bQICJrZOZIoJvOokjXUHhkBRqwH8qcP/DsXUdRfzv0iChgGHlKIqSi85iq/seiA7EP1T58pHbp6mU%2bVRDft8%2bxHger/cHj22ML3YAvx9dVZGjIbyJyA9qr4l2et4CpIlJhBJ%2bCN0EQ8voNkyQez4vL39oPz907Fy7svz45XQfWkb3IWU/vA/xPvB/H97%2bE/ecKqfG%2bA6BAAAAAElFTkSuQmCC' /%3e%3c/svg%3e)
Prescription Edit -
After selecting the attribute and zones you want, you can either
- Press Change by Percent (bottom left) to enter the desired percentage
- Or bump the values up or down with the +1 and –1 buttons (bottom center).
- Press Save (bottom right) to confirm your changes or Cancel (bottom left) to discard them.
Export Prescription Files
If you've made changes to a prescription since importing it, you may want to save it for future use. You can do that by exporting it to a USB drive.
The 20|20 exports prescriptions in the .2020 file format.
When you're ready to export a file,
- Insert a USB drive into the port on the left side of your 20|20 monitor.
-
Navigate to the Data page.
- From the Home screen, press Setup (bottom right).
- Then press Data (bottom right).
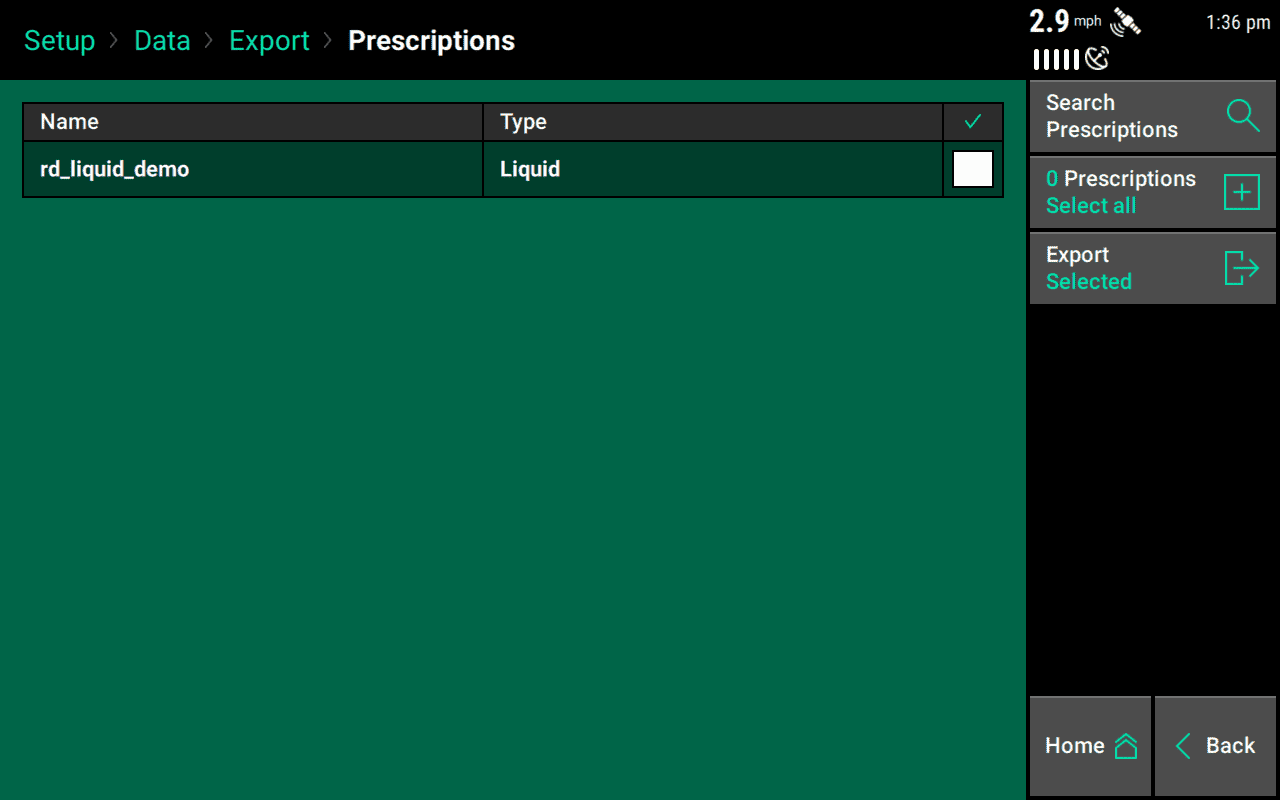
- Press Export and then Export Prescriptions.
- Select the prescriptions to export, or tap on Select All.
-
Export the files by pressing Export Selected.
' width='1280' height='800' xlink:href='data:image/png%3bbase64%2ciVBORw0KGgoAAAANSUhEUgAAAEAAAAAoCAYAAABOzvzpAAAACXBIWXMAAA7EAAAOxAGVKw4bAAAGcUlEQVRoge2a61MTWRqHTwdQS0UFQV1ZGQiBpBMgIXLLpTtJ50I6d5CABMUJd0QuGtAtpsa1tsr9P/bzftn/8Nnqk4wDzm4VXma3BpKqp97Oyelfdf/q7ZNzzttCCME3oXzj%2bd8BRVFk7Lc70LQwPp%2bXGzdu0PvoEaOjo2f6tre38/DhQzo7O2lvv4kQ1skDPYihXsTAQ8SDTloUBaW7A%2bH4M8LZi7jfQYsl8Og%2bwtGD6Hsgo%2b1ehxQdHvViGDH8fj9e7yjTgSDxuEEgGGRiYgK73f4/McAx5MT/2I9bdUkDnEODFIpFWmy2T31v3bqFqqq4XC66u7utNlG/Ke8gwudAuHrlzSqdtxFqH%2bKxE/HD/boBf%2bpCuPsQE6o0xnb3thR1uVQimk7OzBCaniaZSrO0UCYRT5A1TUaHh39fAxpxwG6nUCgQiUSYnJykp6fnHOe3tZxtaLEh22zK2TS/2vrbdLf6XG0734Va/a60/i4ojWsYcjkplUoYhoHX65WpbmVHW1ubpLW1VcYrDVpbWxHiRQKxYiCeag10xDMD8dxArMTrWMen207HZwbKShxlJYHtRULGz7%2bLJR2xGEZUor9qfS%2bWoyhSM0qvNsFCaY4n5XnK5TKLi4tkMplPZLNZspkM6XyOXLFAOBRCiLUUjwJjJOeKRIpZQpkkjsej2MdGsPtPMfaF%2bEfo83nksaWr5dOMhKfqbV%2bj95l2v2%2bYPq%2bHQW0Kx4QP8STIQFrn7eEb3n/4K7VajZcvX1IsFuVjkc/nyeVykuhqhcT6czRpQDXJgG%2bYxfkFni4uUioWGfF4UF0uVJcqcasqHtX9ZbjduF0qzsEhZkuzvFhZITg9jWvIybDb8%2bV6n2l7VJV%2bu51u1UGfYwBRnGYwG%2bNgZ5ej4yOOj4%2bp1Y74%2bPEjJycnHB3VKJWK0gDzySwzLypoER0hVlMoARUxPogYdyAmBmkLeiTXwiNcDQ/TElBRppzYplwo52XahTLpRPE75HnisYMrQc8nrXPr/AcsDeG3058KUfv7ByIrZURhHHsyRFqLEjMMjHgcw7Aw5KAYjUbRdZ1YLIahR0hGYoyPj9czQImOMnO8Tby2xdLf3lL4aZ/Y4SqzP7%2bmcPIK%2b9MZRNCJiIwg9OHzERlGhN3YQh4SR1uUPxwz//6Qa0k/QnPXf9e/DlvMi/D/wJPX21iff/zrn4ikB2cmyszyIuubm2ytrbNerbK5tsHu7i4bGxsyC9OmiTFfIl6ZJyAfgdWUvJi2mJc2w8f15DjXEn6uGGOfaImOIjQPQhtuxHNgXWzYjQioXI37uZmaoC3mq7efV%2bO/oFgaAScP0kEWTg7wLhcQpUmcZoT0dpX5V1ts7O%2byebjHxrsa%2bwcH7OzssL62Rq5URN9aQTveJhyNIMT6DNKEaqLOj3HEj4mzVJP1Pl9FsqETr%2buvfovWKU0rvjAQiwHE8yhiNcFQIkRi9RljtXXGd1eY2FxmfLNCIpEgmUySSqUws1liy2WM1QpBLYwQG2nOsNng8%2bNv5XvpnNE0adnO0rKVkQb0xaZIxQyCwSDhcFg%2b9/GYIceBX7DGgHhII6VFGmOAlQF/cJQNE1GNMzSjc7i5w19qR7x7U6NaqWAmU3Lkl3MAi1wO49kC6cqCNOm3GfBH47QBKY35nQ0q749ZPNpj5uUqxnKZXDZbnwNks2SKBSLry0T2VgnJMeAiGZAIk6gu83h3hcD6EoG9qpz0WGuUbMMAKyYX5sjNldAuSgZINtNcU/vovt5Od/ttuixu3uJu%2b206OjrO0Hn7Dp0dHXJleHEM2M4geuXy9gvZuCAGbJmIvvu/rlIvtQHKZc8ApWkAzQwQzUeA5hggmoMgzX8B0fwbpDkPEM2JEM2ZoGhOhWmuBcRlWQzZLuNyePtSb4ik5ZbYdXc/9zo66brXLV9%2b6OrqktHaBrt79648Ps2dO3cu3q5wKZvDbJTDrU3QUi4va4NmOk0hn5ftpmnKarGmaRfPgOdPl5ibf0J5fp7sXInU8gK6ppHKmphzJSpPlygvWO8OXKS6wOYvhRGNN3sHvDk%2b5qe37yhtV5k6XJNV4XgxR3ypzOv9A35%2b/579vVeEZHH0AmWAc0ZnLl%2bo1wByOfKFAsW5WVkiy5gmhVJJpr6F9eKErlvvB/y/b%2bC7GJCWBdNefQIjrBPSwvL5tlJc13TGxsYIBAKf2mS7ruPz%2bfg3AJ2QTBw/Ih8AAAAASUVORK5CYII=' /%3e%3c/svg%3e)
Prescription Export
Delete Prescriptions
If you no longer need a prescription, you can delete it. Be careful, though. This is permanent and irreversible.
Deleting files is an irreversible operation. Follow the above steps with caution, as deleted files cannot be restored.
When you're ready to delete a prescription,
-
Navigate to the Data page.
- From the Home screen, press Setup (bottom right).
- Then press Data (bottom right).
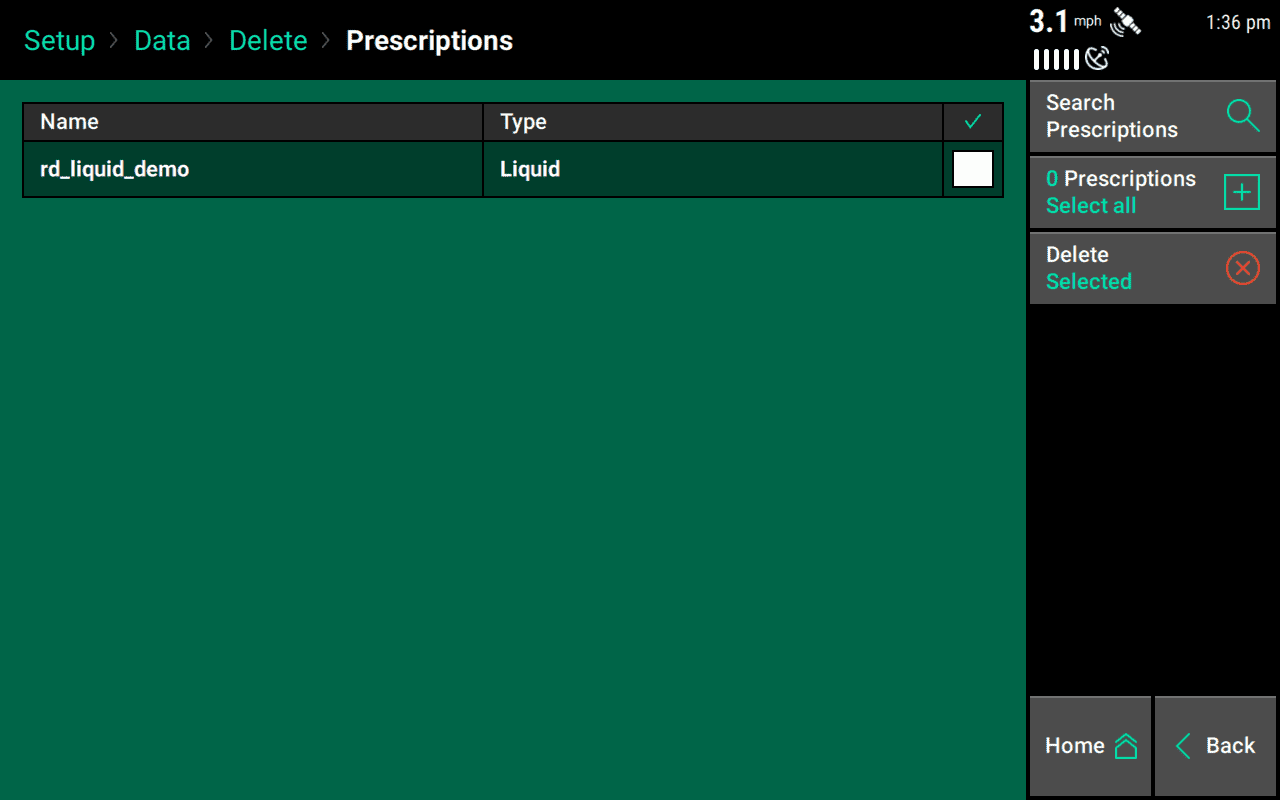
- Press Delete and then Delete Prescriptions.
- Select the prescriptions that you want to delete, or press Select All (right).
-
Delete the files by pressing Delete Selected (right).
' width='1280' height='800' xlink:href='data:image/png%3bbase64%2ciVBORw0KGgoAAAANSUhEUgAAAEAAAAAoCAYAAABOzvzpAAAACXBIWXMAAA7EAAAOxAGVKw4bAAAGdUlEQVRoge2a61MTSxqHe7ioZQkKwtEV5XBJSEIC4ZIISWYm95DJ5AYkRsIRDXdFQOXiLmePa22V%2b3/s5/2y/%2bGzNZ0UC%2b5uFXq0toRQ9VRPXnp%2b1fPL252%2bjBBC8KOjKIosbXYH3jEPNpuNjo4OHj16xPj4%2bLm6VvzBgwd0d3fT0XELIaybh/sQI/2I4QeI%2b920KgpKbxfC9hDh6Efc66LVEvhDD8IzVI85%2blE6bloC%2bB7PEAoGmJ6exu0ZQ1VDRKMRQqrG9PQUg4OD9QY0Gvq9DBi2O3A67PQ9fCgfdGTETr5QoLWl5bRuZ2cnLpcLp9NJb2%2bvFRMIWx/Ca0dM2BDOfvmwSvdthGsAMe1A/HyvbsD9u4hpJ2J8GDE5gtJ1C0UIvONetGAQ08jg9z1mvjjPQj7HXGqOVCLOmMfzfTOgUQ4NDpLP54lGo/j9fvr6%2bi5wf3vr%2bUBrCzLWcubbUgTielu9/LzutbaLNfJ6e73ud0BqC8GI00GxWJQGeL1emepWdrS3t0va2tpkea1BW5vV9ucJxEoM8VRroCN%2biSGexRAr8TrW9eexM3FlJY6ykqDleUKW5z/HEUs6oqIiqpF/a30rliMoUjNCv%2banXFxgsVyiXC5TqVTIZDKnmKaJmcmQzmXJFvKooRBCrKV4FJgkuVAgXDAJZZLYpscZmhxjaOoMk1/I1BgDE255belquTRj6kw99jV6n2kPTngY8LqxazPY/BOIxSDDaZ3jN%2b/48PEvHBwc8OrVKwqFguwWuVyObDYriaxWSaw/Q5MG1JIMT3iolJ7wtFKhWCgw5nbjcjpxOV2SUZcLt2v0yxgdZdTpwmEfkWPC85UVgrOzOEcceEbdX673mbbb5WJwaIhel40B2zCiMIvdjLL/cofDo0OOjo44ODjk06dPnJyccHh4QLFYkAYYi/PMPa%2bihXWEWE2hBFwInx3hsyH8dtqDbskNdYzrqofWgAtlxkHLjBPlosw6UR47UKZs8j4xbeNa0H2qdWGd/4KlIaaGGEyFOPjbR8IrZUTex1AyRFqLEI3FiMXjxGIWMcLhMJFIBF3X5fgQ08Mkw1F8Pl89A5TIOHNH28QPtlj66zH5X/eIvlll/re35E9eM/R0DhF0IMJjCN1zMcIehDpKS8hN4nCL8scjSh/ecCM5hdBG6//Xv46WqBcx9TOLb7ex/v7%2bz38gkm4cmQhzyxXWNzfZWltnvVZjc22DnZ0dNjY2ZBamDYNYqUi8WiIgu8BqSjamPeqlPTbBzaSPG4kprsUmT2mNjCM0N0LzNMoLYDVWHUUEXFyPT3Er5ac9OlGPX1Tjf6BYGgEH99NBnpzs413OI4qPcRhh0ts1Sq%2b32NjbYfPNLhvvD9jb3%2bfly5esr62RLRbQt1bQjrZRI2GEWJ9DmlBL1HkRR7xInKeWrNf5KpINnXhdf/X3aJ3RtMrnMUQlgHgWQawmGEmESKz%2bwuS7NXw7K/i3lvFtVkkkEiSTSVKpFIZpEq2WiNeqBDUVITbSnGOzwefXv5dvpXNO06B126R1KyMNGIjOkIzE0FQVVVVl349b48EZrDEgooeJRWKNMcDKgB8cZcNA1OLYUxpHO3v88eCQPx%2b/p1Zdxkim5Mgv5wCmScY0qZgGtbwpTfrPDPjROGtAUqX8apP5410qh7uYuxvEqmWyplk3oTEPeJVJ8afcHPplM8CRUEm8qOLbfUFgfYnZ1y%2bIrlbJGpnGw5tksllKpkE1n708GSDZTHPDNUDvzQ56Ojrp6bhNz61O7nbcpqur6xy3u7q4090tV4aXx4DtDKJfLm%2b/kI1LYsCWgRi4V3%2bosyvZK2mActUzQGkaQDMDRLML0BwDRHMQpPkrIJo/gzTnAaI5EaI5ExTNqTDNtYC4Kouhlqu4HN6%2b0hsiabkldnN0kJ%2b6uun5qVe%2b/NDT0yNLaxvs7t278vosd%2b7cuVyboiMpjaKZxWgch1u7wcVsTp4PGOk0%2bVxOxg3DkKfFmqZdPgOePV1iobRIuVTCXCiSWn6CrmmkTANjoUj16RLlJ9a7A08uz66wstkwYE7j3e4%2b746O%2bPX4PcXtGjNv1uSpcLyQJb5U5u3ePr99%2bMDe7mtC8nD0EmWAY05nIZc/PQDJ5fMUFubl0XjGMMgXizL1LawXJ3Tdej/g//0A38SAtDww7df9xFSdkKbK/m2luK7pTE5OEggETmMyrutMTEzwL%2bHWj8tLQIw%2bAAAAAElFTkSuQmCC' /%3e%3c/svg%3e)
Prescription Delete
