Crops
Get to know the 20|20's Crops setup menu.
Updated January 28, 2022
After you have added a system under the Equipment setup menu, you can go to the Crops setup menu to tell the 20|20 how you expect that system to perform: what counts as operating smoothly and what counts as failing.
To give you greater flexibility, the 20|20 saves these settings on a per-crop basis (hence the name of the menu). So when you switch from, say, corn to soybeans, the settings for all systems will also change to how they were the last time you were planting soybeans.
Thus the Crops setup menu serves as a home base for settings that change when your crop does. It even provides shortcuts to a few settings in other menus that are commonly adjusted when switching crops, as we'll see below.
Table of Contents
- Find the Crops Setup Menu
- Understand the Crops Sidebar and Navigation
-
- Add a Crop
- Switch Between Crops
- Set Seeds Per Disk
- Set How Many Seeds to Use In Calculating Averages
- Select What Happens When a Row Fails
- Configure Behavior When Planting Outside Prescription Boundaries
- Quickly Adjust Crop-Related Equipment Settings
- Quickly Adjust Seeding System Settings
- Quickly Adjust Crop-Related Control Settings
- Configure Alerts and Alarms for Each System Used with Current Crop
- Fine-Tune Row Unit Position Measurements
Find the Crops Setup Menu
As its name implies, the Crops setup menu is accessible from the main Setup menu, which you can reach from anywhere by tapping Home (if you're not already on the home screen) and then Setup.
Once on the Setup page, tap on the Crops button in the sidebar.
Understand the Crops Sidebar and Navigation
When you arrive in the Crops setup menu, you will be on the Crop setup page, a homepage for settings related to the current crop.
In the sidebar, you'll see Crop highlighted at the top, since that's where you are. But you'll also see a list of other systems below that. These are systems that were previously added under the Equipment setup menu, and tapping on one will lead you to a page where you can configure that system's alerts and alarms. If you don't see a system that you were expecting, you need to go to Equipment to add it.
Finally, at the bottom is an equipment-related page, Custom Table Setup, where you go to tell the 20|20 how far each row unit is from the center of the implement (it's an oddball page in this menu and will be moved in future releases).
When you change pages to anything other than the Crop homepage, a Restore Default button appears at the bottom of the sidebar. Tap on this to restore the default settings for the page you're currently on. It will not alter the settings on other pages or systems.
Change Crop-Related Settings
Add a Crop
To make switching crops easier, the 20|20 tries not to overwhelm you with options. Instead, it gives you a shortlist of crops that you have preselected.
To tell the 20|20 you want to add a crop to that shortlist, tap the Add Crop button at the bottom of the Crop setup page. A long list of options will appear, including a Custom option at the bottom. Simply tap a crop name to add it to the shortlist.
Switch Between Crops
Once you've added a crop, you can switch to it easily by tapping on the large Active Crop input field at the top of the Crop setup page. This will bring up the shortlist of options you've already added.
If your shortlist gets too long, you can delete crops from it just as you added them. Simply tap the Delete Crop button at the bottom of the Crop setup page, then tap on the name of the crop you want to delete.
When you switch crops, all settings within the Crops setup menu will also automatically switch to how they were configured last time you used that crop.
Set Seeds Per Disk
For accurate seeding metrics, the 20|20 needs to know how many seeds each vSet disk holds. Tap on Seeds / Disk to let it know the correct value.
Set How Many Seeds to Use In Calculating Averages
When the 20|20 shows you a seeding metric, it's actually showing you a running average. And you can change how many seeds are used to calculate that average.
For example, let's say you're looking at a singulation rate of 96.5%. You might wonder, 96.7% out of what? the last thirty seconds? the last one hundred seeds? The answer is the value shown in the Seeds to Average field on the Crop setup page. If you have that set to 300, then that means that 96.7% of the last 300 seeds were properly singulated.
The lower the value you set here, the more responsive your averages will be to fluctuations in performance. That's good. But it's also possible to be too responsive, since the 20|20 may alert you about problems that are really just random blips. We recommend that you set this value to about 1% of the current population setting (for example, if you have Population set to 30,000, then 300 is a good Seeds to Average setting).
Select What Happens When a Row Fails
What do you want your 20|20 to show you when a row crosses a failure threshold that you've set? You can change that behavior by tapping Row Fail Action on the Crop setup page. Then select between the following options:
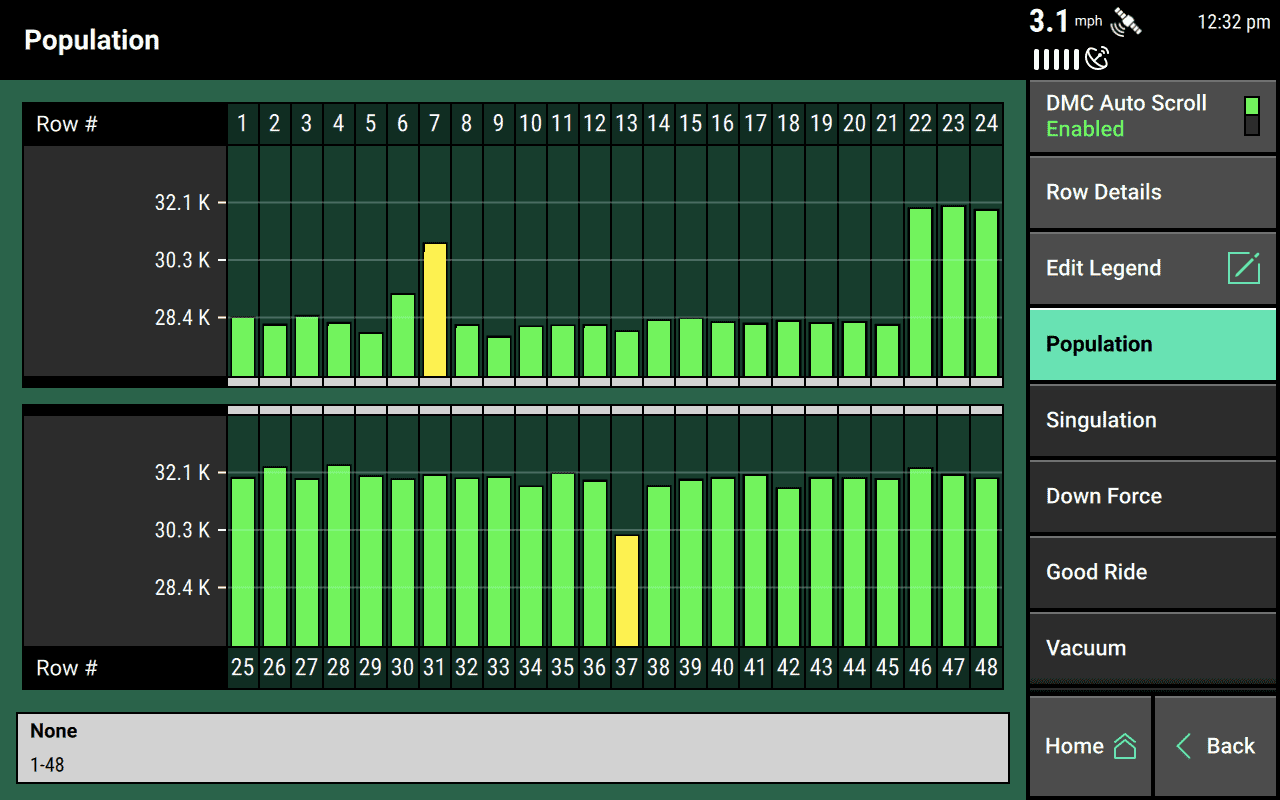
- Being taken to a bar-chart overview of the implement, where you can see the status of all rows (Jump to Bar Chart)
' width='1280' height='800' xlink:href='data:image/png%3bbase64%2ciVBORw0KGgoAAAANSUhEUgAAAEAAAAAoCAYAAABOzvzpAAAACXBIWXMAAAsTAAALEwEAmpwYAAATX0lEQVRogdWaWZScxXXHBwkrJgaNthlp9p6epfd9md73fZ/pnumeTRpJWAgJEMhabHYh4BA7MQYDYTFgA5IQkkBIAgnJCGMbxwFCQOA48fFx4uTkIclJ3vL8y6nq7tFIQnDsY5%2bYh/%2b59d1/VfVXt%2b6tulVft7S0tPBFxxVXXCHlsEqDyWhgaHCIpdcspae7G6PJdL7eokV0dXXR09NDe1sbS6%2b5hpZFixcTCIZwOp04nQ7cbg/JZBKfz4/NZmXRokVfGAMoB4dRDw/JQbYubWVoaIhisciVV145X6%2bnt5fBgUFUwyraVrXRsnjRYvQ6PaFQlGqlTDwWp5gvEI3ECAcD/%2b%2bD%2b13Q399PPl8gEongcDikIT633RVXLv7MCouWXHkJFl8kL4fFS750QfmPhSu/vES%2bq0qtolQqEQqFMJlMdHR01MewaNG8lyxefCVLlixhyeIldc9Qr00wPB1joBZmaCoqoZ5NoJlNSCm4JiQ/GWFwMlKXok3jWZSlXADRZ70cRlkNoqyGZL2BBsTzQC1Ul03UQgv4oNQJfr6O4Brlhe2UU2F0fifjoxXWrl1LdaLG1OQUMzMzzM7OSt3c3BwTExOkUilyUxl8AS8tqrkkbcN9dA8oWN7ZTntfF1etWMqS1q%2bwpPVqKf9s2dV86eqrWKlR0OU20Oe3zMtOl55er5E%2bn5lOl4Eu8ew30%2b02oAza6PEIzoQ24WU44qQ/YGWwIdUxF4Mhh9QPR10MhR0og3YGhAxY0SW9DAkuMoI%2b5ZNyMOxAFXVJqONu2caQ9tNfCWBPh7l5243ccfcdbN66ma/t2sHOXTvYunUrO3bsYNfOncxMz8g1Lr49gC/qpWV4Ns7yNe2YdEa0ag19Pb1ccZlwuKa7nTU2NQq3iU6bVsouuw7FiIF%2bt5k%2blwml28Rqq0ryqoCDLruWXqceQ8yPOuigx2lgKOBAMWJEF3EzHHCgC7vQhN1ogk50EQ9Kr4UeuxZbOiR5dXAEazqEJjTCkM%2bGNuxCF3aji3pQB504c1EUo17sqSBjW/Lkd6YZuyNPaWeWTC1NKpEimUrKgWezWXK5HHabA4/HQ4tmLkXXgIKO1Wvo6Oygo7OTnt4eent76%2bjrq6O7h1VqBa1mJSusQyw3KVlmUtJq7JcQ5WWN8nLr4DzXlEuNCpYaGrzlPN9q6Ocag6JexyCgYJlloPHc1IvfHTj/O000dK0mJb0lD6aoh1gkQjQZJZqIEE1EiUQjclFciHA4TDQaxW6306KeS6KxGjEbTXLhEDAajRIGgx6NRoNOr0On0cpZWeXRstqnp82tpd2jo90j5Pmy0K/2G%2bb5tgt43YW8t667AJ/CX9yn1HuFTi/77gga6R31Yk34yaezcidLJVMSYtZFzF8M4Qke4QHquRQqkw69VodOdx5ajQarzUY8HsPj9eIZcdFt09Dm0bHGZ5AvWn/hBubLWtb4P5tf7ftd%2bfO61V49K6xqVpjVrHJqWWnTsNKqkwawp0J8fedubrv9NrZvv4Xbbrude/bsYc%2bePZRKRen6%2bXxeSpEf%2bP3%2bpgH06MXA9Xr0DWi1WhwOJ/l8jkAwSDQUot9lYo3fSFfIQofPSKffRKdfyPNlof9D83Wdmc6AiTabDts2N86dboL3%2bbFc72BkhwdF2YstEWCsOEq5UpHb4ejoGOVyWULMeCaTkUhnMuTyebxe76cbQHiAkGq1WiYXIqMaVA7SaVGxYkQt3XrViJpVLk1dLiivdKpZ5dayynl5/vPaX8w3de1eDVcplaR/EKH0SoyxV2PEHvMy87MsiooXY8RDOBDE5/cRDAYJBAISYqZF3DcREhMaDjfXgM/2AOEukWiMsN9Pr0MvXVHMxBqvXobCGm8dHaIs3VTHU097mdhs5Rq7nk5/o858XT0dn9L%2bs/m6rjNopFWjIvVklML%2bOKVDCWIPBZh6My8NYEsGGR%2brSA8QLi68QEB4gPDk5g6Qr5YpzdbwfV4I2O0OstkckUiUkN9Hn1MvF6OmATr8Cwwg4n5Ez0qblo/fT3LDrU6usujo%2bjQDBBcMsIGmARfyHRe1kQZQq0h/L0rxxTijhxPEHg4w/VbDAKkQu3buYs%2b9e9l64w3s2buXu%2b%2b5h9vvvIPKRIVMLkt%2btEhp01rKt2zCHw5%2bdgiIHUCEwODgIEMDg3SYVCy3q2j36aRbrrA33VcsSGp6s3qUFT1/86MIX91pZYlRxWqPRvJt7roU9du8urrOo5H9yL4cdSndXfDC9UcaISDDTqz8Gr4yNEDiyRC5/REKL0UJf8fD5JuZugHCXgrBOJlwjGw4TiGaJB9NynImFJtHNpOhWCrhtY98hgdoNDicTsbGxkimUsRCIYZCJhQ5M6tdYlEyMDgmFivhEUZaVVpC3wozcSrDz8/GuH73CFcZdHT5jKzxGGkX3uM2sNqlZ43XxOoRA212A11Bo4QibZZS9NfhM9HhNdAVMkpZL9f5pYPDpL8Xo3QwydiRJPHvBpl5u0hfYQTfjVNsfOFbzDy1l9mn72X26fvq8qm9zDyxZx7Tj93Fuu/dS/rW6xYY4OJtUKvFZrcTi8cJhoLYNDaie3xUXkvhv89H5Nt%2bqqcz8gX893lRFozEvhum8lqan5wMs%2bthD%2b5vB1Gk9PSl9JJz3%2bEh%2bICP8F8FcewcQbvOSu65GKknQ9TO5Ig/EiT%2baJDgX/hwfcNB/vko3rtcBB/wSs59%2bwju20ZIPxOhsD9G6VCc2EN%2bpt4u0JO0En18F9f%2b9lXW/fIgc786xOy5/bL81X87zpb/OcP1/31aYvN/vcGN//s2lTcfrRtAJEJGgxGjqZ4ASZiM6A0GNFoNeqOewS4Vsft9jJ2JM/GjNLnDYcZOxSmfTpI9FKb6dor0iyGKJ2L89HUfdx30kf9xmuLRKMnnA0y9myX/coTymQTjb6fJHQkzfjbB6KkEmYMhJoTucITSazFGT8aI/LWb8g8TxJ/2yd8qvBoh%2boSH0ZNREj8IkD4Qkn0EH3JR/UlaGiDy0HZm//ZZYo/tJvXMnXU8fQcTpx9hy7%2b/zubfHmPzvx7nun85xg3/8QblEw/WM8HegX4UXT3yHNDXfR6KHoE%2blAoFHUvXkNwRZO6lcdbtH6f2RJF1ByrMPF%2bm%2bniR9YcnqD1ZYub5MV57scidT%2bSo7quwbl%2bF2lMl2U60mXlujLkXJ2R57f4Ks8%2bXZbnZfvrZUWafK1P6Zlry5Qdz1J4oMPP9MUa/lWH6mRITjxaoPVlk5vujst61r07Sn3YQ/MubuPE/T7PpV0e47jdH2fzPr0ps%2bvXLXPvLl7j2l4ckNv7DQcmXDj9Ai2Z9mo6AkfYRNatdWtpdmkuw2q1lhX2I0NwYk7duZfIbW5nYtZnq7uulvLg8desNf3D%2b03S1r2%2bRUryPYX2GAbcZjV7HsF6LyqCVclinQW3UY7BZLoDRYWNQoxIGSLHGNET7cB/tagXtqougVrBa3c/KgW48pQSlLesY3bKO/KYZCptnKVw300C9nN80zejWuUv5zb8//%2bm6GUrXr61zW9ahm02isOlIReMUCwXSyRSFXJ5SoSiTHnGW0YlzjUYrT71izVP299dDYEinRjukQjP8KWjqB4botWrlKt0j0lKxMnsNUsqyr1H26OkJmi/UNes00B0wy3rznGdBXx493cGLef18G9mHr45ukSpLzoSyEkA5YiQVTzI5PS0vQcTlR61WI5tJy/VsHnq9XOcGBgfri6DabMAgtj/DAuj1GAwGDOJUaDRKi3WYVSx3qlluFVDJfXq5TcUKu4rlNjUrGvv5CodG5gvy2V7XtXnrdZeZh%2bWJUuztK0Ve0IB4rrcX7bTzbZp9rnTVdStdGtlHq2mIFU6N/O2VI1p5IaJ06OnvVaDoV8j8RRzn%2b/r6UCqVDA8Py5S%2bCZVKJfkLt0Fx7F2QBLlcbmnBeCJBKh5nQMx%2bzEDomyH0cw7aLBqCD4jtyUd/1kxv3EhXQI9m2oEyZ6Y3ZpJ6RcrESpOO4YoNwwaHzCTlASgg8gG9zA26ggZ6InWoa3b6kiZWGHX0RIxS15c0S7naocV64wj27S4Gi6Jvo%2bSEAYbdFkx6A1qdVr6/ONqL8YiymPHmcV/AYrFIo1w2ERINhQeYzWZMFhMahY7YHj9jx5NM/bhA4WCc0uEE1dNZiofiVM9kyT4XlXuzSIZyL0QZezXJ2NEUmWcjuO/0SDlxMkXhQAzrNietWhWePV48d7kpH6vXKx6MUT6WJHC/B8tNDqIPB8g%2bF5Ftot/xkX%2bhXh59JUHxpSiRB71UT6VRTvgZGDFTyhel61cq4/I8MDFekWcBq8Uic5tmniPGplQqP9sAzVgRBhjuVhO/18/46RTlE2ly%2b6NMvJGWg8y%2bEKF2Nkv%2bQIzyiSTjpzLkD0QZPyXqpmTd2Z8XJC9efOadPI7bPLR0KKm8nqZ0JE7trRyFgzFGjyZkndgjPqZ%2bnCX5ZED2JerEHvUzejRO6pkQ2ecjFA/HiD7kZfKtbMMAJkL%2bAIlkglgshsftkfcZyWQKc8MbmuMTBhgYGLi8AYTbuD0eeataGC0Rc0dJ3h%2bmejpH9VSe4otJqiezjJ/IUjyQYOpsUerGj2eovtHgT%2bUkX9ifYPKHhTp/LEPtrSKJ%2bwK4ozrKr2QoyPZ1vnw0TflohsQjQcZfy5J%2bMiL7HzuSIvlYiPLLKXI/iFM8cD4Vnj6bZ6AaYMBpRDU4xNBwPc4Xxr0Yj/AAAXnLpdPJdeJzPUBYymg2MNStIrbXT%2bVUSs6amNXK6ynGjqfI7YtSezMrdWPHEtIDLsdXjiUonMpw874Q7x33MXEsSabBSw95OS49IPqwV7ZPPB4gv78%2b28IrSkdipJ8Nyz6Lh2JEhAe8mal7gNOEUde4xtPppPcuTO8XQoxN%2bXkhYDAY5aWB1W5F268nfl%2bA8TfSjJ8ULh5j/GSa8vE0%2bX0xamdz9RA4LkIge1m%2bcjxJ8VSWW/aHef%2b1ANXjKbL7Yky%2bKfj64EdfSRJ72M/462mSTwTJ74/K9SYuQuBInMz3I%2bTFWeBwnOhDPibPZhmY8KN0GqmNV9mwYSMbN25g/YaN3HLzzcSiEXm5Iybz8iGgrRtg4S4gvhNOT89QHC0RcYUbIZA9HwKn6iGw0IXHTywMgUv5ieMZSm8U2H4gynuvBZk8IYzV4A82QyAtQ0CE2CUh8IoIgVhDVw%2bBqQUhYDGa5CnWZrNhNlvkN0/hCQtDoLkY9jcToYUecLGbSGuZ9Ax0DhO9x3dpCByru3h1QQhUTl6elyFwsh4C757wXxACObHYvRyn9HJCunYzBHL7ItLdLwyBui7yHS%2b1%2bRAwoh4cZmh4WMa/2OuFvHjwF6wBmoYH6LTaS2K/aQCxBohdIHavj/IbYoApcgcilE8mGDueILsvzMTZNNn9YcaOx6WRBF9ZwFfPputtjsfJn0pxy/4Af3fCw8TxBGnBv1nnS69EKR2NEXnYI9vHH/eR2x%2bmeDhK9BEvxSMRUs8GG7oI4YfcVM%2bmpAEGXWYcFhtWq1Vu31KaTOeTugaau9ugzATXJWnr7aS9vZ0Vq1bS1t7GsuXLWNraSuuyBpYv48%2b//BUGoxosG0YwzznRVi3YNrgwrXVgnLJju9aNYcpef17nQFs1Y17nxDTrwDBpw7LBia5mwyz49SM4q2Ym19uxNNrbRftJG4ZpG/ppG8NFA%2bZ1DjQVC7qaFf2UFdWoUbbXVa3y940zdtSjJuxfdTNQ8dPvMFAZLbNp0yZmZ2bZuHEjwYBfzvjCCZ1PhQcGaBmaidHWsQaHwYJaOYiyu%2b%2byn8YUGi3WaIiRVAJjwIvK7cQSDuJKxnDEY5hDAZyxCPqAD53XhT0WwRIKYAkHcKeSGEMBTAEfnkwKQ9DHgMeFNRLCnYrjTMSxR8MSprAfjWdE9muJhjAF/TiTUdmPMxHFEY/gTMQwBLwMu%2bzEx0YZKAsD6FEPDV9wtScWvyZESDSlMIpCoaBFvT7FMvsg1xj6aDX3c7Whj6sNvQ25ALpelnvUrIoYWBU2sCpkYEVQx6qQnpUhvSwvfBao19NfqFuoD%2brm9bJ9oP68IrSgr%2bD5tiub9YVslJcHtFL210L0WbUo5VmgXw5OQGx1vT09styvVMpnEfti9js7O2kxb8wzfffNrL33a6y7b0cDOy/F/TtZu/drrL1n%2bx8Pv2f/6/fuwLW5jCnqJZ/JkkqnSKfTZNJp8tms/C6QTCTIZbPzn8bE9bjP56Mlum2Glw%2b%2bxCMPPszBfQf46IMP%2beTDc3zy9x/xyYcX49yfHM59%2bBG/%2bcU/sWnvLjQhJ7OT0/K7QKVcoTA2SnG6SsDvJ5XNkB8bpVatMTExLs8LPmGA4NYa7/zsHc6cOcNP33mHTz75hI8//vgLgXMff8xH587x63/8FZvu3Y0m6GDHzdvZuXs339i1m9p1c5S2XUvAHyBVyJGtjbPtpm3cddddbLvppvqnscCWKm%2bdPcvhQ4d4660f8cEHH/Dee%2b/x/vvv/8lDvOe7773LLz48x8Y9O9CGRygXS%2bTyOfK5PIVCgdGxUfmXmUy6/i1AfBwVEF%2bMAoEgLbr1GQJbJojcOEVwS5XA9RPy%2bQuD6ycIbanKO0FtwEHIF5DfBkXcCxcXsy/O/m63e14n9YGAzBX%2bD53XQiMJ41CcAAAAAElFTkSuQmCC' /%3e%3c/svg%3e)
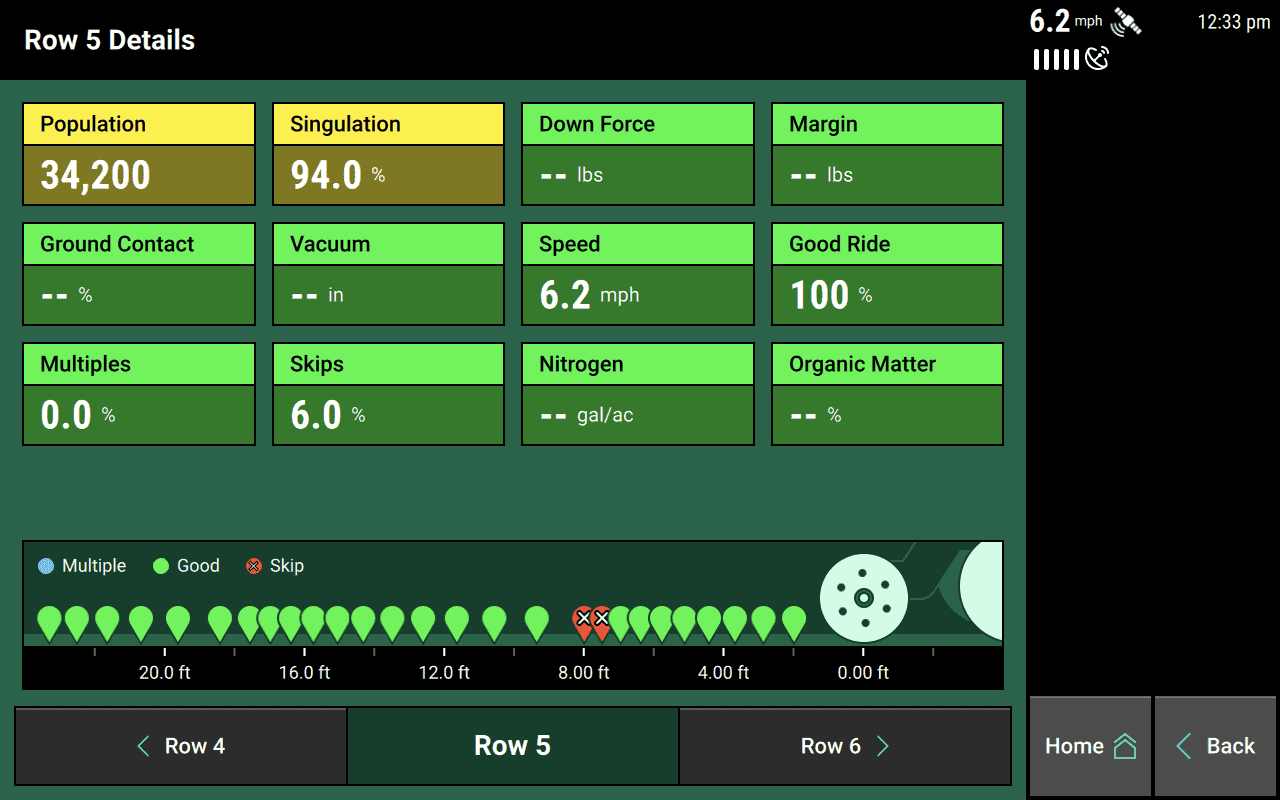
An example of the page you’d see due to a Population alarm if “Jump to Bar Chart” is selected - Being taken to the details page for the row that failed (Jump to Row Details)
' width='1280' height='800' xlink:href='data:image/png%3bbase64%2ciVBORw0KGgoAAAANSUhEUgAAAEAAAAAoCAYAAABOzvzpAAAACXBIWXMAAAsTAAALEwEAmpwYAAARkUlEQVRogdWaeXBc1ZXGbSCTgG3wItmyFltr791S7/u%2b791q7erWYhtsINjYliXLBhsTDPIOxgHCUoEykxBIMDZe8AJkwXsmK1WTSTLFzF8zlUxlaqgQoDIzv6n3WpIlWyYgSE3lj6/Offeec%2b99593%2bvntfvxkzZszgbx0zZ84UrUKpwqDXo9GomT17NlVVlWgaG6/43XADFRUVVFVVUVpayq23zmGGUBkIBDGbzajVapqamjAaTUSjESwWK7FYDJlM%2bjeRAJlcidVqRdrQICagoaGBdDrNTTfdNO5XVbWEhvp6pBIJJSUlzJg5YyYOuwOv24PL4UQulaFt0pLNZAgGgmTTaZo0mv/3m/w0qK6uJplK4ff7MZlMVFZWTkrQlLjhSzd%2bqs5v%2bNJNkzBTwE2jdgJu%2bCTcdJ3yJ0AY4y/53PjlL4lzbJAUn7jX60Wj0VBWVjbFvcwUEzKeFGkhhKwQQr0sjLJPQAh1f1iEvCeELB9Cmg8i6fIX0R0QIS8EUPYGkReColUI5R7BL3DFdxRifHcAWW8QWU8QaSE4oXyt/9gYQru8LyRaAdf4jaKh04%2b8L8Lflc397CtHsTzKc9/y8/oRDydPBTh6zMdrh72ceMPPO%2b%2bEuXQxyoULUc6fj/Luz6LsfDZI%2b6YAp9/wceg1L6dPBzh8xMvrR32cPBng/PkIF0djLl2Kcu5shOAaP7HvxGk9FqXtdJL2M0maj0RF2/l2mp7LORGFizmW/bKF4FMxLFvDtJ%2bOk3k1QvuZFG2nkuN%2b47iUo/fHOfJnszSujjBn6eLiar3xxk9e9hMh7wtz8VyId886OXnIwg9PWDlz2Cza/3gvAh9m4f00//tfafjfLN89GmbV9gC//3WAM4ctnPiuibeOWPjRCRvnTjv48x9S8EFGjBHs//whRWqDj85LzfScjdJ6PEjfP6TIn43RfipE7%2bUEAx8WWP%2bnAuv%2bmGcTvWReTeHeHeWOX6XJHfaTecVL19sRBj4q%2bk2EUHfvf3ahXRtmVuXokp/5GVaArC/M%2biEVzzyuZd8OJU/s0/Lko3rRPrZLze6HFex5RCHaAzvl3L5Oi7ffzIFdKg7s1YgxX9/XxON7VOzfpWTviFL0F7B3RMGuh%2bRYeuzoN%2bpx7dXi3mPAsbNovXtNeHYbcY3oRTgf0ePZrUO31oxyuQ3nzkZce/U4d%2bjEGNcOw7jvOHbocTykRbHMx5zqxdNLwIpVEo58bzPHjmznG1/v4K0zBzj3zkG%2b%2bUwvG9Ys5r7BBoYH6nhgqIauVRrMbUqee7KT77/9NC8%2bv5LXXt3GnhEPW4cVDA/UsHlDHZs21LF5sI7h9bXouyw0frWJ9EiI8INeWnensA/r0A0oMGxQYhhUFbFBhXGjAvVKPZK8gcADdmIPBcjsiBHf7ke3QXHFdwxDKvTrFMh6vdNMQG%2bYlXdJefbxFE8faOHZJ9p55kCO558usPcRF5vWL2HLYB33Ddbx0MZquleqcHTrGNnSxFP7Mzz5WJJvPJ7loftUbN3YwP2DtWwZrC3aoVo2D9Rg6LaivluD63499s06AtvsWIY1GIaUGCdiUIlpUzEBsoIJ67BG9PdsseDZYsIwqJjsL2CjEv16IQGe6SVA3h9F32XDnNdh7NJhKZgwdmkxdDZhLhix9dmw9lixdFuwdpvR5p2o8j4s3UaMozHGbh2WvBlztxlL3iL6ishbMHdbUBQEZncg67Mi67Eh6bEizdumRrfQ5kaa9yItWJH12ZAK/r02FMscyHrsSLuviumyIu8PM6d6Ghwg748QfylB9niSllMZcqfSZI%2bmyB5PkTuZJnsiScubaboutNDzizaCzyYwbgrT%2blaazOtJ2t7OinHtP8jSfbmVrostdF9qKdrLrXSey9G0JkjqpQQtx%2bK0nUrTcjRB/pzA4i2TULjQwrJftBJ4Mo5li6ACSXJHk7SeSJH5XozM96J0fj9Dz%2bVWChdbRPRcbqH7nWYa74kwu2o6CeiL0HMhQ%2b%2bFGB2nQ7S/EaRwLkbvpTjtJ4O0Hg/Q/9Mk6z8oMnTL8TSOhyPc9V4z7W%2bERHZuOxHg9n/MMvTnHgY%2byDPwYZ6BP%2bXZ8FGBde93YdgQpOdSlo43gzQf8dFyzM%2b69/Ns%2bLiHAYHJPyziahVY%2bds0ueN%2bWk8GyJ%2bLkjvsY/kv0wz%2bd684n/WjY3xOFYhgHNKJDO3arRfZ2bPHiHu3Ee8%2bE569Rty7DOMMrV9vQrnMjnNHE649epw7dcWY3Uac1zC0AefDOuQ9DszDBpy7tfj3WQk8ZsO6XY1te%2bMk/8kqYMW3x0hwv53gozZ8%2b8y49xqKc/lCVaA3TNNdGlIjIULb3AQecBbZeVCFXmDocYwxtA5JtwnfFivx7QHCX/Pgus%2bIbkCOcQqGNgwoqe%2b0YFtn5eFXt7HiiT7ufe5OIg8FaN%2bbwbyxsTjOBBXQrDRQ36UjPRJj7%2bEdvHz2O6x%2b7k6cm43iXIxfqAr0hWm8S4Xzfj22YS22TVoMg1cx7SgEhtas0iLNm7FuFBhaj%2bM%2bPdZNTRiGpmJo4aaUSLps6O/RcsdTBQr720mPBHFvsRB60IFxSDWlCkgLRhybdRQea%2bXuZ24XH5B5o3rc7wtVAUmXHVm/DVmfXYSi/zpsmxcY2oU07xMZWt5vLzJ0/pNY3Ta637dTW9BTlzfSkDeLcfVd5mvHmKQCFtG/ulMnxshH5ybvcyDvtX9xKpB8KU7z4RjZQzFyryfIHU3Q9cPsONuOMXT/z1sJPxvHtDlM2xsJ0i9H6XgzM87ohYmMLjJ0q9jWtDpI%2bpUkzYditBxLijFtp1JX4i5eRwXOJGk9lqLjTIb202majwhngyi5Ywnaz6S/IBXoj1A4n6HjrSAtx/00H/HS/JqP5e9eYVtxr/7HPMOjKuB8JMLK32REv%2bbXfdzzuw6R0QVWHmN0sfxRgbXvdxdV4HKWzjdDtJ8O0fyqT1SX1b/rZMPHo75Xq8CuCHf9azPNh3xkD3np/lGU/LkYuSM%2b2gSlOh8XzwJC/Oc%2bC5iG9AQPWEWm9e%2b1iKwusO1UDC2ogGKZDddOnagCov9OA45HdFPs00dVoNeJaViHe59OVBrbI404d2lxjGg/QQVsOHc04hDG2aUXlUnAmDIJ5S9EBSS9QUyrTew5MsLGg4MMHVwvsq1pUD2Z0UcZunGVniVtGu55ZiUDL6xhx6GHSY9EcGzWo59ir65fXyRBrXgWCBPY6iS3K0nbnizhB12TY8aU5o4JZ4HtfkIPerBubCqq04DyijqNxuk%2b71lAe3cj/U900LO/neadUUwb1Zg2TmDnMYYeFlRAR12njuyOMCueLIgxrvsNxb39FHt1w4BCJLqmu9U4t%2bhw3Gcgtt2Lf5sd9xbjpBhBfUzDctR36JAWTNiGNaIS2DdrRQWY8iwwJKiA/HOowLIo0ryDmi4DtV1G6rvNyHocyHoFpr0admQ9buQ9Aeq6TeMx0h6bqBrX%2bgtqIiCArOAU/QQ05C1IClYkBdt1xvAg6/EjLQj%2bgtIIdVPNZ3SMgh35ssj0VECxPIZieQLliuQ4hOvrI44Q8%2bn9BRTH%2bPSIj%2bIv%2b8pFxFHekWDO0kXTWwHyv3EolkVR3h6fXgIUy6MoVsRQrIhfhdgEXK9OeLJ/RYz1vyKG6vYEqjuElVpcgWP1wo3LhCRMPwExZD0hJHkfDYXAOKS9wtvgEJLuIBLhjaz4JjdMg4BCsOgjvDXuDf/VIZxYa9o9VLU4xXkI12JbT4i6Th/KZUIipvkTkPWGKHNpqQq5qPEbqPYZRFtmU1HuV7E0qmWJW8dSr56FNiW1VgU1Hh01fiOL7CpKrQoWXgel17GfBhNj5hkacPRnSA/0U%2bnRssAqp8yu4jZDAx3b7uH4b89iW93GzVUlnz0B0oKfJTEvutVDOAtp/MvbiKxsp9ZnRrbCgHmDD0tLAk9/M4u9TYTcahw5P4GVndSGTZQ6lZS5NSxyqT8dnKOYqs09%2bXqxp5G5JgmrHt3MTz9%2bj5989B4v/uQ41WGTmIT6Ng%2bn//0n/BP/hmtdFzdXTiMB8r6I%2bGTnNkm4TStlnl4uYr5RwXyDgnk6OQvMCuYb5cVrg4K5OjlztTLm6xXjWGBUiu2CHUOJuWhLrarx6xKnihKHghLTlVgR4lhFO9aPMEaV18APfv9zXn73DPvP/D2XP/gtfTsGmGWoQ39nlksf/IYf//E300%2bANB9maaKJ2MEwwacCuPd48ezzYt/uwrrNiWPEQ9O9VgxDdnyP%2bwg9EyD1cpTUK1FiB0NEXwgRezGM51EvgSf9uHd7cI54cO/1ol1nxXdA0HPhhYkX1VoLWpOatWEXnVsDxA5FSL0UIfHtMJFvBol/Kyz273/CL8YHvuFHtcLKsV%2bf59h753j%2b0hF%2b9vG/kNu0klmN1SwOaHn2wiH%2bmd/jvLdzmgkohGnosJI73kzqlTSh5%2bLEDibxfT2Gd3%2bU4NMxLA8EcO4Ii/XZwxk6f9RCx/dbaDmRJXc8S/PRLNGDSZLfSRF%2bLi7GRF5IiHHJl1Oo73YTeyGB/sEgtpCFA2kva3fHabnYSuebOdrO5Gg%2bliV3LEv61TTxb6eIPJ8gcyiL4i4b2fu/yg/%2b8EvOv/8r9p55kaq4haUJK4tDevTLknzzx6/jGcjzlcoF0/sJzJUu4eayUmZVLOTWJYuZXbWIWyoWclt1OSUNS8VrAWJb5SJuKS9ldsUi5tcuEcs3Ly7GzaqcEFe/VLyeVbmQ22oqxKPqrKpF3FZfQZmkijkVpWLsHKG%2bYqzPMhbUL%2bWW8oXiXOYsWcytNeV8uWI%2b5co65FYtX6lYwOzqMuY1VDG3voJbqkq5pbKEhlYPt9aVizc184aZn0EF%2bsLihwNTNcqq66ktX8LCOdf%2b6VhdVkFdxVJKZ992TduSheXUVVRTOufWa/tcWoe0RsKCWXOuaauvqkFRK2H%2bzbdMqr9xxgxqy5fSUFXLvC/fPOVcq%2bMW5tSOngU%2bC%2bTLopTZlZToGyg1SCk1SEYhpcKmpsKmYrFFMaG%2biLG2MrOCUl3DJCw2ySk3K0W7cEL9Ir2USouKSouSxUYZpdorbQuNMirFPtWUmeWU6q/MY5FJRqVdTZVdc1XbFZ/6Th9lqjpK5s6ndGGp%2bAVISWmJaOfNm8eCBQvE8kTMnTuXGdIWD2qflcaQA03QPgkqvxWF14zSZxHL6oBt3E8oC9D4bdSGzFQlLCyJF1EVM4soDxsoC%2bmpiBopjxhECPWVMRNVcXPRX4iLmMb7E/sM2sfHGRtbmIdgNeIcJswzZKcpYKcuYkEXdpGKJ8SvWmLxGPF4nFQiidvtJhKJkEomi22xGMlkEqfTyQxJwo6iXopSKkcplRWtRIZSrkClUmM3WzFq9RiadOjUjSgkY76jqJdSrmmgxC7I3egGxqZkvlmKPObE2BJmiVePNGpHEXMw3ywT28d8S8XVJ0EukaKa0K9CIkMtV%2bK02tFpmjDrDGhUapQKZXF%2bE%2barrpdRY9Ggi7joau8gl8vRksuRbM6Q7m7D5XQSiUVJNGfoaG%2bntbWVtrY2HA4HMyRJB0qFApVajUqtKkKlQq3X0mQz0dbWzvLly8k2N%2bNyu5BP8lWjUiqp1MtZKGyGRjc5wsZonkWKo5Dhzq8Ns2rbEO3rV%2bLpzTLPIqPM3ThhQ6RhoVmOQqWc1K9SpRI/cOpfvpxCTw9trS2Y7FbUZoM45kRfjVJFrb1JTMDa1feyYWiI4cEhOlb2kVmzApfTRSSVIN7RyprVa9i6dStrVq/GbrcXV4CQfeGJK%2bTyq6BAJpEil8nEj4qE74cm%2bylQSGWUN0oocSiLW1dbEcJTLrHKKbHIRTtWN9Y%2bjrEVIJuib5lcHF%2bwwtiK68xRJZFTY9Wgj7jJJlMkkgmSiSSpVIpscxaPx0MsGiOdyYhLX0Amk8HlcjNDJnyOkrAjrISpIB2zKed4eRISDmpTdmqyjukj/ZfH/yRIEw7qci6UbhNuhxOH0yH%2bvoUlLjx9rVYrfj02VifWu1ziF3H/B1OC02NYU73yAAAAAElFTkSuQmCC' /%3e%3c/svg%3e)
An example of the page you’d see for a failure on Row 5 if “Jump to Row Details” is selected. - Being taken to the home screen (Jump to Homepage)
- Remaining on whatever page you were on when the failure occurred (No Action)
Configure Behavior When Planting Outside Prescription Boundaries
When your implement crosses outside the boundaries of the current prescription, it can do either of two things:
- Revert to the default population (Default)
- Keep on planting the same population from when the implement was last inside the prescription boundary (Current)
To change between these options, tap Out of Prescription and select which one you want.
Quickly Adjust Crop-Related Equipment Settings
Since you may want to update which rows on your implement are active when you switch crops, the 20|20 includes a shortcut to change that setting from the Crop setup page. Changing this value will update the corresponding value in the Equipment setup menu.
Changing Active Rows will change the corresponding active rows setting in the Equipment setup menu, not the active rows in the Seeding section of the Systems setup menu. That means that setting a row inactive will turn off all systems on that row, not just seeding.
Quickly Adjust Seeding System Settings
As with Active Rows (discussed above), you may want to update Swath Coverage Pattern when switching crops. Changing this value will update the corresponding value on the Seeding page of the Systems setup menu.
Quickly Adjust Crop-Related Control Settings
Likewise, you may want to update Population settings when switching crops. The Crop setup page has two shortcuts that affect the Population control page: Default Population and Quick Adjust Population.
Default Population determines what population the system should use when it is not explicitly told a different population.
Quick Adjust Population changes the behavior of the + and - buttons on the Population control page. If you set the value of this input field to 400, for example, then hitting + on that page will increase the population setting by 400-seed increments.
Configure Alerts and Alarms for Each System Used with Current Crop
The 20|20 is designed to make sure that, when you're out in the field, you always know what's working and what's not. That way you can stay in control and on top of changing conditions.
In order to alert you when something goes wrong, though, the 20|20 needs to know what you consider "wrong" to be. In the Crops setup menu, you can do just that, by setting two thresholds for each metric you care about:
- An "alert" level, where things are still working but you want to keep an eye on them. Metrics that cross this threshold will be displayed in yellow on the home screen and on metrics pages.
-
An "alarm" or "failure" level that demands immediate attention. Metrics that cross this threshold will will be displayed in red. And to make sure you notice the problem, the 20|20 will sound an alarm and automatically display a relevant page on the screen (depending on your settings in this menu).
You can customize alarm sounds and volumes in the Display Settings menu.
To configure the alert and alarm settings for a particular metric, go to Crops and then select the appropriate system in the sidebar. You'll see a list of all configurable metrics for that system. Simply tap on the ones you want to change and enter the value you want.
These settings are all crop-specific. If you switch crops on the Crop settings page, then all systems in the Crops setup menu will change as well.
Fine-Tune Row Unit Position Measurements
You can also adjust the row unit positions from the Crops Setup Menu by tapping Custom Table. This will bring up a table listing all of the rows on your implement and their respective distances from its center point.
Tap on a row and use the keypad on the right to update its value.