Depth
Learn how to set up and use your depth system.
Updated January 28, 2022
Pairing your 20|20 with a Depth system, like SmartDepth, lets you adjust the depth of your planting quickly and easily from the cab, whether manually on the go or by preconfigured prescriptions. You can even pair it with SmartFirmer to adjust depth automatically to ensure that your seeds are always planted where the soil moisture is ideal.
Table of Contents
- Set Up a Depth System
-
Operate SmartDepth with Your 20|20
- Add a Control Widget to Your Home Screen
- Enable the Depth System
- Adjust the Target Depth
- Add Set Points For Quick Adjustments
- Use a Depth Prescription to Adjust According to Prior Plans
- Pair with SmartFirmer to Adjust Depth Automatically
- Plant at Different Depths on Different Sections of the Implement
- Plant a Trial Run and Manually Check Depth (Recommended)
- Operate Depth Actuators Manually
- Calibrate SmartDepth
Set Up a Depth System
Set up SmartDepth the same way you would any other new module:
-
In the Equipment setup menu, add a new SmartDepth system.
- Tap Add System in the sidebar.
- Select Depth in the popup.
- Press the Add Product button at the bottom of the page.
- Select Depth.
-
In the Systems setup menu, add all hardware associated with the system you just created.
- In the Systems menu sidebar, tap Depth.
- Press the Add Hardware button at the bottom of the page.
- Select SmartDepth.
-
Select the rows where you have installed SmartDepth modules.
If you would like to manually adjust the Calibration Offset, you can also do that here. But this is an advanced setting, and you should generally use the calibration procedure described below to set this value automatically.
- Press Done at the bottom.
-
Still in the same Systems setup menu, configure any settings that apply to the system as a whole.
- Decide which rows should be active for this system (Active Rows).
- Calibrate your SmartDepth modules by pressing the Calibration button and walking through the steps shown on the screen. We will return to discuss this process in more depth below.
-
In the Diagnose menu, make sure that everything is green.
- If not, troubleshoot using the usual color coding and other more system-specific diagnose information (discussed below).
Operate SmartDepth with Your 20|20
Add a Control Widget to Your Home Screen
To access the control page for SmartDepth you’ll need a control widget for the Depth system on your home screen. Once you’ve added one, you can get to the control page any time by tapping it.
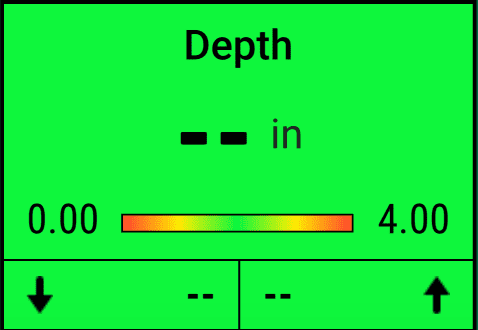
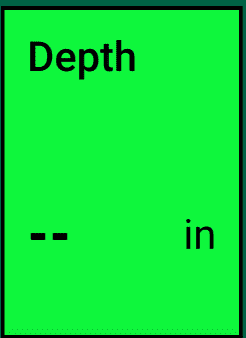
Control widgets are available in Wide, Tall, and Large sizes for SmartDepth. The Large size not only serves as a shortcut to the Depth control page, it also lets you bump your target depth up or down easily on the go.

When the Depth system is enabled, the control widget will also show the system’s currently configured target depth.
Enable the Depth System
To enable your depth system, go to its control page by tapping on the Depth control widget on your home screen. (If you don’t see that widget, you may need to add it first.) Then press Enabled on the toggle button in the top right corner of the page.
Adjust the Target Depth
You can set the target depth for your system manually on its control page. Tap on the Depth control widget on your home screen (or add one to it first, if needed).
Then use any of the following methods to set the depth you want:
- Enter a specific value by tapping on the white input field near the top. A keyboard will pop up that you can use to type in the value you want.
- Press one of the buttons for pre-configured set points in the center of the page (See the next section for how to adjust these set points.)
- Fine tune the value by pressing the + and - buttons on the right.
- Adjust the slider on the left to the desired depth. Moving the slider towards the top will decrease the depth. Think of the slider itself as modeling how far down you want the seeds to be planted.
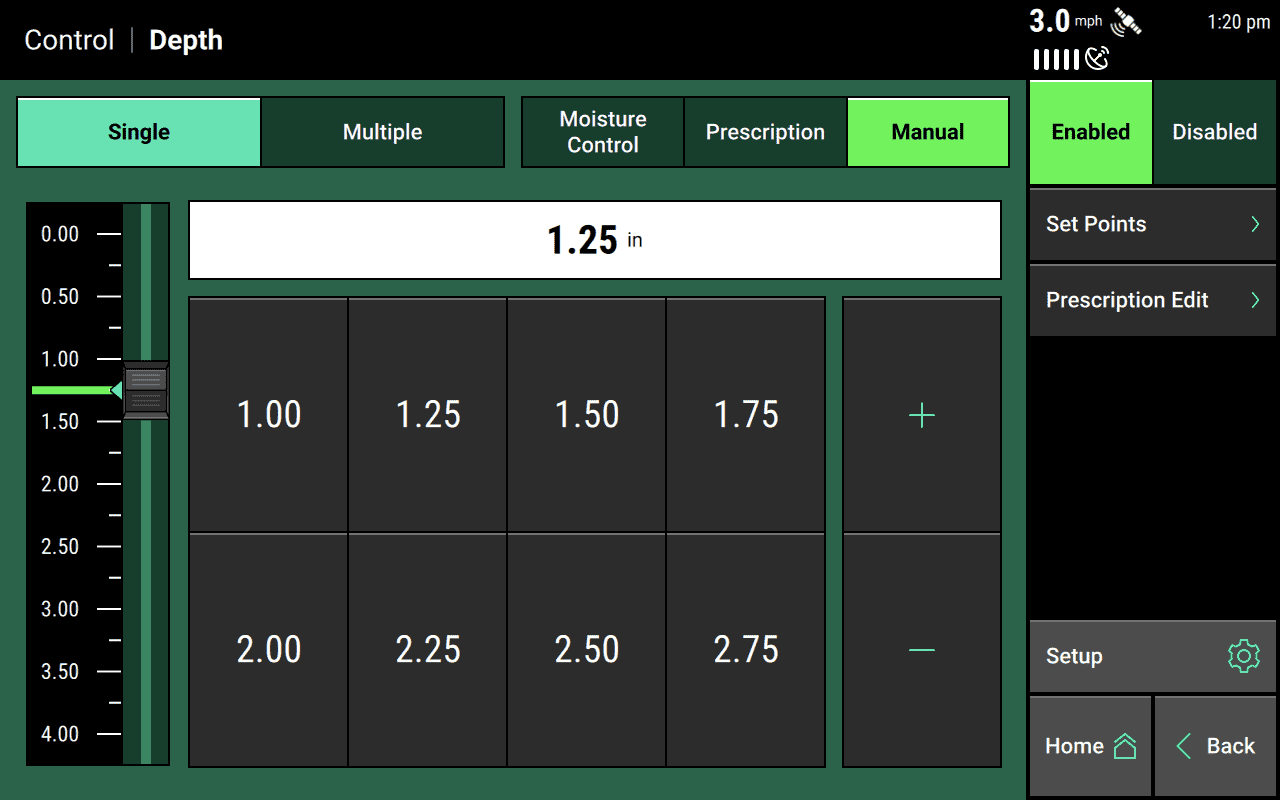
Add Set Points For Quick Adjustments
To make switching between specific targets easier, you can add favorite values (called set points) that will show up on the buttons in the middle of the page. Simply tap Set Points in the sidebar, and then tap any of the existing values to change them. Once you’re done, hit Back and then use your new set points by tapping on them to make them active.
If you have Tank Pressure Sense installed and configured, the current tank pressure will be listed on the top right of the control page, next to the target pressure.
Use a Depth Prescription to Adjust According to Prior Plans
Instead of manually adjusting depth, you can also use a prescription. Make sure you’ve already imported the prescription to the 20|20, then just switch the button in the top right of the control page from Manual to Prescription. This will bring up a popup that you can use to select the prescription you want.
If you’d like to make any last minute adjustments to your prescription, you can also do that in the prescription editor. Just press Prescription Edit in the sidebar and adjust zone depths as needed.
When using prescriptions, make sure to set a default value for the depth so that the 20|20 knows what to do if the implement ever goes outside the prescription boundaries. You can find this default setting by going to the Crops setup menu and tapping Depth in the sidebar.
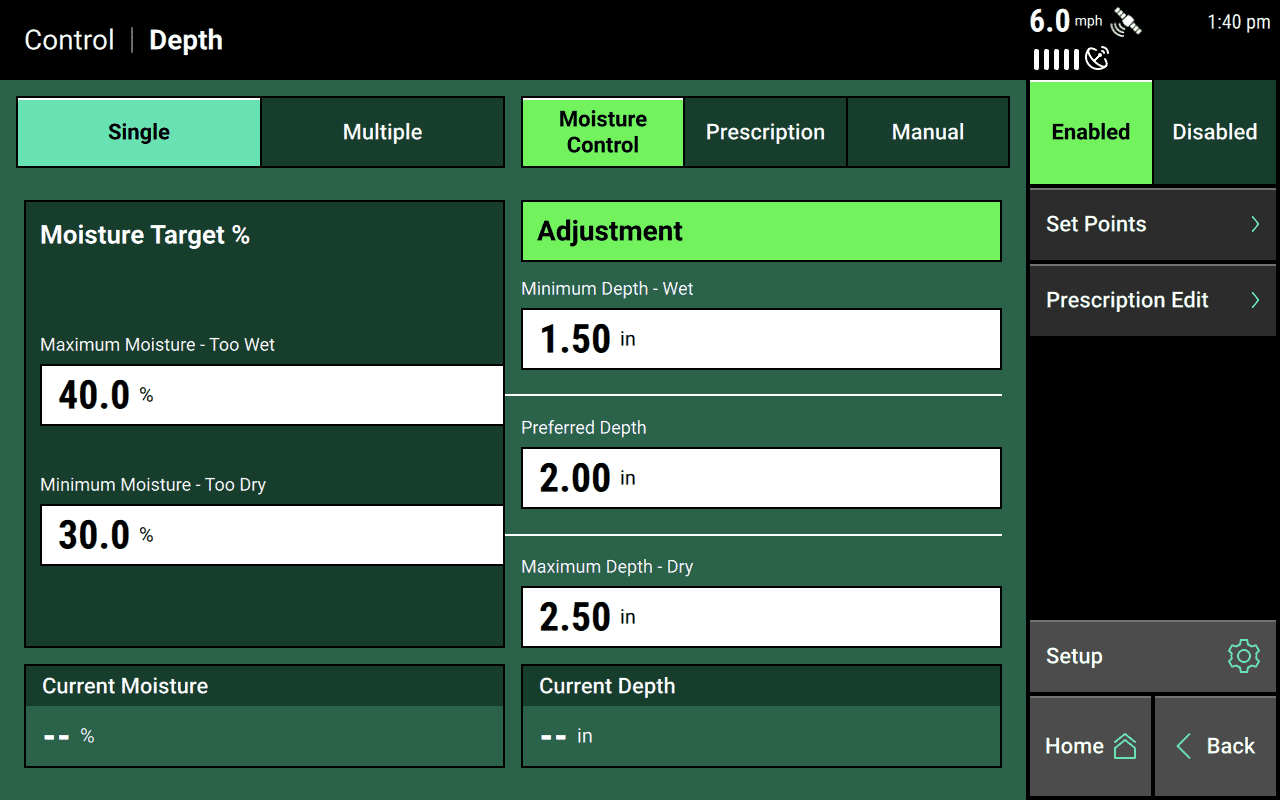
Pair with SmartFirmer to Adjust Depth Automatically
If you have SmartFirmer modules installed, you don’t have to set depth manually. You can simply set a moisture range within which you want to plant your seeds, and the SmartFirmer will adjust the depth to make sure you stay within it.
On the Depth control page, switch the button in the top right from Manual to Moisture Control. Then set your upper and lower bounds for acceptable moisture on the left. Higher percentages mean more moisture.
Additionally, you can set depth boundaries on the right to keep the seeds from straying too far away from each other in depth even when you can’t hit the target moisture:
- The minimum depth will keep the depth module from leaving the seed too close to the surface if the soil is wet.
- The maximum depth will keep the depth module from burying it too deeply if the soil is dry.
- Finally preferred depth gives the depth module a rough target to prefer if possible, assuming it’s within the target moisture range.
Plant at Different Depths on Different Sections of the Implement
You can also configure all of the above options on a per-section basis if you have your implement configured to use multiple rate sections.
We recommend that each rate section have at least four SmartFirmer modules if you are using moisture control. If a rate section has fewer modules, it may not perform as expected.
Plant a Trial Run and Manually Check Depth (Recommended)
When you start a field, you should estimate an initial depth setting based on what you’ve found from digging in the field to find the moisture line, the type of tillage, and the weather forecast.
After planting about a hundred feet, you should stop and dig to confirm that your seedings are ending up within the depth range you want. Varying tillage, downforce settings, and residue management may cause your actual depth to differ from the expected depth you commanded in the 20|20. In such cases, you’ll have to compensate for the discrepancy by increasing or decreasing the control setting.
Monitor System Performance
Add a Metrics Widget to Home Screen
To keep tabs on how your Depth system is performing, you can add a metrics widget to your home screen. Metrics widgets are available for Depth systems in all sizes, from Small to Extra Large.
Additionally, you can configure your Dashboard Mini-Chart to show you Depth metrics on a row-by-row basis, either all the time or on a rotating basis (swapping out other metrics at a regular interval).
View Depth on Home Screen Map
You can also switch layers on your home screen map to show you how each row of the Depth system is performing.
Operate Depth Actuators Manually
If you’d prefer to adjust the depth actuators manually, instead of using the 20|20, you can use the push buttons on each modul (For example, you might want to move the actuator out of the way while working on the row unit.)
If you press the top button, the actuator moves to a shallower setting, and if you press the bottom button, the actuator moves to a deeper setting.
The 20|20 will show the adjusted depths, so you will still see accurate depth readings on your monitor. But you will no longer be able to control the affected modules through the monitor, even if you enter new commands.
To restore control to the 20|20, go to the Diagnose menu, select the SmartDepth system, and press Clear in the righthand column of each row, labeled Manual Override. To restore all rows at once, press the Clear Manual Overrides button on the righthand edge of the bottom of the page.
Calibrate SmartDepth
You must calibrate depth and range measurements for SmartDepth if:
- you’ve just installed the system
- you’ve replaced any row unit hardware
- you’ve replaced any SmartDepth hardware
- the Diagnose page says, Needs Offset Calibration
- the Diagnose page says, Needs Range Calibration
To begin calibration,
- Park the planter over a concrete pad with the planter unfolded
- Navigate to the Systems setup menu. Tap Depth in the sidebar. Then press the Calibration button.
-
Ensure that you’ve covered everything in the pre-calibration checklist on the screen, then press Continue.
If you have already completed the range-finding calibration and you just want to perform the depth calibration, you can press Skip Step instead of Continue to jump straight to the depth calibration.
- During the range-finding calibration process, the actuators will travel their full range of motion — as deep and as shallow as possible — to find the range of possible settings. A progress bar will indicate where the system is in the process.
- Next, you’ll be asked to prepare for the second calibration. Make sure you have two roughly three-foot-long boards on hand to use during the next steps, such as a 2x6 or 2x4. Use the input box to enter the thickness of the boards. The default setting — 1.5” — assumes that you are using a standard 2x4.
- Ensure the planter is lowered, then press Continue.
-
The SmartDepth actuators will move to the deepest setting to prepare for the row by row calibration. Ensure that each row says Moving to Max Depth in the State column.
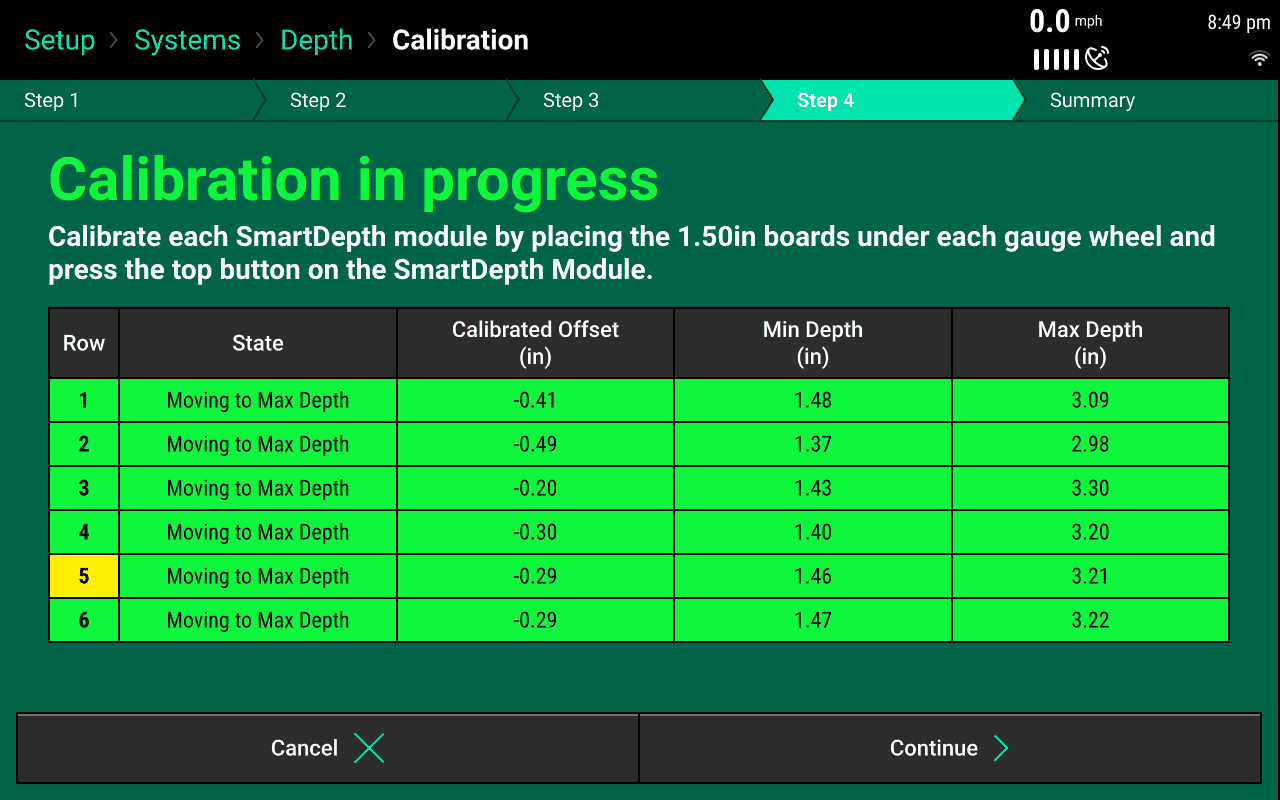
Each row should say Moving to Max Depth in the State column. 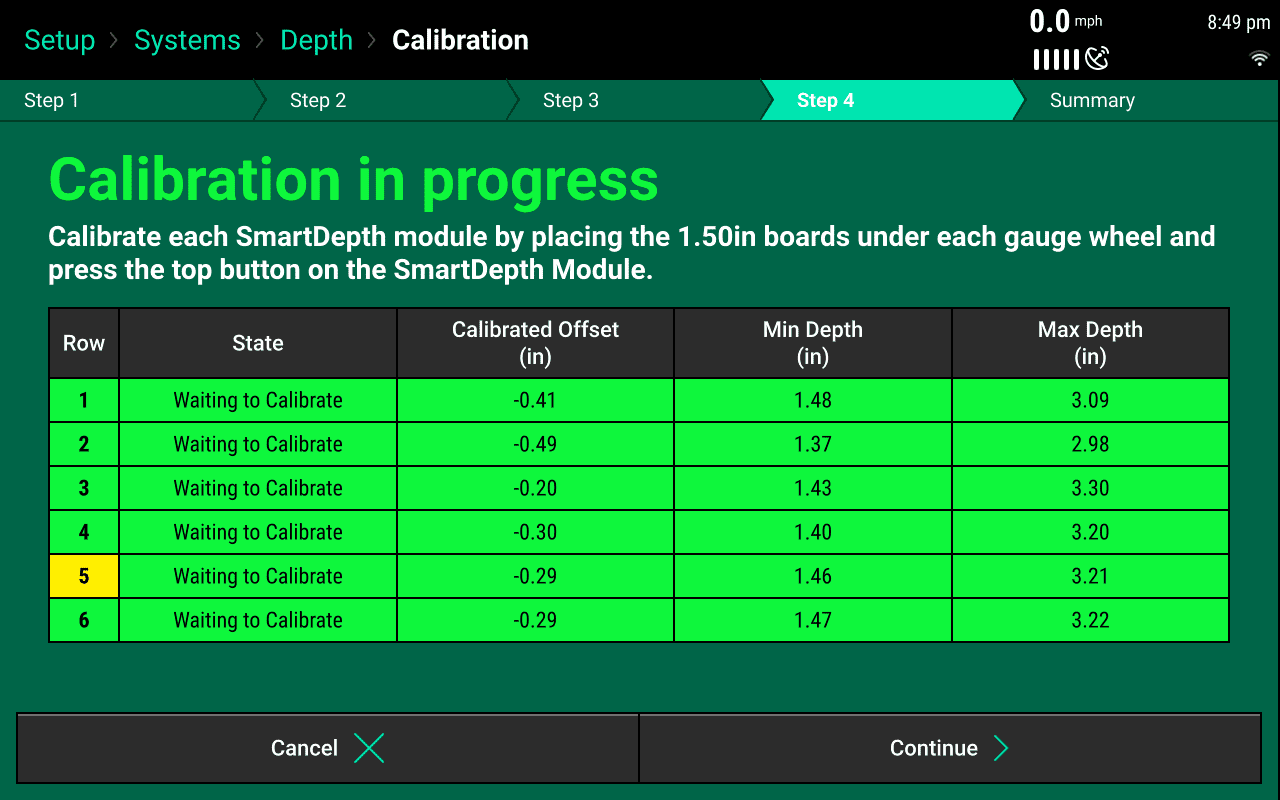
- With the planter lowered, push your board under each gauge wheel of the row you want to calibrate. Since the actuator is in the deepest position, the blocks can be slid under each gauge wheel. Verify that the gauge wheels are resting directly on the boards and the opening disks are fully resting on the concrete and not the board.
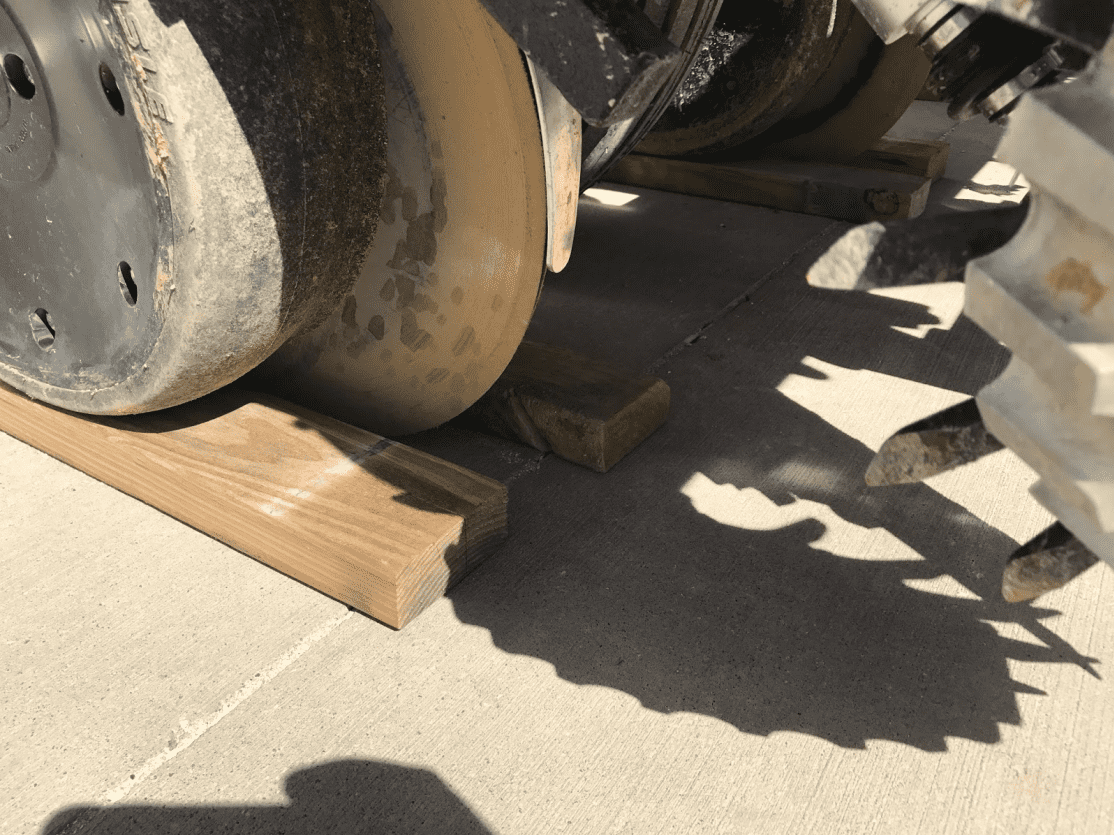
- With the boards in place, start the calibration by pushing the top button on the depth control module. The actuator will move toward the shallow end of the depth settings until the gauge wheels begin to carry a load on the boards. At this point we know that the gauge wheels have
reached the 1.5” depth of the block they sit on. The actuator will move past this point and begin to lift the row unit.
- Once the modules moves back to the deepest setting you can remove the boards.
- Remove the two boards and move them to the next row unit and repeat the process until all rows have been calibrated.
- After all of the rows have been calibrated and the State Column says Complete, press Continue. Then confirm your choice to finish.
- The Calibration Results page will display the calibration state of all the rows.
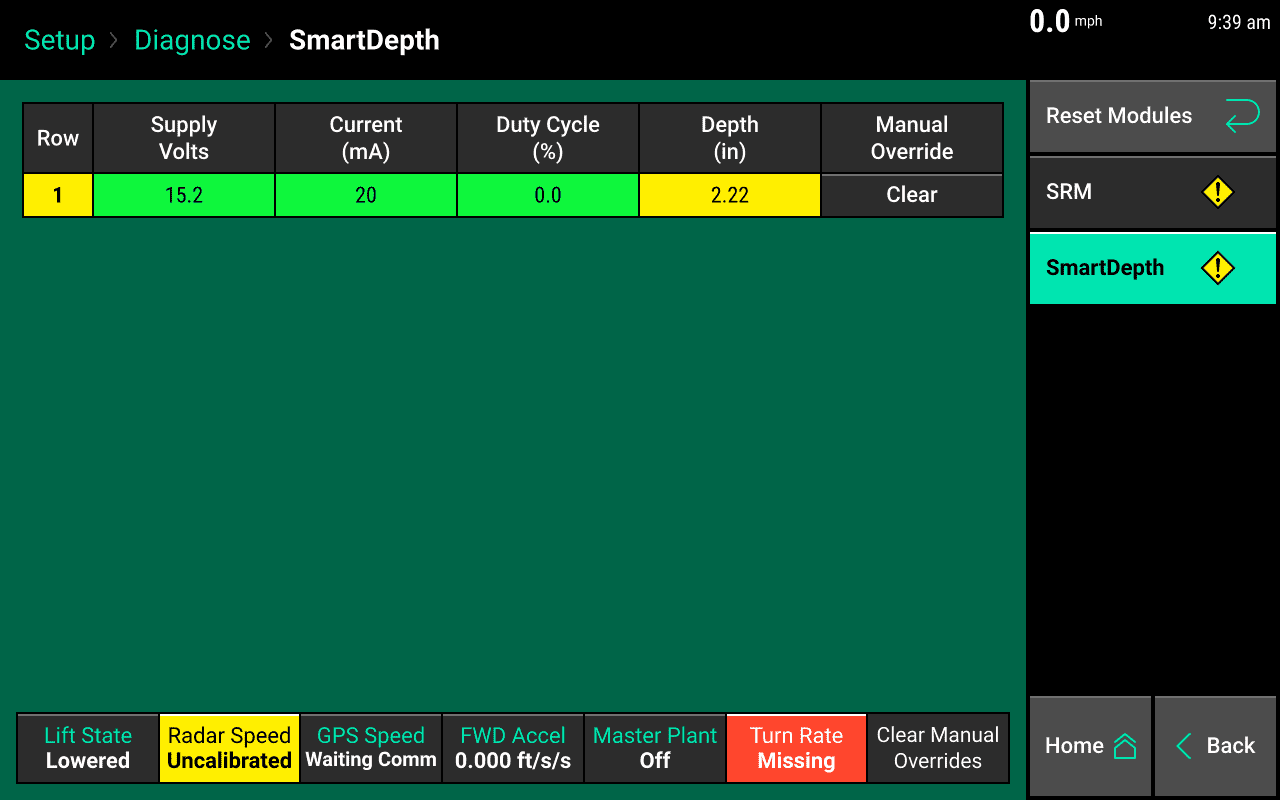
Diagnose SmartDepth
The SmartDepth Diagnose page displays the following information for each SmartDepth module:
- Row - The row the module is installed on
- Supply Volts – Voltage at module
- Current - Current draw on the system for module
- Duty Cycle – Percent of time the motor circuit is on
- Depth - The actual depth of the module
- Manual Override - A Clear button will appear if the manual override button on the SmartDepth module is pressed. Clearing will restore control of the module to the 20|20.
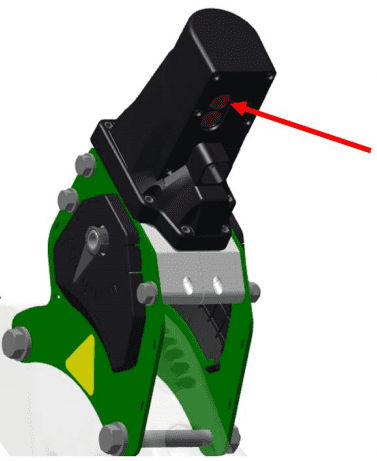
Understand the Yellow Indicator Light on Each Module
The yellow light on each SmartDepth module indicates its calibration and health state:
- A solid yellow light means that the module is waiting to calibrate for the first time. There is no valid offset saved.
- If the light alternates on for 1.5 seconds and off 0.5s, the module is waiting to calibrate the first time, but there is a valid offset saved.
- If it is flashing quickly, the module is operating normally, but the motor is bad or the sensor is invalid.
- If it is flashing with a red LED, the module is operating normally and movement is in progress.
-
If the light is off, it could mean either of two things:
- The module is operating normally and no movement is in progress.
- The module is waiting to recalibrate, but it has been calibrated before.