Data
Get to know the 20|20's Data setup menu.
Updated January 28, 2022
The Data setup menu is where the 20|20 interfaces with the outside world. There, you can do things like importing settings from another monitor, exporting coverage data to a USB drive, or updating your software to a newer version.
Table of Contents
Find the Data Setup Menu
As its name implies, the Data setup menu is accessible from the main Setup menu, which you can reach from anywhere by tapping Home (if you're not already on the home screen) and then Setup.
Once on the Setup page, tap on the Data button in the sidebar.
Export Settings and Data
Export Configurations to USB
Since the 20|20 is so customizable, it can take a lot of work to get yours configured the way you like. Once you do, you may want to back up your configuration to a USB drive so you can restore or transfer it to a new device if you ever need to.
After inserting your USB drive into the left side of the monitor, go to the Data setup menu, tap Export in the sidebar, and select one of the following export types, depending on which settings you want to save:
- Account Configuration: This saves all the configuration done in the Fields and Equipment setup menus. It is not limited to the active settings, but includes inactive ones as well.
- Device Configuration: This saves only the active settings under Equipment and Systems, as well as all Crops and Products settings.
- Display Configuration: This saves the layout of your home screen as well as settings under Display in the Systems setup menu (such as sound and brightness).
Once you've selected an export type, you'll be asked to name your configuration. After typing in the name you want, hit Enter and the 20|20 will save it to the USB drive.
Export Generated Data, Prescriptions, or Boundaries to USB
If you want to backup data generated by the 20|20 or transfer it to another system, first make sure you have a USB drive plugged into the left side of the display.
Then go to the Data setup menu, tap Export in the sidebar, and select which type of export you want.
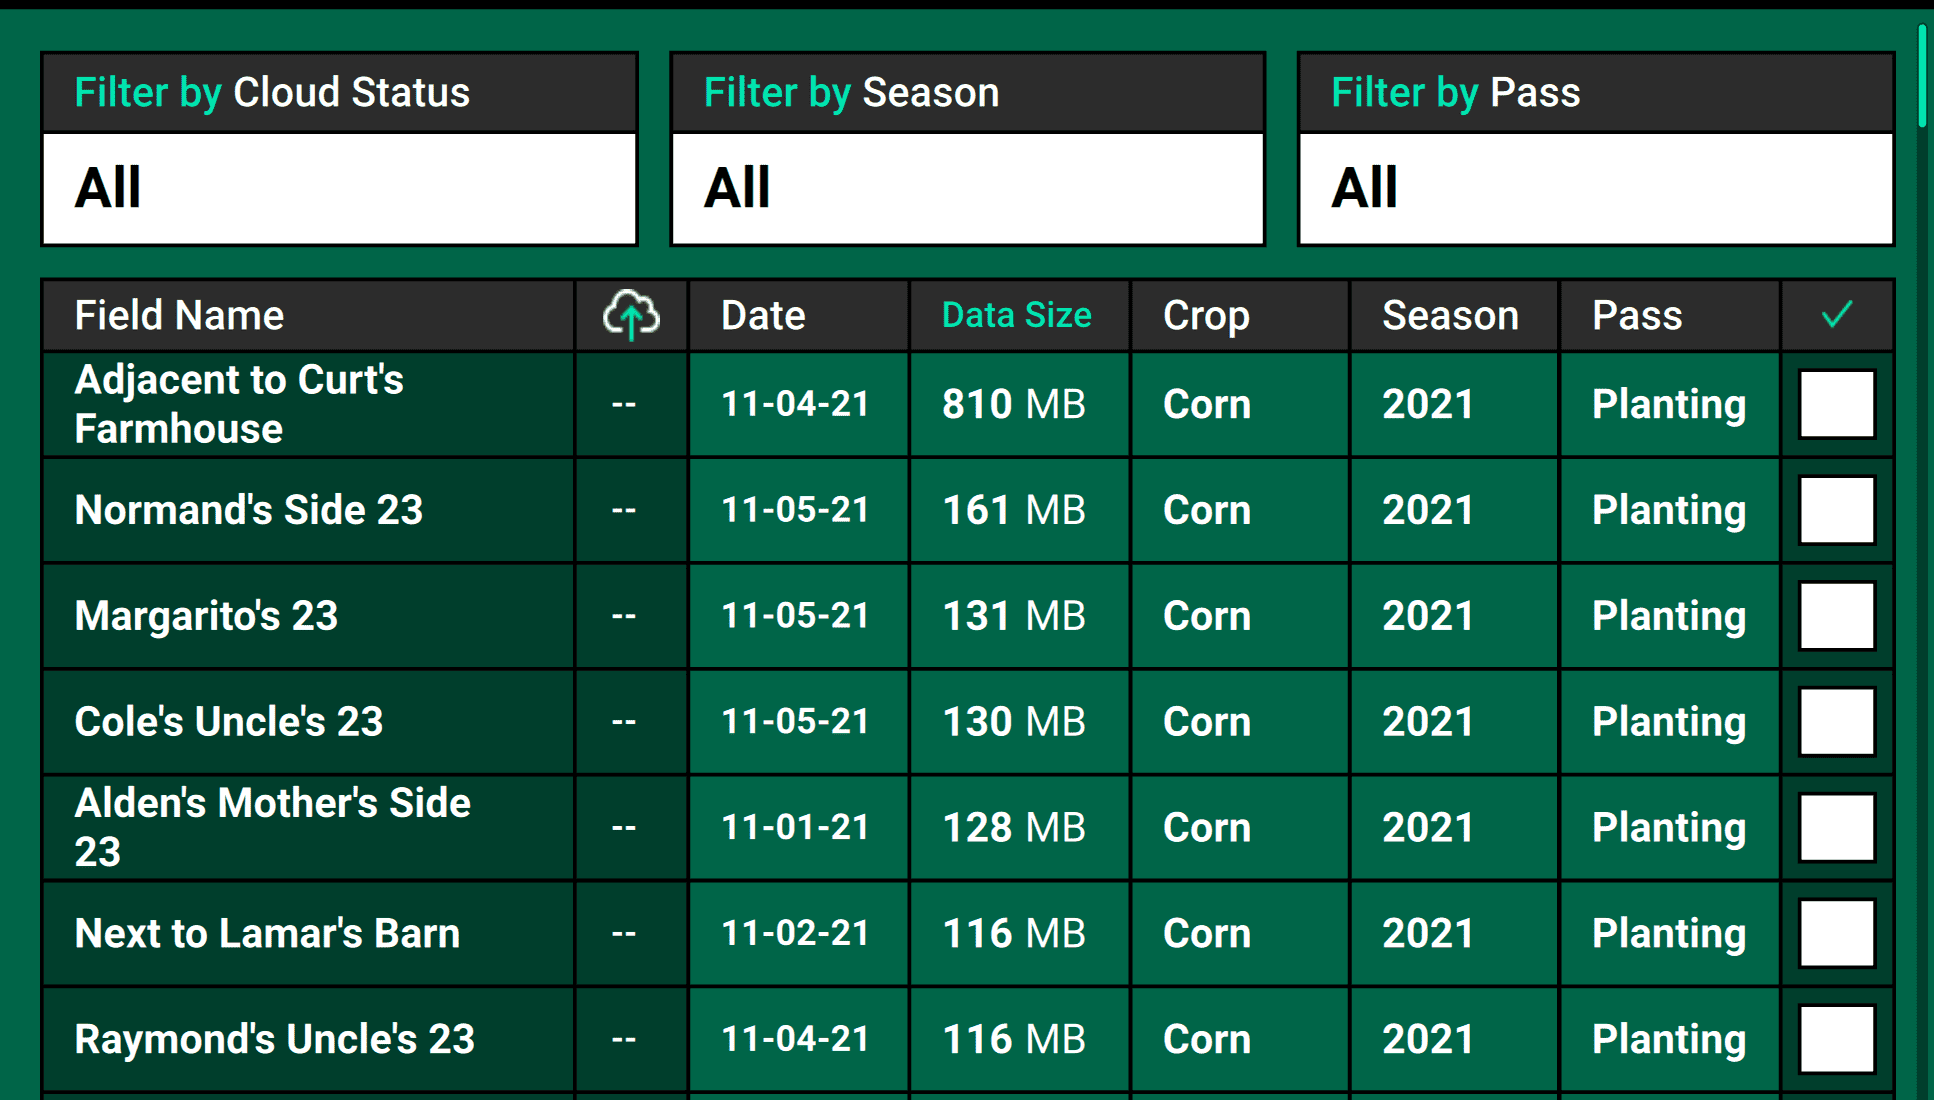
A table will pop up listing the items that are available to export. To help you find what you're looking for, the 20|20 presents these lists in a sortable table. Tap the top of any column to re-sort the list by that column. For an image illustrating these features, see below under Delete Settings and Data. Alternatively, if you know exactly what you're looking for, you can use the Search function in the sidebar.
Once you've selected what you want to export (using the checkboxes on the righthand side of the table), tap Transfer in the sidebar. A progress bar will pop up while the files are being transferred onto the drive.
Export Support Data to the Cloud
If you are connected to WiFi, you can send diagnostic logs and other support data to 20|20 Cloud from the Data setup menu. Just tap Export in the sidebar and then Support Data.
Import Settings and Data from a USB Drive
If you have settings or data saved to a USB drive, you can easily import them to your 20|20. Just go to the Data setup menu, tap Import in the sidebar, and select the kind of data you're trying to import. Below each option, you'll see a list of what that kind of import includes.
Once you select an option, the 20|20 will offer you a list of the files that it sees on the drive. Select the one you want to import.
If you don't see a file that you were expecting, it may mean that the file is saved somewhere that the 20|20 can't find it. Take the USB drive to a computer and make sure that the file is not hidden inside any folders. It must be saved at the top (root) level for the 20|20 to see it.
The 20|20 will immediately try to import the file when you tap on it. If it's unsuccessful, it'll let you know why with an error message to help you fix the problem.
Most import options are the same as their export equivalents, with one notable difference: while you export all Field Map Data, you only import Swath Coverage Map. The Swath Coverage Map is a small subset of Field Map Data, just which parts of the field have been covered so far. This can be useful if you are using multiple implements on the same field, and you want them to swath off based on each other’s previous coverage.
Restore Configuration to How They Were on a Specific Date
Every time you start your 20|20, it saves the current configuration and associates it with the current date. You can use these backups to your advantage if you ever accidentally mess up your configuration or for any other reason you want to return to a specific day's settings.
To restore your settings, go to the Data setup menu, tap Import in the sidebar, and tap Restore Configuration. A list of dates will appear for you to choose from.
Delete Settings and Data
Sometimes, you may want to clear up space on your system after exporting data to a USB drive. Or you may just want to start again with a clean slate. The 20|20 makes this very easy: just go to the Data setup menu, tap Delete in the sidebar, and select the kind of data you're trying to delete.
Conveniently, these are not all-or-nothing actions. Before the 20|20 actually deletes anything, it will ask you to select which items you want to delete from a list. To help you find what you're looking for, it presents these lists in a sortable table. Tap the top of any column to re-sort the list by that column. Alternatively, if you know exactly what you're looking for, you can use the search function in the sidebar.
To help you find what you're looking for, the 20|20 presents these lists in a sortable table. Tap the top of any column to re-sort the list by that column.
Alternatively, if you know exactly what you're looking for, you can use the search function in the sidebar.
After you've selected what you want to delete (using the checkboxes on the righthand side of the table), tap Delete Selected Fields in the sidebar and confirm your choice.
Factory Reset for Settings and Data
If you want to restore your 20|20 to a clean slate in terms of settings and data, you can do that by selecting All Data on the Delete page in the Data setup menu. After confirming your choice, your 20|20 will be ready to set up fresh.
This reset is irreversible. All settings and data will be lost permanently.
Update Software
The Data setup menu is also where you go to update your software version. You will have the option to update either from a USB device or via WiFi.
Please read our how-to guide on the process for detailed instructions.