Liquid Tank Mix
Learn about how to use a Liquid Tank mix on the 20|20
Updated February 6, 2021
Liquid Tank Mix Overview
The liquid tank mix can be used to track product information for each liquid system on the 20|20 platform. Each liquid system set up on the 20|20 records separate tank mixes, and can be exported from the display with field map data.
To begin using the liquid tank mix feature, a mix needs to be created. Follow the below steps to create a tank mix.
- Navigate to the liquid system control screen from the home screen. Examples may include Nitrogen, Starter, and was assigned during Equipment Profile Setup.
- On the Control screen, tap on 'Tank Mix Setup' on the right side of the screen.
This is the tank mix setup page, where you can create mixes, view summary data, and actively track tank mixes.
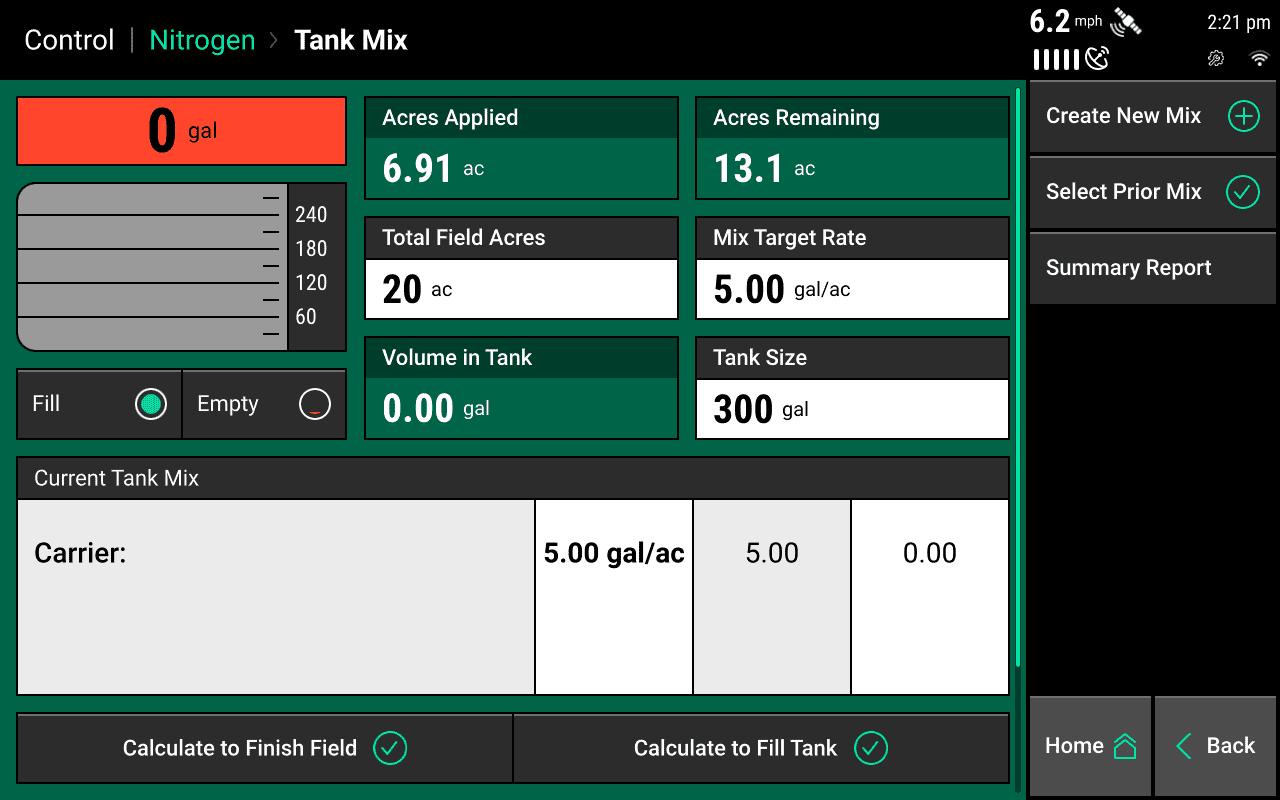
Tank Mix Setup
On the main Tank Mix setup page fill out the following information to track the tank contents.
- Click on the 'Total Field Acres' button and enter the number of acres for the active field.
-
Click on the 'Mix Target Rate' button and enter the rate that is being applied for the field.
This does not set the actual rate and is only used for tracking. If you are using a prescription to apply liquid, enter the average rate for the field.
-
Click on the 'Tank Size' button and enter the total of all tanks being used for this liquid system that are on the implement.
Create New Mix
To track tank mix a mix must be created. Follow these steps to create a new mix.
-
Click on the 'Create New Mix' button from the 'Tank Mix' Page.
' width='1280' height='800' xlink:href='data:image/png%3bbase64%2ciVBORw0KGgoAAAANSUhEUgAAAEAAAAAoCAYAAABOzvzpAAAACXBIWXMAAA9hAAAPYQGoP6dpAAASFUlEQVRogdVaCXCUVbb%2bOysYSMIqiGCWTu/d6X1fknSn96TTS3aSQCJEdqd8IjrKzJt59UogyuaA61gPy4VRnuIyPgcHKDdcUBgVWWVVEQKyyiLL9%2brcTiedsAnDm6rXVV%2bd%2b997z7n3P/fcc869f3Mcx%2bH/O3g8HqNisRgqlQoymQwDBgzA6NGjUVxc3Kvv4MGDcdttt2HIkCHIzs4GR8yFhYXIz8%2bHUqUCn89HXn4%2b%2bqdngDfmVnBaITj%2bKHBUFo4Bd9tQYkJubi7cbjfMZjMMRiPKnE74A34mmA3WNal/pQIkEgmbj0AgYAogGgqFkJaW1t130KBBTDEFBQVMGRyP48DPy4dEIIBOpYZMJEJhXh76p6Qidfgg8LQi8ApHgVfMB88iB2/kEKTxUpCRkgK/24NQIACdRguH3Y5wqAojbx0Rn9S/0gK6aN4deaioqEBZWRl0Oh1b6b59aYFIYbT6ubm54Lj0NNJC7470nJkOLjWlp47KVJ/Ci7dl9Gi1F9JSkNI/E7x%2bGeAR7Z/ByoznaiB5xMP4kmii3PV8OV4ah8YWCIWIRqPMMjUaDVtpetmMjAykp6cjNTUVt44YgaysLORkZyMnJwdcemMp%2bBEzBFELipJQGDZBGrNAVmMFP2pmfRhlZRODIGaFMGpBVmMpuBo7uEo9uKAWXEATp351vEwImy6PKhO4iBlcQwm4SgO4QBJ/gjcZ1D9sTpJhjvO1ujFII0HRHXkYPWYM8vLy2BagbSESiSCVSlmZqKJYAYVSybY%2bV1hnxzGnFGfdcpwql%2bF0uQw/l8sArwKrdAVYrrwDFzxyVne6L9xynHNK4IqYwJWrIW0IQN4ShqwpBFFjEIaJ9Qyatmqk2OXgrBJwVmlvWCTg7DJwISMG%2b0yMXzkuAkVLGMb2eijHR7oQRfG4CNIcijhPgp94tUXgxrtxa5kelW4v6hsbMHbsWNTW1qKpqQmxWAwNDQ0YN24c5FIZ%2bG47CpqqUMDng%2bPX2vCLSwZ45IA7joukgIAS8wQjcG/eUGy2CPCZobC7vRvE45TCEzaC82oxptaNvLEBjKh1YXSDF4ZpzRC1hsFvqQTPpQLnLAbnVHbRZCjBVRkxIGDC7Q0%2b3DHWj9vrPUxW0bgQk1HQFISyvRYZXh24MkWPnHJVXLHj3Rhu18CqNaDc44bf70dpaSlcLhfzCXa7nW0NhUwOoUUPob8MhfxCcPwaG86USQCXFBecUlx0SnHeKWUv%2bJ4mDysVo3GqVIKTpWJcdMXbqR/rS4orFcMdMoBrdmLk3TXImRKG9MEJyJ0aATfWAa6lDFxzKbg2N7g2Tx%2b4wd3pATe2DFydHZkT/BA80IqhM6oxeFoUqXf6evgJTSXM1HvJuNPLxuZmVGGoRQVJYRH4RUUsmhUl0USZQqVEKIJMKGKRj8tocUJXpYclbII5bOyGKWxEadSMsqgZtogJ1khPuzVqhiViYrCGTciusyOt1Yv7/vvPcM2/H/eueAaWOfcg/4FxyJkRBTfBC26iL077ot0Xf4EaK3KnRTHtpaWoWvIHlHTMhGj2BOTd3wJuohe8iT7w2v2s3JefN84FbkYYw61qKMVSSKTS%2bF5XKBioLJfLIZPLIZVIIFYrITbpWSjk0tq8aPj9LNw99z8x9eH/wLQ5PZjycBzJdVMf/iMm/PuDUFf6kCsXYYRKjowKM7jGEgyaHMaA9gr0m%2bBHRpsPKePLwdHkWlxd1Bl/2WRQXb0DXJ0DXFMZciaFkDsphP4TA0ht9YCXkHElfqon/ukhDDUr0RCtxtTp09Dc3Mz2f2trK/MHLS0tmDJ5ChTKYvB9JSiK%2blAgKAI3bHwAizsewdKFi/CnBQuwZMHCq%2bJP8xfg8UWLMLa2FvWxapRbbOjv0SGloRScTwvOR95a1w1eUA8uQNAhPWRGZsSKjHAPMsMWpEdtSGl2IrWSfIkaHPH4SZa2S46eldNCpkv4MyI29KswgZtOW0AJjUwBnV7PwiBlgUqlEmq1mlGNVsMsQGDQQGg3IZ8sYGhrEPM6OrBw4ULMX7AAC66B%2bfPnY%2b68eSze2h0OGDRa9PPqMcqsQsgXQDgaQWVlJWuPVccQrKhAsCKIUFWITYBCk0gsZqFJKBZBLBQhr1iKVJ8ODocD9fX1cLpcqKqqQjgSQaiqCrHqatTU1rKMs0hQ1M3PZEjEkOYVYGCtC4MdGkgL%2bOALitg4QqGQgfY/PbOxRaK4DxCJ4z5g6PgA5s6dy17skUcfxaPXwCOPPIJ58%2bYhEomgprYGJVYbMj1aFDgMiFaEmOlRNhYIBJgSgsEgYtEYqkIh2G02qFUqaDUatkIEvVoDkUGDzKARLqeLmSvxNtQ3MLOlVDYcDqOuro7xq/rwa3RaGKQKDGr0MgUYi9XQaLXQarWsnVbfaDR2PxO/VCaDoriYOUVuWFsQixcvxuOPP44lS5di6TWwZMkSLFq0iCmAworVaEKqU4lla9/G1xs2YtXf38X%2b/ftx6NAhHOzsRGeCdnbipyNHcPTYsW7Q87kzZ/G3Tz6E9v6J%2bOqrr7Bh4wZGV727Cjt37ULnoU78%2bOOP%2bPHAgUv4jx47isNHj%2bLiiVNoWb4EqUo%2bxkZr0HpnW/f%2bJyUSJk2ahPb2dng8HmYV5BwLKREiC5gzZw7md63utdDR0cFAZu71euGwWMErLcZb//gEr730Mn43ezb27dmLY0eO4Nf%2b1m/9BvY/zMDGL77AX994E8tffBGz7p2JL9avx%2bavN2H7lq04cfTYVWVMev1ZpKr40MkUkCsU7ERInj8RBZIjQiIqFDIFtAbw8Nw56CDT7ui4JuZ2zMPDc%2bagsWksSl1OSMViZHi0WPDmX/DZ5%2buxet0H2LRjG7bs3onte3dj295d2L6P6G5s3bOrFzbv/hb79v%2bA5av/B7J/a8EXmzfhvfWf4P3PP8Wajz/Cxm2b8dW32xg27dqBLXt39caeXdi0Zye%2b27cPdS8sAlcwHNnpmeh/yy3o379/N25JeqZyAv369QM3eLwfTyx6DM8//SyWPfk0nnvymV5Y1hdPPI2nH1uKltp62A0maAQSDPQZmRfPqC1BWq0DXNTCwItakBKzsSwvJWZFZl0p65NR14NM4qkrQUqzCwOrSzAg5kBWzIHsmlL0q7JiQKwEObVl7JnaB1aX9kZNKbKrbEi/pwZc0aWnv2ujzQ3Db8ah4oFp8M6aDN%2bsKT14YAp890%2bBvwvx%2bsnw3jcJ%2bVVO3GKWYXCJBmn0kmXFENX5Wc5Ouby4MYjCWi8Kajww3dWAO6IucHo%2bOIsYnFnUA5MInE2KNL8eWp0OFaFK%2bIMBeLxeRGMxFtIK%2bXwIREJ22uuLIrEIotF5yGnwgJOMiR%2bNr%2bcuIm1sGXLsKtxikiLbrkQOgwrZ1mIM0qkw0KJAlkWOAWY5BhC1KFj7UKceI30W3FpuREa1A5xXg2HRUgjGV7FcfmRtOUbVuTE8Vobi9lqMqHGxHJ6dCVzKbvAop3cpWSy3Wa0sCtTX1bEIQp6f7hnIk5MX12ouhUang0GiwLCWIDjx6Ou/jEkPW2DV6lFR7oFeEU8k1BI5rAYDymZ6YTEboJHI4XGUotRkQanZCo1UDp28GJ5SFxxaA7LcOpaRFc5qQdakSshnt2PUPQ3xPJ7y/SYHuHHOeN7f60zgBm%2bCD1yNBcqZrfj222%2bxes1qrFm7Bhs2bmSRhKLIsS6P3zsC9ESBC8d/RuuKJ8DdnovU61VAatgCk9GESDiMYkVx/NwsFMPssMD6WgQmjwUKsQyxaJStTHUsBrlMxjKr6soKlNsdyCzXIHOiH/e/%2biwCi2Zjydo30fznDqj%2bOJWdB%2bhFUyiPZ2eC3rl8yl0BcDVmGB%2bahO/27MVDv30Qs2bOxOuvvoZtW7ai88DBXxVJpr31HLhR2Ui7bguotiNfKkKeRAi%2bQoai4i4oZJDKlCiSS1l7vkTI%2bhRIxeArpCiUSyDVKCGUS9EvaALXVIqcu0LIbq/EoElVyJoYRMp4d/wc0Dd/75vLx0wQ39uC9Zu%2bxJpPPsLqjz/Eun98ga92bL289%2b8bBfbuQ92Li8GNHnT9FsBrcSGj0oS0oBEpAT1SCUEDK/MCOqT4dayOPHIclm5kVJqRyfJ7GzIiVqSGTAwpjJqRTn3CBOs1kRm1MW8/uNGNwQ1uDKp3Xd37Xy4KCEZdvw9IC1ug1mhQ5nIyz0uXCazs88Lt9TKPXO52QyyRsNyd5eF90ZWX01k7GT19RL36XQnMqwsEcQgFvT3%2br4wC162AjKgNJqMRFcEKBANB%2bHw%2buJxO9ky3KsFAgOXzlH%2brVWrmkW8ElINr1Ek5fB9QHw2DposmP8fbaQ7xaKDpxj8dBfKm1WLLli3MA2/dthXbtm/H9h074nT7dmzbto2Vd%2b3adUOgfH7Pnj3YSF798CGcPHkSJ06cYJ49gZ9PncI333zD5kF9iW/37t0MVKY6Oh8cPnyY8R4/cZxRwpHjx4CTp9G24skbiwIFM%2brxww8/4MiRIzh2PD6ho0eP4qeffmJ1yfRGQJMmeTt27MC5c%2beYx7548eIlXpzmkJgH8bAQ2NnZzU9KuHDhwhWjwOQ3/wvcqJzrjwKCe5qwbt06rFixAq%2b88gqee%2b45Rkn7NIkDBw7g4MGDNwzip5fYtGkT3nnnHbz88st46qmnsGrVKixbtgwvvfQSVq5ciQ0bNuD7779nPO%2b//z7efvttvPDCC4yf5kEWevbsWZw/fx6ffvop1q5diw8%2b%2bABnu5R61%2bvPMgVcvwXcXc/MjCZIZvb1118zSkdaWgGaENEbBfGTAmgr0QrTS1I9bYkvv/wS3333HVtdaqcy9aWXpe1AdQkF7ty5kymAfmQRJJcs7NzFC70UcN0WkD%2b9jk2KTJ/O20e6cDNevq8CaPWu9Nu3bx8DrTb1T2wh4qe6ZAUk/87/0wqYUcc0f6jzUnO/2RZw%2bvTpbh9A%2bzkB%2bpEVJBTQdxv1VQDxJ3Duping0KGbsuJXU8CZM2cucYJXUkAy/%2bUUkKA3ZQvs2bsXBw4exH66errJIJkHOw9i85YtLNxdoEmfP9%2bNX7qcGIXL3Xv2XDIPKlMdheZTp0/jwsULvfjPnD8HXATaSQG358YVkHIdCiicUY/jhw7jl5OncOb4yf8TnPv5FPbv2Yer/Y4cOIijnYcuOw%2bq6/x%2b/1X5Zyx7DNyQfr/%2bxRMYPjmCpX9dgWdWvYGn/rYST/fC60no%2b9wXK/HUqkS/HpDMZ959AwtffQHPv78Kf/lkLZavW4PlH3dh3Wqs%2bOw9LHnzZSx9Kz6P3mOtZHWLX1%2bO5z98tzf/ujV48aO/443PP4Tzoang8oZj5JBhGDpsGIYNIzqUUfpTBP0vIFGfQC79P4DX5MRAr4FdayVjgNeALI8eA7z6OO0ClbP6lAkkI7tcd1lZrJ2VDfH2LiTGyPLoWDkxBpPt1rH6xFjZXmNcftdYyTJyvAb24aSo3IpwoAI%2bv787ja8KVrDvDT6vF5UV8fSe0n26urfZbPGzgEIshVIqYyiWEJVDq1DCoNZAW6yCQa2FTqliMKq17FmvUsOo0TKY1FoUq5SQ2s1QqFTs%2b1yyLKlA1GuMRJtaroBOqWaySDaNlxjHrDPApNVBr9JAr1Sze3ypwwwFfeVJnq9MDq1QioF6CQo9NjTX1rOrtOpoDP5IFdyNNXDYbHD7ffBFqtBQV4%2bamhr26dxqtYLLiNnYx0SZXMYglcX/QFBdU4NJkyez%2b/Vp06ejtq4OzS0trH7CxIlobmlmdRPa2zFhfCtEpRYURDwQ2U2QiSWQ0odIGcmUx7/GJMboqhNLxLDZ7UxWa1sbWttaMbG9HfUNDewqjMZtam7GnTRWYyMENiMKol4IHeZu%2bSSLaLFYiiyjlCngnmkzcO99M/Hb%2b2Yh0D4eprvbYLfZ4QwFUVYfw2%2bmT8fs383G9OnTYbFY4hZAR9fEPygSoHtzul9P3Kcn7tmpb6LM/nFBLySTQSKXQWDRM5osh%2bTSsfVyYyTu6xP39%2bwLbpc89hk7MY%2bEfLMeEkV83G6QDKEYWXoJ%2bF4bohWVCASD7ARbUVmJUCSMkpIS%2bH1%2b9pmNTJ9AX5zsdjs4blw5SAl9kR61Ij2ShK667rbuchyMjy4/Livr0rruNiY7MUZinD7z6BrrSvLpMoWu4UfbtCiz2mGxWdn%2bJhOn1aejuMlk6q5j9XY7u9b7X4ai77pADfXGAAAAAElFTkSuQmCC' /%3e%3c/svg%3e)
Creating New Mix -
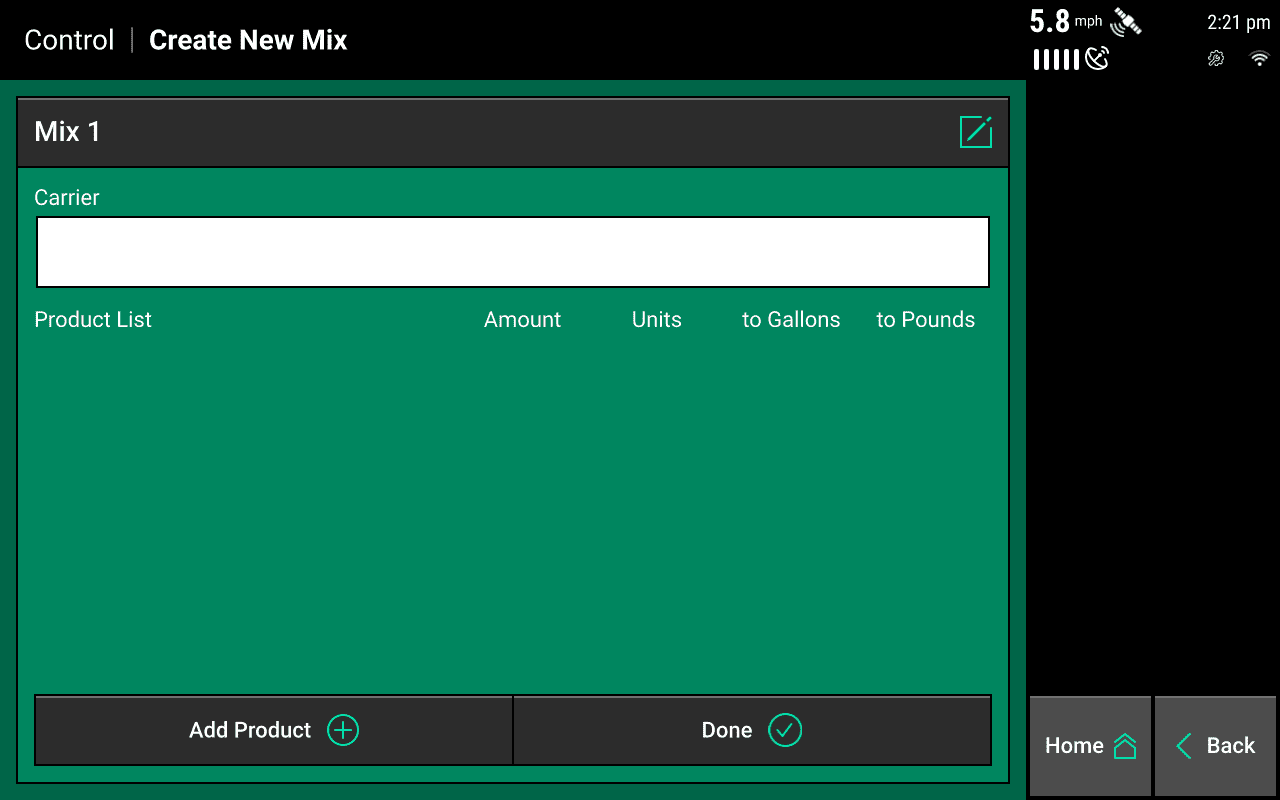
Enter a name for this mix. For this example it will be named 'Mix 1'
' width='1280' height='800' xlink:href='data:image/png%3bbase64%2ciVBORw0KGgoAAAANSUhEUgAAAEAAAAAoCAYAAABOzvzpAAAACXBIWXMAAA9hAAAPYQGoP6dpAAAHY0lEQVRoge1a%2bU9byR0f4yQQDmPOsNAUDPh49nu%2bCEsAH9gG4xMbwn3ZTgThcCAtmyWrrZYc3CS0oUthtRs2/amq%2bqdVaqUqTaps208182wHNhCBIzVBMtJH33nfme9nZj7v%2b57fMEMIITjvkEgkzHIcB6vVisbGRuTm5uLq1aswGAxH2hYXF6OyshIlJSWQyWQgNLiurg4KhQJGkwn19fWsLL0ghVKpZIQNDQ2w2WzgBQEejwctLS3QaDTo9Hjg9XpRVFwsdpAYyMcSoKamBm1tbWzSVAC1Wo1QKASpVJpqK5fLmTC1tbVMDCIhBHU1CmhUKlwzmaHVcOw6i0hQr6iFw2aHp8ONLn%2bA1Xc4XbjR3Q2j3sDqukNhVJSViwP5WBmQsHRSgUCAidDU1ISqqqojAlGUlZUhKysLhYWFKCoqAiEXL1AVRCRJaTk74T/NIKQEJOeiGPP/Bu338iU2jnqlkt1xh8MBvV6PioqKd8ZKUz87Oxt5eXkMRDLiRH5vG/J77Sjoc6Cgr41BvG6DrN8BWb8TsgFnouxA4YATBYfLifYfBd1WFHRbcWnUBfKZ/OwZdKnPBl4vwGQ2QzDooTcamaXPO/V/sqDjM%2bihsbdAMBhQ7LkOoq6ClBBkSaVH0v69kHRdh9fnw9LSEmbjswh2daHh2jVwWi10PP/pQqeD1mhAzXAQ6rZWFFEBlJ%2b9fYRPmwEXeywwaXm0mK%2bhtaERZi0PQaUBr1Qz%2b8lCqQav4aCyt4AX9Ch2N4EoK88uQNaIA3mDTmQPOnBpwI7LQ04UjrnPDeTD7ZAPOHFxxAlSW3F2AUi0HZd/O4XK54uoPvgKVT8sgmxFQTYjIFvnAE%2biIE9iIPNdINXl6QjgguxxDK79B3DtLcG2%2bxsoN%2bKo34in7KcM1UYchY%2biILP%2bNAWIOKBYmcJf//43vHz1Cv/450u8fv36XODl61fAm/9g4k/fgky6IK1J5xEYd6B%2bfRZvfvoJ5%2b3v3wk7/Zd9kAkXLijSESDigHJtBvjXG5Htv%2bcMAGb/vPcBAkTbkfNgDN4flhE4WIX/%2bSqCB2sIHoi254%2bb6H6xkTYoB%2bVNgvp6Xmwy3tCP6/A/X2F9Mn%2biL7Hv1UTdSiou/GJd9Ce4fAcr6D5Yh2IzDjLrg6T6SjoZ4IJscxLlv59H6bM7KPldHPlPp5D/9DZyn0yCLPWBPBxIG3lPb6PkWRyy7WlmyeNhkAcDIu96FFd25lC2cwfk0SDIg35mC7anWfvynTmGwu1pkW9lDAXbUylf6bM4a0seDUMSD6b7EnQhf%2b0WqncXoP3uK4aqnbuo%2b8M9/GLnLsjKOKRrMUjXommh%2bttfQ7X3JVT7i1DufYnsjVvIWo2CrERQsj0D9f4iNPv3U/4LazEWo9j9AsL3X4P77j6Ue/eYP29rAordhRQnjavd/QKS5XGQeCDdn8EOkIcjIMujTEmGx6Mgj0dEuxphIjDQ8mmQbEst4zmEwzzLY6KP9nlcTGo8ibif8yXrKE/aGRBtB3k0CrIWhWQ1wkAO2TNN/DgRElyHuQ8L%2bo7/EMc7ccfUpYT8YAFWP2CyHwvJ8WYEGMtkAMk8AsHMO4BkXoLlmV8BkvkZJJnvAJL5ECKZL0GS%2bRQmmbUAOfVi6OEoW58Tuq4%2bb2BL5LGj/w/IkpxRgOUxkK2bIJuxs2MrgXRiT8N9mjZrEXEtcLX0DBNP4mYHpPf7IZ8JQz57PApnKEKQTYeYFa9FyKdDkE91nRhLIcadXP%2b2n0PtkrzvG9dsGEXTYeQs9LJ9gVyuBuVFJSgtL2PnAErLSpml5wDotnhpmehPQi6nu8mTHuRGOyGoOQha3bEw6HgYeQENRhPMegMrG3gBRh0PXYMJ2ubPIXDHx%2bq1OnAqNXhOy8on9UHrTIKe8eo5LXRmI7iWJgg6HgKnPTaG1%2blgqtegwm8BmfZA3WFB2B9gm70%2bnw8Bvx/hQBB2ux1ejwddwSDz01MtwWCQnX4RBYh5oKO7wcLRHVi6Da3SqOEPBDA3P4/YzZsYGh7G7akpBo/Xi5oOCxQjQej0ghj3cw5BgFqjgVane6cu2Z7WGYxGRGNRTExOssEp2i2o6%2bkE12hmEz0uVqsXYFBzuBK0pgQYGxzCjd5e9N3oha8nDPdIP%2bxWK9w%2bL7w9YQwPDqG/vx8DAwOwWCxJATrB0x1hKgL3FvSu6TQcuysNJhP0Oh56nofZaBKv6d01G6G53gie447Epji0WmiUKmg1GpHvBNA6o17PuE28wHjVrU3sxpzETesMdWpcCVhAZkQBFu7M497iIr5evA//7Ria796CzWqDKxSAc6gXv5qbwzdL32Bubg6tra3iOyBroYeJQDPhOFyOdiIn4mY2WWbXNCbiRu64%2b8TYZDxr%2b542FDlRkTcnmuTteO%2b4KPIibly6EwKZcEPttqIn2MUylp4VomcdQj3d7MyQz%2btDKBxm2UVBj9LYbDYQEusAFYFmwrnFrU6QcSd%2baf8cTosNrVYLe75pitO7bzKZ0NzcnPIxv80Go9GI/wEqoHUeU0GxsAAAAABJRU5ErkJggg==' /%3e%3c/svg%3e)
Mix 1 Create New Mix -
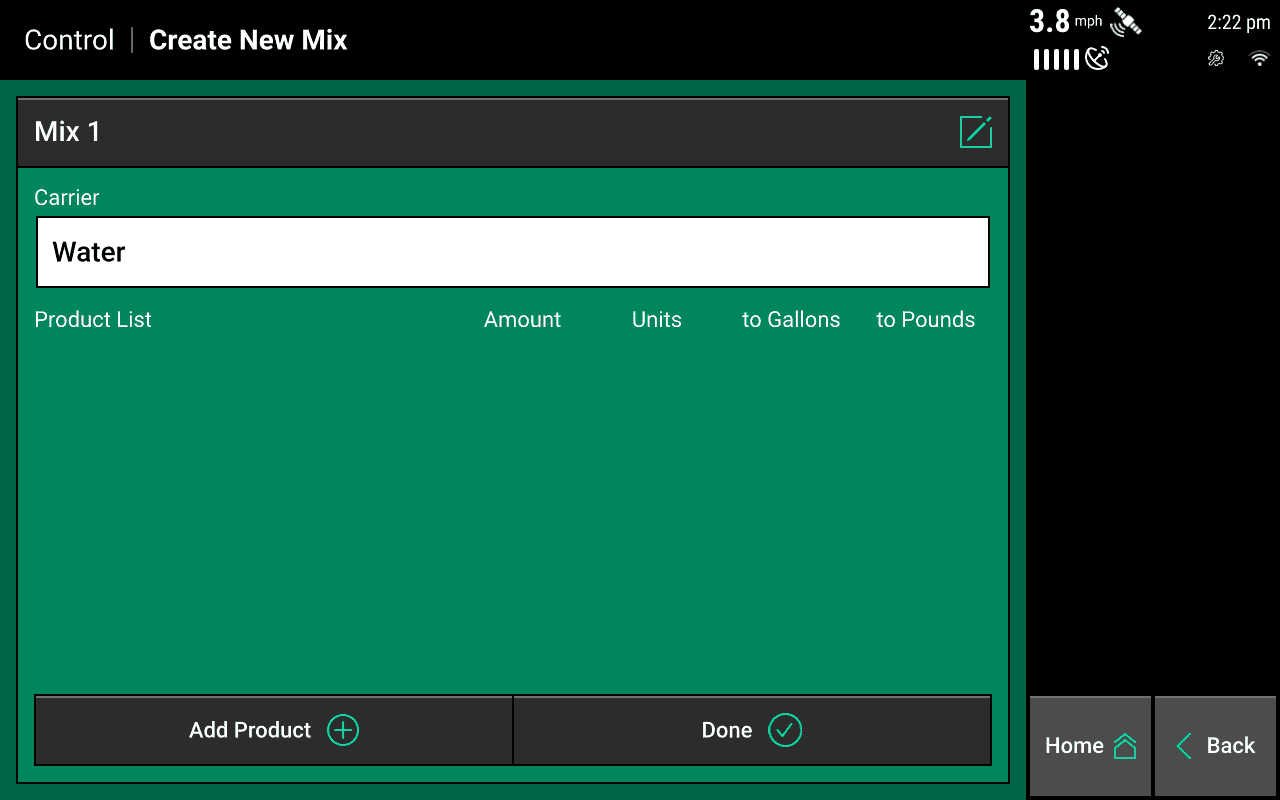
Click on the 'Carrier' bar and enter a 'Carrier' for this mix. This can be entered as a custom carrier, or add it from the existing database on the system.
' width='1280' height='800' xlink:href='data:image/png%3bbase64%2ciVBORw0KGgoAAAANSUhEUgAAAEAAAAAoCAYAAABOzvzpAAAACXBIWXMAAA9hAAAPYQGoP6dpAAAHnElEQVRoge1aa1NbxxleIRswGBAgMDF1QYDu5%2biGCQZ0QQKErkjI3K%2bSPdyMjJ0SG2fSCTY2d4cmNI7taY2d9EOT6Ye2/6XtX%2bh4eoldpybupHk6u0eSIQYPyDM1zIiZZ97dd/d9dvfZPUdn2SWEEBx2iEQiZisqKmCz2VBTU4OsrCycOnUKer1%2bW92CggLml0qlyMnJAaHBlZWVkMlkMBiNqKqqYmnxETHkcjksFguqq6thtVrB8TxcLhfq6%2buhUqnQ6nLB7XYjv6BAaCDWkbclQLlMhsbGRjZoKoBSqUQgEIBYLE7UlUgkTCg6zgLabxEhqCyXQaVQ4LTRBI1KzfJpRIQqWQXsVhtcLU60eX2svMXRhLPt7TDo9KysPRBESVGx0JG3tQJitrKiAj6fj4lQW1uL0tLSbQJRFBUVsXxeXh7y8/NByNEjVAUBcVKazoj599IJMQHJPCrE/L9B2z2WLgggr2IzbrfbwfM8SkpKXulrYWEhMjIykJ2dzUBE/Q4c72jE8Q4bcjrtyOlsZBDyjcjtsiO3y4HcbkcsbUdetwM5W9Ox%2bm8F7RbktFuQPtAE8o5k/ysovdMKTsfDaDKB1%2bugMxiYpc879R9Y0P7pdVDZ6sHr9ShwnQFRlkJMCNLE4m3L/rUQtZ2B2%2bPB7OwsJqOT8Le1ofr0aag1Gmg57uBCq4XGoEd5nx/KxgbkUwHk77x8hPe6Ao6GzDBqONSbTqOhugYmDQdeoQInVzJ7YCFXglOpobDVg%2bN1KHDWgshP7l%2bAtH47snscyOixI73bhmO9DuQNOg8NJH3NkHQ7cLTfAVJRsn8BSLgZx34xjpMPZlC28QFO/voqyGoYZGUYZPUQ4HYY5HYE5FIbSFlxMgI0IXcugub71xmsn/8c8uUo5CtRwS5HUXWAoViOIm8uDDLpTVKAYTsqFibw%2bB9/x9Nn/8LTb5/hxYsXeP78OTa/%2bw6bm5sHFt9uPgf%2b81%2bM/PYzkNEmiMuTeQQGG6Fdew9/%2bsufsfHwIb76%2biv8/o9/wDdPnuCg/30fsxO/uwcy0oQjsmQEGLJDsTSJF8/%2bjc1vnuKff32MJ4//Bnz/g8D%2bwwEHgMmv776BAOFmZM4Owrsxj%2bCXKwyh36zC/3AR/o1FhL5YQfuj5aRBOXwbCwlQX%2bjRCuMNPFyC98E8vA9i/lhb/o0FBqFsPhEXfLQk%2bGNcno15tG8sQbYSBZn0QFR2Ipl3QBNyV0ZR9MspSD%2bJouCTSWTfHsPxj8eQdXsUZLYT5EZ30sj%2beAyFn0aRuzbBLLnZB3K9W%2bBdCuPE%2bhSK1i%2bCzPWAXO9iNmdtgtUvXp9iyFubEPjmB5GzNp7wST%2bNsrpkrg%2biqD/Zl2ATji%2beR9mdaWjuf8BQun4ZlZ9fwU/WL4PMD0G8GIF4MZwUyj77GRR3r0Jxbwbyu1eRsXweaQthkPlhFK5dgPLeDFT3riX8RxYjLEZ2533wv/oQ6vvXIL97hfmzV0cguzOd4KRxFXfeh%2bjWEEjUl%2bzPYAvIjX6QWwNMSYabAyA3%2bwW7MMxEYKDpvSBel1rGswVbeW4NCj7a5k4xif7E4n7MFy%2bjPEmvgHAzyNwAyGIYooVhBrLF7mvgO4kQ49rKvVXQV/xbOF6J26EsIeQbC7DwBoN9W4j3NyXAYGoFkNQj4E%2b9A0jqJVic%2bhUgqZ9BkvoOIKkPIZL6EiSpT2GS2guQPW%2bGbgyw/Tmh%2b%2brDBrZFHtz%2b/4A00T4FuDUIsnoOZCWyf6zGkEzsXrj3UmdxWNgLnJLuY%2bBxnGuB%2bFoXJBeCkEzujLwLFAHkTgSYFfICJBMBSMbbdo2lEOJ2L3/ZzpZ6cd7X9WsyiPyJIDKnO9i5QJa6HMX5hZAWF7F7ANIiKbP0HgA9FpcWCf44JBJ6mjzqQla4FbxSDV6j3RF6LQcDx6PaYIRJp2dpPcfDoOWgrTZCU/cuePXOsTqNFmqFEpxaw9K7tUHLjLyO8erUGmhNBqjra8FrOfBqzY4xnFYLY5UKJV4zyIQLyhYzgl4fO%2bz1eDzweb0I%2bvzs2ozb5UKb38/89FaL3%2b9nt18EASIuaOlpML/9BJYeQytUSnh9PkxduoTIuXPo7evD2Pg4g8vtRnmLGbJ%2bP7Q6Xoj7MQfPQ6lSQaPVvlIWr0/L9AYDwpEwRkZHWedkzWZUhlqhrjGxge4Uq9Hx0CvVOOG3JAQY7OnF2Y4OdJ7tgCcUhLO/CzaLBU6PG%2b5QEH09vejq6kJ3dzfMZnNcgFZw9ESYiqB%2bCTprWpWazUq10QidloOO42AyGIU8nV2TAaozNeDU6m2xCQ6NBiq5AhqVSuDbBbTMoNMxbiPHM15lQy2bmN24aZm%2bUokTPjPIBUGA6YuXcGVmBh/OXIN3LIK6y%2bdhtVjRFPDB0duB96am8NHsR5iamkJDQ4PwDkibDjER6ErYCcfCrcgcdjIbT7M8jRl2ImvIuWtsPJ7VfU0disywwJsZjvO2vLZfFNnDTqRfDICMOKF0WhDyt7EVS%2b8K0bsOgVA7uzPkcXsQCAbZ6qKgV2msVisIibSAikBXwqHF%2bVaQIQd%2bansXDrMVDRYze77pEqezbzQaUVdXl/Axv9UKg8GA/wExYnD9ASKX4AAAAABJRU5ErkJggg==' /%3e%3c/svg%3e)
Carrier Assigned - Next, click on 'Add Product' at the bottom of the page. Continue to either add products from the database, or add custom ingredients to be used in the tank mix.
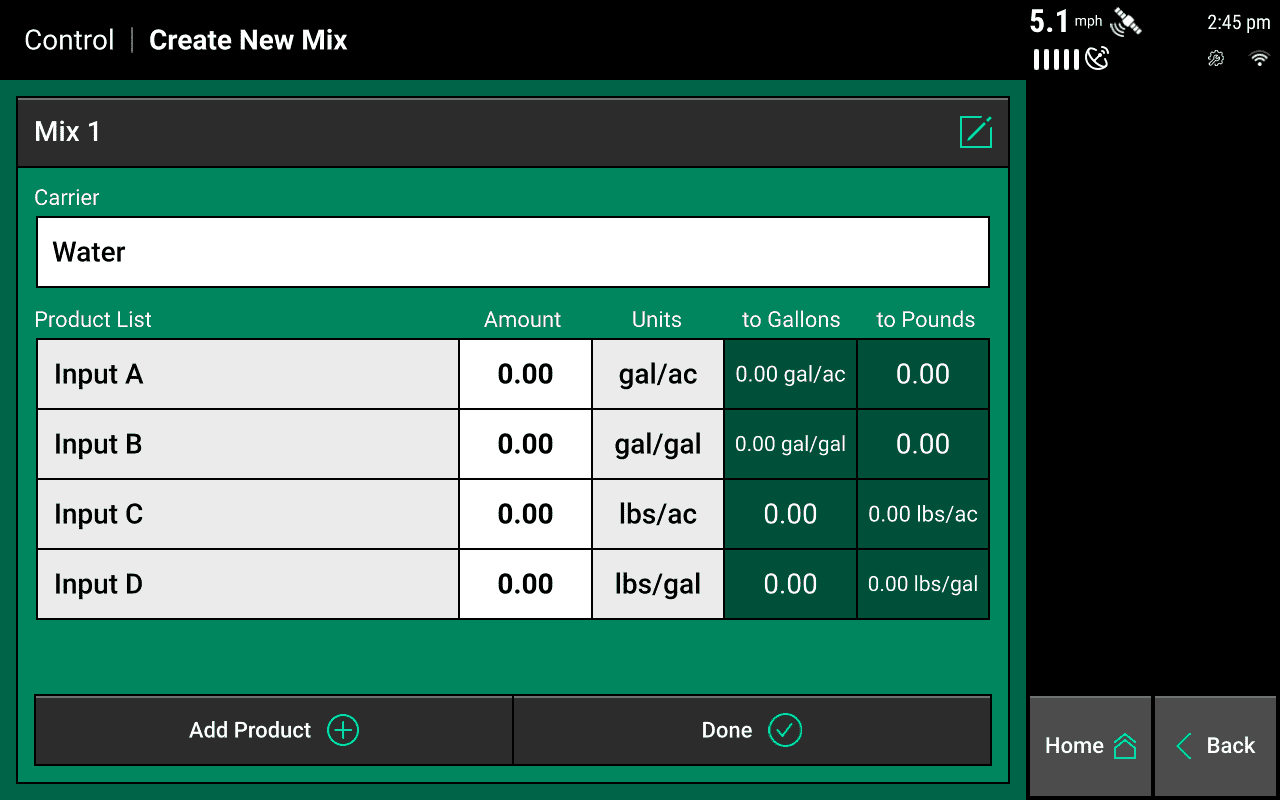
The system allows for either liquid or granular products to be added to the mix, and two types of units.
- Per acre is used for products like Nitrogen when using it as gallons per acre.
-
Per gallon is used when you are adding to the mix such as an Anti Foaming agent when you are adding it as gallons per gallons.
' width='1280' height='800' xlink:href='data:image/png%3bbase64%2ciVBORw0KGgoAAAANSUhEUgAAAEAAAAAoCAYAAABOzvzpAAAACXBIWXMAAA9hAAAPYQGoP6dpAAANvElEQVRogdVaCVRUR7quligaAzYIhhg3VOim9wZcWbuBpoFuNpUdukFBZDPojOa9lxfFKEY0GY0z771kInFmzpnEOI7JJGaSNxknMWrcUAQVREVWFZFNHJc36vfOXxdQJ%2bogZCamz/lO3ftX1V9VX/1L3b6XMcbwY4dIJOKlQqGAXC7H1KlTYWdnh/Hjx0OtVj/Q1tHREePGjYOTkxPs7e3BqPOUKVPg6uoKjVbLO9O1zTM2cHNzg5%2bfH7y8vODv7w%2bFUgmj0YjZs2dDKpUi1GhEWFgYHBwdhQF6JvJDEUBzl0gkePHFFzkB7u7uiIqKgo2NTV9bsVjM29DaHGneIsYwZZIrpO7u8NZ6Qib14PdDmAhTXSdD5x8AY4gBkREmXh%2biD8KcmBhoVGpeFxMVDRfnMcJEfigL6Cknu07mC9br9Zg%2bfTon4n6CCM7Ozvyedt/BwQGMDX2GWBDQq5SubXvk/ZmEDQMbPlTo868GjTtimGABbm6IjIyETqeDSqWCi4vLd%2bY6evRo2NraYuTIkRxMlKzHc3MD8dzcANjN08FuXiCHcB8I%2bzgd7OP0sI/X91zrMCpeD7v7r3va/yCI8YNdjB%2bGpQSBvSB%2bcgsaNs8fCpUSWk9PKNUqqDQaXpK/k/ypBc1PrYI0YDaUajUcjTPBJC/ChjEMsbF5wOwfC1HkTISFh2PFihXIzcuFOTISXt7e8JDJIKeo%2brRCLodMo8akJDMkgT5wIALcXrjnwv21gKGxvtDKFJjt6Q0fr2nwlCmgdJdC4Sbh5VMLNwkUUg%2b4B8yGQqmCo2EGmNvYJydgSLIOIxP0sE3QYVh8AEYk6jEq1fCjgTgpGOJ4PYYm68Emuzw5AcwajBE/y8bYLcsxsfTfMPbdZWDrrWAlFrD1PwJssIJtSAdbHAk2ccxACAiC/ap0BL%2b9ksP/v16B27o8uJXkCeW6PEx9iuG%2bLg%2bjVlnBciMGSIBFh8nFi9DSdgVd3VfRda0bt27dwvXr13Hj5k3cuHHjqcW1G9eB/7uDzPd/DpYVBJtJA3GB1EDI3yzEiVMnUfree/hg2wfY%2bfFH6OjsxNP%2bu91TLtr%2bP2CZQXjGdSAEpOng/noubnX/FTc6utB%2bsQWdLa3A7buC9rtPOQDkbvvvQRBgDcbwFamIKC1GzK9LOGJ/sx6R761FZOlazPlVCWK3Dhykw1RaDHPpWphLixG7dR2Xk97o916HaUsxR688Zus6mLcUc0RsWcNB9SSn9qSjVxa%2bZQ1iStfCtSQXLDccoonPDyQGBMG%2bJAuOm/Mh3pgL%2b405sH0jC8PfyMKwDZlgK%2baCFcUNGKRr1MZcjHhzIS/ZqgShbuU8sNctGP1WPhzeygNbFQ%2b2Mg5sdRLsN%2bVyjPnFSxyjNuWCrU7k7e025vTJnDYXwI7XJUOUZx5EFliTAcWbSzD9reWYtmkZJOsLoNn4E0g3LMZzr6ZCvNKKUSst/YZ4pQX2K9IgLrJC%2bbMl8Ca9m5fD661lcH5tPuxXWLjeCcXZ8Nq0DN6blsGxKJ3Lbf89ARPXLOSBWfVGIWQlBTzSD305HiNfScak4mxMWL0Qbq/nQrouH5PXZEP0SgJY/kAJsOgxflUmKmqqUdvciPMXmnCusR41dbUctQ31qK2v6zfO1dehrqkRh4%2bW4XLbFbR1X0VLZzsud7bjUkcb/nrrJk5Un0LVmRpcaG1BTf15jqZLF3Hm3Fl4ZMSCharATNPADCqwUDWYUQNm0IBFTAMzeQt1VJqngYWowTJCwAqjwSY4DyQIBkJSko8jR47gk48/xo7tv8Nfdu/GJ3/4A%2brr6tB99So62tvR2dHRL1Db7q6rOFNTwwMUXf/5T1/idx9ux/9%2b/jmXXWhuRkN9Ax9r5%2b9/z8tv9uxB6%2bXL8C3MgHtuPLyXpkOWlwivJVaoXkrhT33MqMW4%2bZGQ5sYj4rWlvB0RIJpvGAQBFh03oxMnT%2bKbb77Brl27cODgARw7dgznzp1DU3MzGhsb0djU1D80NuLChQsoLy9HV1cXuru7UVVVhVNVVTh79izu3L2DM2fO4NSpU9ixYwf27t2Lvfv2Yf%2b3%2b1F3vg7qzHmwneMHh4QgjLOaMCY5FE7JBtiGzwAL88TwOX4YnRSCsZYI2MXrwYI1YOkhYEtiBkiAVY/xRQs4AQ0NDaivr0dtbS3q6upQXV2NkydP8sn2F9Se%2bhGZpOPKlSucBDpYXb16Fa2trdzaiKDm5ua%2b8WjsE5WVcEuKAPOXggWpwPQKAUFKsAA5RAZPsBBNz71MMH%2bdCiwtaBAEpOkwdW0OqqqrUV1VjZqaGr5j%2b/fvx8WLF9He3o62trZ%2bgxbc2dnJSbh9%2bzZu3rzJd76yspLL6EdWQuScPn2aWxpZxPHjx9HU2IRpeSmwTw6BizUCzyXo4Zhi4PcjomaDhXvBPikYzmlhkOTEw8kSBhaqBcsYjAukBfIoW3a0DO%2b//z7efvttfPrpp/jwww/57tBiaFEDIeDOnTt817/88kt89NFH2L17Nyfg0qVL2LdvHzZv3oxt27Zh69atfFyyAp/CdEzIjIY8Pwkzls2HanEKAl7JgXhOII8BLukRcM%2bJg/4/8%2bCaPed7iAFWPSYULUAF7VBVNSoqKrgp0%2b70mvRAXYAIJJNvaWnhxNA1lWVlZRy9VkHuQFZHLuBOLqAj8%2b6J/MFqYZcDFGDkAgYtmNFLKMO8INKpQWeZgbuARY9Jry3EudravgnSDtHkaUeampqeCGTe5Dpk0mQJvQ9WhGvXrnG3IDcjt6BxCETQ5dZWHgTllAbDtLCJnAlR5AwMiZwJFjlDWHA4pb7pYKbpPCCSSzC9Eiw9eDAxIBDuJfk4eOgQdu7cie3bt%2bOzzz7DF198wYMULYJMm2JBf0BtKfqTBdGP%2bpMuMnXSSz/SSxnmnXfe4W5BY3799de40toKedY8nt%2b1hRbMWp7JMWSOD7eISQuioV1igfdP0qEoSIZ8cQrc5scIWWCwafDkqXtp8NChQ9wsKVDRZAdiAdSf/L83DRJo1%2b/evcstgALfnj17eCygVHjgwAE01NVD1mMBoxND4JIaBqckg2ABwRqMiPGFOCGI/0NNqXB0sgGOsQGDJMD63TR4/vx5Dpr0PysNUqwhsmgcSoP1DQ2orKiENMUkpDlKgzq5APJ5Sndk7gSqp/QYrALzlX4/afBUzy6drqnhCzl46CA/0LS1t/NFXGnrH1qvXEFHRwcn4W%2b3/8b/VDlz9iwqKitQVV3V5wLHK47j6NGjfLyaMzUoPy6cCxQL4/gxd2yGGRMWRGNiZgxEMbPBQj0xKiEIL2SYMcYSjtGpoRiZqId4rg6i%2baGDT4Plx45h%2bwfbsOWXv8Rnn%2b7CF3/8I5obG9Hd1YXO9g509ROdvUfh08JR%2bPq1a/hq927s%2buQT7Pnqay67fKkFZYeP4IPf/hY7d%2bzAb371a5S%2b%2by5aLlyEMisOLMIbivwkTFuaDs9Ci0CAQYOxaeHc992y50FbmAbPpVZoc5IgGtQ5wKrHuKIF2H/0MI5UHse3R4/gcEU5Dh0/xnGw/OgT4UB5GQ5XluPzv/wZlWdO41xTA2oa6viD1tnGetReaMRX3%2b7D3sMHUXaigo9B1zTmt2WH4ZZqFtIfRXxCmJfwEERHXkqHBCOVPQ9HOiXoP41BHIWDwYpSMHSNFcNWWzDsgdIqlAPA0F4da6yw/fv61Rahvke/bXF6n1xUlAK2MhmsKFko7wfJqL4oWWhXdJ9s4P8HBIOtSgFbkwa2OvX7w%2bP0rXmMvNjy5FidBpZnukfAENETErA6FWxDBlhJ%2bqOxPuO7uF/%2bj/o%2brv5R7db3ow9hrUWwgPFOT7DwXmSEwOblOIhzoiHOfThG5RCiYL8oipfCvQDxoiiIsyMf2Zcg9Ht0/b1x7mvXq/dx88qNhsOiaAxfOpe/F3jWYxLGOIyG0xhn/h2Ak7MTL%2bk7AHot7uQsyHshFtPb5CwjnrWGQinxgFImfyjUcgU0CiW8NFp4qtT8Wq1QQiNXQO6lhWzWdCg9Ht5XJZPDw10ChYeMXz9qDKrTKlVcr8pDBrmnBh6zZ0ApV0DpIXtoH4VcDu1UKVwifMEWGSEJ8UV0hIm/7A0PD4cpIgLRJjMCAgIQZjQi0mzmcvqqxWw2869fBALSjZDT22Dlg29g6TW0u1SCCJMJBYsXIz0jA4lJSViYnc1hDAvDpBBfuCabIVcphX5/r0OphEQqhUwu/05db3uqU2s0sKZbkZmVxSfnGuyLKbGh8JjmyRf6sL4ylRJqiQeeN/v1EZCakIg5c%2bdi3py5CI%2bNhiE5DgF%2bfjCEhyEsNhpJCYmIi4tDfHw8fH19ewkIhYLeCBMJHvdAuyaXevBd8dJqoZIroFIo4KnRCve0u54aSGdOg8LD44G%2bfTpkMkjd3CGTSgV9jwDVaVQqrlurUHK9Ep8ZfGMepZvq1FMkeN7kC5YjELA0fzF%2bunw5/mP5y4hYmI5ZL82Hv58/gqJM0CfORWFBAV5d8SoKCgrg4%2bMjxIAhS2M5CWQJD8MIayiGWwy87L3m99THYsCzaYZH9u3tz9s%2bpg1huFXQO9zaqzfksfMijLQYMCw/CizTAInBD7HmSG6xJpOJf%2bsQFRuDwMBAhIeFIyo6mlsXgb4l8vf3B%2bMPEvSvapbxxws6CqfpMSFgOvS%2b/vDx8%2bX%2bTSZOu6/VajFr1qw%2bGZf7%2b0Oj0eD/ASfLY/Cw2NF1AAAAAElFTkSuQmCC' /%3e%3c/svg%3e)
Product List
-
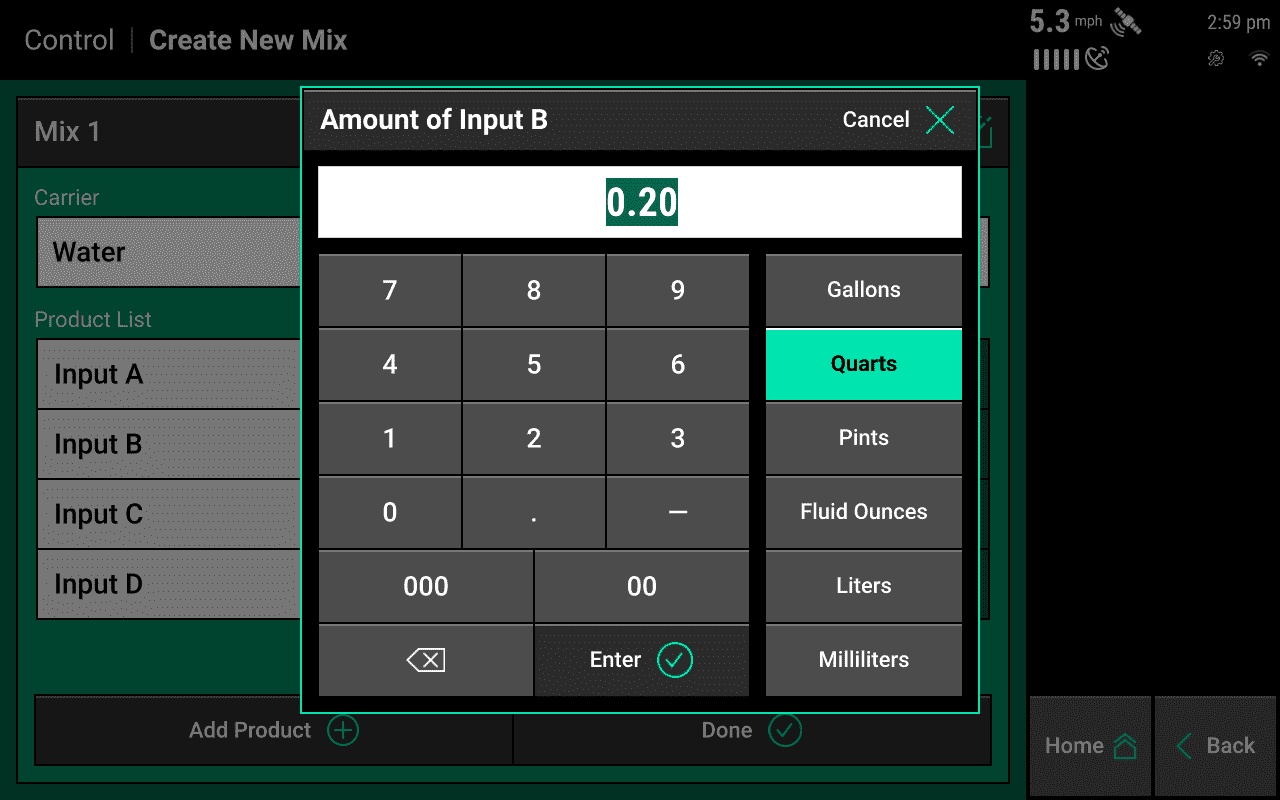
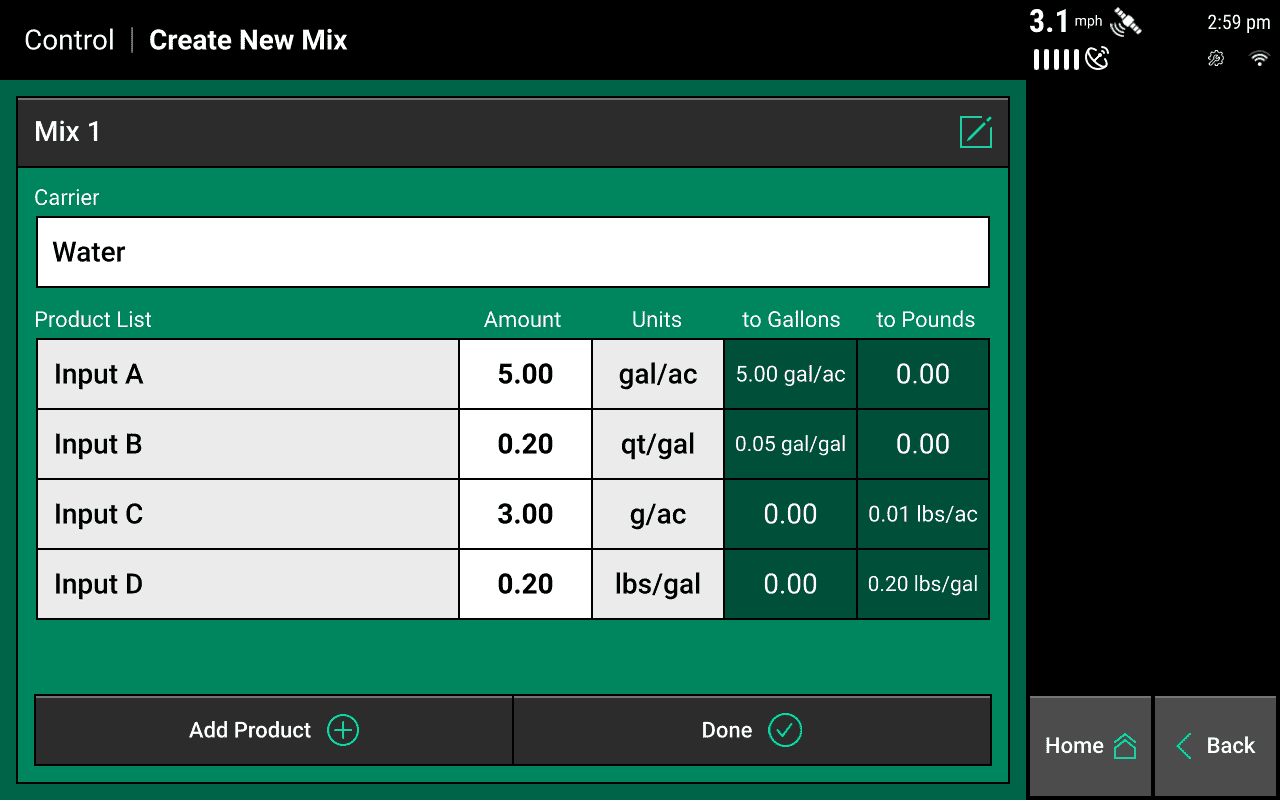
Once all Products have been entered, in the 'Amount' column, click on 0.00 and enter in the units and rate for that specific product.
' width='1280' height='800' xlink:href='data:image/png%3bbase64%2ciVBORw0KGgoAAAANSUhEUgAAAEAAAAAoCAYAAABOzvzpAAAACXBIWXMAAA9hAAAPYQGoP6dpAAAPGElEQVRogd1aWWxc13m%2b3DdxnX04%2bz7D2TjDmSFFyVxm5b7K4iJSEkVxk8RN4qaNkpM0llHY7kMeEiRx4sRa4jRujaIompfmqW6LPqS2jKJG81ADXZ6K9qkFWnzF/8/c0YikqIgUEKADfDj/PefcM%2bd8/3buPVcQBAH/XyCTyaBSqaBQKFBUVISqqiqWc/uUlpaiuroa5eXlKC4upjoBtbW1qKmpgVKpRF1dHct5%2bXks63Q6HlSn10Mul8NssUCj1UIqlcJsMcNisaC0rOx3vnhxHWq1mudGBEgkEtjtduTl5WX7lJSUcD2trSw9bwG1NTWQSiRQKZWQSaV8nScIqKuphUGvh8Vkhs1qg0qpgslohNPhgFKhgFGnh9Nmx4nyCh4873eAvQTYbDYYDAbU19ejsrJyH0mkeZGI0tJSCEJ%2b/sGMFryg/iAU5UMoKXwexYUH1xUVHA10bxZiHZX5EAoL0gTU1bHGiQCy1hMnTuybK2m9oKCALaSoqAiC4DGi2GVAsVOfLkVkrksIDcY0RJnavWbIYy2Qh72oC7khDXsh4dLDsqLFD0nIA2nIk61XNPuheSOM%2btMhaF4B1J/Gk0V8DGVrAJpTTdC2BiGLNaO4wYgCjxHCidJXd50CV9q3lSoV5AoFFEoll1QnVxwEBeQyOaT1KjhPhjEzPom5mUsYGxnFxckpTI1NYPLNs5gaG8fs%2bQs4d3Yc5yfOYe7iDEb6B%2bCy2hHweOFv8LwUjW4q3Qh4fOhJpDDc189jxN9oh6M1At/pFtgiQcg09Sgz1UOQVKZdI8fnXw6bBharBW1tbQiFQrDZ7VBRIJHJIJPLD4RcJoNErYTjdDPmZmexsLSEi5dmsLyygnNT5zB9fhoDQ4O4PDeHtfV1zM3PY2p6Gn0D/XA1NMDf2Aiv3wevLwO/Dz6/fz8a0yX17%2b3rw9jEOM6OjSEWjcLefhKeztOwnAyhzmJAmbkeQt1%2bk38p8h06KGVyaFVqhkomh1wihbxOki4PQq0EMqUSNRYDigsKUFhUyCmlsDBdEijAUEnBRqwn/6MUVFlVBWlt3XNjUso6DHQvjUUor6hAdWUVqssrUGM3QlavRplRDaFuf9B7KfI8BhS5DSggNOhR6DagxGs%2bFGU%2bM/I9RkgbbPjJj36Mn338MR4/fownT55wuRe59Y8ePeLywXf%2bAHfefYC7776D3ffewUcPH3Lbi5A7Hl//7Ak%2b/OEHPId8lx6FFANqj2ABgs%2bEwmQQlf2tqB44hcr%2bkxDivsOR8ENod8FyKoKj/n7yt7%2bC/9vLGP3B23j3Lz498jiW0xEIHQ3Ia3ZAqK44CgFGlHT4Yeptg7G3Dfru06iLhQ6FNB5BebsfltYQ/ue//vtIE//gL3%2bJ5gfrGP3et/DOL//wSGPQf1tbQxBOuSCE7UclwIDaaBNubG5ge2cb2zs7uH37Nm7evIlbt27tw81bt3D3zh0sb1yHORLE33z2V/jyyy/x%2beef44svvuBSlPdei/LTL57i%2b5/%2bHG99%2bF28/fAH%2bP3HP8Kv/%2b7X2T403tOnT/eNlTsm9fnrzz6DqyUEW18HhCYz8qqP4gJePWTJZiwuLWFgYAAjo6Mcabe2tnDv/n3s7u5i994z3N3dxf1797B19w7KdWro6jUwmc0wGo28AaHSZDJxqdfrs3JuG8kOixU%2bVwM8ThfcDie3EcxmM%2b/oeNudGVe8XxyDxzGboK2vR51RB/dICkLQhLyaI8UAAySxEG7v3MStrW1sXr%2bB7RsbuH/nLt7avYe37u4%2bh/t3d/HN3XvYuX0LVSYdkrE4%2bgcG0Nvbi6GhIfT19TG6u7sRj8fR39//rK2/P9sWi8XQ09uDru5urifye3p6MDw8zMR5PB6W6V5qIwwODmbHozIZT0Blt8A9lDgGAX4TCtu8sPZ3wjEUg2MoDudQHPaBKMM5GNsH12AM1sEYygxqpOIJztG0sCtXrmQXkktAKpViSxobG0NXV9dzbYlEAlevXsXly5dZpkWTht0%2bHwZGR5Do7sLV1RXc%2b%2bY3cGv3Lm5sb6FvaBBd/X1IppKoMutxItYEIWQ9RhCMB1DWFUZpKoSSVBMKEgEUJgJcCm1Ojvj70NGAYr0KyShpspcXLS6cSlo0azlTJxJzUBuRR1olckjLeoMBTXYXJpI9GOmI42wshYlED8bj3RhPdONMZwJnokkMn%2bpAhVEDIeqFELIdnYDiTj/HgfpUK9Spk5DEw1AmWyBNRFDc5kVpuw8lOaDrog4/SvQqxDs62YzFRSWTSV4IabOjo4Pll7WRNVAdtZM76DVaqBfeRPDj9%2bD94Fvw/vRteD56B96PHsDz0QN4f/x78P30ATzfvYdir%2bW4WcCIqo4AFq9ewfL6GlbW17C8toqrK8uM5dVVLK%2buPIfV1VXML19FpVHLMYAmTRqcnp5mTZMsmrno89RGcSDXPcS28fFxjI6OMpFDI8Mwa7QQvr8J4X9/BeHf/xTCPz6G8PRDCF89gvAPD9N1//lnEP75EwghJwSvAUKLA0JV%2bVGygIE1Tj44PjaGN8%2bcwfnpaZZXV1aws72Nrc1NzgqMzU3sbG1jZeM6Kk0ZAjImvLKywia8d5Gk5eXlZZw5c4brc2MAaX1hYQEXL15keXhkGCYi4DtryP%2bPP4fwL38M4bPvQfjhDoRH9yB88m0IX/8Cwr9%2bCuGrJxCCjmMS4DOgpjPIaZAmMTExgUuzs5ifn%2bdJ08PM2tpaFqtra7i%2bvo7F1WW2gEQ0it6%2btMZpAS%2bKASIOayMLGBwaTBPw3jUU/tufIP/vH6LgNz9H4defoPDrP0LBP/0C%2bV89RsFvPkb%2b5x9CCNiPS4ARVe2NTACZNoE0SaCovrS0tA9Xl67g0uICThg1iLZ3ZGMA%2bTGVorzXz18UA%2bg6GwP6%2bqDX6eBo9KHrzRFEB/oQHehFW3cSb3Ql0NHbjdhgH2LD/ejs6UKZTgWh0QSh%2bRgWUBdt4sUSKCVROTMzg%2bvXr2Nzc/M5bGxsYHtzC8s31p%2b5QCYGXLhwIZunc12AFrq4uIiRkZEDUyRZ3vnz51mmNEgbHq/bg5GBQfQkUxjuH%2bD9ydq1ZUxNTKA7mUI/ZZ54AhVaFYSAGUKz/egxoC4WwtzcHE%2bQJi8GJbIG8nta9G9DAN13EAEkE6G0uL3xgciZnJxk18slwOP1Ymh4GN09PTz%2bxZkZzC8sYHxiIrt56k6lUK47LgE%2bI6rbG7GwuMiap4AkWsJB5n%2bYCxxm5oelwb0uQG%2biGxoaWBbdKhqNMrJuRuNEYyjXHtsFjKjpCHLAI%2b0SyPTFeJAbAEVQEFzKDYIZjdOEX7TZOWyTRESIoCzCFuDxZDMK1ZNliTLdz%2bMkEmkC2AKOkwZjYczOzuLs2bOcqsgcz507h/X1dXaBvXFge4tcIJ0GUxlTpsnu7OxwSYTQBElbYoqk/UHucwK1iYuiLbKYIsWtMBFAdTQmbaPpf%2bkJdXt7m8sLlDZjcVTo1cd1AQNqO4Ns2mIanM2kQcoERMJhFhDr6GQ/Jc3QRkdMaWTOnZ2dLJPGRCuhfmKbqFFqI1A9kUIPQ263m2UijEgRSab/4Ov%2bPiRiGRc4bgyoeo1pkOIA%2bSqVBDEtijGAZCrFdrFexEExQOwrjivGgdcUAwycBpdy0iAtkqyAtC9G/o3NDDY2eDd4LZMFuuIJDAymzZs0Rltesh5yJ/GxlcyfJk0ap2sxU0xNTWVTp%2bgqlInIBXw%2bXzYrkdbJTQiiNdAjeE%2bqCxW647qAN/0%2bgCZ9ZnQU/X19mBifwLnJSayvrWW2wls52MTNnK0waUEMflRSzHj//feZQNKoaN6kuVxzJw0SmXfu3MnGDHIRWqwYBEmmeyglU2CmWHDp0iW%2bl1NoIvl60mBVeyNm5i7j8uICLlG5MI9ZEfNzz%2bHS/BzmFuYxNTfLLkAEiP6dG%2b33bn/J1HMJIIha7%2bnuOZAA8nmqE/uLYzGIxNeSBfwmCO0e5Hf6UPAKyIvmPg6nU5MYB8RUJfo7Tby1tRV%2bvx/BYBBer5d93O3xIOBvRCAcQiAYRKCxEeFwmI%2b5iQAiiO6nPQOBAqcYByjuJDqjKDdpIHR4IISP/D7AlB6g0/tqiPqYgFQszm%2bERA1SFrl27RrHACJC9HsiwOFw8OktLYIff5NJNISCMKXaYG0/CafTyQund4JEFlkAkSBuyfkxfH6eYwFlnm5yAZM2PZ/cFyJ5r0pApxdC3P9qSPhRalCjlzYvw0McCMUgSE%2bME5OTnKooANKWlo7eSOMNbjdrkl68Dg8NwdMShnU4CWfsNG9/A4EAn9%2bTRdALWrqXCLixscFPpiurq5g%2bf56P2fq6e1Bh0bEy2AKO6gJ5p1woDdlRGnIciJKQPY2mNEqb7CiOOFGoliHs9eNkOILmUBgt4TAiTSGcjDSzTKD61uZmeFwufoNM3xRo6AhOroBaoYShXsuvwAw6HfT0hllvwImycpgNRpxubuHxAj4/I0gu5G9EOBjk/4j4AyjVKJDf6uJ3gkXSGlSUlqG8opy/AxBBx3R0tJZbJ9YLQsCCIr85fUYnkx0IhUwOpVzOH1CoFAo%2bS5SrVSizG1CkU6LIrEFJvTyL4hzwtTpHplKjQKlGyZPna3W6rVSr5Dbup1ehyFSPYu77PKgPj6%2bWocyiQ4XTCCFohsSkg8Nqg8VqhdVqhc1qhcNm440Vfclit9m4nmRyRZ1O94wACjz7ToEVckikElhtNkQiET6lJTMONjVxMLO4HKhxmlEbdEOu1UCuqYdcm4PMtVStgkyjfr5tTz%2blTgt/JIRgSzPsngbUOsyo8zkgM%2bogF%2b/V7IG2HkqlChU2HR%2bMEAFetxtOlwsupwtWpwNmTwO/XzBbLbA4HfC43RyACbpcAkQLkEmfQc6lFIqM9skSRJmvJVJIFQpeoFwieQGkkNbWQsanzRLI9kCeU5JlkWsopTIeV6JRQ8anxwePTW2KmroMARYmoCUcwcnWVpxubYU16Icm0gi9Tg%2bj3Qaj24XmcARvtLWxQrVabSYGtDiYhBehkECHqLly5pr7%2bEwvv/%2bQ9oP%2b57cat5H6mFEQsUMImCAx6/ibJbJYMnH61sHudPC%2bwmqxwp7JQgT6lEav12f2AYSA5egIHuPe1zFuoxmC14hqfT0HWa1Ox%2bZNIO3T128ajSZbx/X6dP3/AdmdKmwRwkV7AAAAAElFTkSuQmCC' /%3e%3c/svg%3e)
Product Units -
When all products have a rate entered, click on the 'Done' button at the bottom of the page.
' width='1280' height='800' xlink:href='data:image/png%3bbase64%2ciVBORw0KGgoAAAANSUhEUgAAAEAAAAAoCAYAAABOzvzpAAAACXBIWXMAAA9hAAAPYQGoP6dpAAANoklEQVRogdVaCVRUR7qulggaww5qTERRofcNcEO2bqDpbrqbVXbobhRU1hhnNO%2b9vCgGMKLJaHxbzkSSmTlnEuNzfJlJMnpy1LjHXUEBUZHVhR1xXN6o3ztVl0adqIOQeTF9znfq3qq//qr66l/q9r2EEIKfO3g8Hit9fHwglUoxY8YMODo6YvLkyZDL5Y/Jurq6wsvLC56enkyG0M7Tp0%2bHt7c3FEol60yv7V6yYwqDg4Ph7%2b%2bPkJAQSKRSaLVaBAYGQiAQIEqrhU6ng6ubGzfAwER%2bSgL4fD5ee%2b01tjhfX1/ExMTAzs5uUNbZ2ZnJUFk3Om8eIZg%2b1RsCX18EKP0gEgjZ/SjCwwzvaVCFhEIbqYEp2sDaI9XhSIiLg0ImZ21xMbGY6Dmem8hPZQED5bRp09iC1Wo1Zs2axYh4lCAKuvP0nhLh6uoKQka/RFngYFNKrx0G6ocyCTsCMmY01%2bf/G3TcsfZsHjN8fGAymaBSqSCTyTBx4sQfzNXd3R0ODg4YN24cA%2bGlq/FKYhheSQyF43wVHOeHMXD3YXBKUsEpSQ2nZPXAtQrOyWo4Pno9IP%2bTIC4YjnHBsM8IB3nV5fktyH5%2bCCQyKZR%2bfpDKZZApFKyk/k7rX1jQ%2bcllEIQGQiqXw007B4T/GuwIwSg7u8fM/pngmeZAp9dj5cqVyC/Ih9Fkgn9AAIQiEcQSyYsLsRgihRxT04zgh82DKyXA59WHLjxUCxgdHwSlSIJAvwDM858JP5EEUl8BJD58Vr6w8OFDIhDCNzQQEqkMbprZID6Tnp%2bAUekqjEtRwyFFBfvkUIxNVcM5U/OzgUtaBFyS1RidrgaZNvH5CSCWCIz91WJM2rwCUyr/CZM%2bXg6yzgJSYQZZ9zPAegvIeitIsQlkyvjhEBAOp9VWRHy0iiHkP96Gz9oC%2bFQUcOXaAsx4geG7tgDOqy0g%2bdHDJMCswrTyJbje1Ym%2b/hvou9mPu3fv4tatW7h95w5u3779wuLm7VvA/95Hzmf/BpIbDrupw3GBzDCIP1iKszXnUPnJJ/h8y%2bfY/uX/oKe3Fy/6795AuWTrf4HkhOMl7%2bEQkKWC73v5uNv/F9zu6UP31evovd4B3HvAaX/wggNA/pb/HAEBlgiMWZmJ6MpyxP22giH%2bd%2btg%2bmQNTJVrkPCbCsR/OnxQHYbKchgr18BYWY74T9eyeqo39pP3YNhczmCrj/t0LYybyxmiN5cx0HZaT%2bWpDludfnMZ4irXwLsiHyRfD96UCcOJAeFwqsiF26ZCuGzIh9OGPDi8n4sx7%2bfCfn0OyMpEkJKkYYPqct6Qj7EfLGIlWZ3Cta2aD/KeGe4fFsL1wwKQ1ckgq5JAStPgtDGfYfy/v8HgvDEfpDSVyTtuyBus89hUBEfWlg5egXEEWaAsG5IP3sSsD1dg5sbl4K8rgmLDLyBYX4xX3smEyyoLnFeZhwyXVWY4rcyCS4kF0l%2b9iQCqd9MK%2bH%2b4HJ7vLoDTSjPT61W%2bGP4blyNg43K4lVhZvf0/p2BK2SJ4ly%2bB7P2lEFUUsUg/%2bq1kjHs7HVPLF8OrdBF83suHYG0hppUtBu/tFJDC4RJgVmPy6hxU1dehoa0Fl6%2b04lJLE%2bobGxgampvQ0NQ4ZFxqakRjawuOnTyB9q5OdPXfQHtfD9p7u3Gtpwt/uXsHZ%2btqUHuhHlc6rqO%2b6TJD67WruHDpIoQL4kGiZCCGmSAaGUiUHESrANEoQKJnghgCuDZaGmeCRMpBsiNBlsaCeHkOJwiGgV9RiOPHj%2bNPX36JbVv/G3t278af/vhHNDU2ov/GDfR0d6O3p2dIoLL9fTdwob6eBag7t25h7549TO/OHTtY3ZW2NjQ3NbO67X/4Ayv379uHjvZ2zC02wzc/GQHLrBAVpML/TQtkb2Swpz6iVeL1BSYI8pMR/e4yJkcJ4C3QjIAAs4qZ0dlz57B//358/fXX%2bP7I9zh16hQuXbqE1rY2tLS0oKW1dWhoacGVK1dw%2bvRp9PX1ob%2b/HzW1taitrcXFixdx/8F9XLhwATW1Ndi2bRsOHDiAAwcP4tDhw2hsbIQsZz7GJATDNSUcr1sMGJ8eBY90DRz0s0F0fqzNPS0Sk8zRcExWg0QoQKyRIG/GDZMAixqTSxYyApqbm9HU1ISGhgY2mbq6Opw7dw41NTVDBpWn/SiZVEdnZycj4ebNm7hx4wY6OjqYtVGC2tramAwbr6kJZ6uq4ZMWDRIiAImQgaglHMKlIKFi8DR%2bIJGKgXsRZ/4qGUhW%2bAgIyFJhxpo81NbVoa62DvX19Wy3Dh06hKtXr6K7uxtdXV1DBl1wb28vI%2bHevXu4c%2bcOsyR6T0F/lOjW1lZmCVVVVZxF1NSgrbUNAQUZcEqPxASzHq%2bkqOGWoWH3Y2MCQfT%2bcEqLgGeWDvy8ZHiYdSBRSpDskbhAVhiLsidOnsBnn32Gjz76CF999RW%2b%2bOILZg10MXRRwyHg/v37bNd37dqFb7/9Frt3736MADoexaZNm7Bjxw5mEYFvWDA5J5b5/5zlCyErzkDo23lwSQhjMWCiNRq%2beUlQ/2sBvBcn/AgxwKKGV8lCVFVXMwugO0J34/z584MmPVwXoARSk7927RpDe3s7I4i6AI0xVPbs2bPMHeh41VXV8KUuoKLmPRD5I%2bTcLodKQKgLaJQgWn%2bu1PmDp5KDnmWG7wJmNaa%2buwiXGhrYZOkE6WTp5G079TygQZC6zpkzZ5glUBdgD1b04eXmTeYW1M1oQKTjUVLaOzpY4KRZR5wdD6JTws40BzzTbIwyzQExzeYWrKepbxYHnR9zCaKWglgjRhIDwuBbUYgjR49i%2b/bt2Lp1K7755hvs3LmTmSRdBDVtGguGAipLoz/d0QcPHrBF7927F1u2bGF66c9mGdQK6Hg0GzQ1N6OrsxPinESW35VLzZi7IodhVMI8ZhHeC%2bMgKc5gLkBdQ1ycDp8FcVwWGGkaPFfzMA0ePXqUmSWN0JSE4ViALQ1SAqhL2NIgJYWSQ0k4ePAgI3rfvn0sENKzgcgaxyzAPTUSEzN18EjTcBYQocDLcUHs3%2bmxCcGs3j1dA7f40BESYPlhGrx8%2bTIDnfQ/Kg1SFxlMu5cvs1RYXVUFQYaBS3PhMhCVmAP1eZruqLnb2mh6pKkySPDjpMGagcPK%2bfp6tpAjR48wv%2bzq7maL6OwaGjo6O9HT08NI%2bOu9v%2bL2ndts55kVDKRBalVnqqpw8tRJZg31F%2boZIbResiiJHXMnZRvhtTAWU3LiwIsLBInyg3NKOCZYozHerId7ZhTGparhkqgCb0HUyNPgaeqPn2/B5l//Gt989TV2/vnPaGtpQX9fH3q7e9A3RPTajsLnuaPwLRoD9nyHPbt2Y/93e1ld%2b7XrOHHsOD7//e%2bxfds2/O43v0Xlxx/j%2bpWrkOYmgUQHQFKYhpnLrPBbauYI0CjxapaeHYN9l8yHcmkW/JZZoMxLA29E5wCLGq%2bXLMShk8dwvPoMDp88jmNVp3H0zCmGI6dPPhe%2bP30Cx6pPY8eeXai%2bcB6XWpvZw875xgZcbGlCw5VWfHf4IA4cO4ITZ6vYGPSajnn4xDH4ZBq59EcjPoXOn3sIokdemg5p9NcqQaIGHo5UUtD/NEZwFI4AKcnA6DIL7EvNsH%2bstHDlMDDapqPMAocyKxzKrQ/bS81c%2b4D%2bwbZSM3glGSCr0kFK0rnyUZQ8BJMbvM8AGf7/AREgqzNAyrJASjN/PDxLX9kz6svNz4/SLJACw0MCRvGek4DSTJD12SAV1qdjXfYP8Wj93%2bv7rPanya0bQh%2bKNWbOAiZ7PMfCbciOhN1bSXDJi4VL/pPhnEcRA6clMazk7jm4LImBy2LTU/tScP2e3v5wnEfkbHqfNa/8WLguicWYZYnsvcDLwqkY7%2boOj/Ge7DsAD08PVtLvAOhrcQ9Prt4GFxf6NjlXi5ctUZDyhZCKxE%2bEXCyBQiKFv0IJP5mcXcslUijEEoj9lRDNnQWp8Ml9ZSIxhL58SIQidv20MWibUipjemVCEcR%2bCggDZ0MqlkAqFD2xj0QshnKGABOjg0CWaMGPDEJstIG97NXr9TBERyPWYERoaCh0Wi1MRiOrp1%2b1GI1G9vULR4BVCzF9Gyx9/A0sfQ3tK%2bAj2mBAUXExrNnZSE1Lw6LFixm0Oh2mRgbBO90IsUzK9ftbHVIp%2bAIBRGLxD9ps8rRNrlDAYrUgJzeXTc47IgjT46MgnOnHFvqkviKZFHK%2bEBOMwYMEZKakIiExEfMTEqGPj4UmPQmhwcHQ6HXQxcciLSUVSUlJSE5ORlBQkI2AKEjoG2FKgvAh6K6JBUK2K/5KJWRiCWQSCfwUSu6e7q6fAoI5MyERCh/rO6hDJILAxxcigYDT9xTQNoVMxnQrJVKmlz9vNtuYp%2bmmbfLpfEwwBIHkcQQsKyzGL1eswL%2bseAvRi6yY%2b8YChASHIDzGAHVqIpYWFeGdle%2bgqKgI8%2bbN42LAqGXxjARqCU/CWEsUxpg1rLRds3vax6zBy1map/a19Weyz5ChGGPh9I6x2PRGPnNeFOPMGtgXxoDkaMDXBCPeaGIWazAY2LcOMfFxCAsLg16nR0xsLLMuCvotUUhICAh7kKD/quZqf76gR%2bEsNbxCZ0EdFIJ5wUHMv6mJ091XKpWYO3fuYB2rDwmBQqHA/wH%2bH2YUiu3HswAAAABJRU5ErkJggg==' /%3e%3c/svg%3e)
Mix Setup
Filling the Tank
At the bottom of the Tank Mix page you will find all of the tank mix setup in the prior step under 'Current Tank Mix'. In order to start tracking, the mix must be added to the tank. Follow these steps to add the mix to the tank.
- To fill the tank click on the 'Fill' button under the tank on the left side of the screen.
- The 'Calculate to Finish Field' button will use the 'Total Field Acres', 'Mix Target Rate' and 'Tank Size' to calculate the amount of product to finish the field, and then allows you to fill the tank with that amount.
- The 'Calculate to Fill Tank' button will use the 'Total Field Acres', 'Mix Target Rate' and 'Tank Size' to calculate the amount to fill the tank, and then allows you to fill the tank with that amount.
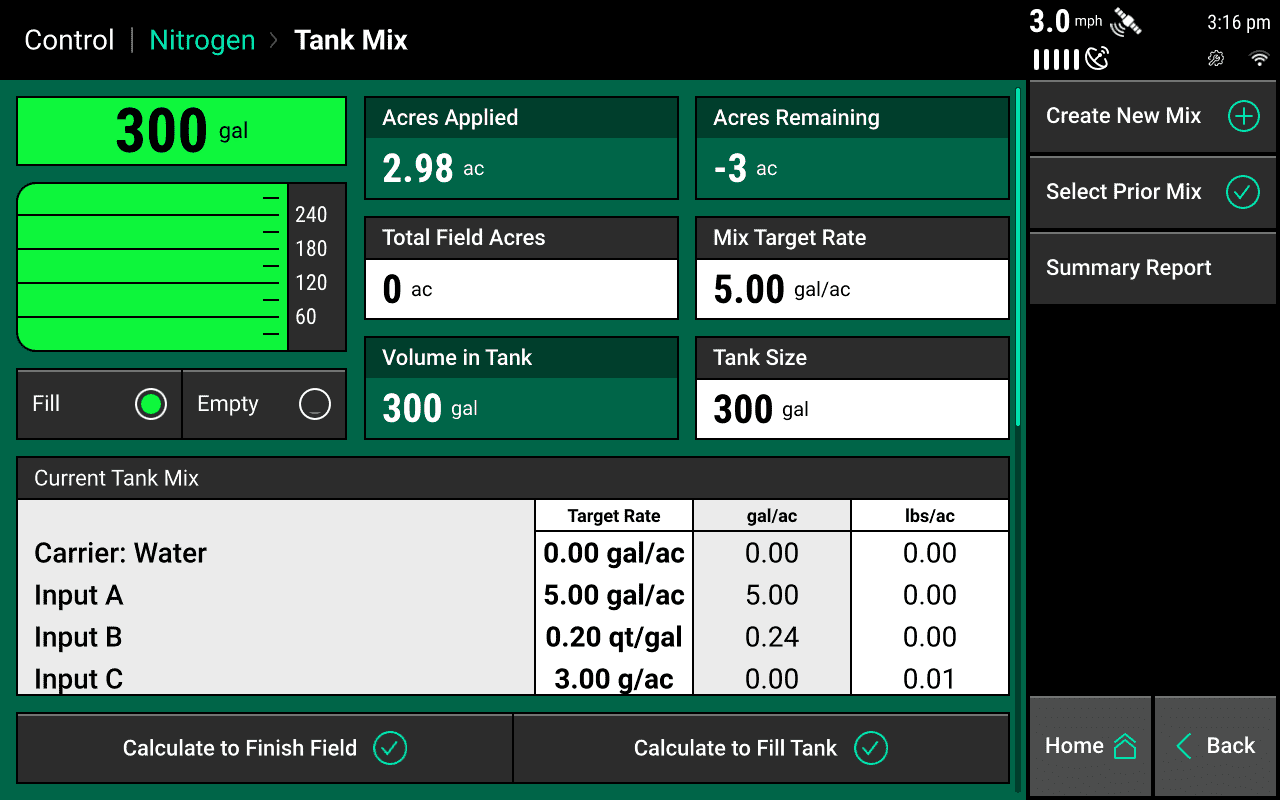
Tank Mix Summary Report
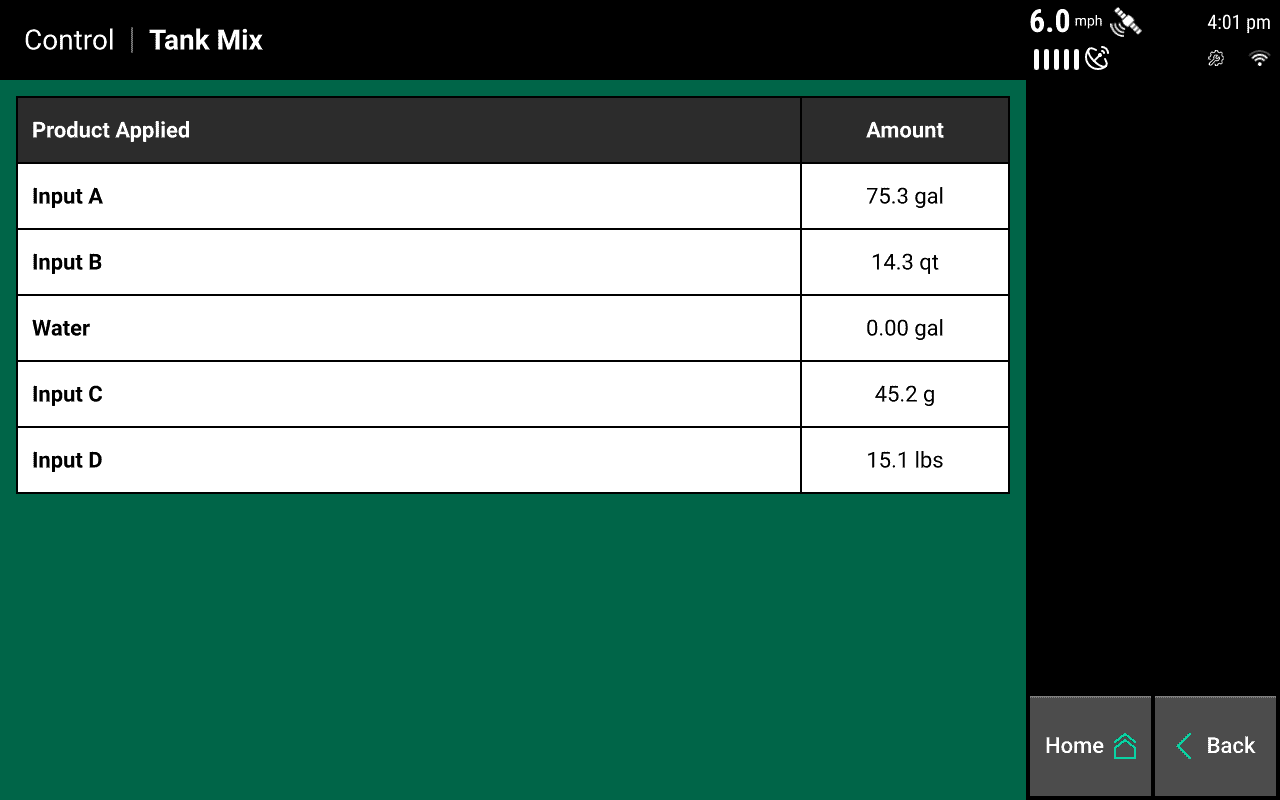
Once the tank is filled with product and is being commanded and applied a Tank Mix Summary Report will be generated
The 'Tank Mix Summary' can be found in the 'Tank Mix' Setup page or by clicking the 'Field Acres' button from a home screen widget and locating the 'Tank Mix Name' on the right side of the screen.
Product must be applied to the field and the tank must be full to generate a 'Tank Mix Summary Report'
Select a prior Mix
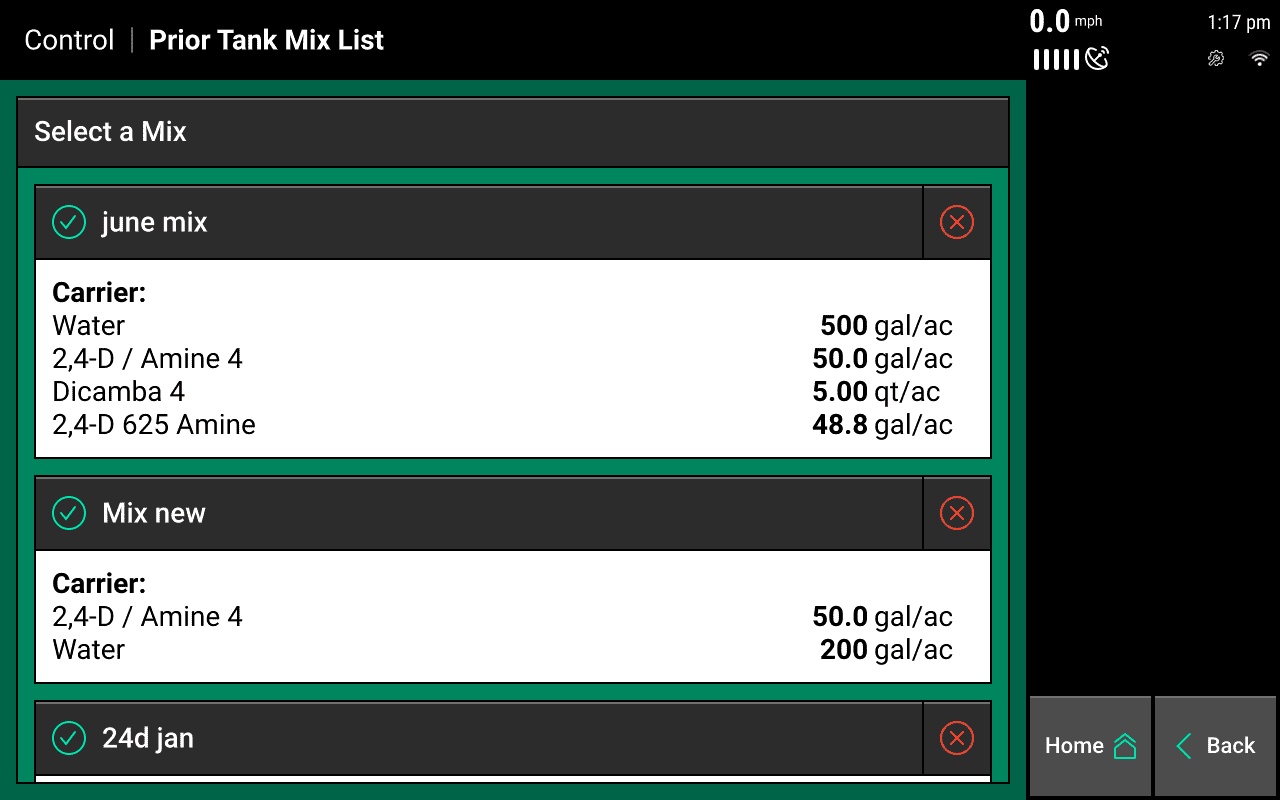
Once tank mixes are created, they are stored in the 'Prior Tank Mix List', available on the right side of the tank mix setup screen. Select any of the available mixes to make it active. A mix can be deleted by selecting the red 'X' at the top right of each tank mix.
