SmartDepth Calibration
Learn how to perform SmartDepth Calibration.
Updated March 25, 2021
SmartDepth Calibration
SmartDepth must be calibrated which consists of finding both end points of the depth range and a depth calibration.
The calibration should be preformed after:
- Initial Installation
- Any Row Unit Hardware Replacement
- Any SmartDepth Hardware Replacement
- Diagnose Page Displays “Needs Offset Calibration”
- Diagnose Page Displays “Needs Range Calibration”
- The Yellow light on the Depth Module is On solid, or On 1.5 seconds; off 0.5 seconds
The Yellow light on the SmartDepth module is used to indicate the calibration and health state of the module.
| Yellow Light State | Condition |
|---|---|
| ON Solid | Waiting to calibrate first time; no valid saved offset |
| ON 1.5s; off .5s | Waiting to calibrate first time; valid saved offset |
| OFF | Waiting to re-calibrate (2nd or more iteration) |
| Fast flash | Normal operation; bad motor or invalid sensor |
| Flash w/ red LED | Normal operation; movement in progress |
| OFF | Normal operation; no movement in progress |
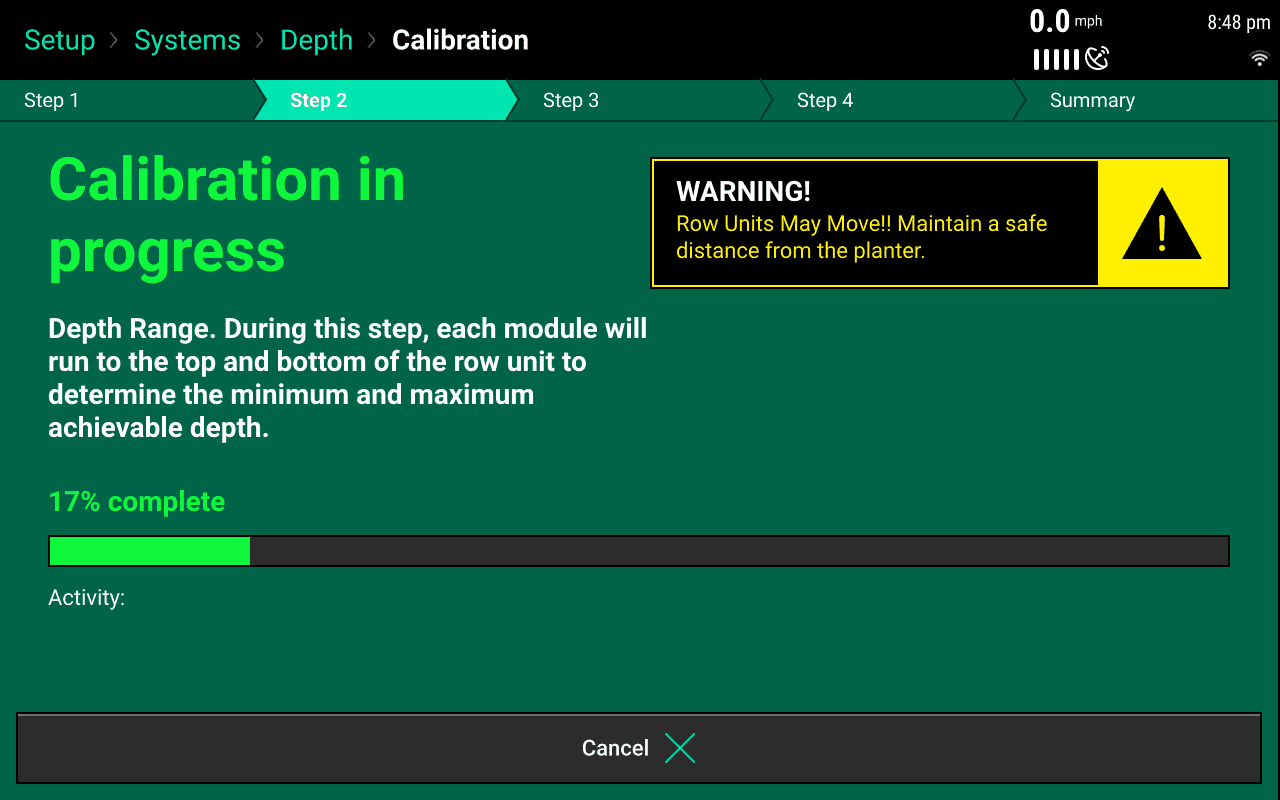
Range Finding and Depth Calibration
- Part the planter over a concrete pad with the planter unfolded
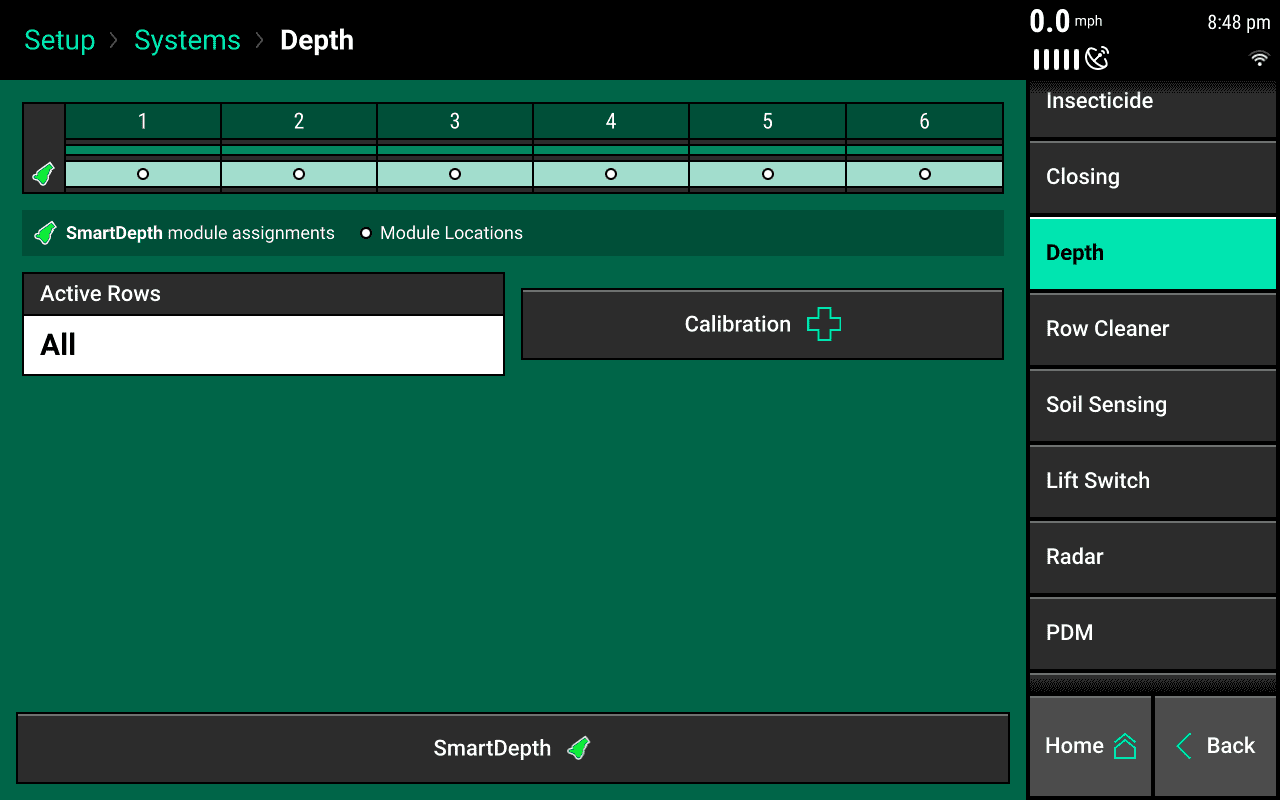
- To start the calibration navigate to Setup > Systems > Depth > Calibration
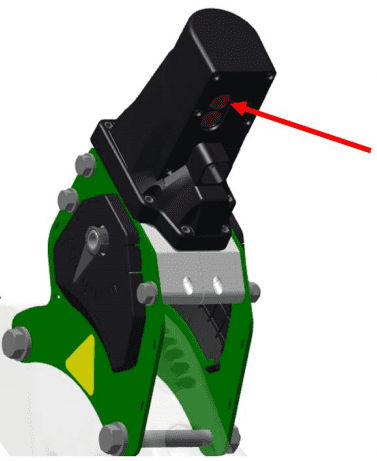
' width='1280' height='800' xlink:href='data:image/png%3bbase64%2ciVBORw0KGgoAAAANSUhEUgAAAEAAAAAoCAYAAABOzvzpAAAACXBIWXMAAA9hAAAPYQGoP6dpAAAL6klEQVRogd1aeWycRxWftb12EydN7I2dy%2bfe9%2bk9vfd9r9e79vq%2b12snqZM0aVOoGqBURQSKmhQB/yAVASqUXCV1EoUmLU0q0QohgQR/VVACQkioCCRKekk/NLO79tpxikidVNjST2/m/ebN7Pe%2bmfe9mTEhhOD/HRwOh0m5XI5AIAC1Wo3t27eDy%2bXe1pbH46G9vR1NTU3YunUr1REQYQuIvAOEvwdkNw/VHA44vG0gkjaQtp0gik4QwZ4iX1ONuro6%2bPx%2bmM1meL1eWCyW4gClH/JZOUAqlTIHUNnQ0LCmA3bv3g2VSgWRSITGxsaSA%2biDaUUgKj6IuBXVtNMtm0C6pEXn6MUggr0g0nZwqANquPC43RjMDSAcDMGg03%2b2M6AkOzs7EYvF2EuhL6e1tXWFgypBHdTQ0ABCuNUrySoOmK66au0BKbfahqK25jMDp674pgUiEWLRKLq7uyGRSMpveE1s2bIF9fX1IGTcDzLmW8aoF2SEwlPEaIWeSsZ5i/VRL6rG/OAwvafCzgsy5AIZLuvWAOWXbFbDU%2bLvYDtcyZf6GPdhk7QdMoEIao0GXV1dzBF%2bvx86nQ579%2b5lM6KMlpYWFgcImQlhj0kNgUaBOq8OpMcCkjChJm1Dfb8bJG4CSVqKMmwASdGykXH1fZQ3FnWUo21KfMNQANx0N%2btrBU/7SpjQMOhHdY8NJGFe2Tcdu8cG3nCwaLt67ISJ9Uv7Z2MnLeBQfsiJXd06JEJhDI%2bMoL%2b/H319fRgeHmbLQqlUsuBIQWOAVqtlcYCQyQAEGiU0Ehk2WRUgYT1IQIvqcBc2J22sTEJ6EL8WxKUqlTXYmrJjU8K6zFOOtinxvIwH3KhpbT6oQ1PWy8ag5RV9B3SoCncxe8YFV40d0KI2ZkZTn4%2bNs/Tb%2bu3gmZQQd/DR0dnJ4gEFjfh8Pp8tCbFYvAQaKNvb20HIVBAdKgXUciWa7To0RqzgBc1oDFuwPWgCL2RhaAyY0OAxgBcu1inXEDIX%2bbCFcbRNY6n9tiAt387zKvmgec2%2bqX7bJ4xNx91W0RcvYAbJOdBs1UArV0KmkEMmk7GH1Gg0DOW3X54BVCdiM2DYB1WvFY4DHjz09JfxrV9excnXF3Fi8cf46rkf4tQbl3Dy%2biKeuXoeT53/AU7duISTNy7ixEsv4MSFH7Ey1VGOtjl1fREnb1zCV37yPTxz5SxOXr%2bI58r8K%2bdw6sZFPPvaBTz94vN49tWfsjrVU562e/b1RaZn/M9fxqnryzwbm/6WK2dZ/2zs64v4xtXz2F5IosGoQCoaQzbXj/6BHPpzOWi0WsiVCihVKihUyiKUSqjUagiEAhAyEcCeVDdaU2ZoR3vhf3w/3I8W4Dqah/tIHp5jcwy03n1wAt7HinXKMRwrsDrlnEeL7d20/cPTcD8yy3jvY/OwMX6G1V2PzMJ5eJmndraFiaLtowWmp7zrDjz9Lcyeti3VuZMh8AxyuI0WhHx%2bhLw%2bpKJx6JQqyIRiKMSSFVBKpOC30SWQD4P0O0FybpA%2bK0hEA5IwgCT0JUmDlx4k2QWSLJUpym2oPmUsoWvZhpVL7Wj7HtNKpM3rU0%2bVymMe7A5YYQh6ofQ6oPI5mdSFfdBH/NBHfMsI%2b9AVC0JqM9HPYAAP5j0Qfj0Ow/5ReD43B//n9yFyfIHNBvFsBsp9A9AvjEAxn2PQHBhiUntgGB1TKTyQsqGtPwjNgWEYD41D%2b9AwOiaTS22U%2bwewOetkEbyKRm0Gc0mWy5X1/8ZX1s3gpG0gKTOqTi6g9t3L4P75PLg3z6H25jlw3zkL7jtnVuIPp8H96wXUXPgaCJkOoWbKj7r5ALgjfmyfTaB%2bKozGQhLb8nHUjgXwwEQID0wEmdw0EcKDMzEmN02GUDPqBxl0oWbEi9rxANPTttwxf8kmiPrRAKr7HCCZbnCy9nVGNzg5J0jaAvLcQZDLz4B88zDIt4%2bC/Pp5kL%2b8BHLzLMifKvDHMyB/exnkInXATAj1cRvq/UZsDhnB9epQHzah1qsD16vF1ojlNmyJmJfKD0at2BazMVnZZqkeNoMMuUEKYZB8CGT2kxAuYZW%2bbLeWPdXti4Jku0G%2bcwTk1lWQ330f5OZpkHcXQf55GeQfq/D3iyDvXwN57TkaBP3okEswkEqjr6cXfak0%2bnt6MZjtY1IqEELY1gFRe%2bddgdrWxS1oinaj1W/F3oAVLatAdbu8Jux0d2Gnx4hdJezxmdFCbYI2tPgta9oxGbShKtONzZMxND%2b5Dzu%2bNIemLxaw44l8CTNoeiKP5uOzRdDyk/NoyKdpHhCAP5vC4YOHcPDQIczv24fp/AyTFEPDwxgYHMTA0GBR/g8YHBpCbmAADf1eCFUKGGRK9p3WVYDVFSp4bHZEvH4EnG64bXZ4ux2w6AxQOKxQ%2bF3QqjXQyRQrbJf6kClQnbGjWS%2bDrVMCg0AMQ6cIRqEUBr4YXQIJ9B1CaFo7oWnjM%2bjaBRDv2ltMhK796k38/u238Yu33sS/3nsP73/wAf596xbDhx99dFf44KMP8fHHH%2bPWrVvQHJ3AHpkIGqWKfYPLoOmpQqFgMhqNolAoYGpqCpOTk5ienkYkGkWH1wZxxAO5QQelXL7CvrKPqt5u7LBpMDYyium5AtJ9WUzN5pGfn0Nh/z54gwFIFHIotRooNGqodFrwxSIQznQIb/32N3j18hX87NJl3Is/w7FpNMkELEMTKWS3Qy6DQCpBh1i4AgKJGCK1EgK9BmKZdE1bccmek7Fjh0UNtVQGlUbNHFPO%2bGj2R51Es0N6aEIlrXd2dhZnwFMvfBeLb93AmTeu4fSNqzh9fT3wCs7cuIYXX7uCjoMDIGNeVE0GwZkIrI3JAOMrwaEY9xdxJ7sSyHQATUYl5EIxhCIRS3MrUX742x2QD4OM062texljFeW7RbmPMQ/IdLAiwt8LREBmgmg2qeC1O%2bF0ueDz%2bWC322Gz2di2mO7%2b6Iwog84MoVBYcsBsBJx7CDbGTOiegcP6D4LXpUAmkcL4xATbCtM4MjIygvn5eUQiEbYLLMcM6gQ%2bn1/MA9gPvNe4V%2bOU%2b50JosmkhEoqg1QmW9oNUtBy%2bcHLoHU%2bc8D9ePj74diZIHaUYoBAKFxa%2b3Sa07OA8vpfOwbkN4ADpgPYaVbD53ChN5NhU56eBKXTabhcrqVZULkEBAK6Hd4wDgii2axG2OdHsifFHn5wcBDZbBZut5s5gD502QkbzwEzNAjKIekUoJPPZw/X0dHBQMt0GVRi%2bUgsv3EcQJeARqaAVFYMfjQBWn0cdvuRWH7jOIAmQrl0hu1D6GmwXq9nQW/1F2BjxoCZYiLkc7oQT8QRj8fZWy5/8lZjQzqgyahkFyN8oYB9/irT343/GZwpOkCvVLPN0OopvxobLxGaLn4G%2b9O9OHL0KPsEltf/amzoGGBQadBlNMJgMNxx/a90wMy926TcL3CYDLJ7AXqER1NhGgPK12Crr8XKV2NtbW0gbDs5F7m/mF/v/qJsW9yol7JESCAqOoC%2bYSppMkTXe9kxVE9zgJaWFhB6vc1LObFjHcFLOtCYsKNxSdqX6rykE7y4Azt61mmsHieak05U9TkgDDmQDEcRCocRDocRjUSQjMbgcDgQCgYRj8WYPhQKsVTZbreD1GYcbAtJMyj1p0SxDzmLxCatHga1Bma9AUaNDkatHl1qLbRaNYxWA1QSGTTyTz%2bmWq6AXijFFpcWgrgb47lBZPqy6M9mEc2kERrOweVwIhiLIpJJY2hwkN0Z5nK5kgOyDshLwULxKUEvICVSKbw%2bH2YLBXYwUZibQ352FoePPoy4PwbjvBu2GR9kAimU6pWHpHcFmtZK5Kj36JgDjhxYwCPHjuHxY48hVpiE9dA0nA4nfKk4vINZHF5YwPEvHMfCwYPspIjNgHJisFbScDcoR18aacsRl/7XBuM0SijWaRwGpQJqkRT1bh2EcQ8y8SRi8WImmEgmkepNs91gNBJFqqcHiUSCIZVKwel0Fm%2bHqRPWG9yMHdxeO7gVZcb1rvNYWQfqeh3seq7VbYLX7kC3w87WPZ3i9O3Tf5GxWq1LOqZ3Otk54X8AZYzFeLRUzDoAAAAASUVORK5CYII=' /%3e%3c/svg%3e)
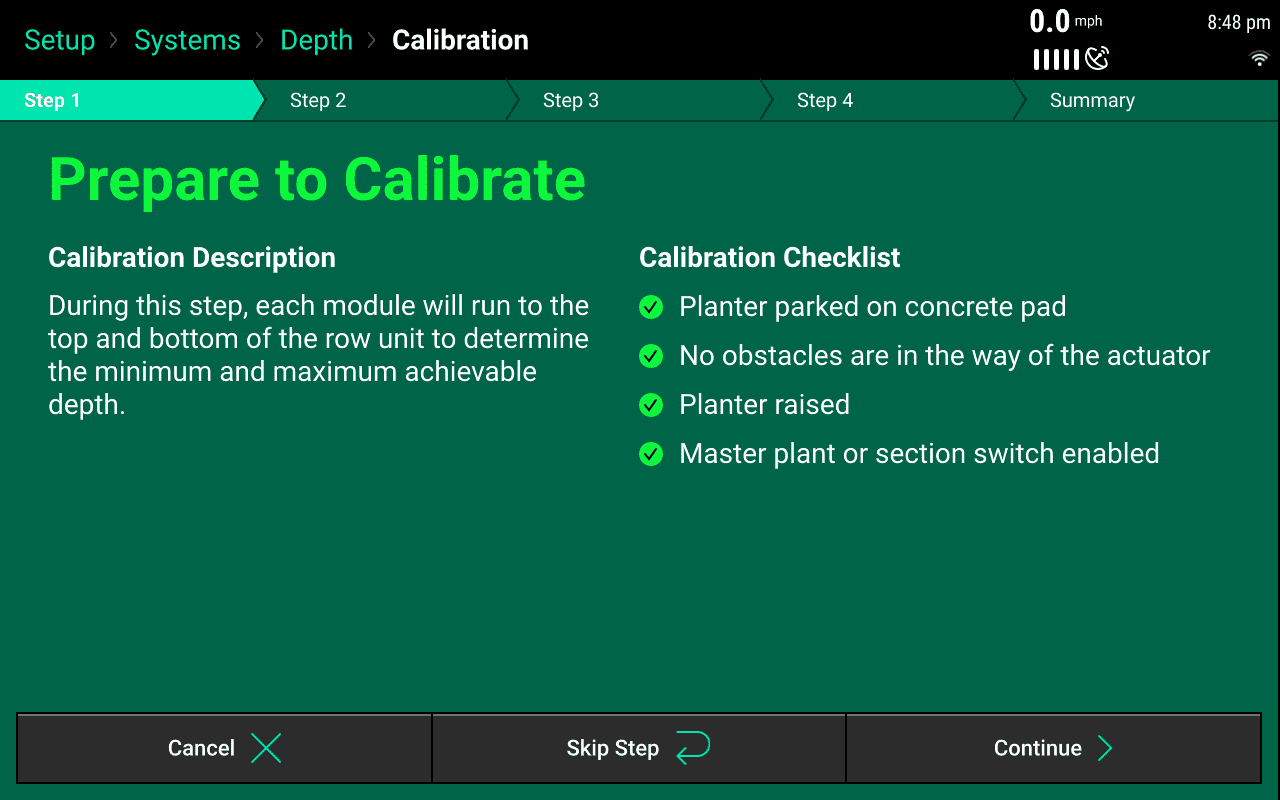
Smartdepthsetup - To begin the calibration, ensure the planter is in the raised position, the Pre-test Checklist has been met and then press “Continue" on the calibration page.
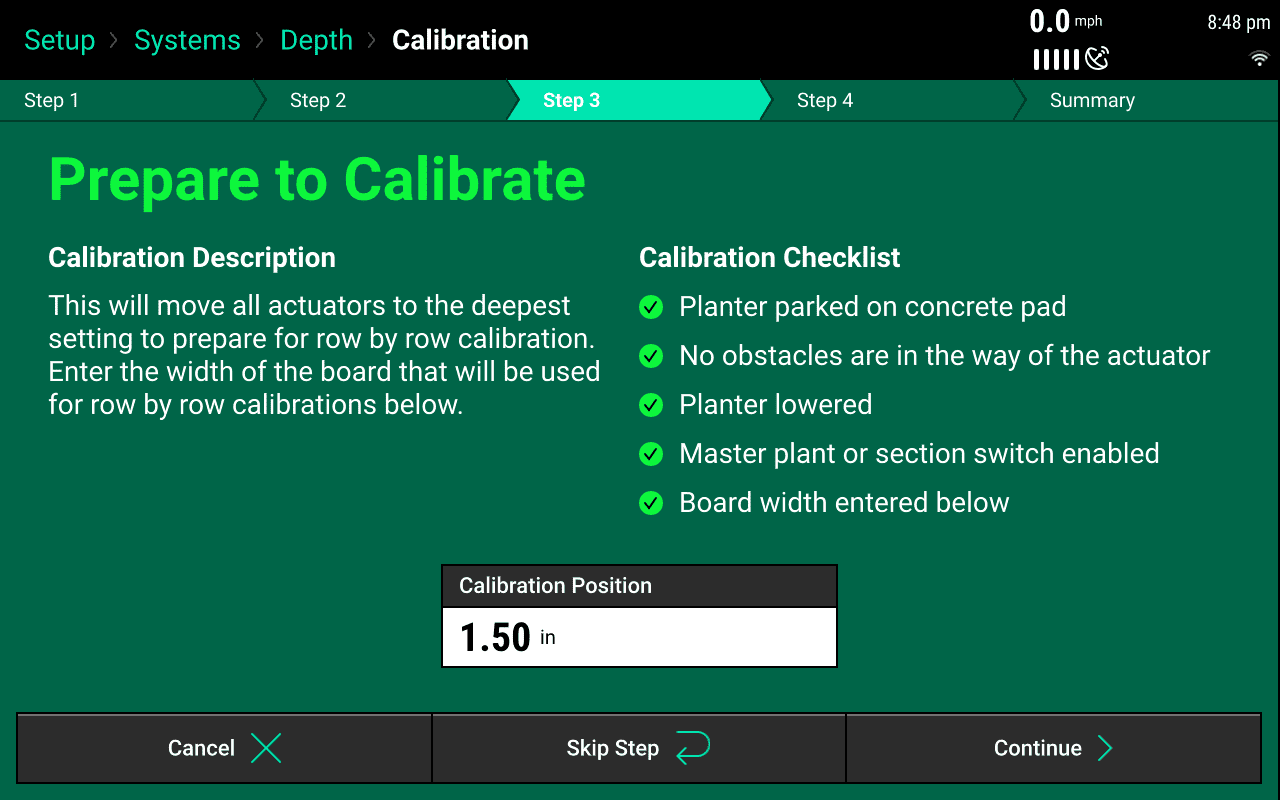
The “Calibration Summary” button will let you skip a certain portion of calibration process. For example, if you have already completed the range finding calibration and you just want to preform the depth calibration, you can skip step 2 and jump straight to the depth calibration on step 3.
-
During Step 2 the actuators will travel to the deepest setting (bottom of the depth handle range) in order to find the maximum setting. Once the deepest setting has been found/calibrated the actuator will then travel to the shallowest setting (top of the depth handle range) to find the minimum setting.
' width='1280' height='800' xlink:href='data:image/png%3bbase64%2ciVBORw0KGgoAAAANSUhEUgAAAEAAAAAoCAYAAABOzvzpAAAACXBIWXMAAA9hAAAPYQGoP6dpAAAMCUlEQVRogd1aaWxcVxU%2bb3bH28w43mIndryOZ%2byxnc27PfvmJYudpPEy8TJje%2bw43p04i5s0%2b4qzNU3aQikiUSnQVtBGqBJCQu0f%2bIX4gUBVC7QKBVR1AxUQfOje98aeLC5J1TgJPz7d5Z373j3fOffcc%2b8MEREedwiCwEuj0Qin0wmz2QytVgulUnmHbEJCAjIyMpCYmIjY2FjWR6CcdJAxE5S1DJSaALkgQEiIB%2bWvAK1IBplWgrKX8ecyhQIypUKUzxXHCdlp/OUrMjNRVV0Fr88Hu8OBdWVlsNltqK6uRlJykjgJabIPggCDwcAJyDcYoNPp7kpAamoqisxm5ObmQq/XSwQwBUrzQEXZoPzlkLOXxkSB1hhEclbliTIFGZAp5JCxMbnpENYZIRgyIKQl8penpaTCabOh0VcPl80Ol90Bp82Oeq8PaanLxMner3L3IbMyM5N/y2axomztOixPS1/wHbp4LXRaLYiU8lsfCgTeJ1vAUmolKG4JSC6AFBKYPCNMpfjyycoJJJPAxnwpFCCFXJwPk2ffW0BWUImWzjEa0NC8EdV2KwwlZiSkpYoEsHlFyirkiNFrEa2NA9F2B1aMtyJ9rBW6HZsg63KB9VEng1NEl4ROB4SAB/Tzi0j74%2bsoee8Gst79EbTv/BD02%2bsQfvcSZO98bx6s/f6rkF2bgdBmQcZEO9JGnkDSUAvk3W7Qdrv4rUh0SmWrBaoeD7InO/gYbWjDnbIRYwS/A9RSAYXfAV1vI5aGNiJpsBmJQy13/w7ra6kCUcCN5bs6YJgJImF0M6jXAwp6xDJcD7cDbgiDjaBfXEXKzRuo/uCnKPngTcT94VXQey%2bD3vv%2brXj3ZdDN10DXZ/gHM6Y7kb8/gNSJVsj7fKCgW3q/%2b1YE3KBOO5T99TDsDyBvXw/0wy13ys3BA%2bp2gbocSBx/gsuvnO5Ezt4urNjVzmWECPAxfV5QmxXELeu3gtotoFb7vMX9TlCH5AHdErocIGa5UCOo3wPqc4tlrxfU6wOFfKC%2bu4B7k0P8TocF5LeJbe5ZLlC3ZwG4QX67CD4P98LoYqVHlAuPaWdg1nbfik72TRdoay1ItIAXQr8X8gMuiU0PhEk3hN0uUMgD8ntAXezlHlCIEcDIcUPwu3lJQRdowAVqZ5NwgXpug%2bRFQq%2bXY86rgl6ou62I216OGH8F4rZXIsZfPodYfwXiOyuh7apCfGcV4jor/yeYHIOuuwqpA1VYNlCF5P5KjhTWDlVgSdAqGqbNAqJepoQHist2KK/YIT/lgPJ5O1Qv2aD%2bsRWq79qguGSH4mk7lM/ZoX7VCuWzdiguOKC8ysY4IIy7ofyOHcpv2iGMSZYI3gbm1pFgxIQakVqfjVQdYWmSBlqtDElJao5EhkQV9Ho54uPpnqHVEjQaQnER4aPfE/52k/DFh4R//ZXw8fsy4C%2bEwGwOyN8EeXtdBAGSQqrrNkT9sg6ql21Qv2GF5k0LVD%2bwcUS9XQf1K1aoX7NyctQ3rJwo2X6n2H7FCtmTbNmE17VnYTACBpugt2cgJT4eI2N70NHejdHRKYyPTWNiYhrDw1MwGkukXeT%2b8oesDMI/PyTgC8LN3xB%2b/bZYx%2beEgUvZIP96KDgBAWmyPR4II2xNswDhBieGlQPiM17na14KIoOSTBj9EfXAPRIw0IilrmzoNIS8fD0yMvTIWqmFIV%2bH9HQtzIU6JCepodcRkhMJOi0hcSkhJVksGZjFo5cQoqMJqSmEJUtEAnKzCZ%2b/TwAIw/0Et52AvwvAp4T%2bCyIBck6ApDxXaEDCkKTQjgiEIjAoKcnGsfL2Oo/knnsjwJmDxGhCsZlgyCWsSCesKSFkZRJKzYTKdQRTAaGkiLB2FSE3S%2bxft4qwppRQZBJlDXmEinUiUYyA7EwCPiH86i1CSpIo88IzAickeC7SA/qkJXDFjqi3LFC/Lrn3GyI0P7Nwl%2bfuf0N0f9bHAyQLjMzid2xj9%2bMBOYjXENaskWN1qYBCk4ACgwBDvgBjgYDsbAHFRWJ7VYmA0hJRRlwSCyMzUwA%2bEbAzJECrFdt1dTLRAy5GxoA%2bN6jdIwa%2ba3bID7qgOOWE4rwDmp9Ia3yvC8rLDijOOqE45%2bB1YXSBYHePEDgBTVjmXgktEWJUhHi1iDgVYYlcLKPlhFglQRdF0GrEPiajEQhqImhILMP1KJY5EqEwi4A/E/Anwn9uEv59k/APtiQ%2bJwxdWhnhAUFpCexkwcsFYlsbywHaXaBxB6g33Mc8RaqzZ2y7C7DSKVozHNlvj/Q9TlFublsMy7O6G7Fta5Fan4Olvvw5JDLUR5T188/CSGq4O5IbxOeZm/PRdjofXefz0XlOwvl89MzmIG%2b0DBSo59mpmAcEXIgb3ITYoY1QDzRCN9IC/ehmxA82Q9lXD9VAAxT9Pt6vHmhA/HAz1KFGRA2sR8LIFiwZXM%2bztujBDVD1N0DW6%2bXtqIEmxO/cxPs0oUb%2bftZm/SwTTB7biqihZlB/g5hcfZ3oawT5G0Edd0G3D0Kfh6fbxBOT7TaUHRvG0LWn0fXCWXQ8fwrVJ8YxeO0SNj79FHZcu4TigwNovPAkfOf2Y9vV49h65SjWXzyA5suHeL/l1BS6vnUG7c%2bfRO7ebmy7egzbnj0O77l9sJ3ZjS1XjqLtuRMIvjjL3%2bk8O42Rl67ANBMEbbdCNucxXw%2bEgAvy3ruDp8NM79awB3Q7kTbZhtpTk1h7ZCdKnhqA%2bWAInnP75hQ37A%2biYKaXK1p1YgyOs9NwfmMPrKen%2bBiWf9ecGEfTxQOwndnF5Vl/0YF%2bZO/pQvmxEdScnEDFsVEkjm6Fos8HVagBQjhJ%2boqx5CshsAABGy4d5JMtOzrMDyFMmYL9QXhm96Lu1CTWHB5C/fkZrljV8TFUHBvh7fKjIzA92YfSQ4NYfXgI9jO7kb8vwJVmMowERlTl8TFOIPsWddnnY8VikxBJgBD08pPXqkODnABmbdvpXVxhptyqQzvgmd3HXZYp1XBhBo6zuzk5zJr15/dzkpjVw/JMlvUzL3HP7oX19C7uVczVqdMmBs7bJ/SwPEDgHuDgx0e27tmaXXdkJ18CTAFmdebOtScnOAHM7VnJLB62%2bvKpdm5l1k6fbOfKMiJy9/bwJcSeZezyg5HNCX8YSi9IQC/zABt31yeuHuNBjAW39udOovfFc9j8zBG%2b5ndev4zAt2c5FH31IL9FtCazKjsmh60brvO2XaqzfvutE3hUCCCpgwUktsWx7YsFKLYdMihYu98HzWAjYnZs5M/EywzPLRZlnsS9KaJf7Iuw%2bsO2/F0JCEgTYhcKfunCoEsqw%2b0Oqc6Tn4cUuB6cB7ilCxAX5EedkB90Qphw8WOt/JATshkn5CcckB92QmCHosD/CW4hoMfDLzWEaTdk%2b0TIj7sgZ7n/LDsXOHmdhljA9IJCXlD/4wrf/H1nayQBIRtkk3WQjVsgm7BANiZhwgJhxALZqAXCtAXKYC00TdXQbHocUQPNhirIW60iEa2MAHapucUN9YsV0KIccR%2bXI/6zcsR9ylAmlp%2bVIe6jMkSjAstPl8CcmAeT0YDCvMcLpnwDzJk50FtXg3Y0gLaFPYCd64drQUcqQAcrOeRHaqE4UstLXj9cC/nJOmhC1Yh1VyCmsRIxDY8ZGisR6yuHcmtdhAcE2eWEEymjbcif6kXOZAB5U0Eouthpit0Ie%2bfR4QX1eEEDPvEFoccU/Bp/LgZ4%2bOlJP9KCzD1%2bLJtqRdaeTihD9eJ1d%2bS9X/j2p%2bcRiOJfFeG535EHdLMfKew8LZ47qDzOe/295wGeOSXnM7lHKGt74AQEHgG3fBjLgBHRyn8Z8jwCyclDAAvkbVaQzO9AwvpaLF1EJDTVQC%2bB1ZeGsZhz2FgHYUsNSNVcgyJDAYoLTDA/cBhRbDRhtbkYa8wlWFtcitXFJSgsLUHRqlKYjYsxBxOKC4woNJkgayoHqVpqYDSZUFhYCNMDhrHQBHOxGdtaW9ET6EGgNwivy41MexXyfFYUGo0wFT34eTBdC8xFEgHNNSgoKIDJZOL/sloMFBUV8X9ysZKRzybDwOqL8X2T0QhDoeQB1OkEI2ExoWyuhnJTNS/n%2byPrizCHzbX8DxL/BV%2b2YQXGWECFAAAAAElFTkSuQmCC' /%3e%3c/svg%3e)
Smartdepthsetup -
On Step 3, enter the thickness of the board that will be used for row by row calibrations. Use a 2”x6” or 2x4” board to create a block of known thickness, i.e. 1.5” thick boards. The default setting is 1.5” assuming you are using a standard 2x4 piece of lumber. If you are using a block that is not 1.5”, you can type in the thickness of the block in the box shown. Ensure the planter is lowered before pressing the Continue button.
' width='1280' height='800' xlink:href='data:image/png%3bbase64%2ciVBORw0KGgoAAAANSUhEUgAAAEAAAAAoCAYAAABOzvzpAAAACXBIWXMAAA9hAAAPYQGoP6dpAAAN2klEQVRogdVaaWxc13W%2bMxxulhdSFCVTlCiSkqiZ4cyQ1EZK3GY4O0WKoiiKEiUuw2W4aaG4WpRIrbG1RbbsJE2boLGt2ErsOAhiIEmDNkWLogmKprVbtIDdJE3SBejf9kd/pPZXfOe9R86QHFIypDQl8OHed%2b855557tnvf4yilFP6/w2QySWu32%2bH3%2b%2bFyuZCRkYHk5OQltFlZWdiyZQuys7PxzDPPcExBbdsEZc%2bHKtwIlZOFJJMJpqznoHbkQeVtgCougNq6UebNFgvMyRaNnny2fJgKc0V4Xv4WVFZWIlxfD6/Ph73l5airq0NVVRXWb9igKaEr%2byQMYLVaxQA7rFZkZmYua4CcnBw4XS5s374da9eu1Q2wNReqrAjKuRVqx2YkUejT6VC7rdomdxZpNNYtmgHMZjGOqcIBZS%2bAabO2udyNG%2bH3%2bdDY0ICAz4eA3y/PB0Jh5G54XmjMlP0om3sEmoL8fBwI16PO7UH5nr3YnLspoYzM5zKQmZEBpZKT4idNCjJmTuApi1mbXzzOqFhJ0bRkqDWpUE%2blaO2aNKg16YuQBkXDP5UGlaSvQ33MCirJpD0vA1OK5ultdisaWppR5fXAWupCVm6OZoAUSzytJQlPr83AmoxnoVSXD3nj7dg01o7MU4dhjgTAMdVN%2bDVEYtpOL1R7LbJOt6BgsgPPj7YhPdog46ZuP8w9gQX0BmE%2bWQfzlW6YfvYOHP/8PRT94n0U/OK7SP6nd6A%2bfgD18TcW4QHUz9%2bButqNlA4vtk51Inf0GDKGDml6LYduH0ydPqgj%2b2Dp9CEz2oh1Q81YP9KC7NNHoLq8y/B5oY5UQqm%2bIDZPd8A614%2bsc61Q0RBUfwJwrjcA1e1F5mgrbHNRFJzvRupwI1R/MJ6OGAhrC73YC/Xr9%2bD4tz9Cxb//CYr%2b9Qew/Oo9qF%2b%2bC/XLby3Fr78tPJZIANZLURRd7JX1VtUr4kf2%2bDEUzfahYKYbhTMR2Rv3uISHup3wQGle9UCdcEOd8Gpe7lkBEZ8eCXVQnW6Nl9Y/acz7oTo4r/dJP1gPNXQAKhqEGgxCDVCB%2bsSIhrVII2%2bHG6rDA9VVp8tLAEYsW9IZPAT1XI62JwDVVgMl1ugLwzwagnkmCNUTgurS0b0Ixrhh9e4wVCQM09kgzLNMHW3cNB2AaSoA1ReC6mQUBKG6AzDREyeDMEWCmscSYsFjpmhYkND7y8DgWZFvPgKiVCqE5K94kfanbiS/7kXyH3iR/PsaLK/4YPmiF5YveZH8h15Y7vlgvuhHynseGeNmyUuapLs%2bJH/Ni5R365D6XQ%2bS36yD5csaT8rbXiTf9yL5q16YxnVDr7QRGutJgsZpd8cY4KteJN3mZn1I/Y4H6X/hRtqfuZH6vgfpP3bLhlK/7UHaD90wjQWQ%2bn0P0v7YjaTrflh%2bzysbTf2eB%2bl/7kbKtzQDpLH/dp2Mp/3IjZT36pD%2bV7UwzzBfudFFuRmbq4n6K409LOIM0E%2bLMCSCMPVoIWPqD8N8JgTLzQDMw2GYhkMwDYZgjoZhHgpr88MhoTH1hSWvaRQ1FNTAPB/RQdnD%2brgBY019E5Rn6tfkLw7f%2bfGY8H68BujTFWLedXukwktxYyFhjrBl0WAx6ajVnqXQeKBOkt6j8TKkexeBY33LjPfFKNPDIylmXfYNyImjr8s2otMYm/%2bsRog1gIkDER9sc/0IvXIB7V%2b5gfC9WbjvTOHQl65g74tnUX1rHA2vzUnr/fwL8NyZQujeRRlzXRkSDy0J59XQG0DKUANq70yi8QuXZN2qm%2bOof3VWUHZtBDW3JqTPNQ%2b8OoemL1xG8JULsAwcWH3zK83Hp0AIqtePDePHUX1zHBUvjWL/jTHsvHYKlTfGUHJlWIyz53NnZI7tvpfOyRzpdlzsW1rFeRz2%2bvW%2bL2ZOH9OVoOF2XTqD6psTKH/xrMhmS9lc0zbbL3pwHc4Zaxs6x6/HUyfmdFnJCEsNEMDa0VY8d6ZFD0s/nj19GOkjTfKcFK3XvNzrF5okntX6BszRemScbUHa8EE8faoZT400Yd25Njx96pD0s8%2b1SUtQJlutEmt1R12ohurzIHu0TfJb1pF5biiAlMEGeRav60bk%2blwvdahRQLl8Js2akUNIHz6o8a90usQZoMeP58ePY9e1U2Ll7Rd6JNSclwfleff10%2bIF%2b1xUwtSIDqYJPRJ4eUZ4HZcGUHp1RNKC4/Ri%2bN5FkVV7e1JCedPUSclvFk/TqSDSf7QfaecPoPqlSfjuviDp4L49JesxzQx%2brrH3c2ew/8Y50YNjNbcmJU3Y53r%2bu%2bfR%2bNolbY1e/3zxXEBMAV3OAPa5qGxsx2wftrzQKeFNYcWXBmRzBMOSV1PSFpzvkv7WmQiKLvTCOqvRc27j5AmRYYS26/IgSq8Oi1Ezzh7RQ5YXJ3qcdcirpQvBgtdr3D7159iW49xERL8tsmBGvNoJIWnA216dVlhjW9IJb2hpESw43yUKMuepJC1aeL4b1tl%2bFF/SPF/%2b4qgYY/uFXtk4N0tjMWK2THeKh/huQP7NUx3YdqFHDMCIcFwelIigcdadOyqnASMg5f39SJ2qR%2bDOzLxhK2%2bOSdQZ0UdQLr1Pp5COY7uun5Y12C%2b5MoRtMxG4Lg%2bJnuQlLYtp2dUR2RujhSkpRhiYN0BYLETlKIihSs8ZhYcLcPN1n58W5bg4TwZultFApZgSPBloDPKQnnM0Ig1AWTQkI4jy/S/PaLkdDcByq07uC8%2bPHUfORLtEItekDowqGpnG5TgjbcP4MemTNv%2bFLmnpKG5289RJZI%2b1yRgNRj7OGVHKPbJeSPTFRUCPTxYkyJwzcVwstW2mR4pj3nQnNk6ckD7nublNkyclaqgEF6LHN060S5%2bLrx87phXS4YN45nSz9J87cxhZo62aEnoRNF/3ImkkjPzpLimiTA8WNvbZsrhRhlFUJeSNVDHSRlLBSCE9bYz0YMsUkLYuPvXaYwzAjbCoMHfpTRYzepfhzLSg5%2bgZhlHolYsyRzq2DFmGGL1vFKt9L43On/cLR6Ce19IPiedTv78PKdNhlF8bRc3tCeFnBHFNhjIjjxHDAso1KGvhlqgXOSl2Cy8%2bsc8azcKtMsFNMKQfO8bLQsxZajDo56wIMc7cVRCr1FIYRyGPV/1GOA/di8brd%2bx9wmiNYmeMkdaQLTz%2bOBrRO/YGGXcK9K1wYVg8t/gaGtuuRhu7eb0Ipv6wAmnn69H82jWJJnqakcSawQhz356UAsdIZC6ThoWNR6VRoxhxjBS2jBLWHdYpyiKqb03E3x4f2gD9jwHLyta9H%2bV3BJ%2b8ID176rAUN9YO1gGeFOxnnj0i9YAXMNYC3lg5tvZsq7Tpw03SJ/2GsWNCxzSmLBZQ1iU%2bL3FInAH6f9vQDTAYRNI9Dyynwyia6ZUCKSfBxHFknGmRgsqTh0WThTlvugNZo0e1O8Z0pxiDm1w/1oa0oUat0MmnMaNIxmBxpD4RA/QtWiQR9BTga3LKd/YjZaoevtvnJWxZALlpnt0suDxKecTxpmncQnkDZaiz0HKeoHFYB%2bKK4Ur6PbEI6FsU9qt9zoroN8HFRS4SUwyN08MobvOF0jjyYorgw6TzE42APl0B/eux9jGT11jv0pYwrrWrRs1nrTe/bQP006t%2bbKrcibKAG7sb/LDXVaIk4IbNsx%2blIQ%2bc/hq4ArWCouq9yC8vRX5F2bIoLC9DTmWZ9hV3tU3%2bThggyq/FPuRtK8SRxiZ0nTiJ1ubD0jY3HkTYH8ChhkYcbz0q8FTXIG9jLgrztqBgc94SbM3djJxtBY8W4v9nBugngvIfoWt3b%2bPtt97C1954HW%2b8%2babg7QcP8Lo8vzE/9ub9%2b7j/9a8vizfu38c73/gmZu/cWIiAx%2baoJ1YEg0iO1uPDn32Ejz/6GH/74Ye4dv06fvyTn%2bCTTz/FZ/n7m59/FH/T%2b103QFJfCB/8w9/jP371L/jwr3%2bKd996gH/84O/w3//5X8BvPgE%2b%2bfTh8Jv/EQP85Qc/fYIG6Hv8/3Qw9QbhvXIWx1%2b9irZ7V9D55Rs49upVtL48h8N3Lj40mu9cwNG7c6i9dFpLgcelo/Gfp3b5xwhvZOFHw9BD0PTySww/Z9dCdVZrbcSdGD2J5mqher1QQ/WPrudKGK7XPvubO33IaqrBugTIOliNtTFYRzRWJ6Rfd6gGaxursP5QLTY0u5cgu6kW2U01Mm%2b0MtdUq2EZHtJQJmUvq2OTrl9j1YKenDPa5Xiaa2E6Wg2V0lINp9WGElsxXEtgx05nCXa7SrHLVYI9JWVwlZbCsXsnXMUOlNjsS3hK7MWwby9aIlP6VrvIKN%2b5S%2bSWl%2b3CLmeJyCret1fkluywwWWP56MsyqTsuLV0HcscTuxylWJPaZnIp8wSp0t%2bCrOsjjY7HMXFMB%2bsgEo5Ug17cTEcDgeKY%2bBwOuW3No0HGxEdGEBHVyeOt7XBVlWOwsNBFLuccfSL%2bSiz2Bk/brXZ0Hr0KCYmJ6UdHB7CQDSK4oo9KGzyw1pdAYfdHsfHPmVRJmUsXosya2pr0dXdjf5oFJGeHkS6IyjbX4Ht7v1w2OP1ED6HAzaXUzdASzVsNhuKi4vlV1aLQWL%2b6srpdIrVbE4HbCUu2B3L01NO0Y4dCWVybF6ew4ESlwt2lxPW3WUJ5VEWZSbS0ZBJeZTLvuiXSEe7HVaHHgGq2w8aIRGSicNVGozxw1Wr8qwqr0UHZRHNn12mzC%2bWuRp9a438QOJ/ARVGSgrhA9JwAAAAAElFTkSuQmCC' /%3e%3c/svg%3e)
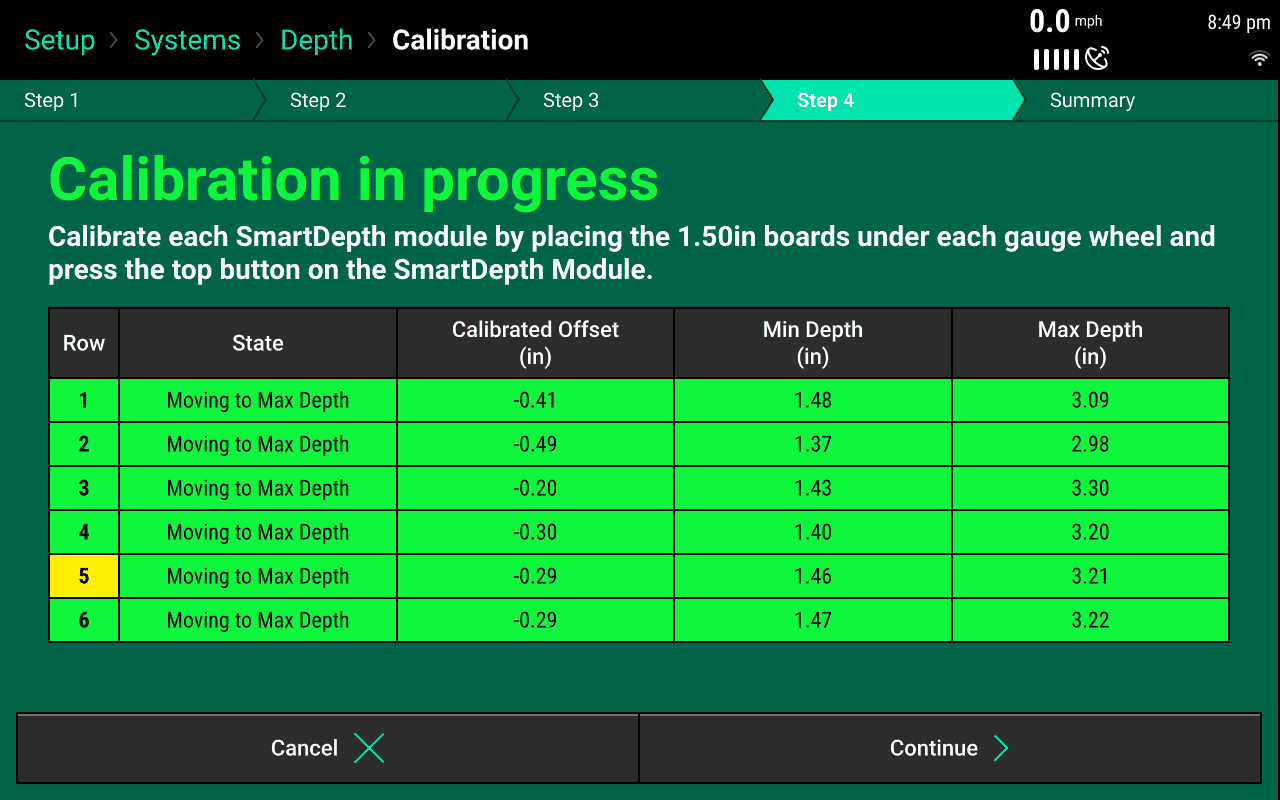
Smartdepthsetup -
Press “Continue” to advance to Step 4. The SmartDepth actuators will move to the deepest setting to prepare for the row by row calibration. Ensure that each row says 'Moving to Max Depth' before continuing.
' width='1280' height='800' xlink:href='data:image/png%3bbase64%2ciVBORw0KGgoAAAANSUhEUgAAAEAAAAAoCAYAAABOzvzpAAAACXBIWXMAAA9hAAAPYQGoP6dpAAAQTUlEQVRogdVaeXSUVZZ/laSy1UIWFgkSCCSpSm2pvSq1JLUlVUlYhLAZyB6yQCKrNI0sKqgIiIIbiLYzbffY22n7jDpjd2uf6XaO2ipqa2vbKIvo2ChuuE97en5z7ntfVT5CIInHf/qP33nve/f%2b7n3ffffd9/JVGGMM/%2bxQKBS8NRgMqK2thcViQV5eHpRK5QW6hYWFKC4uxsSJE6HRaGiMgZVeDmaYCTarCGxqIdIVCigKJ4DpisGKp4AZS8BmF3F5WkYG0pQZQp94FTOhmDWNGy%2beOQN%2bvx/1DQ2IxmJwezyIRCIIBAKYPGWymIQ02e80AGlpvNXr9TwAOr0e%2bfn5IwagqKiIB6q0tBQFBQVSAGZPA7OVg5lng%2bmmI52MqnPAnHrxkvZyoaOfIQJADnXFUHhNYIYSKKZP4canFRWhNhbD3DlzUBeLoa62lj83NjRg2tSpYrLjfbkxcJLykpkz0VjfgEgoDI/LjenTLr%2boz/wJecjPywNjyvTzhQoGPpZ2kZXKSBPy4eOUFaO9UJoMZOOiyADT5IKpssFyM8FUhCzxrMoZhmwoSFfBUKrXYU7TAgSiYeitFhROk4KemZGyrchUgmWkQ12QB1WeFoy1xVC8oRmXr29G/sBCpHXUgcZYO6FWoEPWtkbBmmtQONiEkqtbcNnapcjpmcPHFe21SOusuxAtQjZjw3JMW7sMkwcXIb0zDtYWFb7kIB9X1oDdvxnZp38F%2b4n/QNmJhzHl%2bENQvPETsGPD8SDYiZ9B8ewRsJYwMlZEkN8zDxP7F2Dy6iZMGlw0sh8aW%2bQHY91xTP9eC/TbV6Jw3WKwngTYyoRok/0k6LmrDqwjivy1i1GxvQclW9qRtWou2Mr4%2bbpy0Et1xzFjcxt027oxdWMz0nsbRub01IvJPbgdmWcehvedx%2bF%2b9wkUvf0IFKd%2bATYcJ38O9s5DYEfvBetvxKT1S1G%2brZvPa9aWDv5u5PsCP731YMvDYGJVw2ArQmDNUdlK14K1SCvfKQPPDhqPgLWGwNrCQ2OdErfzIiA/nBMB64gNjXfIkPTfPweMgtQTF6AJ0/NI6GsE65Qyl4LXEuLZwNFKvob7IN91YEurwURE6qHoq0f6tXUiOp0JKK6OQ7G5Dqw/AdZKq5gAa0%2bArUqArab0rQdrp9WiiSXABuJCr0vSbZPQLrWcXy%2bDJOu4SNZQpnXVQdEV52AcdReHbJUVPfUpXDQrUxnQEwdrSSDj7iiUh6NI3xuD8gdRZP40gqxHwsj8cQQZd0aRcVcUynujyPpVGMojUWTcHoPyHsFRbKhD5gMRKO8T/YwDMSgPRYX8UBQZB4Vu0ga1GXdEuV7GbTExeXmajpSyY0HSzlhAwWkOSQFoTSDjYBSZ98SQ%2bWAUqqMhZP8iipz/jCD38QhyfhlF9i%2bjyHkqhKyHIsj59yhyH40i%2b7Ewsn4WhXJHHNmPRriOclccub%2bOIOeJMLL/LYbshyPI/W0EqhdCyP55FDmPRJHzmwhyH4sg%2b5EIch6NQNGbfGnx4grKyJUJpPXUc8if5aubepbpns%2b5UCcVqFQAVsoiflUYrJdWJATWGQLrCoH10j6qAesiWS1YH1XqGrDuarAu2ktUC6rBuql%2bRATn%2biDYShoPg/VEwQZDYIeCYN1SDeiOgHXWgPVGhT7xkivTSfWE9i3t5RoBqjPJmpMEf64RfdKltqVaamuEnHhJPrdXLdruxFAAFHzPx1CxbSUabt2OliN7MffADoT2bELDbdtgv24Atfu3YO7BHbBdN4A5B3agZs/VqL91GxbeuRPzbr8WjQe2Y8Ed18OxcxD%2b3euR2LeV68%2b9fQdCN2/i%2buYt/Zh78FrU3boF0X2bEdy9EZ5da7HiyB5Yr1%2bF2Vs6ULv/%2b%2bj4l/2oumkdordsTmHhXTvh2DUI701rMef27Vhy%2bEZYruvnsvit1yC8bxPnNB7cjpq9V6P%2bwDaYr%2b1D0927MP%2bO6/g8iJ%2b4bSuXK3sbxYIvpxrAA1DLjyYSkhMyFpKMGrb38HH/zet5kJw3DCJw8wZU793IJ%2b65cQ0W3b0LrhuugnFHL3y71yO4ZwPXj992DUw7ehHcsxE1%2b65G4sA1iO3/Phy7BtB0907Ydq7m/Jmb2zBp3VLot3XDfcMa6LZ2w3JtP/fjpBe/cS2X2XcOcH2a44zNrXDtGoTvpnVcP7Z/Mw8EBTiy73uYvqmFz4l0K6/rh25rF4I3b%2bB2FMkjvZkygJ%2b7YYT3bkLzkd1YcugGbqDprp1YeNf1vN/2g30I7d2Etvv2oeXePei4/xbU37ZVivo23qfx6j0bsezwTTwgSw/fiNb79qL3gYOcT/2GA1ux6ke3Y/mR3ei8fz96fngAUzdcKdKWKnk7pbKU7vJjlqd8dKifSvukbFi6J%2bXJPt9C0jZJbrfzakBXHfLWLYZ6bRNyr1qAnMErkL5qjmj75yBv/RKo1zQha2A%2bl1NLMuXqebyf1i90M1bN5UjaSOtvhOqqBSjcsAyKvgZuK4s4q%2bcje%2bAKrkf6qUtXj3Q88QsYTVJ%2bIZOe%2bX2g/uL9pN7wNqUju3A1UwB4NBLITriR76hAnseEAq8Zk/1WTPJbMTlgQ6GvkvdpfILLgHy3CRN9lZjst6V0qJ1YJfRINiVox9RqB4pCLkwK2FBU4%2bKYHvXyMZInuZN9VkwJ2HBZ0I4pATsuCzpQHPFiWsiF6REPiqqdvKVxkgsdOyaNwOP6NUJ/6nAezamqEjnzfGCrGqUtwCtiHFNrnJgXjiFaE4LVYIRZp%2bdtpcHAW5NOj%2boqH%2bbV1yNWE4LDbIGlwoBKmY6xrByVFQaYynWoC0fQ19WNjWvWoKe9A72dXVi%2beAlW9/RioLcP3W3tsBlNnG8oK4dZX8H7ZNNqNGGwrx%2bdLa1Y1rQoxfG53Hwewuf5PBr3OpxYNzCIrtY2XLkoyetN8SxGE2yzdSiMOMEG5oBdyTNABGBKjQvN8xejbUU73A439GV6mCvMMOlMMOvN0JfqEfKH0NHSgbblbfDY3TCUGWDSmzhIlzhGnVE8G8ywV9pRaaqEy%2bZCZ0snGmobYCg3wGa2wW6xw6g3ns%2brELYIFoMFPrcPLVe2oD5Wz/VobER/Eo98kk6kOoIVS5ejLlzLn1M8ks%2bqQEHULQ9AnO%2bJgjo7SpwlKK4qxQznbJT69CgLVKAsbJBgxKxqHYq9s1HsL8Xs6gqURYwCNQaUBQwocZeleKX%2bCsz26TG7SoeyoAHhljjcV/gxq6o8JSvzV1zAE2MVmFWlQ0XYgkhrAtZGN0o8ZSl56SV4Jd5yWOIOhFvqYEk4MMtbPsQLGKBzl2FCgxNsVTIAfQmwJXFk/dCPvC990B73QnPcDc0ZL7Tn/FC/aIf6BTvUf3JwaF93Q/NHO9SvOqF61gb183ao/%2bqC9osAbznvEx%2b0H0s454fmPS%2bynrcg5xUbtB/JZNT/1H8hj8Y/8UN9xovMZ83IfdmGCZ8FhriX4n3qh%2bqkC1lPm6D6sx3az4d4mo/80H7ugfIOP1hro/gDMBmAzAf80H5TBfW7XqhPuKE5WwXN536oX3dC9aIdqj/ZxQu/6YLqORtUrzmgesEG1R%2btUL/lhubrAJdpPhA8zac%2bAeqfrYL6L05oTrmHxpP40g/18RF4n/mg%2bdgH9WtOqN9wQfOFf2w86tM7vOoU85Lzzvmh/coL5Z3DA7A0jswjVdD8zQXVy06oXrILp297oH7FwSevPuYS%2bKsT6pcdov9nh3h%2b3cmdqo7ahnhvuQVOe3hAyQ4FUn1KGpPkmnc8UB21j8w77ha%2byL9cNhrvDZd4h1ccXG%2bI54HmXSeU%2b31gbcMyIOvHfmi/8IqIn5Yy4As/VM/bkPtfFqj%2bUInc35qhetmB3MfNPBtoPPcxEw%2bA9u%2byDKCofyaB%2bmerRNYctUFzzjckG76Sch6t5IdVPPP4C39J%2bqPwaPwLP9QUnOdsfIG0XwekjBJ87ddeKO8KDMuAZXFk3uOF5n0XjzpfSVrh027uRH3SLZDsn5DaN0lfwtseHqwU75QMSS7xho%2bPlffWGHmkl5zTBTwPNO84RsiAxXXI%2bkkA2q8p4g5eWDRUWL4JQPWMVWTAf1ci93cWkQGPmXiEc58wI/c3Zr4NtKgWK3XOx7OBIs/x9wA0H1VB9ZSV26KVS8m%2bCkD7TVBk3HDe/wb4HHiNec0J7T%2bCQv9SvOQ4ZcDTVpEB/zfE03wVhPYfVVAeCoC1NEgBoKvhsjiyDnuR954TE6gAPmcVe5uixiNJq%2b7me4u3yegel%2bG0lHZJ3kkZTknZQpCPk61L8ZK%2bjo%2bX5xJzHYGnedsB5S0jZIDip0Eovg6AvexG%2bhnfhRnwtBWqJytFBvzaJGrD7yzIfcIiasBoGUD8p63QjjcDnrHyOjCuDKDt8cwYM0DRGwdblkD5YSua/laK%2bcfKEHmuFNpjTqmCSytHe42qcXLvvylFmVZgLHs5yRlPDZBn4Hh4J2T1abQakNEXB1s6B7v/dRrwAcP7zzG8/wZDwVkPVHS5ed4mVoFacviqA7m/F7WA7%2bunrKOfAu97oXrBLk6BT6SzeqynAKX5qw6%2bikPVfJRTgLYHHZ%2bp0%2bMSp0A6z4BG9B%2baiWOn0/D7l7Lw6LPZyH/DCRWdoXR%2bH6XJ23khpMnwYLxkFy0Vm9Q9QJzLQ2e2R2TRSTcvrvyITZ7VybvA/3guzjvlhuoViZeUXZInMoOygvOk2jSme0D2j/wo%2bNKDgmNOaE%2b5oDnrFTdBSvu/0MWHLkNOviX42UzGycmrDv6CtMd4Bpwd4Ub3YRXUr9GLOMQ9IHUzk1bsYrwPqsQWo70ul12Kx2%2bCHmm7SjfIc/KboGeEm%2bAScRVWf%2bpF7isuqGivnKniKaN6yQHVMzZ%2b8VE9KY6k3CetUL0otkDuHyrFbezLAI%2b85r0q7oiusRzUP%2bMV12m6mX1IBVYm/8w/Mu8T6QJFmXOSrtCS7JNRePQ3wlsePm8%2br89kso/FZU95h/witJK%2bxtJXkgjSBkJIWxOGorcGiv4QFKtCUNDz2rBor5KwLjI0ThgMC/0%2bGS8Jel4t2SHIZUnI/Q3HGpn9sfDoeeASvP4asJXRYV%2bEuulXF%2blXGkJnPf91iKNjBCR/0ZGjcxSMVe%2b74I02ry7ps1gz/2EkAdZXL9AvQd4fL8bK/a78fds5rmoQn8XTWmMonF%2bNieNA4bwgClIIYOK8ICbODY7LxsQrqlEwN/Dtfc8N8Jaeuf/x2llQA8WSIFhmU1B8V6ug73GXhtAxwG6ywGmxwmGxwl1pg6WyEiaHHRazGZV6w6h2uC35N73x%2bDYL326bHc5Kq/g2aamExWTm3yPH5Ju%2bWxqNSJvnBctcFITBaITJZIJxFJjMZv7/N7G6WvT09qCtox2tLa0wepwoaUrAYLfCaDSOakdui3wbzWPV1yGeSKCruxudXV3o7O7CiuZmGHxu6IJemAyGsdkymVBhMUsBaAqioqKCT5z%2beWgsIF36Tyyz2SyMmYVBg9k0LhvlOt239k1%2bzRYLzzqDycgDOWYbBgP0JikDWHstKAjjgZKwMABlE0EaXxj4Vna%2bve%2bhOYzXBrezuJr/g8T/A6Le48MK%2bSsmAAAAAElFTkSuQmCC' /%3e%3c/svg%3e)
Smartdepthsetup ' width='1280' height='800' xlink:href='data:image/png%3bbase64%2ciVBORw0KGgoAAAANSUhEUgAAAEAAAAAoCAYAAABOzvzpAAAACXBIWXMAAA9hAAAPYQGoP6dpAAAQSUlEQVRogdVad3SU15V/I2nUpqBCMcIIBCrTpeldmibNqAAG0SxQF2pIppoQQrENtjFgbHADY8e7cbJOO3HO2t44G3v35OwmTkzsdVySNTbFuOOGuzc52d%2be%2b973jQYhgcTJP/vH77xy7%2b/e9%2b67r%2bgbMcYY/r9DoVDw0mAwoLa2FhaLBXl5eVAqlRfpFhYWori4GFOnToVGo6E%2bBlZ6NZhhLti8IrCZhUhXKKAonAJWUQxWPAPMWAI2v4jL0zIykKbMEPrE08%2bFYt4sbrx47hz4/X7UNzQgGovB5XYjEokgEAhg%2bozpYhDSYP%2buAUhL46VOp%2bMBqNDpkJ%2bfP2YAioqKeKBKS0tRUFAgBWD%2bLDBrOZh5PljFbKSTUXUOmEMnJmkrFzq6OSIA5LCiGAqPCcxQAsXsGdz4rKIi1MZiWNDUhLpYDHW1tbzd2NCAWTNnisFOdnIT4Mjykrlz0VjfgEgoDLfThdmzrh7XZ/6UPOTn5YExZfqFQgUD70sbZ6Uy0oR8dD9lxeUmlJYCsjEuMsA0uWCqbLDcTDAVIUu0VTmjkA0F6SoYSnUVaGpejEA0DF2VBYWzpKBnZiRtKzKVYBnpUBfkQZWnBWPtMRRvasHVG1uQP7QEaZ11oD7WQagV6Ewp26JgLTUoHG5GyfWtuGr9CuT0NvF%2bRUct0rrqLkarkM3ZtAqz1q/E9OGlSO%2bKg7VHha9UkI9ra8Ae2orssz%2bH7dS/oOzUY5hx8lEoXvsh2InReATs1I%2bhePYYWGsYGasjyO9diKkDizF9bTOmDS8d2w/1LfWDsZ44Zn%2brFbqda1C4YRlYbwJsTUKUcl0GtbvrwDqjyF%2b/DPqdvSjZ1oGswQVga%2bIX6qaCJtUTx5yt7ajY0YOZm1uQ3tcwNqe3XgzukZ3IfO8xeN56Cq53nkbRm49DceanYKNx%2bidgbz0K9twDYAONmLZxBcp39PBxzdvWyedGvi/y01cPtioMJlY1DLY6BNYSTVnpWrBWaeW7UsCzg/ojYG0hsPbwSF%2bXxO0aB%2bSHcyJgnbGR/s4UyP4HmsAoSL1xARowtcdCfyNYl5S5FLzWEM8GjjbyNdoH%2ba4DW1ENJiJSD0V/PdJvqBPR6UpAcX0ciq11YAMJsDZaxQRYRwJsMAG2ltK3HqyDVosGlgAbigu9bkm3XUKHVHJ%2bfQokWec4WUOZ1l0HRXecg3HUjY%2bUVVb01icxblYmM6A3DtaaQMZ9USiPRpG%2bPwbld6PI/FEEWY%2bHkfmDCDLuiSLj3iiUD0SR9fMwlMeiyLgrBuX9gqPYVIfMhyNQPijqGYdiUB6JCvmRKDIOC13ZBpUZd0e5XsadMTH41DQdK2UnAtnOREDBaQlJAWhLIONwFJn3x5D5SBSq50LI/mkUOb%2bIIPepCHJ%2bFkX2z6LI%2bW0IWY9GkPPPUeQ%2bEUX2k2Fk/TgK5a44sp%2bIcB3lnjhyfxlBztNhZP9TDNmPRZD7qwhUz4eQ/ZMoch6PIudfI8h9MoLsxyPIeSICRZ88aTFxBWXkmgTSeus5Utupq5tsp%2bheyLlYJxmoZADWpET8ujBYH61ICKwrBNYdAuujfVQD1k2yWrB%2bOqlrwHqqwbppL9FZUA3WQ%2bdHRHBuCoKtof4wWG8UbDgEdiQI1iOdAT0RsK4asL6o0CeevDJddJ7QvqW9XCNA54x85sjg7RpRJ10qW6ulskbIiSfzub1qUfYkRgKg4Hs%2bBv2ONWi4Yydaj%2b3HgkO7ENq3BQ137oDtxiHUHtyGBYd3wXrjEJoO7ULNvutRf8cOLLlnNxbedQMaD%2b3E4rtvgn33MPx7NyJxYDvXX3DXLoRu28L1zdsGsODwDai7YxuiB7YiuHcz3HvWY/Wxfai6aRDzt3Wi9uC30fkPB%2bG9dQOit29NYsm9u2HfMwzPrevRdNdOLD96Cyw3DnBZ/I7vIHxgC%2bc0Ht6Jmv3Xo/7QDphv6EfzfXuw6O4b%2bTiIn7hzO5cr%2bxrFgq%2biM4AHoJZfTSQkJ2QsJBk17Ozl/f7bNvIgOW4eRuC2Tajev5kP3H3LOiy9bw%2bcN18H464%2b%2bPZuRHDfJq4fv/M7MO3qQ3DfZtQcuB6JQ99B7OC3Yd8zhOb7dsO6ey3nz93ajmkbVkC3oweum9ehYnsPLDcMcD8Omvgt67nMtnuI69MY52xtg3PPMHy3buD6sYNbeSAowJED38LsLa18TKRbeeMAKrZ3I3jbJm5HIV/pLZQB/N4NI7x/C1qO7cXyIzdzA8337saSe2/i9fbvHkBo/xa0P3gArQ/sQ%2bdDt6P%2bzu1S1HfwOvVX79uMlUdv5QFZcfQWtD24H30PH%2bZ8qjcc2o7B79%2bFVcf2ouuhg%2bj93iHM3HStSFs6yTsolaV0T71mecpHR%2brJtJdlo9Jdlst1voWkbSJvtwvOgO465G1YBvX6ZuRetxg5w9cgfbBJlANNyNu4HOp1zcgaWsTlVJJMuXYhr6cNCN2MwQUcso20gUaorluMwk0roehv4LayiLN2EbKHruF6pJ98dPVK1xN/gNEgUx9kUpu/B%2brHr8t6o8ukTsqDq4UCwKORQHbChXy7HnluEwo8Zkz3V2GavwrTA1YU%2bip5nfqnOA3Id5kw1VeJ6X5rUofKqV6hR7IZQRtmVttRFHJiWsCKohonx%2byoh/eRXOZO91VhRsCKq4I2zAjYcFXQjuKIB7NCTsyOuFFU7eAl9ZNc6NgwbQwe168R%2bjNH82hM3krkLPSBDTZKW4CfiHHMrHFgYTiGaE0IVQYjzBU6XlYaDLw0VehQ7fVhYX09YjUh2M0WWPQGVKboGMvKUak3wFRegbpwBP3dPdi8bh16OzrR19WNVcuWY21vH4b6%2btHT3gGr0cT5hrJymHV6XiebVUYThvsH0NXahpXNS5Mcn9PFxyF8Xsijfo/dgQ1Dw%2bhua8e1S2VeX5JnMZpgnV%2bBwogDbKgJ7FqeASIAM2qcaFm0DO2rO%2bCyu6Ar08GsN8OkM8GsM0FXqkPIH0JnayfaV7XDbXPBUGbgcq6jN3OOscIo2gYzbJU2VJoq4bQ60dXahYbaBhjKDbCarbBZbDDqjBfy9MIWwWKwwOfyofXaVtTH6rke9Y3pT%2bKRT9KJVEewesUq1IVreTvJI/k8PQqirtQAxPmeKKizocRRgmJvKeY45qPUp0OZX4%2byagPKIkaOecEKFHvnc5SG9CiLGlEWNqAsoEdZwIASV5ngBfQo9esx36fDfG8FyoIGhFvjcF3jxzxveVLG7Y/iiT495nkroA9bEGlLoKrRhRJ3WVJeegleiacclrgd4dY6WBJ2zPOUj/ACBlS4yjClwQE2KAegPwG2PI6s7/mR95UP2pMeaE66oHnXA%2b3nfmhOu6D6TRVUx63QvOKA5mUntK%2b6oD5ug%2bq3VVA/b4PmnJfrql91QvOeB9rzPmg/kfCpH5r3Pcj6gwU5L1mh/ThFRvXPxuBR/3k/1O95kPmsGbkvWjHl88AI91K8z/xQnXYi6xkTVC/boP1ihKf52A/tF24o7/aDtTWKPwDlAGQ%2b7If2r16o3/FAfdoFzQceaL7yQ/22G6o/WKF6nmCD6mU71K85oXrOyoNCpeZDLzRf%2b6F%2b3SnqX/ih%2bcwnQPUPvFD/2QHNGddIvwzycXIM3uc%2baD7xQf0nB/en%2bdI/MR7VaQ6vOKB%2bw3Uh71M/tF97oLxndABWxJF5zAvNu06oXnRA9YIN6hNOaN52Q/2q1JYGQm2ajPolO9QUjBNOqGlib7mhes4mBvummzvnOOuG%2bpSL66v%2by8Z1eZ8kvyTvpAvqF%2b3CX6rscjxaIBrzS3auN8JzQ/OOA8qDPrD2URmQ9QM/tF96xETPUgZ4of0mwAec%2byszcp%2b2IPfXFpH2L9uR%2b%2b8W5P7SxPv5FiBdeUUo6p9LoPoH3pFs%2bdQ3Ihu9kqk8WsmPvFD90SYm/BXpX4ZH/V/6oabgHLfycdK4REYJvvYbD5T3BkZlwMo4Mu/3QHPOyaNOA%2bUrS9E87eKO%2bCqekkrqe510qe0U7TfFVhE8l1hpGUkbzov7J8p7Y4K8NyTOmDw3NG/Zx8iAZXXI%2bmEA2m8o4nZ%2bsND%2b0/5vUGTAL8RKq/6zEqrfVUH1kh25T5uR%2b6SJZwLX/VtQrNSnPmj/QrYk/CUAzcdenjnEpZVLyr4OQPvXoMi40bz/CUBz3gfV76t4VpJ9rn8pntxPGfCMyFSag8zTfB2E9m9eKI8EwFobpADQ03BlHFlHPch734Epp1zQHK8Se52idyolA%2bRVfz0FckacdYm0I568SjKoLeun9hP3rHt8nuz75GR5TnFejcHTvGmH8vYxMkDxoyAU3wTAXnQh/T3fxRnwbxaonrVC9XuryICnJpkBz1RxaCebAZRxf7RNLgNoe/xughmg6IuDrUyg/GgVmt8txaITZYgcL4X2hOPCM4BWj05jOQvkCMtRvtxeljNgMmfAmZTsmwwvNVsvdwZk9MfBVjRh7z/OAj5kOHec4dxrDAXn3FBR1E67xOrTHn7BJq6yPzug%2bk2luBVoX3/o5VEe9xY45xFvCLoFzkt39URvAUrzV%2bzc/shpfplbgLYHXZ/J2%2bMSt0A6z4BGDByZixNn0/DrF7LwxLPZyH/NAdVbHmjoTqWH0HM2kY50975sF320JWiAtLfeHrmXR%2b5sdzKL6HDlV6x8V8tvgUvxzrj4duM8WXZJnsgMygrOoww4O8F3QPb3/Sj4yo2CEw5ozzj5qvEo04n6vJg0N0hbgw4ZetjQY%2bO/HXyPc116CX4wxovuIy/Uf6KJ2MU7IPkyk1ZsPN6HXnHI0V5PlV2Kx1%2bCbrFdT0svyE9TX4LuMV6Cy8VTWP2ZB7kvOaGivUJX4Rd%2bqM%2b4ofqPKukaE89hembS3we5Ur/mfTEI/nqkOr3/6e1NoPp7Hr51aFU0H/mgOZ8i/3wc3nnpAUWZQ09zegTx/svw6G%2bEN9xQvSCe7Dz1Zdkn4rGnvDv1IbSGvsbSV5II0oZCSFsXhqKvBoqBkMBQCIoNEYHrwlCQnEq5b30YirUhKAZDUPRLvMEUUJvkxCOkymTI/saSEWc4PLZ8LJ485vF4AzVga6Kjvgj10K8u0q80hK56/usQh/yLkPwrTueoPkLXBJC0PUlcCS91nGPJu6XPYi38h5EEWH%2b9wICE1PpkMVHu38vflY5xsEF8Fk9ri6FwUTWmTgKFC4MoSCKAqQuDmLogOCkbU6%2bpRsGCwJX7XhDgJbW5/8naWVwDxfIgWGZzUHxX09P3uEtD6BhgM1ngsFTBbqmCq9IKS2UlTHYbLGYzKnWGy9rhtlK/6U3Gt1n4dlltcFRWiW%2bTlkpYTGb%2bPXJCvum7pdGItIUesMylQRiMRphMJhgvA5PZzP//JlZXi96%2bXrR3dqCttQ1GtwMlzQkYbFUwGo2XtZNqi3wbzRPVr0A8kUB3Tw%2b6urvR1dON1S0tMPhcqAh6YDIYJmbLZILeYpYC0ByEXq/nA6d/HpoISJf%2bE8tsNgtjZmHQYDZNykZ5RcUV%2bya/ZouFZ53BZOSBnLANgwE6k5QBrKMWFITJQElYEoCymSD1LwlckZ0r9z0yhsna4HaWVfN/kPg/P0Xk9j%2bluNEAAAAASUVORK5CYII=' /%3e%3c/svg%3e)
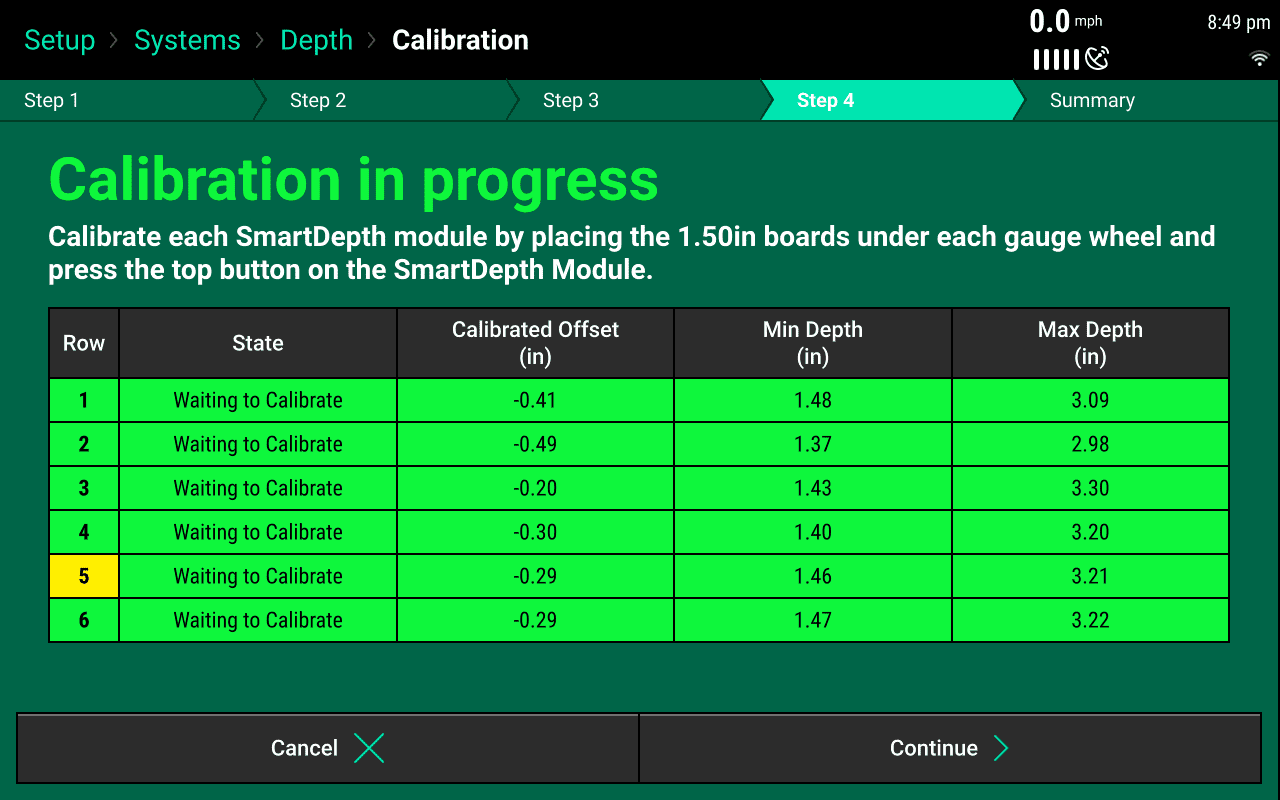
Smartdepthsetup -
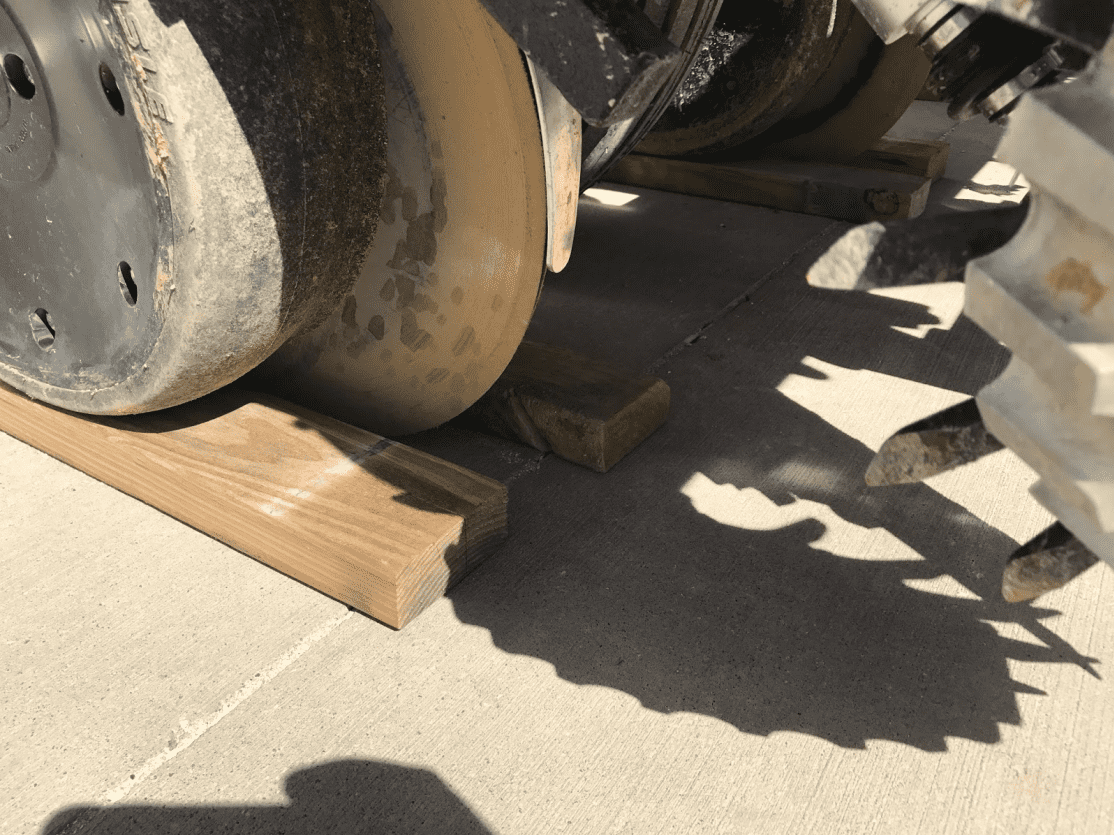
With the planter lowered, push a 3 ft long section of 2x4 lumber under each gauge wheel of the row you want to calibrate. Since the actuator is in the deepest position, the blocks can be slid under each gauge wheel gauge wheels roll off during calibration. Verify that the gauge wheels are resting directly on the boards and the opening disks are fully resting on the concrete and not the board.
' width='1114' height='835' xlink:href='data:image/png%3bbase64%2ciVBORw0KGgoAAAANSUhEUgAAAEAAAAAwCAYAAAChS3wfAAAACXBIWXMAAAsTAAALEwEAmpwYAAAgAElEQVRogUWad1hU6Zav%2bePOnTvhng4mcq6CqqISoQqKqoIiJ0mKOWMOCIhIEkWyEcWIuc3ZbrUNZMzadtsmMpgRs326%2b3SfM3Pf%2b%2byNM/PHenbVLh5gvd9v/db6vtpWs6eOorqygDUlS8jNmkNFSS6FeenkLEzlx8ZDNHy/H623DwqFHK23CqVSjrdGjszDFQ93Z9yc7ZC72%2bLhMgy5xBZPN2u0SldSonyZPzqQvCnBlM0OZUN6BEXTQ7CYdBgC/AgM8MViDiDMEoha5cUwa2uGDBmCtfUwtEoJSpkLESZvosx%2bKD1d%2bd///E/85S//ztdff4G93VAkzjZEWXwIM2mJCdOzaVUWbTdPcqfpCLcajrCmopjUaZPIzppP0bLF1B1aR/6iObhJJNjb22BnPwwHB2usJo1NpDB7Lru3VLC6vIBd26s4c2ofm9YspfbkZnoeNLKrpoqyoiVotSpkMg80ahkyTzdcXRxwdbHDy8NBhCCXCDBskEsdCTGomDXSwJLJAoAw1i6IYFNGBNkTgggy6gky%2bRNk0hNo8MNs0mM2%2bmNtY4ONrQ1OjnaoZC6EGDQE6dVI3V0YMnQwgwcP4uuvv2To0EGoPBxJjArEXytF5mbL1HExnNhTzsqCWWwsy%2bTIzlVMmTKV//VP/8yQIV8TZPJj1IhY1GoFLi72IgR7AUDWwhksXjiD747vZsfWVaxds4KD%2b2vYuG4Z%2b7cu53bzMbofXaav9wbz50zCw8MdmVyCm7sTUqkznhInvDycUHk64OFqIwLw8nDE4KdgalIA2ZOCKZ4Vxtr5EVRnRrMxPZy0MSYMBh0Gf1/MJn/8/X0YlxKDj7eaocOssbGzRy6TYtYrCQvyJzw8FIPBn8GDvxbD2dEWf40UnUaCUmKHm%2bMwFJ4uzB4bQaDSkTHDTVQunYO7u5OY/JdffsH/%2bZd/5d/%2b/d/QqDzw0cjwkDoTHRaA1aQJIxk7Kp6t1WVs31xGQV4aizJmkr5gOge2Lufqxd103qvjaUcL9ef34afTIpNLkUhdRRV4SpyRSRyQSeyQuduikjmKitB5y0mJ0bNoUjArZoezZkEEGxdFszkritIZRlLigwgM1GMy6jEE%2bGIM1BEeakal8kLvpyExxkJEkB%2bxMRHo9TqsrYcyeMggHOyHoZU7o1e74yW1w0vigK3NYOysv8JfbkO4jxP%2bKicGDf4Ke/th2NgM5csv/8KXX32Fg6MjxgAfnB2GEaBTUbFsIVb%2bAf7IFXLS5kykamUuxYUZTBqXSEJcGNvXL%2bXs/goeP7xEz8MGnndeJjtrDlKpG15eHnh6uKJSuKHxcsXby1ksASF5tcwRX60n4UHepE0IomhWOKsXRLIxM5qt2bGsmWMmf068KEkfHxX%2bem%2bCzQGYzf4Y9BpGJYQQbfEjJiKY%2bPjh2NoOY9Dgr7GzG4bM1RZ/tTtquRMydztcnGz5etCXaD1sCfF2JtLbAYPKCVdXe6xtBjNk6CDs7a0xGIzo/M14enowNiWRWdPGsbo0F6upU8aj0/kwbnQc5cszWFmymIXzp6JQyFhTmsX3h9bw7MH3vH9yhcetjVypPyzWrFwuwVvtKRqWWuGCTuMuJi4oQSVzwKj3wmzQMHOUmWUzw1n1GcC27Fg2LQxj6YwIKpcvZMroeNFbBAWYDD4kxwQRZdERbPRhRHIiTk5OfPnVFwyzHiJKXePhgErmjNTVDmdHG776%2bgvcHIcS4OWA2csOi9oRf40EV2cbbGwGi2a6uTKLFUszmTJlCgmJI5g1aybz5sykMDcDq4Vzp5CVPpOpk0aSnT6dNWXZFBUsJDEhhtyM6TQcX8u173fx1xdXab97kb6uZpbnzcfNzQk/HwUqhTveKnc0CmcUUns83W1ReNhjCVQTHuzHuPhACmaEs3JBNBszY9i%2bJI4t6WFUzIukZs1STmwtZkxyJDo/NRNHRjExJQZfjRx3dxeGDhvKV199gZ3NECQuNnhJ7MTEHe2HMXTI1wwa9AXO9kPw9rDDR2pNsNaVcSOiGTcqgbBgPTEh/sSFG5g0MpyaDcs4cXAj%2bUvSSEpKZNSIJGZMm4hV5oJUFqXNZFbqOObNmsiqkmxKl2WyOGMWGfNT%2bW5PMVfPbObZo0u0/1zL00d1NH2/G71Og5%2b3Ao1Sio9aisLDUax/udQeudSOEJOW%2bCgTo4cbyZ0RSWVaLBsXDacmZzjbF8ewZl44BzYWcffsVuZNjBF/19b1xcRFWZC42ONkPxRX%2byGisXq62SJ1sRXrf9CgL/niy//LkEFf4uowBJXEBo3EBp3MnrEJYaROHs3EsUmMHxXP1HHJjBkxnOlTRnPx9HaO7Krg6O4KNletYO6sqUydOBqrLCHRBanMnTGBBXMmU7w0ncoVWeRnz2PWjEkc3FxIa9N2nj84x%2bPWBrruXuBFay05GVNRe0lQeUlRyNzw8nRGKXNE4eGAl4c9oWZvRg4PZlSciYzJoVQujKM6K56a3Hh25sWzclYwF/et4t3NE8ydGMvc2VOYO3sybk42aD0cULhZ4%2bFijaPdEIYNGyTW%2bZdf/YXBg77AZtjXONkOxsV%2bEBLHwcicBuMjc8TiryRYpyDcoCQhPJCUxFiGR4extnQx3x/dyNHdlRyoKeb0gbUc3rOO5fkZWGWnz2Bx%2bkzmzhxPXvZ8SpdnUb58kQhi3uzJbFmZTe2hcn6%2bcoSe%2b7U8uHWG548ucObgOvQ%2bCpQKKV5yN3xVggc4ofQUuoA94WZvxiSGMiY%2bmPTJ4VQuHE714kRq8pLYmZ/Eunkh1O0v493NY%2bTNH0tQUCASZ2sMMhv8Zbao3W1wdxyKg80g7KwH4WAzBCd7G1wcbHEWrva2uDrY4uZgjbv9UNxsB%2bFi/SWe9oMxKV2ICfYnJMhIRdFiHv98ngvHNnJ4VwUn9q7iyK5yTuxdyfG9q7ASks9cMI2MeVNZXpBBeUkOayoLWFmaw9LcheQumsuu6mXcbjzA80eXePTDOVpvneTelSOMTgpD7umKUuGOj%2bDMMkcRgrfCmVCDktHxwYxJsjBjVBAVGQlUZyeJAHYvTaYqLZzvdxbw90cnyZkzSiwprcIVX5kDGndrlK7DxJA5DUJq9xUejkPwcrNFLXVE6eGCXOqOh0SCTCqUnwdKD3dUnu74KqQEauX4aZTMmDyKBze%2b5WlbEz9fPcXx3RUc3lnGsd2VHKwp50BNOVbzZk8hY8E08hbPZ1l%2bBqVF2ayuKGDThgq2bFxN3pIMKkvyuHrpG54/PM/tKyd5/PMZun78jrzMaeIg5KORiuOvUAJC8n5KV0IDBBnqGJMYzJRkExWZSQMA8pPYW5hM9cJIzmzLo79lD%2bsL53K5dj9dD2rJSkvFy1OCwsMdTzcnJC52uDta4%2b4wFDe7wUgcBrqBg70t9vb2ODm7YGcnKGEYcldb4oL1WAL8sBgD2LR6KXu2lLF5dYEYy7Kms740k93VhRzeUc6BrWVYzZ05hQVzprJk0RyW5qZRtDSTVeUFbNm4ig1rS1lWkEVBbgZnj2%2bn7c4ZrjUe4ceWQ9xq2M/%2bmhIMvjJ8NRKxDfqq3PBTuWHykTI8VEdipD9xIX5MTjJSuSiZjUuS2ZafzDeFyWxMj%2bTkpiV8uHKQsXHBGHQaRiWGYzHq0HjJ0Cg8USs8Uck9xFDKpCg9JcgkLni4OSN1c8LNRRh4huLs5IjeW4HKw5lAPzVqpQIvhQypxA1PDwkSiSsSiRPlyxayvaqAspxUdqzN4dD2UqzmzJrKvFlTyUqfJXrAsvx0VlcUsnlDJWsrC1mxfAklRbns27GaW01HuFJ3kFsNB7jbcpBzRzcQafFF6%2bVKgFaCv1aQoQORJhWTRoYRH64j3Khk4aRI1i0ZxY7CsexaPkYEUJ0ewbEN2dw5Vo3Cww17W1ucHOyRurogk7iJClB6SFHJhPBAK2zGvP4nNF5yPF3dmDV1HCeP7yMtfT4yuRwPuQyJhxRXV1ecXZywsRkm7iNmpo7j%2bDfr2Vm1lO0rM9havoCtlZlYzZg2ibmzppE%2bfwY5WfPEneDKskKqqyrYsLaEomU5bN1QSuPZ7fx45Sg/tBzhh6YDXL%2b4i/MnNjMiPlhc/QBvD3EAMWjdSYkJYHR8EJFmDTHBWvLmJFCdP5ZdKyZxaPVsjpZPojo9iu%2b3FXBt/yocBUNzcsTdRZC8M1IhXF3wdHdF7u6OwkOKWi5Ho1Cg9fISAcjc3Jk7dTR3r5/lxrU6oqIjkHpKUSq98PKS4Slzx83dBU9PT3FXeGDPJg7tqmJHVQH7qnM5vDmXvesWYZU6ZSJp82aQmTaLnMULKMzPpLJ8OaUly1iYNpvqdaVcPLqehjM13GzYz9XafVyr/YZj%2b6rYu2MVE0ZF4ad2I8TghcFHQqTRi4nJIaQMN5EcbWBScgglmaOoWTGFPeUzOLJ2LidXp7I5K46KtLEsnjIKW%2bthYuISZ2c8XFw%2bQ3DBw9UVmbs7cokw9wsl4IlGWGVnFzJnjqfzpwt036tn944NKLzkuLi64O7milYtEzdHicNDKSvOp6K0kOp1JWxdt5ztFWmsyUxi6/KpHN9RhNXsmanMnZ1KVsZcFmfOF%2bu9rHQZVVVrSEhMonrtClpOV3Hh%2bEYeXDvMjfpvaDq/k4O7V3N8/zqmjIkk0MeDKLMSi07KqGh/Jo0MJSXGwIioAOZNjKYscwTVeaPZu2ICB0vGc2jFKLZlx6NXS3G0t0MucRWT9RDk7%2baKp5C4mxtyN3fk7hK8JFKUAgCpFI2nJwp3CbPGJ7OruoTju1aTNX8aixakUlWZx5Hdq/nu0HpqT27l7MH1HNhWzMoVS1i0cDbLlsxhQ8Fk1i4ayZqMRHZVzMIqKzONhWlzmT8nleysheQuSaeoKI81aytZkrOE6vXlnD%2byhuYzW3l49QCXz2/n%2bIF17N9RzoUTGxifHEykyYtEi4oYo4LECB1TR0cwMdnCmDgDaRPDKM9IYkNWErsKUqjJSWBfQRIr50Zh9FNj8FWj03jhq1bgo5LjrZSjkctQe3qi9vBE5eGJUmhzUikqqRStTIZOqULrKUclGXhv0KgZlxBNYeYsdlQV8fRhLdDH/SvHObilkH2bllGcn8bMqWPIXzSNDeWL2FaUyjdr0rDKzVlMRXkp8%2bbPJyMjjezFaeTkpFNaWsTOXdtYV1XJkb2ruNu4m1uXtnPm8Dp2bV7BsT0VHNxWyORkE0khaoYHqYgN8SYu1IfEyACmjQojdaSZ/NmxrMxIYnPOCLbnjWRXXjL78pOYmWxC4SnFVyXHRz3Qt3XagRBfa1T4KpVoZXIRhlbmiY9Cjo9CIQIwevtg9vXF7OuD0ccbPy8vgv38SAwNpjxvAbfrDzN7QgpVpZns3bSMbatzqCzKJDtjNsIZyKqihezakIdVYWEB5WUl5C9dRm5eDjk5mSxenMbKVWVs27aZdevK%2bWbHSlq%2b38aZw6v5pmYFW9bmUrM2i9UFkxgd7UOwXka4SUNMiA9xoX4khOmYOy6CaUkGFk0IZm1GEiWzI6hKj2NnbjKbModj8pEhl7iglklEp9coPPBWyvBRKfBVKfH2EhShxFuhwFfphU6lFK9%2bSiUGrRYfuQJfuQKTjzcmX2/Mvt6MiAqjoiCTmeNGijAC1BqizUbK8%2bezdVU229fmUr0qj/LiPLZUFbNzwzKs1q8ppnhFIeXlJWzeUs3SwjxycrIoLl5G0YoCqqtKOH2omvpvN7JrQy7riudTmT%2bVkvQkhls0yKSOqL3cMOvlJIT6MDJKx4yUYNImhJA9NZylMyIpWxBH6ZwoKudFUZOdwPR4PVJHazRSR7SeLmg83VB5uokQtMIMIJSAXIbWSyG2PyFxg7cWf612IHmFF/MmjyF1TLIof52XF4EaLSZvH/RKNYHe3oT4%2bxMeaCBYpycmyMz60iy2rclh25ol7Ksp4/mji/zZfx2rC8c3c2z/RvZsr2LLpjWsW1NMzZaVrCxfSnlJLru3ltFydgu7qxZRtmQCFVmjWJIagcFbIvZXOzsb3F0dxVYYZvAiJVLH5AQDs0YaSZ8QwqKJFrInWViaGkb5nCjyp4ahcLETAXi5OqCSOIkQtJ6uIgi1pzveghoUMry95OjUKvQqNXq1BoO3N2EGA9nzUqkuz%2bNW7UHuXj7FpVM7%2bWZLJflpMxmXEEuwny96lQqTjy8RgUbSZkzl8N717Nm0XDwb2FyezvGdy%2bjvasbqVHUGR7YVUXtyC4f2VvHd0U1cOLmF8ye3cPrQei6dqOb4tlzKFqWweHoUw0PUDBvyFf/6r//Cv//bv/DFl3/B1nYoLs62YusJ0HoQEahiZKQfk4b7M3NEIAtGm8iaEETmeAtqD0ecbIbg6jAMN0cbJM72eLg64unqiMzdCY2nC1F6GWbvATP0UynRqdUEeHuj02hIiYvm3eOb8FsXb3qvwa9t8LdOMf7j/QNetjZyt%2bUkp/auJ336BNJmTaNmy1p21azh4PYKdgoqqMxg38Z87jSdwup1XQWtp5dzaWcWB9Znsm1NFhtXZXO4ZhmHNmSRMyeJ%2bFBvfJWuDBv6FTbWg5mYGMSxDVmULBxFmF6G7dCvsLUejIO9tXhEJfdwxt/bUwQxIsyX8bF6EkI04lH2sMFf4elqh8bTCW%2b5C15SZ%2bTuwnGaC95yV4I0bgSrXfFVuItDj69KhZ9KhV6Qv48PBq03o%2bKiOX9sG//v00P%2b/v4%2bv/Td4a8vf%2bAfb%2b/B37p43XWNndWlGP19yFwwhY3rSlm/toS9NavYu7GInWuyOFJTxJ36w1h1nCnj6YVi%2bhvK6T67nCu7Mti5bCILJ4QRZZDh5%2bWETuXGyCh/1uZN5NaJUvoub%2bF57TpeN1Zx/2QxGRPCsfhKUUsdULjb4%2bpkjZODNVI3e/F4WyZxZNDXX4mHk8OGDsLF0RpvhQt6Ye/g5YKflxtBfgqCNe4EermgkgjnClK0CgU%2bSiX%2bag16jZYAwfn1eky%2bOgK0WvLSZ9D780X49EiM3ruXKFg0G2%2b1Agd7G/HYPiUhlG1rc9mwupDtm1eyZ2sle6qXcWjrcg5tKsDqTWczrQ3buX96OT1nl/GqoYK3Tavob1xH77lSHh4v4MHJQtq/X8mTxo08rq%2bi7WwlPx8u5If9S3l4fAXPLlZSv2Mx42P0xJg0xIboCPCWIXOzx8Z6KEOGDcPWzg5HRwccHBywtbXF3VU4RrfHT%2b6Mv8qNML2CAC8X1OJRuzteMhlauQKdSiUaoFHni8VgIORzRAQZMfh6MzwsmP3bKmm98R1FmVOYMyGa%2bFA/YszeRFp0mAPU5KdPYff6AjZWLGFbVTHbN6xg14alHNhciNV/fnjEf3xs5XVXI3cvrOfe8QK6v13Ks3MreH6%2bhJcXy3lRW0n32WIenFrBvVMlA3GylJ%2bOlXD/dCVd36/i7a2dPL51gBVZU4kwakm0aEgJ1TDc5IXJxxOlzAM3dwkSqQcymQIPTzmubu7irk44TdIpBQN0ReEpQ6tU4afViKuv12iIDg0iOTqC2FALsWEWZkwcxcyJIxkVH0mMxUxkkJHFcyeQM38slfkzSZ8az4R4C1lzJ3Du6GZedV2j9eZ37NtYwNbKxWxZW8TOTWXs31aO1R/9d/j7m5/4j/f3%2bPPdPV611dJau5EHxwroPpXP07PL6T1XTM/ZFTw5X8bT2lV0ni/nwbdltH2/kmct1bz7aQ8f7h/j9weHeHKhgtULE4gyeBHi50lSsIoJkVpGhaoI95fjq5ajUHiJIZPJxB2cEEqFDJVSiZ9Q5zodOq2GrHlTOL5nHQWZc1gwbTxjE6OZN20sVaVLqCpZTOXSdGZMGMHEETEszZhI5qyRFKSN5/SeSp7cu8BvfXf4x7v7/Nr3E39/%2b4BbdUeoWZ3DzuoiTh7Zzbcn9mL1t/4f%2baP/J37vuy3Gn29%2b5I%2b3d%2bl7dJ6759Zy71ieCKL3zDK6vltO97kSei9W8KRhNX03tvLmp328u7ufF3WreXAoj7v7cmg/WsDRsmmE6OUopQ54y50J9/ckxaIkKViDRqlAJpOLCatVarRaLd5ab3w0WvR%2bfhj9A9BpvdmzqQx4Lhpc971L3Kw7JO4A50wZRWnefKaPTyI5JpRxidFMHBFLcnQow8MtpM%2bazLULB/jl%2bS1%2beXGb949v8vvLHzl3aAuVhens27iUum93cu92A1YCnd/7fuLX5zfE%2bO35df7Wd4t/vPmJP978KB6G3jm9kh/2Z9F9Op8n54pEs3xSW86HR4d4c2cPXd8W0nYki0eHl/Dw4GLu7k3n1s50TlSkUj4/gaxxZsZH%2bhBuUBNl0qJWyJDLBQAq1GqNGFqNFl8fn/8GEKDTEWIM5NS%2bDfz%2b6g782Qn/2cunZzfovXeRjh/O0HJ2F6njkgg3Gwg1%2bmMJ1JMcI5SKmeToMHZtKKavvYU/Xt/l07Ob/O3Vz1w8voOa9SvYW53Pz1dPYvXbq7v89uI2vz67zi9ProrX317c4Nen1/j1xXX%2b8e4uf3t9h547p7hxvIyb%2b7LoOJXH47PL6TiVT8fpAtpPFdB6PJ%2b2o3k8PLCI%2b99k8HBfJo8OZtN9OINPdcVsL5pOgMYTg7cMuYdELAGVSkhei0ajxcfHB52fjkB/f0yBARgDByD4ajRMSEmgfGkGu6qLxc1O2ozxRAQFUHtiM7%2b%2bvMHZQ9Xs3lDExJQ4Av28iQ4xkRQTysSUeLLnp/L94c382f8jnXcukJIQxeTxyRzevY6LJ2uw%2buuL23x6cp2Pj6%2bJAD49ucovT6/yy7Nr/PX5df76/JoI5B9vfuS3vlu03zxKy6Eibu1bROepPLpOL%2bXBkRzuHljM3QM5PDiUz6NDuTw4sJjWg1n0flvEuZp8EsL0qOVuSNxdBlZfpRYBaLXe6HQ6Avz9CQwIwBhgIDBAeO2PUXyvx0%2brFY3RR61Gq/TCR61kRFw4Zw5u4G1PC//5/if4eI83HY2iL0SGGIkKNZEQFUpiVDiJkWHMmTqGEKMvUjcHDHolabPHs2NTJVbvem/w8ckNPj6%2byofeFj70tIgQhPirAOHZVX4VQDy7zq9Pr/BH303xs7arB7l8oJBruxbw8PBiWo/lcWN3Fs1bF/DDnoV0Hc3iwYkiWi9Us7NiAXKpExJ3V9H4Blb%2bf5LXCytvMBBkMmM2mTAZAzEHGjAZBgAYA/wxBfhjFq7%2besz%2bOoz%2bfpj8/Rg7IpYF08ezaO5kCjJnkj1/ChHBBoIC/IgMCSI5LpqU4VEMDwsgOTqQGRPiSYg2M396Clcu7Mfqbfc13vVcEQF87L3CJwFETwvvBRBPr/HL02ufgVwRlfGxVwB0hT9e3%2bHTy5s8unqQ5n1LuVwzn%2bs702jYlsalzXO5uTeLu9%2bu5tbJVWwuniMmr1Qq0WiExAfqXVh1k9GIQVhpYyBBZhNBZiNBpkDMRgPBQSaCTUYCDQMABBgmf3%2bMeh2BOl8Mft7ofTT4adX4%2b3qLQHLTp3N8zxquXdhLwaJZxEaEMm9qCptL5rBkdhJL5qZwaEcZH5/e5D/e3sPqbc8V3vVc5X2PoICrvO%2b%2bzLvuFhHIpyfX%2bCAAeXyZD0%2bu8FEI4XXvZfHepyeX%2baP/Nh%2beXuN%2b8wHO1uSwZ8VELm2cxd0jBdw4Wsrl46s4sasEvZ9Q477odX5iGITVNAZiEZIMNmEJNovxX0mLEExGTEYD5sAAEYhwNRn0GP2FAUePUeeDUe%2bLOUAnHoNbTAEkxYYzL3UslcsyqakqEv1jbFIEy%2baPZOeqRXTcOi163m8v7/DpyQ2s3j8WFHCVt12XEabC1%2b2NYrzrEZK%2bxvvHV8XXApS33U2872nmfXcj77ob%2bdDbLN573dHIpxe36X9ym4Yz2zmxYSGNW%2bdx49Rqen48xd/6rlGcN49gk7CqRkIsZsIsZsJDg4gMsxARbiE8LITQUAthocGEhAR9BiIoQlBDAEaD/4AqzIEEGQMICtQTqPcVS0FQQ6AA43NZBPr7YdD5DJTIyOEsXjCN1AkjSR0/koZT23nXKZT6FX55cg2rdz3XeN3RzJvOFl53NNHf1sCrtkbedAnJXR74rKuZ151N9Hc08K67ibddwudNvO1uoU8A1nuddy9%2b4M3jK3x6doUXbZf4qW4nz%2b6f4X1vswjrTXcDD64fJ3ViCoYAPdERIcRGhREdFUZsdDhx0eHiNToyjKiIUMJDLYSGmAkJNmIJMmIxG0V4FgFAYABBRn9RDaYAnagCIYTXwYF6UQmhQQbCLUaiw4LYuraQO01HWVeymG1rlvK2s4U/X94WS93qVXszLx7W8aq1nldtDfS3N/FKiLZG%2btoaxHjVLkQ9/cK1rV58L%2byl%2b4Sf673J2%2bd3eNHeyNOHF%2bnvqONddwMfnwg%2b0sS73kbedjfwvreJP9/c4k7zIUoKFpIxbzJJCdHERkeSMDyaxOFRJA2PJik%2bmuExEURHhhIVHkJEWDChQomYAwmxmAaAmA1YBDUZAzAH6gkyfI5Af0JMAYSYDIQID2AFBRJhMREXaWHquCQyZk9iZFwEWXMnc7v2AG/aGrB68bCevtZG%2btsaxaRftTfS19rAy9YGnj%2bq40VrHc8fXBJfv2yvF9/3dTTysr2Z109u8/rpDwM/8%2bgir7sbef/4Mv2dwu%2b8yNuuBj6IIBrFeNfbzG991/n95TU%2bPrnM9dr94nf5UYIaosOJiQ4nKSGWkUlxIpS4/wIRKSgiaCBChNIxExpsJNQcKEIQEhcABJuEL0QDxcTDggOJDA0iKszMuJQ4btXt5%2beWo/zUdJir53azq2oZnTe%2bxerlowYRgLDqL9saePGonhdi4g28bGukv7OZF20NvGxv5EV7A8%2bEZDuaefXkNs87W8RVf/FIWPl6MV53fo6uJt4IAB43865HUIHwN%2bpEhbzvaeDTs6v83neTe1ePc3DnSnZvKWN5XhopI%2bJJiI9hRGIsifFRxMdFkhgfTXxsJLHRYcREhRIdaSE81EiYxSgmHCJMghekKKwAAAXFSURBVELSFhOhwULyRiIE%2bQuP2ESHkhgbzuoVmdyuPyB2sX/03eKX3su8bm3Aqu9RI/3tzSKEF0I8EqTfyKuOZvF0Rbj37FEdTx7W0nP/Ir2PGnj19DZP2xp49qiWF62XRAAvBQjt9bzqEEqknr62Ot50NogQhJ3mm%2b5GXncKpVQrAnn/uJm3Pc18en6d3/tv8%2bfbH8XJU/gSdsHsiUwalyw%2b6JCSHEtkeAhxsREkJ0QTFx1KVEQwsVEW4qJDiI4IIircTGSYmegIC5FhQUSEmoiJsBAbFUzS8HCxDKoqssVvt1%2b3N/Chu4UPnU186rmM1ev2Zt60N/PykbCCzfR3tPCqTfCBZp4/bODxvUv03L/Ey%2b5rosu/6LkpQnj84AIv24VSqROTffbgPM8fXuL5w1qePbjEy0e19LXVfk6%2bidedApB63nTVi57wtqeRD0%2bv8KanhdfdTfR3Cfea%2bOXZZfraa2n74RSP753jh8YD7N5UzOTxI4gMDyI%2bNowR8eHERJgJDzESE2UhJjKYkCADIcEGIkNN4lMm4SEm8SHM6HAzc1PHsH9bsTjUiYNe7xU%2bdDcPABhw/2bRGd92tfBaeN/ZLCrgRVszTx7U0v7jBZ533%2bBF7y267l2k%2b955eu9f4NnnhIXEX7bWiuYotMT3vUJLFYxUUIJwv070hFdtl3jdVf/fqnjb2yKGAKj/M5z%2bjlredNfz4Ukz7x838fHpZdE3hK/jzx7ZwJWLu3lw7Sj1321jdfEixoyIYcq4BNaVLKJg0XQmjh5OaHAAy3PnsHvTCubPGCM%2bDPHbC6HVN4gtXIDwoauZX3qvYCU4/7uuFt51XxYBCDPBu96rvOpsofd%2bHU/bmsXEe9ta6Pr5PD1C8g8u8vjhRZ6IKqin994FbjUe5syRTZzeX0X9t9u503iYnh/P0i%2booKNeLJG%2b1kuiPwheIZZKR8OAOroaRQX0d9XR136JV%2b2XRK941VHHy7YB833/uIXf%2b67xy7MrfBKgPBf2LJdpu3Gc%2by2H%2bPS4mV%2beXKb7xzNcOrGZ9tun%2bOPVDVFVQtkNdKdGPgptuauRD13/XQKNvOsUbl7mjQCh5xr9nVd4LtR%2b%2b2VR9j0P6sRV77k/sPKPHwjJXxRL4LvDG8UHrBITogkNEQaXANGlk%2bIjSZ00ktzMGdyq3SfODs8EYK21A2oROkmbYJYDifd31dPXIZjvJV62XeRlmwBC8JM6cQZ529vE625BOUI7rhPVJMSnJ838IpSSYMDCnNLVyG8vrvOx97LYtt/1togd53XbBV4/PMeHrno%2bdjfzvrOJj8Kx%2bOv2JoR433OF3/uEHd9dPj6/w69vWnn/8h4vBI/obuaVYGCdwko18aqzSRyA3nS3UJSfhk7nKw4tQoSFBhEmtCmhZYUHi9cpE0Zys3a/aJKP735PnzBLdDSIg5Ww8iIEQRmdgqcIAAYgvfhcVoJKhESENvpeKJlOYT65JIJ4I3hM50Dir9vreSOoqkO410S/ONEKbbiZD%2b0XeN96jjetF3nX0cD7jkbRB6yE6U%2bQvrAdrvt2F%2bXLF7OqNI%2b1q1ZQsCSN/Ky5rMhbQFHuApbnLqAoL42ivIUU5iwgP2sOqZNHiUmHCwOLMLkJrUgAERZEVFSo2M8jIkKZNG4EP9QfFP%2bxvlZhVYWkhTYr1P/AZCmUhjBa93cIHUOYTht52SqAEWaT2oHEBO8Qx29BCQPxtqOBt11NvBOm047PIYz1nU3ivkXY4L3vauJ9Rz0fOht539HwP12gv0OgepXvjmwRZ3RhR2axBGEyBWA2GcRZXIwgI4GB/mKYTIEEBgZgCPTHKExeFmEzY8QiTGohZvGJrxBRARYRQlxsJGFhFmanjhO/sRVakSBP4R8UBi9xlT9D%2bK%2bJ83Vno5jUq9Y6UWmCuQpj%2bsDqDnwmAmir461QIkKywn7lMwTB1wQIvzy5LqpbKPWP3Zf52N0iJi5chff/H2RbqwXv%2bjp8AAAAAElFTkSuQmCC' /%3e%3c/svg%3e)
Smartdepthsetup -
With the boards in place, start the calibration by pushing the top button on the depth control module. The actuator will move toward the shallow end of the depth settings until the gauge wheels begin to carry a load on the boards. At this point we know that the gauge wheels have reached the 1.5” depth of the block they sit on. The actuator will move past this point and begin to lift the row unit. In some instances it may even lift the row units until the actuator reaches the shallowest setting. This is determined by the row unit weight. In both instances, this is normal operation. Once the modules moves back to the deepest setting you can remove the boards.
' width='377' height='461' xlink:href='data:image/png%3bbase64%2ciVBORw0KGgoAAAANSUhEUgAAAEAAAABOCAYAAACQYxCuAAAACXBIWXMAAAsTAAALEwEAmpwYAAAbgklEQVR4nN1cCXhUVZZ%2bVdlT%2b5Laq1LZN7JUkqoshBAChBATCItAQkhkyb6QAIpAQ5BFWaelF3tQdhBRW7tbaW0du6e16ZFW3LVRW5kZAdnJAtmXf75zX16IEezWJmhPfd/hvbza3vnvf87577m34Pr7%2b/F9GD36%2bujIn9/q0dPTM6L3wX1fAPT19Q06eeSJp7BwQSnycvMxY8YsLF16H5599lm0tDSz5%2bn1vb29/z8BqKtdAplUDY3aCJ2fGX5aE1RKHdRqHZyJydi589FBoAgEAZB/aQB6enqYI88/fxRajRFBgeEICgxDgD0UAQGhCAwIQ2BAOExGfygUKsyceTcuXbo0CMK/PAD0IBCyJ%2bUiMiIWdv8QZv624K8YARIcFAGlQoPx4yeguZkPCWLPvywAPQOjf%2bTIk5D4KnFXTj5GRTlgMQfcFASykOAIyKQK1NXV33YWcHd%2b9PvR1dWJMWnjIJOo4UxMRf7UuxndbwWAwBAC6b333r%2btIHB30vnu7m528wcOHIRMqoLVEshyAAGQmJACs8l%2bSxAoT1ByXFzXMBhC/1IA9AxQ//XXX4fdPxgGvZU5TFk/IjwGM2cUMEC%2biQVCXvj4409uGwu4O%2bG8UL6ampoRH%2b%2bEUuHHnDcabOyoVukxOXsK0kaPY9duBQJVB2LBkoZ7bxsLuDsJQGVFDeQyLRtpcpSMYp/qPzldMKeYUX1o3A83AYhPPrk9LODuVNwfPvwEVEotbNagQeeHgkCsGJ%2bZjfQx46DTGWCzBcBqtfNm8YeFGbEjEBKJHHV1i3/4APQOjPxnf/sMwcGhMBr5uB8OgGDEhJCQcGg0fpDJFJDLlUPsxt/0fEHB3NuiCbiRZgA98qdOh1ymYfSl0f6683TNypzz9w%2bAVquDVCJjIAw1AQCVSoOXX37lh82A7gHqb9v6b5BIFCzuafQJAKoA5LhBb4NeZ4HJaIOf1sCc9PWVMopLZUre6QGjc6VSDTc3D2RkjGOffTvukxuJERecP378L4PljhwXjI97YfStMBrNTPOTkxKZEhqZAn7ktJQcV0IyAAIBIBK5sZniD7IK0EOo983NLXA5k6BRG5iCE5Ld0BAgcNjo%2b%2bmZs3KZHCEKOZKUMiSolJDKVPCVyqCXK6FQquEpdoczwYnege/4wTGgZ%2bDG2trakJc3hY3q8JInAMDCQM8zQCaVw1cih0mhRrJKgxSNHla1BmslPvhc7Ibf%2bnjDqNCA8/TCoeeO8kB3dqL/hyCE%2boY0NviRb0ZW1iQoFBrYrDec/7rR6Fuh1ehgNlmhUGlgkMoRoVLBoNJAotIgXiLFKQ8PfOLjjd%2b7e2C3pzeuHj6C3o4O0LeSUZ3pp1D4jmBwt8N5GnFy/Pz585g6JR9yuYpl/OFOC8nvxt8myORKBIaGIUSrQ6JCgSSFHHa5irFHJFUgVCpDiFyFQJEn3iqeh95p%2bbic4MC1RaVoe%2b436GprHwSfTbV6utHfQ2D0jSwAvQM1/tixPyM9PQM5OXchNjYOWo3%2ba%2bVOONfrTNDrjSzz098ajQ5Sor%2bPBAlyJVIVKjiNRpg0ekilCijlSnhJ5PAzWZCUPg5nOzvYd7af/Cuubd2MpkkT0ZqYiOsLF6H9uefR3d7GQOgZBOPvM4P7rgAIj6lT8xHvSERcbDxsNlJtATCbyG5kfTK9zgydn5GpPKK/QW8ZyPxyKGVqWOQaOMMjMHZMBqRU76kKyJVQK9UQc2L84ueP8LHf1TVIfTp2f/xXtG/ZjOasCWh2OdG8aCHann8eve08WELbtb/75mBw/8zoHzz0OLy9fJE%2bZjySk8YwRynpUdYXSp/ZaGfO6nR6%2bPkZ4ac1w2gwMzVHo08Kj8ofOa1Ua1nZY9dlSgaQp6c3oqNj0dLSckP59fYNjO6N/EOj3vHxR7i2bQtaJ05Aq9OJVmLG0aPoaWtjzwuvHsoM7p8BoHBOEXx9ZWyKmj0pDyHBkYMgEAC82aDTmQYBoDyg15uYohuu9KgaCGqP/ibFx3Ei7Nmzd1BffO1%2bCJABh1hCHGTGSVzfshktWRNwdYAZnUdfQF97O3uesaIf3w0AodztOrQLCrkGfn4m1tAgJlBs8wAEwGy2w2AwsTrPm5GVPrWa1/rCCGdlZWPGjLuZBCYprDcY2XPe3r4ID49Ca%2bu1G6P/TWEpgDGQnMnJLgCdH59E25ZNuDZxApqdiWhZtBDtv3sJXb293x4A4XHmi9NI2TAa3uESmLV2GI02xoKw0FGMBRQGdBScJ%2bdo5PV6Mz/CA9Snc6L4qlVrEBYaBYvZH3Z7MHsPx3FYs2bNoMD6VvdKYHR3o48qwlBmfPoJWh9Yi6vl5UxLfCsA6NHa2opHfvEIVq9Yg/nLS6CYrYBBZ4VWa0RcnJNNaQUAKNsPBYDYMHSmR7FOMpgk7t13F2DhgkrWIaL5PiVLCptTp079Q6N/y3seEibEECFfMA73f4sQEOL%2bxIkTKCouQsOSBtTV1EFXqYNvvAxmrQ16vQWTsnJZi8ugNzMnyHmN1o8dqQSS0z4%2bEkgkMgYIAUDXAwODMSUvn/1tMlnh4eGFhoal3230/x4zSCt82yTYN4DeX//6Eeor61EwswDTc/MhXyiHaK4IeiO/qkMtbmptUZzrdHzZ8/MzMGcpqdGRLDd3KgoKithrTCYLlEoNK6UTJmQxthAr3njjTfadI7Us1v9dADjf9CXSqtKQkpOC%2bJkOcKUicHUc5EkqmDX%2b0OqMyMyYxCoCdX8C/EPh78/HNI08OVhTXY/qqnrMmT0PQUHhDCSSxUT9woISVlUKCgr/KerfdgB6evnMv/GFjeBKOHjVeEFcLgJXwUFUJYL7PE8YzCb4aUyIjIzFuIws5lB0dDwS4l2IjXUgI2M8qiprWe8vc9wkJMQnsyUx0gIEAJVIWicIDYnErl27b1367jQAwuN//ud/EbsyFtxCDqIK3nmuasCWcPDJlMGs9mcJkZKhyzkaiYkuFt9U3iZPzkPG2IkYFRXHqgU1OSMjYuBwJECj0fOq0WSFt48v8vLyvn8G9A3QnlTYjp/swKrlK1F5bzVkNTJw1RxENSK43%2bMB6WwpZNOUkOYr4Gc3QKcyIiQkki17kTymxEd13WYNgNUSxEKDnKcOMJ1PyZvGgLBaAxAQEAS7PZBViVdffW3E9whw/wgAb7/9NopLilFfvxj11XWwLrTCJ0cCXaIJRn8LIkKi4IpJYXTWJuphNFjYig8Jo4yMTIwZM5YxgCoDCSWaLNGiJ4UIqcWY6ATERDtYLjCbrSxJ0usrKioH7%2bF7BeDTTz5FQ3UDZk2bjfwZ02FzBsKiDYDVEAArKT6jDa6kVESExMLs8Ic2TA%2bjnwVmsw1hYREICQljDhHNiQG886Gw24NY%2b1ujpnnBV7vAVCaTklLQ3t7%2b/QNwqeUikqvTkDjVidSJqTAbqEcfAAujdCCL3dCQKCQ50xAQGApdkh46oxEajZbRn4QPjaojLpFleBp5Olqt/lAo%2bbn/0LkBPwfg8NOf/uz7DAGgu5eUNLDlpc3g7uHgWe0FXYQRZmMAA8BqDmQACG0vpzMV0WEO2GLsUMVpIPWQQ%2bzmzkCgEc0cl4XJ2VPZfIBygFKhZg6r2SzwxqSIAKHub33Dku9PB/T186N/5foVWKutLOMrxqth0wbyoz%2bg9al0UeuLmptBAeFISk5DsC0CsmwVDDOMmDR%2bMvx0BkikMrYylJc7gy2N0ySKRp0EDwEgMEWQySqFBlaLHa%2b/fnxEQeD%2bXt3/%2bR8eATeTg6RQCrPVxkadZnk0glmTpyErOx85k/Phb%2bVXfOMdLsRFJ8EaFgD5Sil%2b/e6v8af/OIac3Fz4%2bsig87Ng2rSZSEkZjbS0dERGjvqK4z6%2bUthtAUjPHAeN1YC5s4u/nxzQ28dr/6mPTGV13xRrgkUfCOtAozMuLgmzispRUbMceXfNQkS4g12n2I6JjUewPgJu49yRvmcMzp46g3ffew8ZYzPh5SVhZS45ORWhoeEICgphlCcjNsgVSpiNFgSHhEI2WQGdxYi333xrxFjA3eoJenR1dyJ0XRjcxnvBXx8Es4VaXoGsw5OcmolZJTWYXVyJsRnZCAuLYSWNQoPqucnPCkWqEtxyDjt/vxOnP/sCf/rzMaYISRILSU8IA8HUGi3cPbzgCHeg9MlF4EZxePk3r4xYMuS%2bKf6vtjfB0GCEJkgHmzFoMPappzd69ASs%2b7f9mFlYivCwaLary2K2868x8U0NWbYcXCWH%2bJ8m4v2PPmRT21deeQUhIaEQi8WsGeLh4QkPD4%2bBoye8vLxYBXhww4P429m/QVetxf4nD/AA9N5pADquwFRhgtZihM0cNJj4AuwhGDsmC5OyZ8DlSkf0KH6Tk2D%2btiCY/WzQjPKDuNINXC2Hzb/ZgjeO/QXH3ziOgwcPYOHChSgtLUdZWTkqKipQWVmBmpoaVFdXY/369XjxpRfx5msnMPvhOVhxZAW7n%2b47DUBbbxtC6kOgsejhbw5mo2vQWRAZ6UB2dj4SHElMytL8fygANlsQLAZ/6EINcKtwB7eAQ1bjRBw5cASPPvYoDh48iKeffhpPPUX2FJ544gkcPnyYHckOHTqEnY/uxON7H8eidWWo3Fd2ZwHoZ50UfgLkanRBZlXBbg5hAFCiS04ei/HjcwalrNABGgSAyqLeCp3dAM8FnuDKOCStcOLJg0ewd98%2b7Nu3F3v27Bm03bt349FHH8Vjjz3GbNeuXeza4QOHcd%2bWezHnFwV3Pgn2DajA7B9nw8cuQ4ApdLD8jc/MQWRENKv9ghD6Sgj4ByPQPwz6KCM8ynkAgpYEs91h%2bxgAN2z//v3Yu3cvc1gwAZQD%2bw5g045NmLx5Mnr6%2bGbnHdcBRXvmwjPIC4FmfodHbEwiEhNSWSIc7rjQDrfbQxAeGg1TmBlcIccA0NRosXPvThzYfwB79%2b0ddJ6cpXPBcTonNuzesxt79%2bzFz/79Z0hvHIPWntYRmR5zfw%2bAuqfqIApzQ6A5GCazFVGRcYPrfgIAw4EQFkVJMkfcEwXnvU6oq7XYsnMLHj/wOHOO4pxmmUR3YgBRn5x/9913GRAsFHbvwr49%2b%2bBa7sRvjj2H3s4R2CyNW3ygAMCDL28EN5mDTqtnq7gmk43v97O1fT72hfpPIohKoQBQzl15aFyzBuvv34Ax9elY8cj9ePrwL7H/AE97WkwVQCA2kNNnzpzBBx98gJ07dzKmHDn0JDJ/NA53leVix7afoL3j9s4OuZuJC1KBnd2d7It2vPwwuEUclGkqKL3VMFrMfL03DVn%2bMvECiRwXGEHVoaSkBLWLa1FbVYv0%2bWMwZ80cPLz1YTz40INYu3Yty/hHjx5FY2MjNm16CKtWrcKePbvxzDPPYOXKFVjTuAYb1z6E0UtHI6koCSVzSnDqv/%2b5NvnXAOjo6Bj8QBr13mHr/ZX7q1gi0yzRwMsmgdpXC6PZzG9bM/PLX0Ppz4dAEGttzZo1G/MXzEf%2bhHxEzIxAdHEMSmeXomheEeYVz0NRUREKCwsZUAsWLMC8efy1goICzC2ai8KCuSiaPRfGchO0WVosq1k6WKJvGwOuX2/H9bbrg9RCXz9Onv0IL33wO/ziD49AXa8GV8qxFpj7PHdI9HKopRoYLZabxv/gNas/AvyDMWpMDFwFiZCUSKEoU8BR5kD62Exkjs1CZmYWxo/Pxtj08ayVTj1EmkwlJ4%2bBI9YJ%2b6xAGCqN4OZzmPXwLPR39t/%2b7fJfnvuSxWLzlSY88V9HMG7rWPjW%2bLAvpe4vV85BVCliRwZCiQd8/SXQKHRsbjDc%2baGl0KTxhyJBxdrmrIFKQDZwkM9XIiI8GqMiHRg1Kp4lVpLT9D7aNstyiM4KbgYHbjEHbh6HaT%2bfNiJymCMAWi63YPHBenDFHFNtzOkqEcRVYqbl2c3TkUCo4SAuFUNik8CgtrCu0M0YQMlSrzRDOUoBt2r%2bvT7VPvBbrAe3jIN2vg6OKBdbTqP2OC2ukrBi7zcFwhboD68SL4hrxOyeHA/Eo29gOfy2AnDl4hWc/N%2bT8Kry5EeIHBWcHm50vYxj2t692A1KoxImoT02DACtTg%2bFtwre8b4Q1fEM8lrgjaRNyfBr0IO7l4N1egASI5ORkJDEQKBVJVooMWptrPPkVuHGs28Rh4A6O663Xx%2bI0tsYAleuXMELf/ot8u%2bfirKVZXDcF8ecZF98MxAqOIjLRDw1s92gVRtvmgfUGj8ofFTwzPIBVytm73ObIUbcqhiM2ZoORb0C3DIxIsfGwRlL6wepSHKlITIqFia1P9ROLc%2b2Sp4B4RUR6OzsvP0AvPzyy6ipqcK2zduwZvkaNKyoh2%2bVzy2dFw2ww6NcDNcmL0jiaGHU/pVQoMpAa30013e/24MxhpbQvKZ4I3plFEZvSkPiOie8lnhDXqGGy5EGp3M0UpLHICoqDnZTKORZKgaAW5UbywEZdem33fl%2bAmD79u1YVFqK8soKlNxTgqrKKpgrjLyzwurPUOeJGQtFWLHfEy8d84R3sTs0BgNsJkEVkjawQC5TQ2KQQzxfxL9vjhg%2bed4wVhgRWB%2bI9M3pCF0RzkIhMjsSKfHpSEoezXJBaHAkfGdJGAAe5R7gcjhUbqoYmSS4detWVFZWsrn4okWLUFhQCE2Jhl/uGh7/zHkxGnZ74dN3xHjyd2J41XPwSZbBohPa5HboDQbIfVXwDZYyJ%2bg9XK4bpPkSBC0LRtSKKCRtdCL1wVTIlykgLZMjJTENrqTRSE1OR0hMBMSUkAmAUndwmRwe%2b9XOkQHg0KFDKC4uRnZ2NnIm5WDKlDz4lPhAVC1m9BusBATIAhEqdnrhvbfEeOM4hyMEQK0I4kIPGCzWgTa5HRo/Pyi91PBx%2brASSPlENJWDvkiPoCWBMJTqYak0I2VjMqJXRTEWhE6NQGpMOpLj0xDoCuYrEeWbahG4XA7H33l9RKbEHGlv0uBz5szBXVNyYMox8RpgwYAOWEBxKAJX5oa5P/HAeyfE%2bNMxDif%2bwuHIS27wIoCqOGhi/WDVBzEBRLtAFN5yeGZ78hqgkoNbrhj%2bZTYYKwzM%2bfB7w5C8MQmpG1KgXCaHT7UEkZlRcCQnQHO3H7/2SCFYykE/y4hLly%2bNzGzw4sWL/C7Pc%2bfx/GtHsenZTdj/x304%2bNpBLH9qBZI2uhgIojIOvz/mjTePcwyAt97gcPhFd3jQEnkdB8kkOWx%2bQTDrbFD5aCFXyuFe6M6HwCIO3rm%2bCKkPRXBDIIIbghBUH8gs5aFkhK4Kg6hcDI8iD9hjAiCZLucrwEACTK8ZSIB9I9AQOX/%2bPM6dO4fzFy6gpakFbc3X0H71Gjpb29Hd1oPmq0145vgziFwdg4p/5/DR2254bQCAQy96wJ1GiRRikTtUJg1kFgV8HL5wn%2bkBkbB0TvsJcn0QvjwcoUuCWQho52tgrbIwgB0bEyCfp4DUIIPCqIDHHG/2mW61bmxNon57/ch1hc%2bfPw/Bvjx3DqfPnMGZL8/i/IXzzC5evITO6%2b04f/EiFu4qxUNHOLx3QsSYcOAFd4gr%2bBpPmV50jwiiUjFEtSJ%2b5Ol6jYg5kbFkHGJXxyJ4CT/6xIKYVdFwNDqQuMEF4xIjuLkiiBdRSPHVR1xHyZPDwedGsCt8fggAFy5cYGwgox8rC3buwjlcvXwZHS092PirlXjs1xw%2bfscNe56jXSJuNypF1RDJLJROAuMuDi/%2b4SiePv4U/OutCF0WAluVFfpFOhjLDXBtcCFyVSST31%2bpPpQHcsU48cHbI9cTPD8EACEchgNw%2bdIlXLh4EZcvXcC15h6s%2b2Ulfv0Kh2f/Q8KS461EkyCp5dMV%2bPDk%2b0BXP7Y/tw2maiOC6wOZvA1dGoLUh1IQ3xgPWaV0EDymREs5mOeYcaXp6ojtFuGGA/Dll19%2bDQDBLly6iKbLl3H6XBOWHUhHw24abc9bzh2olFJFiVsYx/4zhKvNTbjech3VeyoR2TgKqQ%2bmIGmDC671TrjWuWBuMN%2bQ2zV8AsyszxwRBXhLAM6ePctAuBkAZJQXrje34i8fn4CUtsp8w7yBydgZHAobC9nOxCtNV9DR1oEzl85iwtYsxDXGwrXOCee6RAZE1MpR8Kh056V2pSe4PA7LfsIvkXeP0B4BbrAKDGHANwFw%2bdJllhP62nqx/lcPsAzPHB0OAFWGhbyK27x/C3OiqbkJTc1XGRhP/PkIIlZFwbUxiQHgXJ8I59pEaOpULA94zPcEN45K7aERS4D9BIAQ8wIIAgNIH9wKBAbEZQLiLEJ%2bFMLqPIEgqhDfYEMlx1eIbA4vvPZb9Pf2M71BW21br7WitbUZsx6ZjVFrIpG03sWzYJ0LwcuD%2bfApE8M91w3vnBxIgCOgAfpvBgA5TyBQRbg1C/jK0HWtCz998WeDnSNmZUOSWAUH9XQVPjv1OTraO9DcwgPQ1NKM/q5%2bPPvmLxH5o0ikbEhmIJDFrY6DpNqXgWqfa2fvGdEccO47AMAS4oULuHjpIs6cO4vYxhjYa%2bzIXjIZafePZhJWTCWtmIOrPAmd7V3sd0W04Un4fREx6MLFS8jbMQWhq0MR90AsHGvj4FrrhGmZEdwcDjlLc0Z09Pv/EQDoRuk4NCTonJ4nu3L5CjZsXYd1DzyA7Ru3Y8PqDYhpGMXX89kcihrnoaWpCadOfY4vvvgCJ0%2beZIsf77zzDj589yOsfmw1Uu9NxZzts9gSmOMBB6LXRLEVpeTpyTj1t9vbBv9GAM6dO/cVAMhRwdmhADDBRI3Upma88eabqCirQG1tDe5ZdA9qK2oxqTqLJUFSgMVL5uHQ/kPYsWMHHn74x2wNgBZL6HcAa1avQePqNVh5/0psaFyP1dt%2bBOcDfEKUzZXDOTERex7bM7J7hM4NYwAdaYZITg5ViMPBoOu0g/TVP/4RZeVlqFtch7LycpQvrEByYQovhfM45MzIQcPiJSivqGDT7szMTIwdO3bQ0tLHIGNsBqZlT8OMoulIWZ8E10YngucHI3vaZPx4%2b49HlgFNTU1s1IcqQQKAnBwqigTKC6FBx6tXr%2bLDDz9kDZUFC%2bZj0uRszM6fhbDpoQwA38lSNNy3FJse2ootW7dg48aNWLx4MWpra7F06VLUN9TjvnuXY35lMZJmJSNxvhMxjdFIeDAR8fMccCQ4cPS3R0eWAb29vV9xlo4CAygUPv/8c5w%2bfXrQeQJJYILwetrsMHv2bGRkZGBi9kR4FniCm86h4qEydLd3oeVaKxtBWoWiRCh8Oe0E7%2bzoxOlLpzFpWxYsi80IWx6G0avTULa8DNu2bmPfM5K7RTn6h6aZ1HEVjG5UOL9%2b/TrL3F1dXV8zwSECkdhA/1HCW%2b%2b/hf/85D/x6vuvorW1BT3d/GfTa4T30TkZfW9HZwf6evpxsekC3vj0OE58fgKnznyG3h5%2bJZiBRL8THqEq8H%2blkP8rAqgi2QAAAABJRU5ErkJggg==' /%3e%3c/svg%3e)
Smartdepthsetup ' width='1280' height='800' xlink:href='data:image/png%3bbase64%2ciVBORw0KGgoAAAANSUhEUgAAAEAAAAAoCAYAAABOzvzpAAAACXBIWXMAAA9hAAAPYQGoP6dpAAAP%2bklEQVRogdVaeXSUVZZ/laSy1UIWFgkSCGSpPbVXpZbUmlRlAYSwGcgeskAiqzSNbAoqAqLgBqLtTNs99nbaPqN267R95vTpabVBemxse6ZBUNBWFDdwY9rp%2bc257/u%2bSiVk5fQ//cfvvPe9e3/3vu%2b%2b%2b967%2bSqMMYZ/dMhkMt7qdDpUVVXBZDIhJycHcrn8Gt38/HwUFhZi8uTJUKlUNMbAim8E080Gm1MANj0fqTIZZPmTwMoKwQqngemLwOYWcHlKWhpS5GmCPvG0syGbM4MbL5w9C16vFzW1tYhEo3C6XAiHw/D5fJg6baowCXGyf9cApKTwVqPR8ACUaTTIzc0dNgAFBQU8UMXFxcjLyxMDMHcGmKUUzDgXrGwmUsmoMgvMrhFe0loq6GhmCQEgh2WFkLkNYLoiyGZO48ZnFBSgKhrFvPp6VEejqK6q4s91tbWYMX26MNmJvtw4OJK8aPZs1NXUIhwMweVwYuaMG0f0mTspB7k5OWBMnjpYKGPgYykjrFRaiiAfOk5ZMdYLpSSBbIyINDBVNpgiEyw7HUxByBCeFVlDkAkZ6coYijVlqG9YCF8kBI3ZhPwZYtDT0xK2ZelysLRUKPNyoMhRg7GWKAo3NuLGDY3I7VuElLZq0BhrJVQJaEtqmyNgjQHk9zeg6NYm3LBuGbK66vm4rLUKKe3V16JJkM3auAIz1i3H1P7FSG2PgbVEBF/JIB83B8Ce2ILMCz%2bD9dzPUXLuGUw7%2bzRkZ34AdnoongI79yPIjh8DawohbWUYuV3zMbl3IaauacCU/sXD%2b6GxxV4w1hnDzG81QbNjFfLXLwHrioOtigut1JdAzx3VYG0R5K5bAu2OLhRtbUXG6nlgq2KDdZNBL9UZw6wtLSjb3onpmxqR2l07PKerRpjcUzuQfvEZuN99Ec73foWCd56F7O2fgA3FWz8Ge/dpsJOPgfXWYcqGZSjd3snnNWdrG3838n2Nn%2b4asBUhMGFVQ2Arg2CNkaSVrgJrEle%2bPQk8O2g8DNYcBGsJDYy1i9z2EUB%2bOCcM1hYdGG9LguS/tx6MgtQVE0ATpufh0FMH1i5mLgWvKcizgaOZfA31Qb6rwZZVggkRqYGspwapu6qF6LTHIbs1BtmWarDeOFgzrWIcrDUOtjoOtobStwaslVaLJhYH64sJeh2ibouIVrHl/JokiLK2EbKGMq2jGrKOGAfjqB4ZSass66pJYMSsTGRAVwysKY60RyKQH40gdX8U8u9EkP7DMDKeDSH9%2b2GkPRRB2sMRyB%2bLIONnIciPRZD2QBTyRwWObGM10p8MQ/640E87FIX8SESQH4kg7bCgK9mgNu3BCNdLuz8qTD45TYdL2fFAsjMeUHAag2IAmuNIOxxB%2bqNRpD8VgeJkEJk/iSDrF2FkvxhG1k8jyPxpBFkvBZHxdBhZ/xpB9nMRZD4fQsaPIpDvjCHzuTDXke%2bJIfuFMLJ%2bFULmv0SR%2bUwY2b8MQ/H7IDJ/HEHWsxFk/VsY2c%2bHkflsGFnPhSHrll5aeHEZZeSqOFK6ajiSn5NXN/GcpDuYc61OIlCJAKxKivgtIbBuWpEgWHsQrCMI1k37KADWQbIqsB46qQNgnZVgHbSX6CyoBOuk8yMscO7wg62i8RBYVwSsPwh2xA/WKZ4BnWGw9gBYd0TQJ560Mu10ntC%2bpb0cEEDnjHTmSODPAaFPutQ2VYptQJATT%2bJze5VC2xkfCICM7/kotNtXofa%2bHWg6th/zDu1EcN9m1N6/Hdbb%2b1B1cCvmHd4Jy%2b19qD%2b0E4F9t6Lmvu1Y9NBuzH9gF%2boO7cDCB%2b%2bAbXc/vHs3IH5gG9ef98BOBO/ZzPWNW3sx7/AuVN%2b3FZEDW%2bDfuwmuPeuw8tg%2bmO9Yjblb21B18Nto%2b6eDqLh7PSL3bklg0cO7YdvTD/fd61D/wA4sPXoXTLf3clnsvtsQOrCZc%2boO70Bg/62oObQdxl09aHhkDxY8eDufB/Hj92/jcnl3nbDgK%2bgM4AGo4lcTCckJGQuKRnU7uvi4954NPEj2O/vhu2cjKvdv4hN33bUWix/ZA8edt0C/sxuevRvg37eR68fuvw2Gnd3w79uEwIFbET90G6IHvw3bnj40PLIblt1rOH/2lhZMWb8Mmu2dcN65FmXbOmHa1cv92OnF71rHZdbdfVyf5jhrSzMce/rhuXs9148e3MIDQQEOH/gWZm5u4nMi3fLbe1G2rQP%2bezZyOzLpSm%2bkDOD3bgih/ZvReGwvlh65kxtoeHg3Fj18B%2b%2b3fOcAgvs3o%2bXxA2h6bB/anrgXNfdvE6O%2bnfdpvHLfJiw/ejcPyLKjd6H58f3ofvIw51O/9tA2rP7eA1hxbC/anziIru8ewvSNNwtpSyd5K6WymO7J1yxP%2bchAP5H2kmxIuktyqc%2b3kLhNpO026AzoqEbO%2biVQrmtA9i0LkdV/E1JX1wttbz1yNiyFcm0DMvoWcDm1JJOvmc/7Kb2CbtrqeRySjZTeOihuWYj8jcsh66nltjKIs2YBMvtu4nqknyi6usTriRdgNMnkgkx85vVAzch9SW9om9BJKrgaKQA8GnFkxp3ItWmR4zIgz23EVK8ZU7xmTPVZkO8p530an%2bTQIddpwGRPOaZ6LQkdaidXCHokm%2ba3YnqlDQVBB6b4LCgIODhmRtx8jOQSd6rHjGk%2bC27wWzHNZ8UNfhsKw27MCDowM%2bxCQaWdtzROckHHiinD8Lh%2bQNCfPpRHc6ooR9Z8D9jqOnEL8BMxhukBO%2baHoogEgjDr9DCWaXhbrtPx1lCmQWWFB/NrahANBGEzmmDS6lCepKMvKUW5VgdDaRmqQ2H0dHRi09q16GptQ3d7B1YsWYo1Xd3o6%2b5BZ0srLHoD5%2btKSmHUaHmfbJr1BvT39KK9qRnLGxYnOB6Hk89D8DmYR%2bNumx3r%2b/rR0dyCmxdLvO4Ez6Q3wDK3DPlhO1hfPdjNPAOEAEwLONC4YAlaVrbCaXNCU6KBUWuEQWPgraZYg6A3iLaVbWhZ0QKX1QldqQ4GrWFAp0QDfZleeNYZYS23otxQDofFgfamdtRW1XKOxWiB1WSFXqMfzBNtEUw6EzxOD5pubkJNtIbr0ZgkH45HPkknXBnGymUrUB2q4s8JHsnnaJEXcSYHIMb3RF61FUX2IhRWFGOWfS6KPRqU%2bLQo8WpR7NWipFKHOQENCr1zUegpxtygFiV%2bHZdz%2bHQocpYkeMSZ69FgbkUZ1ws1xeC8yYs5FaUJ2XA8YUyLORVl0IZMCDfHYa5zoshVMng%2bI/CK3KUwxWwINVXDFLdhjrt0gOfTocxZgkm1drDVUgB64mBLY8j4rhc5X3mgPuuG6qwTqotuqD/zQP2JB%2brLXqjedkJ53ALV76xQvW6H8qQVqveSdK54ofyzY4D3qQjifuBGxqsmZL1uEXQl2Ug8Gv/MC%2bVFN9KPG5F9yoJJn/sGuKPxrniheMuBjJcNUPzRCvUXAzzVJ16ov3BB/qAXrLlO%2bANQCkD6k16ov6mA8j03lG85obpUAdUXXqiueKD60gvlX1xQnLRAccICxes2KI5boDzv5DLVZQ9UX3mhPOuA6qMkHoH6lyqg/C87D2JiXMJIvM89UH3qgfJPdijPOAQ/4%2bFRn97hDfvA/CTZZS/UX7shf2hoAJbFkH6sAqr3HVCcskPxmlVw%2bo6LG1FSe9oBxR9sUP7RxvvK/7ZDSVlxQdBRvUsBGsI7L8rPOaGkoP2ndRBnTN5ZJ5SnbDx4ymTZWLwzDuEdXrdxvQGeC6r37JAf9IC1DMmAjO97of7SLUT8gpgBUvQo2uedyP53E7JfMEDx23Jkv2DkK6D%2b2ndtBhDvcxHUv1QhZM5Ji6Arya6MwqOV/LgCij9YhRf%2bivTH4EnZSsE5YeGLpb7qEzNK4KuvuiF/2DckA5bHkP6oG6oPHTzqNFG%2byhecwooRaBXPktzBt4jynNiSjNp3XFC8OgxPkhOPOEPHx8s7P07e%2baR5XsNzQfWubZgMWFKNjB/4oL5KEbfxg0VFB8tffXyF1f/r506yXzQi%2b3kDFC%2bbkf1LI58EybjON4IOrTDnXRXxVx9Un1RA8ZIZilfMfOUSstF4/%2bPjc1D8zsyzUv030c9oPGmcMuBls5AB/zfAU33th/pvFZAf8YE11YoBoNJweQwZR93I%2bcCOSeecUJ0wQ/ln%2b0C0pZU4I0aW8GZyNgh7j6fdUJ6UJaRPSB4fizc068bNS5rrEJ7qHRvk9w6TAbIf%2biG76gM75UTqRU8iA1TDZcBLZn4e8Gvwm3FmwMtmDvVEM%2bAVMz8HJpQBtD1eGWcGyLpjYMvjKD1qRsP7xVhwugThE8VQn6bD0DX4DHhTjCxFk26B0%2bIeG89eljJgImcAge9l58R40lzPjuMMSOuJgS2rx95/ngF8xPDhCYYPzzDkXXJB8aUPaunEveCE4j/Kkf3rcqEeeNkM1fvuwTfFSLfAh24ofm8VboHPxLt6vLcApfkbNuG2SZzmY9wCtD3o%2bkzcHqPcAqk8A%2brQe2Q2Tl9Iwa9fy8BzxzORe8YOxTsuqJLrgFctvADiL0OHzBs2fuDw6P5l4F4euLNdQha95RRqCLpipbtaqgVG473t5EUX50myUXlJcyUeZcCFcdYBmd/zIu8rF/JO26F%2b2wHVJbewCnRvU0sOT1mFe5kOHqrsKPpUsV0WI/8m8Yap6D6ugPJP9CI2QTdRmY3B%2b6hC8EV7PVk2Go9Xgi6heHpLrCAvJ1eCrmEqwaVCKay84kb26w4oaK9crOAEKkcpdZRvu6D4rRnZv6EtYEX2b8zCqUqp9YmQYhR51QdJPAL1L7p5FUirovqYDtgk%2bUi8z8QCijKHSnMqgvj4GDya63kXFK/ZhCrx8yTZp0KxJ38wuRBaRV9j6StJGCl9QaSsDUHWHYCsNwjZahHU7wtCtj4sYF0IMtJbExysN5QncUmP9AnJstF4EojTHxpePpK/vlF4vQGwVZEhX4Q66VcX8VcaQnsN/3VoEKRfhlqT9SaA6%2bFcL69tDF6H%2bFmskf8wEgfrqRHQKyK5P1GMl/v38ne9c1xdK3wWT2mOIn9BJSZPAPnz/chLwIfJ8/2YPM8/IRuTb6pE3jzf9fue5%2bMtPXP/E7WzMADZUj9YeoNf%2bK6mpe9xo0PQ0cFqMMFuMsNmMsNZboGpvBwGmxUmoxHlGt2Ydrit5G96E/FtFHw7LVbYy83Ct0lTOUwGI/8eOS7f9N1Sr0fKfDdY%2bmI/dHo9DAYD9GPAYDTy/7%2bJVlehq7sLLW2taG5qht5lR1FDHDqrGXq9fkw7ybbIt944Xv0yxOJxdHR2or2jA%2b2dHVjZ2Aidx4kyvxsGnW58tgwGaE1GMQANfmi1Wj5x%2bueh8YB06T%2bxjEajYMwoGNQZDROyUVpWdt2%2bya/RZOJZpzPoeSDHbUOng8YgZgBrrQIFYSKQExb5IG8giOOLfNdl5/p9D8xhoja4nSWV/B8k/h%2b%2bdOuJrWjV/AAAAABJRU5ErkJggg==' /%3e%3c/svg%3e)
Smartdepthsetup - Remove the two boards under that row unit and move them to the next adjacent row unit and repeat the process until all rows have been calibrated.
-
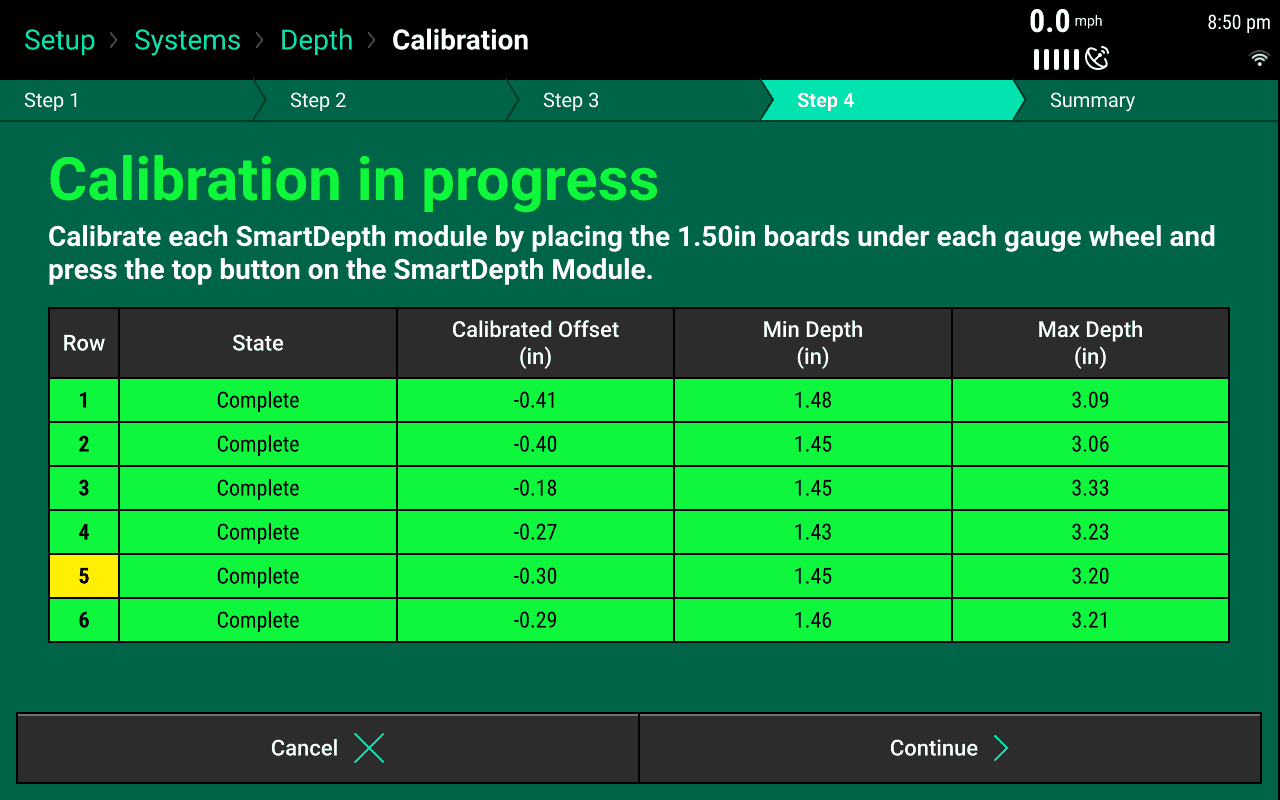
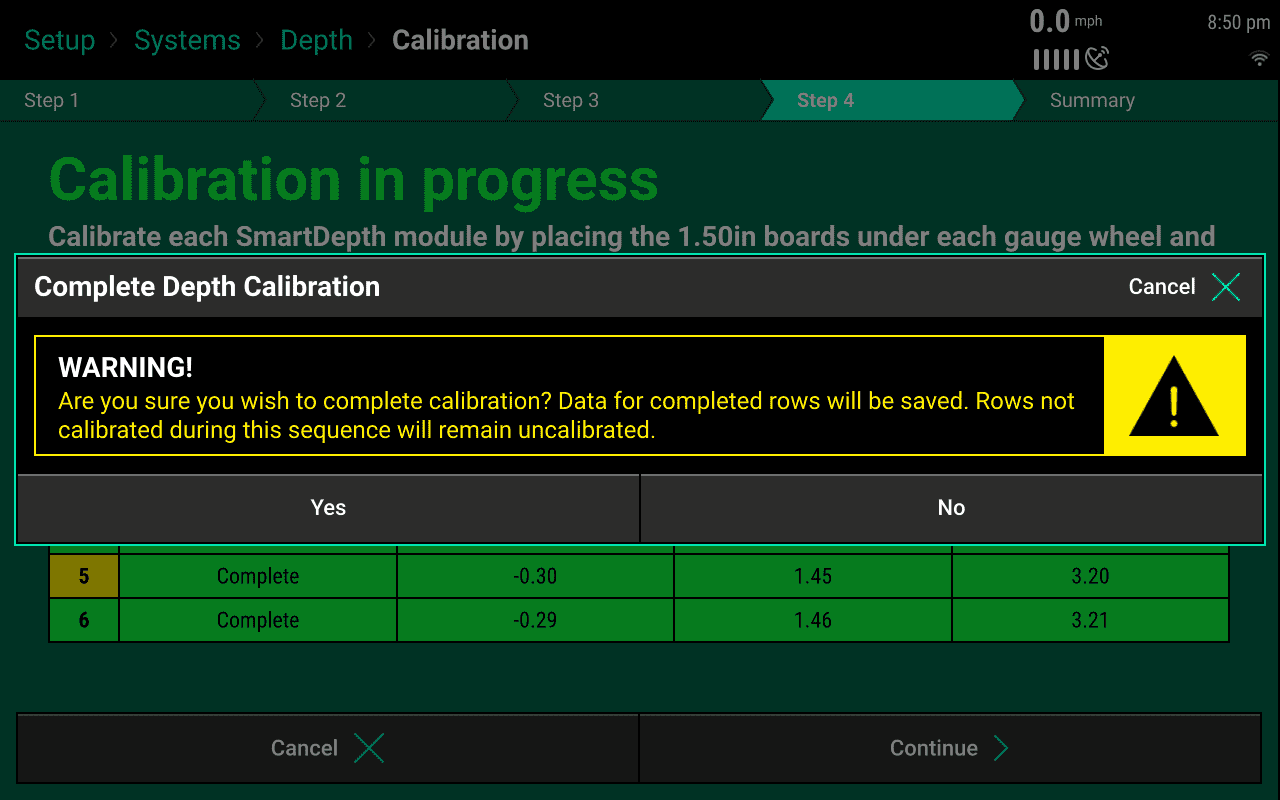
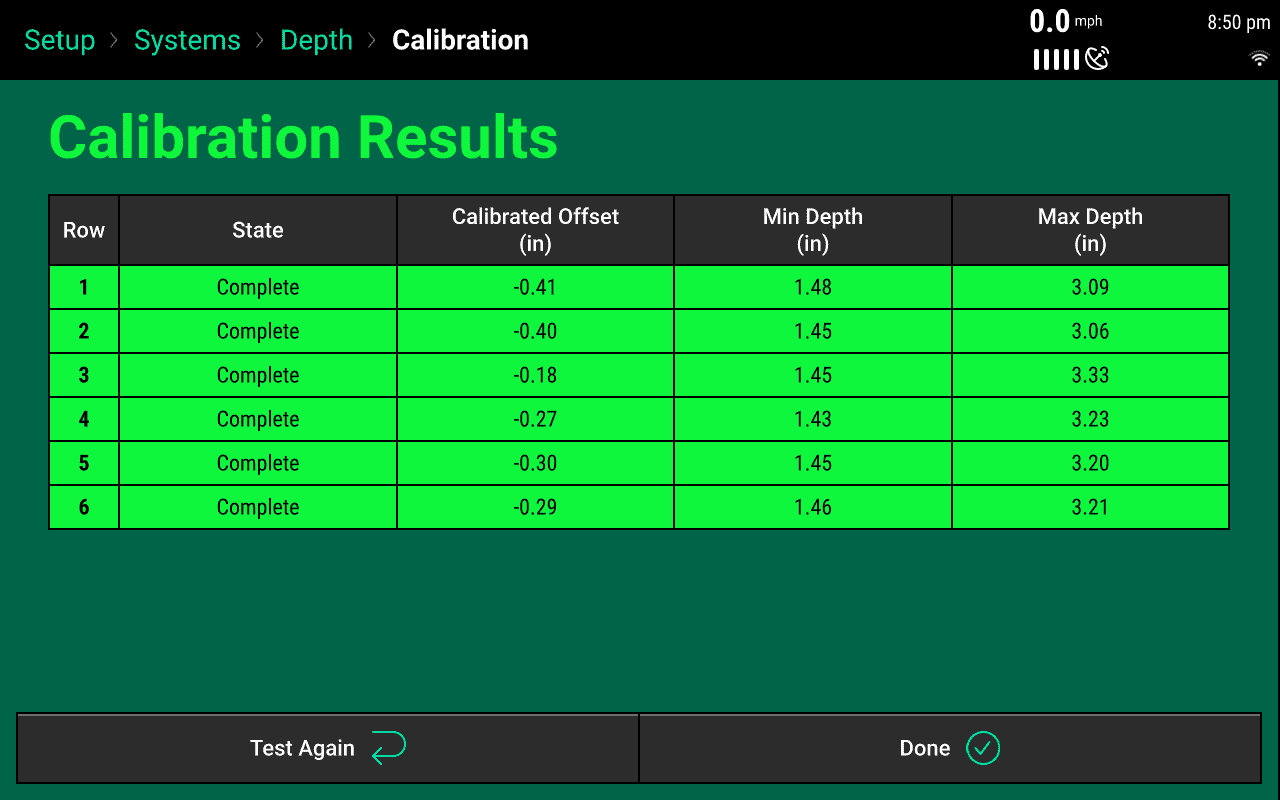
After all of the rows or desired rows have been calibrated and the State Column says Complete press “Continue”. The Calibration Results page will display the calibration state of all the rows.
' width='1280' height='800' xlink:href='data:image/png%3bbase64%2ciVBORw0KGgoAAAANSUhEUgAAAEAAAAAoCAYAAABOzvzpAAAACXBIWXMAAA9hAAAPYQGoP6dpAAAPrElEQVRogdVad3SU15V/I2nUpqBCscAIhJCmjzS9a6o0owYGUQXqQg2JDiGYarCNAWOaMRg73o2TddqJc9b2JrtJds%2be7EkcMHHPbsCUYGJjiI0NLmS92d%2be9973jUZCghEn/%2bwfv/Pe9%2b793fu%2be%2b8r%2bjSEEIL/75BIJKzVarWorKyE0WhETk4OpFLpbbr5%2bfkoLCzEhAkToFAo6BgBmXk/iHY6yIzJIAX5SJVIIMkfB6IqBCmcBKIrAimezOQpaWlIkaZxfcrTTIdkxhRmvHD6NHg8HlTX1CAcicDucCAUCsHr9WLipIl8EsJk/6YBSElhrVqtZgFQqdXIzc0dMQAFBQXQ6XQoKS1Fbl6eEIDiKSCmUhBDMYhqKlKpUXkWiFXNX9JcynXU03gAqENVISROPYi2CJKpk5jxKZMnozISQX1dHaoiEVRVVrLn2poaTCko4JMd68slwRHlRdOno7a6BqFAEA6bHVOn3D%2bqz9xxOcjNyQEh0tShQgkBG0sZJVNpKVw%2bfJxWxd1eKCUB1MaoSANRZIPIMkGy00FkFBn8WZY1DJmQUF0JwUy1CnUNc%2bANB6EuNyJ/ihD09LS4bUm6FCQtFfK8HMhylCCkJYLCtY24f00jcvvnIqWtCnSMtFJUcrQltM1hkEY/8gcaULS%2bCfetWoisrjo2LmmtREp71e1o4rJpa5dgyqpFmDgwD6ntUZCWMPeVCOpjsR/kuY3IvPQTmM//E0rOv4RJ516E5Oz3QM4Mxwsg538AyckTIE1BpC0NIbdrFsb3zsHE5Q2YMDBvZD90bJ4HhHRGMfUbTVBvXYb81fNBumIgy2K8Ffsi6HNHFUhbGLmr5kOztQtFm1qR0VcPsiw6VDcR9KU6o5i2sQWqLZ0oWNeI1O6akTld1XxyL2xF%2bpWX4Lz8C9g/%2bCUmv/8yJBd/BDIcF34IcvlFkNPPgPTWYsKahSjd0snmNWNTG3s36vs2P93VIEuCIDyrQZClAZDGcEKmK0GahMy3J4BVBx0PgTQHQFqCg2PtArd9FFA/jBMCaYsMjrclQPTfWwdCg9QV5aATps8joacWpF2oXBq8pgCrBoZm6mu4D%2bq7CmRhBQiPSDUkPdVI3V7Fo9Meg2R9FJKNVSC9MZBmmsUYSGsMpC8GspyWbzVIK80WnVgMpD/K9ToE3RYBrULL%2bNUJEGRto1QNrbSOKkg6ogyEoWp0JGRZ0lUdx6hVGa%2bArihIUwxpT4UhPR5G6t4IpN8KI/37IWS8HET6d0NIezKMtKNhSJ8JI%2bMnQUhPhJF2OALp05wjWVuF9OdDkD7L%2b2kHI5AeC3P5sTDSDnFd0QZt046EmV7agQiffGKZjlSyyUC0kwxocBoDQgCaY0g7FEb60xGkvxCG7HQAmT8KI%2bunIWT/IoSsH4eR%2beMwsn4dQMaLIWT9YxjZr4SR%2bbMgMn4QhnRbFJmvhJiOdFcU2f8cQtYvg8j8hwgyXwoh%2b%2bchyH4XQOYPw8h6OYysfwkh%2b2chZL4cQtYrIUi6xZfmLy6hFbkshpSuaobE58Tsxp8TdIdybteJByoegGUJEV8RBOmmGQmAtAdAOgIg3XQd%2bUE6qKwSpIfu1H6QzgqQDrqW6F5QAdJJ948Q5zzkA1lGx4MgXWGQgQDIMR9Ip7AHdIZA2v0g3WGuT3liZtrpfkLXLV3Lfg66z4h7jgj27Od9qkvbpgqh9XM55Yl8Zq%2bCt52xwQBI2JqPQLNlGWqe2IqmE3tRf3AbAns2oObAFph39KNy/ybUH9oG045%2b1B3cBv%2be9ah%2bYgvmPrkTsw5vR%2b3BrZhz5CFYdg7As3sNYvs2M/36w9sQeGwD0zds6kX9oe2oemITwvs2wrd7HRy7VmHpiT0of6gPxZvaULn/m2j7u/1wPboa4cc3xjH36E5Ydg3A%2begq1B3eigXHH4FxRy%2bTRZ94EMF9Gxin9tBW%2bPeuR/XBLTBs70HDU7sw%2b8gONg/Kjx3YzOTS7lqe8CV0D2ABqGRHExVSJ9RYQDCq3drFxj2PrWFBsj48AO9ja1Gxdx2buOORlZj31C7YHl4B3bZuuHevgW/PWqYfPfAg9Nu64duzDv596xE7%2bCAi%2b78Jy65%2bNDy1E6adyxl/%2bsYWTFi9EOotnbA/vBKqzZ0wbu9lfqz0xR9ZxWTmnf1Mn85x2sZm2HYNwP3oaqYf2b%2bRBYIGOLTvG5i6oYnNieqW7eiFanMHfI%2btZXYk4pHeSCuAnbtBBPduQOOJ3Vhw7GFmoOHoTsw9%2bhDrt3xrHwJ7N6Dl2X1oemYP2p57HNUHNgtR38L6dLxizzosOv4oC8jC44%2bg%2bdm96H7%2bEOPTfs3Bzej7zmEsObEb7c/tR9e3D6Jg7WJetnQnb6WlLJR74jHLSj482I%2bXvSgbVu6iXOyzJSQsE3G5DdkDOqqQs3o%2b5KsakL1iDrIGHkBqXx1ve%2buQs2YB5CsbkNE/m8lpS2XS5bNYP6WX66b11TOINlJ6ayFbMQf5axdB0lPDbGVQzvLZyOx/gOlR/filq0s4ntgFjE4y8UImPLP7QPXofVFveBvXSbhwNdIAsGjEkBmzI9eiQY5DjzynARM95ZjgKcdErwn57jLWp%2bPjbFrk2vUY7y7DRI8prkPb8S6uR2WTfGYUVFgwOWDDBK8Jk/02hqlhJxujcpE70V2OSV4T7vOZMclrxn0%2bCwpDTkwJ2DA15MDkCitr6TiVcx0zJozAY/p%2brl8wnEfn5CpD1iw3SF%2btsATYjhhFgd%2bKWcEIwv4AyrU6GFRq1pZptazVq9SocLkxq7oaEX8AFoMRRo0WZQk6upJSlGm00JeqUBUMoaejE%2btWrkRXaxu62zuwZP4CLO/qRn93DzpbWmHS6RlfW1IKg1rD%2btRmuU6PgZ5etDc1Y1HDvDjHbbOzeXCfQ3l03GmxYnX/ADqaW7B4nsjrjvOMOj1MxSrkh6wg/XUgi1kF8ABM8tvQOHs%2bWpa2wm6xQ12ihkFjgF6tZy19DngCaFvahpYlLXCY7dCWaqHX6Ifo6FQ6/qw1wFxmRpm%2bDDaTDe1N7aiprGEck8EEs9EMnVo3lCfYojBqjXDb3Wha3ITqSDXTo2OifCQe9Ul1QhUhLF24BFXBSvYc51H5DA3ywvbEAETZmsirMqPIWoRC10xMsxZjpluNEq8GJR4NZno0KPFpMaNChUJ3MQo9M1Hs18TlDF4tiuwlcR7lFLvVKHapGDfYFIX9AQ9muErjspF4fEyDGS4VNEEjQs0xlNfaUeQoGTqfUXhFzlIYoxYEm6pgjFkww1k6yPNqobKXYFyNFaRPDEBPDGRBFBnf9iDnSzeU55xQnLNDccUJ5aduKD9xs1bxgRPyNyxQvG6B4rSF9z92Q3ld0LnhgfwPtkHedQGfeaD4yIWM14zIetvEda/fhcd8eiC/4kT6SQOy3zJh3E3vIPdOvBseyC7YkPEbPWTvmKH8fJCn%2bMQD5ecOSI94QJpr%2bR%2bAYgDSn/dA%2bbULcvqiF%2bxQXHNB8bkHihtuKG56oPizC7J3LJCdNEF22gTZm2YoPhVkn7mh%2bNID%2bTkb04vzKGj/mgvy/7RCcdHOdW8Ksht34FGd627Gk5%2b1QfFFguxOPNr/0An5u1bIqb9E3mceKL9yQvrk8AAsjCL9hAuKD22QvWWF7A0zd/q%2bA/I/2iG/5ID8PRs3etYG%2be%2btkP/BymUCFJcdkJ0exhO55%2b2Qv22B7HdmYSxJ3jkb4zF/ibI78Wj/jA2yNy086EN4Dig%2bsEK63w3SMqwCMr7rgfILJ3d2SagAFj0Pj%2bpVF2SvliP7p3pk/6sRsl%2bVsQzFo5%2bYEcq7KYD2r7l45ZwycXui7E48avcTF2SvmdicqF6cOxqPjn/hYUGQ/bac8ZS3vINVfMMD5S0npEe9wypgURTpTzuhuGqD/JydlTiNIsvURQEX7DyTtKXVQLOTKKNOXxuBl8g9b%2bP9MfOEDCbLo/p0frfxHFBctoxQAfOrkPE9L5S3XKx06MZC17fyv71QfuVlLdsDfl2O7J8beAX8RxmLtvIvgs7XPl45nwm8WwK%2b9kHxsYuVP6uAzwXOrbvw/uJlc2CZfMcC5f/4uP6deOI4Dc6r5ZD/lxXK/x3kKb7yQflXF6THvCBNNUIA6NVwURQZx53I%2bciKceftUJwq52tcjLaYCTHzYvYTZZcc7AVv44kZpxzKvzAGnpjJc2Pl2fheNQJP8b4F0sdHqADJ932Q3PKCvGVH6hX36BXwb8bBPSCpCvDyCqAZecfC1u6YKuBVYS3/dYwV8NskK0DSHQVZFEPp8XI0fDgTs8%2bUIHRqJpRn6GboGLq2aAZpxO9lD0jUT5YnVg7FWPeA95LcA9J6oiAL67D776cAfya4eorg6lmCvGsOyL7wQinsrIqPnHwd/6ac46SJn%2bnJnAL0BHlNPAXcyZ8CtOroS75rYVkc0ylAj9xkToFUVgG16D02HWcupeDf38jAKyczkXvWCtn7DijEM/mCHbLXhQCcMnEHFwUZ1fnT4Lk8eGY7BrlvWiCjZ7poL0keXTa0lOOyO/KEe8BZG7/L0CP9cpL3gMzveJD3pQN5Z6xQXrRBcc2ZcBN0Q3HVySdCb2bv8kmxCmA3LCHy71HeCDe6j12Q/55eTCyDnGR51N954SaYjD/a/5ODLVXaDpGxm6BjhJvgAn4Vlt9wIvttG2R0rVxxMQK77ND2iotFPPtX5WwzZEvgY7pZCjo3PWw90nt/nBfnOnn1vG0ZyrkT71PhAvW6cKOjJczG78KjfyP80QHZWxZWLWzZiLLr/LInPZJ4EVpGv8bSryQhpPQHkLIyCEm3H5LeACR9Amh/eQCSVcGhEOUihvMSudTuyhE4o/FEUM6K4Mjy0fz1Czza3ib3gywLD/si1En/6yL8l4aivZr9d%2bg2iPK43hhwL5x75d1tjh3CZ7FG9o%2bRGEhPNUevgMT%2bWJEs92/l717n2FfDP4unNEeQP7sC48eA/Fk%2b5MXhxfhZPoyv943JxvgHKpBX77133/Ve1tJn5n%2bsdub4IVngA0lv8PHvahr6Pe7O4DpamPVGWI3lsBjLYS8zwVhWBr3FDKPBgDK19q52mK3Eb3pj8W3gvu0mM6xl5fzbpLEMRr2BfY9Myjf9bqnTIWWWEyR9ng9anQ56vR66u0BvMLDf30SqKtHV3YWWtlY0NzVD57CiqCEGrbmc/f5GNwZb1LfOkKy%2bCtFYDB2dnWjv6EB7ZweWNjZC67ZD5XNCr9UmZ0uvh8ZoEALQ4INGo2ETp7%2bySgZUl/4Sy2AwcGMGblBr0I/JRqlKdc%2b%2bqV%2bD0ciqTqvXsUAmbUOrhVovVABprQQNwlggpZjrhbSBQhif670nO/fue3AOY7XB7MyvYD%2bQ%2bD8cQO0EhuDHuAAAAABJRU5ErkJggg==' /%3e%3c/svg%3e)
Smartdepthsetup ' width='1280' height='800' xlink:href='data:image/png%3bbase64%2ciVBORw0KGgoAAAANSUhEUgAAAEAAAAAoCAYAAABOzvzpAAAACXBIWXMAAA9hAAAPYQGoP6dpAAANBUlEQVRogeVaWW8bWXY%2bXCVqsRayWFxFFlncWcVVonbJ2ixZi3e73XYct9vtVe2lnW677e5JgnTS0/Myr3nOQ94CZDKDDpABZgaZIIO8B8ivyEPykgDB4AvOvUWRoihZcqOBRvLw4dyzfOece%2bpWgSySiAj/V6AoChKJBFRVRU9PD%2bx2%2b4EYj8eDoaEh9PX1we12s41Ao6dAyjBoZBA04IGNbZ4ekPcUaKi/5RsehM1uFyDfsOT5hqSPSCSORqPQdR2apiEcDiOuaYiOjaG/v//727zNJqTP5xMD8Pp86O3t7TqAgYEBMahR7yh6PR5rALyBwCjIPyI2LQbgdoJCPrnJoFfG%2bIbkALigdwgUUeRwTsnNDQ4OIqElkE6lRSPJRELoKT2FwYGB7/0EDA8PI8XDj8cRDoVxavDUobG9PT1iSER2Ob19YJvtkELs68qxH%2bNKtaGZpyvsILcL5HKCXI42OLuDY4kw6vMincsiqsXhC6jwDFpDd9hbua2129MLV28PiEoJDE0ZODVZRO94DrZyEmzbh3IbTA1UjMEzkcPwtImBRgHOakraywnBPwD2WXUGGwX0T%2bStOlr3WsUY6NwsnM/eQ/DJDYw%2buY7%2bJ9dAH18G7XbiEujJFdDdbZAZh93Q0FvNoK%2beRd94Dn0Tue512JaLgqiSxKkZE775KjyTeVBVPxqVJKisobeRF5zh2TIc9TSomjycw5uqJDE0U4J3voqBKQO2WupwDjd3aQGOF9cRfn4L4U9uYeD5%2b6CnV7vgCuj5NdC9HVA9hb7JgqjBfY3MlsXeRM%2bdNWo6yIiD5FWNS6Uor6K0Weg8Ae0TZF6J0SWuGzhecNrqHAYe6t6QkrJh1g/D3sm1%2btpDl1qi1ySoEAO1T8S2YE2qrIOmk6CZJKiug0zLVtKlPs7F9BZqlo3jKm2x7ehma9oPO2knxdtOb9cTUJWN2zc12Lc02FYTsO9ocFzW4Lgeh%2bOiBvtZC9saHNfiQto3EiKeQVNJOC5ogsdr%2b3piL5%2bQrG%2b1cgi5YdnPJA5u4KSbeZehcXyxfQDrGhxbCTguaXDdi8N5RYPzhgbnH2hwXrVwJw7HNQ3O9zQ432d/XAzKvpCU%2blUN9tNJuG5qcN6Sw3Nelzn2crJ%2bU4PrhrV%2bX5NXQzS1f%2bM2C%2b16p78z9ijO3ro5AEMMoC1pg5tJgKpxUMVCjZ%2bgvGYf3xJ8/8RB1RiowleP7%2b0YqMp2TXJOs848K99EHLTVtDHXimMfS74vOx6ye88M8YyxdLG2wDF7a8vXjDeb/uZzqpkv1qrFzw1DPAT5BMTgna0guTqH4uYyUmvziK1MI7k2h8BCHdrqDFJn5sWa5djylPBl1heErp%2bZQ3p9QfgjSw0klmegr83J2KUpRJcmoczUhJ5YnUF8eVrYgovjKJxdgjJfxdC0ifjKNMztFYROTyC2PCXqMNLr81AXaiI%2buTaL7MYifHNVERNfnUZ0eRIhyxfl%2bqsz8M1V9vWnLtSFneuKIfNQCjGQfbqAvsUq1LVp5C6cQfr8KtLnVpHcXhIysjEn7edWEFqfRXJnCfq5FaR3VpDYXoK%2bswzz8iaSO8vQtpeQOr%2bKwuUN5C%2btI39pQ9iKl88ifWENxStnhU8/v4rqeztInlsWcWNbiwiszyKxs4zcxXUkdmQe5mUvnhEx7MtcWEPOyssc9nE%2bbWcJ5WvbMK9uoXJtG6WrW4huLohcuYtnRG%2bxrUXkOff2EoYWaxhcmYB9PANyzhqYWJjD3OlFVBrjKE%2bMY2phDjOnF1GbamBpfQ3VyQlMzs9hbuk0phfnxXp18ywqjQkR25ibEet8yUTWLCJjFJGxZM40kDUN5EqGtBtFoXNc05YrmSiUTCu2xZGx7Xna8rbV6hbPvaSLBZTG66hONoSsTIwjO15FfrqBwkQd7qkiyNbIYX3zLJ7u7uLN68/x51/9Gf70T/4YP/nmG3y8%2bxjPnz3FNz/%2bGt98/TWePnmCj%2b7exZdfvBH65y9f4i%2b%2b%2bgpfvH4tuGXThFksomQYAqZAcQ8tO%2btSlrrE7F935mnXjUPjS6aBYj6Lrc11PH54H3c%2b%2bEPcvnEdxuwEsudXUKyW4Z7Ig1wzBuKpNFJ6BloihWy2AF3PQtN0oTPS6Tx0PYOxWAJJPSPA/oTlTyTTQsbjyR8UgqEk1ICOQFAX0q8m4Q/q8Ad0jKUycPHHZKpnMTDshOojDA8RRoYJw6cII7wekrbREYJfIagKwe%2bzoByE%2bkOAv7WenSRsrBBWTxPWlwlrSxIbSwQ17AQZOohqWaghO0aHHEgkIohGFGSzcaT0KJKJMHJZDcHACNwuQk%2bPRK8l27HP5j7oPxTHiT1uPrfVh5vgdhN%2b90sC/oeA/yD8/t%2blFPgvwsVLTlDSGoBPtWGwvxcPH73AzZsf4Natu3j06BkePHiCR4%2bfoz4%2bbX2l7fI1%2bAeMf/xWbhb/Sbh6gfC7fyDgv%2bUQLlx0gnRrAErQgX4PIanZEFCdCAUIwYANqmJDbMyOgGpDwE/weeXRyqQI0XDrqMWihPgYIaPLNd8yvE7rhLEIQdcI2hghqBL0hIzlOM7hG23pSU36E3FCOCi5LBWfzJWIkeiNbZEQQYtJmYzLXHxrsuQYHsCvf04ACD/7a%2bm7d9sayIEBBBwY6CMU87LxskHIpgipJKFUJKSThGpJFuSYiapsmhtl5NKEiklo1AlGXtrGq9LGOstiTm6Wc7OP6zAiYUIhJ8E1uB5zuFYhK/vgfGZBDoE5bGOdwUNq1udh8MVhLg/gt38vrz7bOY5tf/NXBPyesHOubQD%2bkBOeHm7ChuV5GyqmDZN1G6olG4o5G6YnCPmMbJ4b5MI8ALbXyi0bX0VuhBvKWfG8KbY3m56blgOolQgzjVZj3wf%2b7V8I//rPhMk64cYVwuIs4ctP5am4csVlPQOqGXj9hKC/dbxY8tTEraDKdYCPryafss0Ybp6PdlNv8vm2aM/DOTrzst68jfjW4tPBUvHu1w%2bD0oxt5422pHeE8Jc/Jfz2W8Kv/47wq58RfvMLwi//lvBP3xJm52ygtA6yTxaghFSEg14Eg74WAvvXoaAPqipl066qo1CUEQQC3gOxXfN06KrqRTDgRTjkOzFCIS8CgREhD4tRFAl%2bW7xPer3wBgOw1zMg95wJo1qBUTRhmCUYxhFo%2bs0SikUTtVodjckpmKUyDMM8mtslV75QFHhr3Q4UDROlcmWvNuvd4kxTwuiAyfG1KtyTBZB71kSePzbmcjDy%2bT0UjkCxUEAmncbK8rL4aDw3M4NsJiPsR/H258gjl80KFI/JadZmTmN8HI8ePsTM1BRyh9QudkMhL/aaLxlwN/Ig93wJ%2bVoFWbMEvVQWSJXKyJdKB8FXzTQtlJBjyV9kyhxvduccgkKphGyxKFA4KtY8zM5foErvVts0katX4J4qgGxTOTimywhs6jA%2bGkPhTgypGzH0306j78MM%2bu5Y4PXdLPruZdH3kYVO/800%2bm5n9tv3uBba7W/j3bFqdrN/mIHnZgp9nX02c354WL40etdzcM2W5YtXO7/JyepYOt%2bPH78ivLhHePGU0PsyCNcXEbjfhOH%2bIgzXZyE4H/jhvKtI3PPD/Vr6RMyXEbieBeB6FWrZmtyXITjv%2bwVcTfubY/BeSZ5rVxVxB3nBg7wvw3C9CIpeBe9HLZ6o/aMQbGcjoGJS/v5g49dcxTTqm8P4%2bJkNt%2b878f5dJ3p3Q3A9i8D9NAw3yydhuO8F4boTgOtuUKz3fCyfR6Rtt83Wzr0fhPtByLJZvuPwHobgfhza73sbb9eq96iTF4H7kxDsZ6KgUlq%2bLhMvJPNJOC9E4XkdFhvveRqC%2b9MI3J9H4X4VlZJ1buQxJw7KNfuaeB2F%2b%2bMOXpP7GXOZE9zPORYvBPeTkIw7Lu%2bTMNy7ISnbfa%2bi6HkThv1sFGQ23wnW5AAcFzggAufDEFw8rRcRSXppkV9E4OIT8EHAOgUBuD%2bz/AwuxEX/qI3Xzr0fhOthcD/nKB7jU8kTQ/j8mDxePwvD9SAoT1pHzp7XEdg3xtoGUOX35PxGVoNtPA5bg9/WxkD1%2bH6Mx0GNDnTGdON1cuvvwJt4Rx7LA37r7fTea/FK88cC61ea/w8QF3zvhxHd%2bt3N%2btmrdgzUj8Bx%2bJ153oXznWtbt4DNTMCTiaHvBPBkxuBJt9CXGUOfkCfMw/zvWJt1Uf%2bkebIxUH4M5MiNwe/zQfUpx0bQryKkBhBUAwirAfGfHH8wCNXvP34eRYEy6n3n2uFAUPbgV2X9k9T2KfArCmzpiBwA/2eGEyhvAcfw/2/47y/VWg2lchkl04QSDmE4p0MJBkQu5QS5ThbvRVLXUalWUalUBAzDgBINwzsWEZs6bi6f6octYw1Afk1UToTm1EUyK6EocIIcXq/3u9VWVXHqFP/J%2bAyfX5ED4D8L8BBOAjsja8kTcjvzvFPtDrxT7XxM/Db4v6juyEE5exY6AAAAAElFTkSuQmCC' /%3e%3c/svg%3e)
Smartdepthsetup ' width='1280' height='800' xlink:href='data:image/png%3bbase64%2ciVBORw0KGgoAAAANSUhEUgAAAEAAAAAoCAYAAABOzvzpAAAACXBIWXMAAA9hAAAPYQGoP6dpAAAL90lEQVRoge1aaXBb1RW%2bkiU5tiTHW4AsOE4c29qe9l3yIlm77ATs2E68JE5ixwlLaDv8aemfTmf6ozPQmbbQsJTSUmAIFAqB0pnyo4V2yr6UhCWENUAJMDQlCTBpyNc5975ny44jy52kAwM/vjlX55zvnPvOPe/e5/fMGGP4qkOlUnFpsViQTCZht9tRXV0NrVZ7mm9dXR0aGhqwZMkSGI1G0jGwNSvALI1gq5eBLa1DmUoFVd1isNYGsIbzwayrwJqWcbtao4FaqxH%2bxDM3QrV6OQ/e0LgSkUgE2VwOXYkE/IEA4vE4otEozjv/PDEJebLnogAmk4kXoNVkQk1NzZwFWLp0KaxWK5pbWlBTWysXgC7c2QwmrQZruRBlFNRQAeY1iYt0t4A1LQczrxQFUKu5HwtaRSEuFBe3fNkyJBMJ9HR3I5VIIJVM8t/5XA7Lli4Vkz0XHSDLVY2NyGWziHV2wu/zYcXy5WfMWbO4GjXV1WBMWzbTqGLgujKVGM8ma9TCPltfrpnbvzCuTiO4ZxkqnVjpNWYT1vX3IZZKwu5x4YKGFafl5b6aMhhqq6GvrgJjmxNgY0mBoST4b8IIgX4nwbbK9i1JsNGEAI0VjCXAhhJgm5JQb00JbJHlWArqTSnB39w1Hf%2bsokvE39gO1usHWx8EG4yCDXeKuc2Vd1McrC8CxrZnwSayYJdlUPbjFNjODEin/n4a6h%2bkwK7IgI1luY6NZ6H6ToaDbcsKjGfBJrMo%2b1EKqm9nwLbIeoq5Jct1qu%2blp/hcnhNkoJrMQb0zD/WOPFQ7cnxepJ/Ll5F9JE4FSIONZKC9oQuan3VBc00Cutvj0N0dQ/lDndDdFYP2pi5u190WR/neGLS/ikN7fRe0v4nzserKFCoe7%2bAc7c1x4f/LLpRdneCcRQ93cl/NT7vAtqXBxr8EoCIMdcoF2JSB5uoEtLu7oPt1HBV/6YDu1jjKfxdD%2bf0xPuYX8qdOXpzyO2MovyuG8nti0N0Sh/qqpCjaLXEs%2bmMndHfEsGhvDOX3xVB%2bbwy6m2XO3TGR/MtQBOqEISrARGZacWUW7NIc2GU5sJ05sEuzYLuoxeVxoe3yrGijnTKUMffLgl2SA9tFfqTLg30rL7jcLw92SV6MzwTy4cgJ3/n8C3mXFOGRnt8WSgeMp0FF0A50oCIbQkVPGBXdYS4reyKo7I6gcm2Ej7m%2b0LZ2JjhXti3qDkGb8UOT9qEs7UVZygtdNgBdPgBNVugq14anefJYIMx9COX5IMrSHpRlvKjoCU3Z5%2bLRb/LTZLxz89bR9YSg2dApijGkFGB7Bue1u%2bGx2CDZbDC1tMBiMsFmscBqNsNmFtIhSRySxSrrFJi5r6m5hY/Nra1oi0QwsH49to6Nob%2b3D4P9/Vib78amkRGMDo9wnWQVcYjH81Eskxl2qw2bR0exvrcX3bkcNvQPYHRoGD63B5ZW4afkU%2bZJeo/Lha2bx9B30cXoyeexYWAmjx6A7E0tqI17wS7rBtvYCaYap3ZI44K4HxNjW7Bt%2bzj8wQBMZhMkuwSbZOOy1WxCOpPG5bt2YWL7BALBACw2C2yyD0niWCUbLDYrj5HN55DvznNsG9%2bGdRetQ6wrjkw2g0wuK7gKz2adESuVSSHXncfghkFsHB5CJpeBy%2bOGVSI/22k8kk63C9lcFr19vRgYHMCGoY08D%2bfZrLA6JNhNZtQm/eK23Kh0wGQGSyJuuJttcNvdMDeZOKzNFoE1QtparXBLLnjsbkgm25SepK3ZgtZVLbA0mfmY%2bC0rm7HmwiY%2bHurfiGQsgaYVq9Ha2MxtM3hrzNP5mi2c57I4MLJhGJFAGKuWN86dr5C3xoLVy1ch4PZjaGCIS/qt8CwtVkgNLaiJ%2baY7gE1mwIbTqPhhAPUPOVFztxM1t9pRd48bdQ94ULfXI%2bTv3ajb40TNHgdq7nCgdo9T2Aj3e1D/oBe1nOfi/vV7Pah/wMv19fd5UH27hJo9TqGTMRdPicnt97mx%2bDaJ513yB2/RfFO8B72ou9eNxbfaULfHhfpC3l6ajxOLrgqCbc2LByW2IwPWn4LuzgiMCEN/yA/94QAMx8IwfBGF4T8RLvVHQqh42omKP0uoeNSOisccMHxe4IMo9O/6YTheoCOcikL/SQiVz7lQecADw4kIDCdlWzEejY%2bHUfmMC5UvumFAm9CfnIdH%2bvcDqHzKicqDXsE7IdtORGFECNrro2Cj9CDUKXfAhjR0u4Mw/tMHw0E/9I%2b7YHjJC%2bPrfhhek3HQB8MBHwyvynhtps345hl4hNdl/kJ5CmehPJljLNRxnh/GtzzQXh0C25yXCyB3QPldbaj6IgzDi14YPwrBeDyCKrSj6mQbl8Z/h6F/0gX9Iw7oH3VA/5gTVSeiqDrVNu3zXhDGT2XeFxRP1h%2bNQP%2bUC/onXMJXsRXjnWrjc9A/44bhFe/0XIrxFP37Qegfd/IFq0JHAa8dixGB9oa2OTrg%2biCMh%2bUOeNLFkxre9MPwhozCVST5mm%2bm7e3A3DzFrnTPbP18vNm5SuGRv5Jv1jUYD1EHhGd1wEAa5bdHUHUsCP0/PDy48UPRBcZPIkJSVakD/uoQeMzJu8J4jHzCfCUosdI9tOocND4chP45N%2b8C4xGZc3QeHvl8FOJdY9jnQdVnUTGXYjxF/7af5zK87EXV58QLy/YIqj4PQntdFGxTYQEG09DdGILxAx8Mr/igf9YtKn8owINRQaiS%2bhc8ogjPuKF/3i2qS7a3/DC%2bGxDtOoM3zeUr9ZKX%2b3Id2ebjkS9xDsyaSzEejakD9ntEBxTa3grA%2bJ4X2p/M0QG630ZQ9WmQF4DaxfhBUFSNVpnk4SBfCeoQWk3DCx6xmlRdkscjYnOizlF4CveDEPenFTH%2bS%2bYo9jPxyOfDEM/JN7TjBbZivKMRcdHEOziLd0Rco/bayKwOGCgoAO2WswugTGa/R2xm1CH7PNMXM18BPgrxi%2bcrd2QBBfg4JDqA5nOs9ALQ5qh02wzeGQswmIbuphCM7/ugf15e4cL2IXnQJ/TUBXQ/872ixJZ8ww/90y6xaZV6C8itrOQ0vLOAW%2bAVr8hHc3xXvpXmuwXKb4ug6ngQ%2bn1e7jy9Ccqb1ochfgGVD0viGPy7U3RAKZsgcWnfeNY9vSGVsgl%2bHBLdRmf9p7L/fJsgdcY7AVE42gQ/m28TnFSOQeoAeoig44XOXjpCAjC8TisYmHqQEA8a8pj0hKljaQ6ewj3gh%2bFln/AtlcePz1m5SuEdlHn8dlY4AsZD3jmOwfX0IBTG4lN%2bGPY7YfzYz%2b%2bVxQij6lRYyKMBGJ61Q/%2bIFfq/2aB/QkLVyZDsQ5KOSjp2ZJ4MPj4egOE5Owz7HJyj2OblfRYUvFdd3I/8i/K4PixOs/0OGA97ZZ5ip7gB6G6IgI3mwUb5K7EM2OY01N/tgO7GCLS/iEJ7TRjan8vjQlxLiPAWmqGn37uL8Ap9FsorFutMvOvkuc6h1%2b0OQ31lB9i2nPzHkPxGiL/NHc6CjWTlx8TswvGV4OXAtmT4KwA2453gBL0XoLdDBZj9uxgmzzGv2NyKxZjr98Tsl6ITXzOc9lZ44muGbwqQ/qYD2NQtMP4l%2bErz/wZ9mZqY%2bjSWAduRPTvgX4jOUqySc/6PeenL1XAMTL0pgbp17agvEbVr21DbE%2bWyTgaNub0ninplPB8uaudxFpJ7ag4F%2bet72lDfHV1wjLqLO6AaaAPT9bVBMpnhMFthLwJuN1ngsTvhd3ngsTvgluxceiUHJEmCNeyH5HLCYbIUjcXjWaywNLeUlHsaFs7zO93wOlxw2%2byw%2bjywRIOwW4S9lDgO%2brJktUK9NgimW98GC32istlgLQKbJPH/vUmmUpjcsQPr%2b/sxPjGBy6/YxT9FtXSEsCYfhynkE5/UpNLiUe75fBWQr9PlxPbJSWzdthXZ7jxWptrQ1JeB1WHnn75KiUPXarZLcgH62mA2mzmZ/suqFFAAgtPphNPlgs1ihdnthNnlgLXEGJSvpbV1wbmV/NRx/Pugx4nWoHdBfJqjySZ3ABtLgoqwEGhlaHqj0PRG%2bFjXGxVYYJyF5ha8qAw578WRhcfobwcbbMd/AYLbcqIjOWbRAAAAAElFTkSuQmCC' /%3e%3c/svg%3e)
Smartdepthsetup