20|20 Display Upgrade Checklist
Learn how to ensure a smooth transition from a Gen2 20/20 to a Gen3 20|20
Updated March 3, 2021
20|20 Display Upgrade Checklist
When upgrading from a Gen2 20/20 to a Gen3 20|20 it is important to transfer information. It is important that the Gen2 20/20 is on 2020.0.1 software to export the data correctly. To update a Gen2 20/20 to 2020.0.1 software click the link below and update software before proceeding.
Transferring Client / Farm / Field from a Gen2 20/20 to a Gen3 20|20
It is important to note that this transfer only works on Gen3 20|20 2021.1.1 and newer software. Follow these steps to transfer the Client / Farm / Field data from a Gen2 20/20 to a Gen3 20|20:
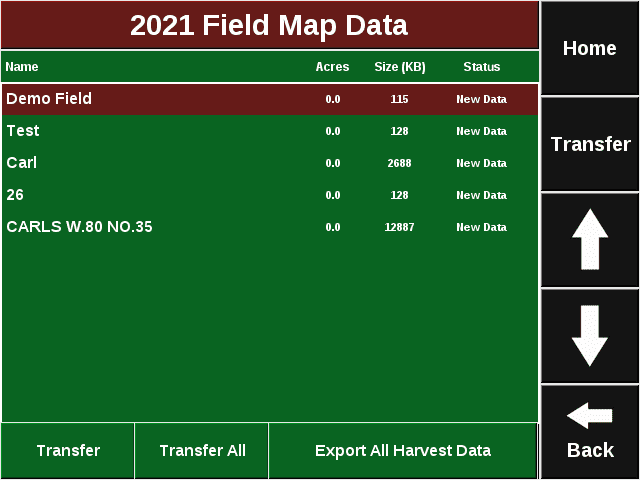
- On a Gen2 20/20 navigate to Setup > Data > Export
- Insert a USB drive into the Gen2 20/20 monitor and click on the Crop Config button.
' width='640' height='480' xlink:href='data:image/png%3bbase64%2ciVBORw0KGgoAAAANSUhEUgAAAEAAAAAwCAIAAAAuKetIAAAACXBIWXMAAAsTAAALEwEAmpwYAAAZG0lEQVRogZV591sbWZquiALlgBIKpZwjEhmhRLDBYHJWqKyABCgQRbJNNBiwwXY7ttt2u8NO6JnpnZ17d/fHvT/t/jF37/489ykJ03T3TI/7e75HT9Wpc96qT3XO9573K9Ker33RbFixW5Zt5k/3JatpXiXP6DVLVlPGoM0YtEsW45LVNKeSp/WaRbMha9JnTfpFsyFn0ufMhrRWtWQx/qpbLNstSyb9amegv7/fZrO5XC7nNXO5XA6Hw%2b/3k3IWY4THQUR8WMj7RAf53Khc%2bgRDNn0eTFK70tyw1tqEy8RRmfgxDG4FfAmVPGMzzxl1s2rFnEGX0mt2em7ElXKQz/30u8AiPlTDwuxWu8NBqa5msVjMa8ZisWg0mlKpJC3bLYiIH5XW4hLRp3hUWgvzOcsNzj8/evghv/qf3//p31%2b9/LeXz//jm6832tv%2bz7ffPIbBf33x7LvD/X99/uwPR/f/19Mn390//P70ZLneCfO5n34jXFqLCXlxV119QwOLxeLz%2bTweT3DNOByOTqcjLZp0KI8bEwmiQv51RwVchM/5SSPhIgFcw47LxM8QeK%2b76wWGno2NPg7NvMDRrFF/OjG619N9eKvnt9tbL3D0sOfm%2bfTUlrv1nt%2bb0ijhGhZeK8BF/J84zONgAt7Pb4TXsHGr2elyMZlMHo/HZrNpNFp1wRgMBofD0Wq1pM0b3UGDBrQaIxZD2Kwvesikm3U55xsbQh9brl9KNdQnXa5RQDytUYzLJZMq2YRSOi6XzBjUMYs5ajGPAeK4uzlk1E4qZZNK2bROOa1RzDU2xJwO0KCFTXrYpIeMuks36Rdam3GHNWTS/eheFkNIr8729jQ2NVEoFBiG8/l8MBhcXV3N5XL9/f1UKpV4A%2bBerGpSRh6XUCYB6pS8%2bFs1KWua6%2bpdHC0fF1OnFFfttCkFeVLqT/f5032UoII2raTPqOhBwhlBNWVa3rcy3jjXWTEprZ6Q0qYVtBklcXVaWT0jH8lNzjU3T4sF0xLhVK1gWiyckYhmZLURmSQDTakTzZRJgDmjZsyois6cUVdNyuD9uLetnUqlut3u4eHh0dFRFEUhCGppaaHT6UQAAthUFVU23%2b0Dsg01SZMk7RTN22kxdVmoljTG1662CVJWXsosSdfxU1Z%2byspJGksmBKWh2ipMIc818lNWdsLAnTVxEoYqXE4a5bGjeu1KmyTtZMX1vJSZM2usmTWyM1ZBlwCt4aDCmpzNvOSwpk36Oa0KkwhTfH6LgU1CZRRUXnXNq1FFKSKRR%2bvqC1OIyWRSCkYuGJPJvJxCEszGmTVOXEQXvtxMvVvPfriz%2bu2uMGWthuTUoGLwIRx/s5L5sJ35sI2%2byqbe5qefJqqmZVRIyYzpbp9GBk7B2OdLG785nLiIVmPKyimxK981doHn/2l//4%2bPkm/z4Wdz82/Xw59n1LeVmKQW5LN3%2b3u%2bWMr97v7%2b%2b7XluFaZEAh8LkkFpqSiSso1p6KqCkSmTTQ2NDSw2WyhUFhcu8KPxuVy9Xo9SQQaSyK1pUFRNayoIlxOhoCyiLg8KC4fF1XCgHjOQUPVZAioAGVkCKhCFWXjovKguCwioSBKMgzQMY1g1loJySogWcmYoCIspaKqKlhuWvEyozoyBFBhZSkuF3Xwo0xOlMNN8AVJoWhWIEyKanEud47BbTfUkEBJRURSfs0rIlJSWAhgDqvVWkWuYjAY9GvGYDAoFIpcLid57g6Y8l77RsCS91nW/ZZ1n3Xd79jqtK0HbCs%2b%2b2aHOe%2b1rgdsGwH7RodtPWDdCNhX/bb1gH2zw5InOlvyPlPeY133m9d9Davd9Vs3iqf6VfclZt5n3e5oWfCFJtrD097gZHtowh0kvD045QEnPL2I17JJ4FvX/VduWw8Y856OreGJ8YnW1lav1%2bu5Zl6v1%2b129/X1kYwbHk7MwE9aeLPmotckTGQEoONqKq6mYko6rqbhakZUw4xq6biGjmuomIqKqRhRDTdhvBrFn7WwE3rbvNe2FmDH9fykhZ%2b8vMSbNdMxNT2urUxqyhLK8llV%2bay6KqUjJ7UVs%2bqKpIYcVzMKyDUf%2bxcBWQm9fc7r8/pkMplarVZdM7VaLZfLXS4XSZJ1loYlZFheCQGVEFAOSmmYBn6R7j0Otu8Mdt2fvH0KeneHXJs3rGuBpu3e%2bq2bN46m429Wmu/cYscM5aC0OJAMyUtBCYDVAQv1pRHxFWDR3TsD1jV/w8aN/uNgYHekY2/Esuxx5jt9O0MtW73dhxOhZ8m2ewPViLICkl0BloBiFVrvdNRRaVQul8vhcNgfjcPhMBgMlUpFAhbrK0AZBVVWI4pqRFEJyXizZvRVFn6xsPrtPvIyk3izHHuzfPKX54H90VsPguFnqcyHraWv7x18f65fdhMroTCWgigrYJky6lJmGisg6RVgNUKsq%2bGHSPTzxcnHsdS79ZVv97DXuc7D8Y6DsdBnSfRlJvxsLvk2//Tfv%2bDEjZUQQEEuActhqQZvJLIQi9g7FMmr%2bPRcLpfNZhNZ6CoAMgxUwgCxiGE5KSgojYjLQWlpuLYclFZAUkHSWgERi7g0JCoJi0ghkTBpo6KqSkhWBct/OQAKoigHpXRcUwUD5aCkLCIuKcASyAS4jMgZoESQtP541GUADfUN1RSKy%2bVqa2uTy%2bV6vR4AAKlU%2bkMAlSDxELyEWZC0smN6dlTPn7UIklZuwiRdcHHjxpo4MdfZMYMoZdMutUnnndIFJw1TC5PWmoSJFdP/cgBkGODGjYJZCyum58QNwpRVkWnkxAy1cw5ewkzHNZy4gbhd3EiGAcrPAmhqaCwrK4tEIqlUamdn5/j4%2bPDwsKenh0qlEmkUWKwv5E2Ja/PG/PuNkUdI5%2bF41%2bHE/PvN0XNs7t166LMU9CINvVjoOwk51jtHL7D59xvDjxDjiufG0dStB8Glr%2b9pFluJxYAAPw%2bAgipLI2J7viP2ZnnkHO0/Dfv2hiPP55NfrE09iaOvcu6dAejFQuhZsn1nsCRcS0VVPwmg3lVPp9OVSqVOp9NoNNqCiUQiFov1wxsoTCG5dME58gi99SDYeTg%2b/jg6co4OnIFdhxOB/dGe4xn4RXrwDHLfG%2bg8GENeZoYeIv79kb6TsG6xjYFrqxHF33sDVFRZFhG37wxOPYl7doc6DsZ6j2fGz/Hxi%2bj8%2b/WpJ/Ge45nBM4gTM5Bh4OdTqMjExUl/ZTU1NZdTSJJzlkYkZEReBkq4CVPPg5m2nduWNb97d8C3P%2bzdHzav%2bRwbnZ33J1xbN3oezIycI3WbXUOP4PbdwYbtHt/%2bMDOqLQWJPFYKSeR4nTxTXwqKyYi8srCoKmGAjMhLImJlrqnraMK9O9h091bTnV7zmq/raLLriIC9fQYOPYKrUQWRgq5GwfISSKzCfikLqdVqknHJzYF1fNzEw4xcVE8Jy2mgkgFpaKCKFlFSI0omrGFAampYQQOVbETHgNR0UFUdBmigkg6qqBEFFzXwMBMfM7JRnSXhtuQ8bERbBLxyPm5iwVpKAYQOquigigFpKBFFsYWNaOmgqobAuTYEM7FQrT3h8Xq8EolEqVQqrplSqZTJZHV1dSTvvSFTpt226LfmfLacz77oty36LVmvNee15XyWrNeS9VizxLEt57fmvJas17bou97Zliue%2bo3Z9sDqUODOsDHTXuhMtFuyXnOm3ZxpJ3By3kIjAWItuK2Ac9mS85oznuKoK8DOlX/ExLVZBylcWwHLyiHpldOjGhqurkYUzJiOFdPTcHUVKieWKSxjRLWVMEDBlJWwrAyUXA2pgGQksFaG2WVpJykiKgKWQZJqVMGM6pgxHSOmpUcvWZwVJzDpUQ0ZkZdDUjICMKKaClhGxVTlkKQMknwEFClQp91mr6quYjKZjGvGZDKpVKpCoSDJFxsqIYCKqQobQIINeLPmzJfbc%2b83lr/e2f7dg/Dzufv//OTudyeH3z8eeYTOvVvPfnVn74%2bP0l9uMaLE2r3aPFYigCpWr8o2VcIyKqqi4WpSSHjrJLT%2bm8Pt3z%2bIPJ/LfNjO/9P%2bwZ/OV77ZnbiInv/vV7t/fLjx2/udh%2bPrvznc%2bt3Rzh/Oxs7xCoiI5HI3GiV4gM1mCwQC/jUTCASXu9GfMHEVLGdEtUC6Xr/U5ljvtOUD8kyDccXjWO8cOUcNy%2b36Zbdlzde43ePavEHHNdeTxk%2byEAVRVkIy8bzDsOy2rQVU2SbZgsu2FnBtdptXvYpMo2nF27TdO3gGyRZc1rWAc7PLudltXPFUIfKfpNGipKy5ZkWF%2bSMmvnqUsoiYNMMnTdeUzvBJIUFJSEiariFNckkTrLKQoGSGT5rikqY4pCluSUhU9fcDuGKx0oiYQJjhEx4UkGZ4hd8C8hSHNMEu3I5LmuKWhoRloPTnPPArAqiEgM6Dcf/%2bqGd3qG6jq%2blOr2O9s/OQaLlxNOXeGeg7Cfn3R4ot7p0BCqq8%2bsN%2bHgAFVZJCQnmm4fZppHG7x7M71L4zePs0Etgfbdi62XK3r%2b8kHDgY8%2b4OF9lGPOeohC4f5lcHUHzj6lxL30m4/yQydoF7CzEMPoTHzrH%2b08jQQ7j7/uTwQ7j3wczYBTZ4BnXdn%2bDEDL%2bwFyLDgCLTaF0L3D4FizRsWfN1HIxNPI7690db7/WHn8/NPJ0NHIyNXWA3jqbMqz4api7uJj41gKtFTEVVZBgYegiHPktOPo7Nv9/AXuXGL/COg/GZp7PYq%2bzQGTz9dDbxxQryMt1/Ghk9x3If7kw9iX9MAD9exAXAShgYfojAL9KTj6Pz7zeQl5nxi2jn4UTw6Sz%2benH0HBu/iMbfLKMvM7dPI%2bMX%2bMo3u9NPEkVt%2bamL%2bHoarYBlpZFaCqYsplEqrlZkGysRgNA3UQ0FU1WjChquEs3b6VENPaphxLQ0XP0LabQIWI0pioC0ImCBmwuASgqmpOEq4ZyNAMQ1jEK3a4CfkEa924Omebct47OmvbaMz571W9Pe4rE17TXNu%2b0Zny3js6Q91ozXliYazQvtxVPCP/a0pX3GBXdgeTCwNWycdxd7Fq9a0h7Lgoc4zXhNC5eAxVNbwc0L7da017LgsaQ9xeMrwM6lfygpV9s5mJ4fM/HjZiaioUJKOqKmwaoqEGChWiaqpcEqOqxmIBoaoiIcJpyFaqmQsgqU02AVE9XyYiZ%2bzMyO6i3Jdsuyl43r%2bDEzL2a6cn7MTCAQnTU0WMlEtXREzSgcUyAFHVGzCiA/GcKK6uyzXq/HK5VKVSqV8pqpVCoAAJxO5%2bVmrgpVkMIix0an/2C0futm673bsTfL5jWffT3QvjvYeKfXmve33rvdcq/fvTPg2R3ULrV1Ho6PXmDevSFL3l8By37YzKX/xmauNCKu2%2bjy7Y84Njq9%2b8PGVU/z3b66za6We/3gi4XRC0yVa76%2bk7u%2bmasjNnO06zu5H23mittpGqYqCdcGDsaSb9cmH8cW3m/u/vGhd2/YuzcUfpaaeZoYO8ewV9nJJ/GTv3x2%2bpfn/v2R0LNU7qu7x39%2bGnqWInLfLygyVFkOSvx7I%2bHPUt2Hk8d/ftp/Eu4%2bnBw4g2bfrua%2bunP39w%2bwV7myiPhvKrJPTaNViLwsQlR7SiNiosITri2PSIo1otJCO6EwI2JmVMeJ6wvKUEIKCuiYmoapC0rq7wZA5FOirCStJNSjhI6pCSVJuIwACYmoqEqQtFwXA78ugEpQVo0o6Jhat9RKCMiEiR3TS%2bbqiEpJzKDMNhXVJiduKDojquXEDdy4UTrvrJ1zMHBNUUb9zQCKl/gJszBpY8f0zKgWWKhXZZtr5%2bzieUdBYdo4cQMzqqUUpA/lbymyfxQAUcmQ1c450h%2b2Bs9A6MXCrQehrvuTE4%2bj%2bOvF3Fd3nRtdN4%2bmh86gsXNs6kl86kli4cvNwTPo9mkk/sVy9sN2kUF/FEChslAFE0UA0hTXvt4Zf7My8gghGPdgNPx8DnqxMH6B12/13DyeHnoIxT5fYsf0pBl%2baUh4xYy/4g1QEII7Wu/2x9%2bsTD2Nm1d9A2fgrQdB/HVu4CzSdq/fuzc89TQ%2b8zTRdxLqvj%2bZeLNCyMILfPQcbbnTR4blP59ClRBQkzAR/0VhmzB%2bgfefhgbOwPbdQc/OYN9JKPxsbuJx1Lc/EtgfXXi/OXAGuncGbh5Nf1T3nxaAJOcsK0jKShhwbHTefDDdfPeWcdXTfTTp2Rvy7g979obs6x329Y72vUHv/nDT3V7dctut01Dbzu3ek6DvYESRbST29D%2bTlGWghDdrvnUacu8OWPIFjXow4t0fseb9dZtdHffHXVs3bh5PDT%2bCnZvdAw9Bz95Q451e3/4IJ24sA6U/SMo6J51OL0rKK%2bNyuUwmsyApl9s5iJ4fNfNwE7Mg8%2bigigVrqREloSpB4pcBaRhwQWSCKjqkYiFaFqKlgSpKRE6NEDqTh5v4uJmN6S2z7ZZFLxvV8XECkIsZKBEFDVQxC8OpBFpRo2qK%2bBxUx4Q0dFBdTUhZFR1S00AVFzMUAVmYzp7wutvcIpEIAADZNQMAQCwW2%2b32SyY2z7dbFjy2tI%2bgyQIpFn%2bLjEh4xmsvkCtBq%2bliT3%2bRUIsMStB2kYk3C0xcuGReaC/yrmnebUl7iSGXDF1AzlwOLx4XTi85u/gwP2Fir9fr8/m8Ho/3OhOLcg4SWMtJGqtwZQUiq0BlZFTOTOjJmIIR11Kj6mJjOSItR6T0uIYe11RHleWIrBSWVKCyalzBSOgqUFkVCpBgkRS3SzNOEiQqQ6QVqIwe05QjskpMLlyw0eOaEqi2ApWSMQX9I3IlCjASumpcWYkC5aiMGlVxksYyWELG5GWIlASL5LjTWeek0Wk1NTV0Op1MJtPpdBqNxmazL6eQJOOsiZtO/uVZ6LNU8ou11Nv81OP47h/O7n53svbtfubLrY3fHN48mk68Wdn57iz74c70k8TOH86Wv9kJfZbCXy1mvtw%2b%2bv7J8tc76IsMJ26QY051tpkME1nfvOpDX2ayH7aXv9658/sH2789Wvz6Hv56cfnrnYM/nc%2b/W98siMnQZynsVW7pq3sL7zaXv945%2b5fnS1/dk8zVVUHySgTQFhYxi83icDg2m21lZaW5ubnO6SyWFolPTNKci4Io5ekGIF1vXfNb1wLqXItr80bP8bR2qdWaD9jyHUC63rHe6drsNq14FJlG50a3Zc1Xt9FpWPFY1vwNWzdt%2bUDjdi89qpHjdcpsYwUkq0Lk7Jhes9hiIxAC8nRD7/HM7dOIccVjXvU5CVXps%2bc7pfNOQcqqyjXXbXTa8x2WNb951Vu30V2NKImK6sfaKI1GU2vU//Wf//XXv/71v//vf//P//ufvlt9ZDL5ShMTHFkeEZeGawtlVwlRvg0KSgqnJWFRaURcEhKRgsLSsLiscPWyvXBAyM5wbSUoLYckymi9MttYBkouv/SAEqIYHBKWRSQFBEFJSFRKDCkMDIvKQUkFKCWuBgWFirKkeLVYMy6DJVdptKampqOj4%2bmTJ1NTU8PDwxqNhsFgEG%2bgGAAD14rnHOyYviZhYuBayXydItMoTNpq4iZu3ChM2oRJK9Ehqi9%2bfSC%2bicyaRSm7KGWXzjs5MQMNVRd4oF6ermdGtcKklYlrOXGjKGUD0g3cwgEvYRbPEwRfKOWa%2bLMWftIiLFSU1blmda6Fhqm5CRM/aZHMExO7GlOo8YZ6Vz2jwANUKrW0tLSsrKy8vPyHj3zAYn1ZWMyJGxJfrESezd16EGy92598m/ftjYxd4NDLNPZ6ceAMjH6%2bhL7KdB6OTz9NhJ4lRx9hfSch9FUWfLGQekd8yWPgmjJIoo41SOYcplVv8m0%2b9CzVdxK6eTQVe7NcoPYJ7HUu%2b2F75CEaeT6HvCI%2bC3QejgcORqeexONvVrDXufGLaM/xzNz79eTbfPT1kinvBWBHU0NjdXV1U3PzwsJCf39/T08PjuN2u51GoxFvQL5YTwZlVFRJQ1VE8fkROvIQ6b4/efsk4t8bHTyDZ57ODpxG/HsjN4%2bmU%2b/yY%2beYI985/BBuuds3dAbnvrrTeTBOhgEaISBlqqhLlWkkQ0DhFVn6T8L2fMfgKTT5ONa%2bOzBxEe09nhl6CE8/TTRt97o2b/j3R1Lv8uMX0ZtHU0NnEPIy03s8031/khMzcKJ6Mgpo8YbGhgYKhdLU1LS4uLi8vJwoWGtr62V5XbzoLAUlVZiCFBHqVtw3Hky79waMax7//VHfwUjzTp97b/Dmg2n/4ah2ubVtb6DjaFyz1NK%2bP2hZ99dv3%2bw5CRpW20kRYRWqKIUlAF4HZOpLIHE5LC2HpS07/frV9oY7PSMXmHtvsGWnz7Dmabp3q/t40pT31m11O7e7x55EfYejjq2uuq1u/%2bFoy06/Oe8ncjcsK0HESryoB6hFAqbRaCwWi06ns9nsy09MzmyHJGKVIw45UicKm7kzWl7QIAqbeEE9L6jnhwz8oKFmRlcLWmojFl5QXxPUiSJmXlAvDJsEISN3RisKm%2bRIHQA7xKC1IR5oyHSJQUuxhR/SiyJmfugSihfUi8ImftDAndEKwyZhyCgoNPKDBgFxbCwc6wVhIwA75HBdLWRpincGAgGFQlH8OKDT6bRara5gKpWqsbHx/wPWihPSRkT/mQAAAABJRU5ErkJggg==' /%3e%3c/svg%3e)
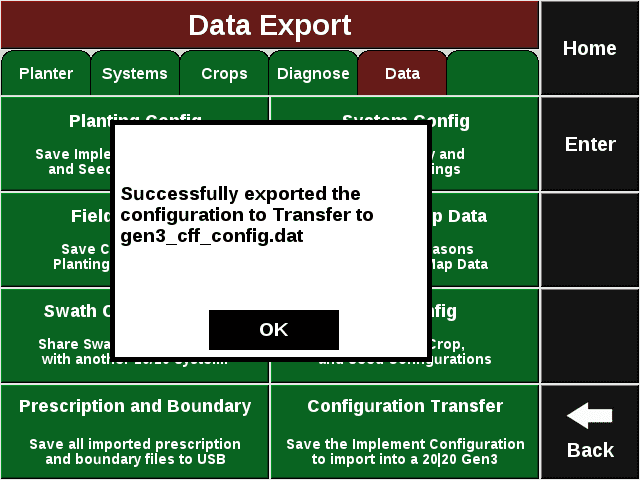
Display Checklist - Type in a Planter Name that represents the Client / Farm / Field Configuration that you are exporting from. For this example we will use "Export to Gen3".
- Ensure that the second popup says "Successfully exported the configuration to Planter Name_cff_config.dat"
' width='640' height='480' xlink:href='data:image/png%3bbase64%2ciVBORw0KGgoAAAANSUhEUgAAAEAAAAAwCAIAAAAuKetIAAAACXBIWXMAAAsTAAALEwEAmpwYAAAYJklEQVRogbVZd3BU17lf1e299967Vl1I2l1JCAkkRBGqW%2b/2VV1pVVcNocKqIboB0YsxFiBB/JI4yfP7w8kkzvNkPOM4BCeAbYyNYx42ocQ21pvdlRUFxwmeiX/zzc453z17zv3dc85XzgGNGfI6FNJujbJLrXh%2b6VTJW/icNomwUyVvk4rapKJOpaxTJW/mcwISYYdC2i6XtMslHQppUC4JKqQBEb9TKfteQ3RplJ1ySU9RQXl5uVqtTk1N1a1CamqqVqs1Go2goFJmJeIcVBJAIT6n2Eh4D4d5wOUYMOS7GLTurPTenEw3i%2b5h0fcDtsECg5/PaVMrmmXiBgG3WSpukghHStf5eBwbCf/8owBUkp2AcWlUGq0WBoViMBj0KmAwGAQCwePxQF0apYNK8jBpbgb1ecTDpAEkXFe67r/27D4X6vnfH139xdG5n88d/uVL5/vz1vzqwkv7AdvPjhxaCI//7PChxcmJnx48sDAR/tGuma40HUDCP/9AbibNRSH6UlPS0tMxGAyJRCISieRVwOFwYrEY1CEXO4l4L5XsoZBWi5OMd5BwzygjQiUDBKyPRT/kAMaK1x5xOWe3Ve431x9xO9tlkl3VlWOlxeENpReHBo%2b4neHSkr11tYO5OTuM%2biYhDyBg3DSym0p6RgAizkUmfnsgNwHrVil0qaloNJpIJGKxWAQCAY0ChULhcDiRSAQaWFdskgptKplVKbUoJDExy8UNqbqWjHTzN5rVj5rS0xpTUyvZ9Doht4rDqOGzqnnMKg6jXirwKhUepWIbm%2b7LzTLLRDU8Vg2PVSfm1Qm5zRnpXp3WJhUBcgkgl9hl4mWRS1pzstxalVku/oexlFKzRNC%2bvjQjMxMGgwEAEAqFTCZTT09PMBgsLy%2bHw%2bGRGbCNeSE1LHAVA1bDhtdyYr%2bQGlZm89r1HZWJVXR4LXdFj6jlgmuYxkCZMVAGM3ERdTxkPR9pigjKJIDVccq6qzKai5JqmNBqJqKOi6jnRZ7W8aD1nK3BmuasrDo6uY5BqaWR6%2biUega1nkWzshht9lqBPwtWw0bXC1D1/Jig6wWQGhYw7tOvyYPD4bm5uVu2bKmsrHQ6nXa7PTs7G4lERgiQATnEw8saLmO3pxMa5YyAjtqiQXgFCWYaaBtJ1LOG3KQiNikYgRRSk4rUpMI1yuKqyfFmGsTF5QQzSE0qrF%2bKb5Dj/FKImwOqJGI9ElH3GkZAh/FJiE0KXIOM0CDDtqnIa8lOAs5JIQTVik6tKiCXNIv4LgaliUTKlmJBThbMyYGsEqiTG%2b9gcDwpadElhEajYVGAo0Cj0ctLiOFS4xpk1fs8rWcHmk73tZ/b3nNhlNKkgto5cBN3027Ad6K77dxQ27kh59H2plOhuoN%2bSB0LbuehveKNu6wVu2ze45398%2bHqfR6oi5dcS08Nrd22zx16eXz8yp7GUyHLoeaWU32W422CjTwXg2YjYUfLS092Bi9NjJ/p7fKJeH4y2ZDKSHLx4E4ebJXAnfwkB0vkz0hPT8disRQKJbZ3Kd8Aj8dLJBIQ1SaLs9LiTVQowIVEhAO2sxOs9EQTPbGKmgyw6c1ahFMAtrOTbCywnQ1xchOqqIkmeoKVAXPwwAAb6RKSG1TJdlaSnRW3jZxkYcKdfAjAkXfr0R4x2M6GA7x4N4daSPKgcR4c3k8iN1KoDWRKI5XmxuObUfg8KQFkYyRZGYmrJMnKBFkobJdWpVJBwBAUCoVcBRQKBYPBOBwOKH%2b4Qh7Sa/oLlCGDss%2bo7DOo%2bozawSJ1X4G626AZKFSE9Kq%2bAnV/gaa/UN1XoOov0PQY1X0FmoFCZSjSWBkyyEP5qj6jos%2bQ3lOcNrguVpX05C73GTKohgqzWw3m6jxLnd5Uk2euzjVFJM9Um2%2brzl/v0CsHIv2r%2bowrou4rkIXyCwe3VFdV5%2bTk6PX6/FXQ6/W5ubllZWUgWX8%2bzislNSqJDYqYEPxysIONdAvgbgHcycM1SAnNCkKznNCswDfJidFffJOc0KQgt6qpAU1MaAEtoVWh6yjUDRUTWhS0gJYW0K48xTfJ8K1KZFAJC8gQ7Qp4mxwVVMWqSY1CsE%2bAcguRbiHhm3cgNihIDUqMX6Jp1hv0BhaLJRAI%2bKsgEAg4HE5qaiqI0a6LtzDAACfZzk62sxNtTIRLCBwJrJ8y5Y5UrJuszeoqoVoVZLOUUi9iABpcvYjvSi0MbaHalAnlOFAxGLQOGhUYqDgZvYGO3sYErU2OVJf1EeE4U9C1PJJJLPNlM6xKriMFXc0h14vFvszM/tLicLX5hcY1OyqgDl6SnRV7E7CdE2ej851pOm0KHAHH4/E4HA77DXA4HAqF4vP5IHZHWpKNBXPyoA4u1MFNtrOIDQrn0Xb7kdb%2byxOVE0BVTfX%2b/fvDE%2bHw1MT0zHR4cmLXzMy%2b3XunpiaHx0cGRocGR7evyPbR4e1jw6s1MZmemQlPhiemJnfP7p6anpqZmRkLj8/u2e31eDaHTMCJ9saTvQd/cRLnkyXb2TBH5GVgDl4iwBS6MyJWCBOJHWLOK/b2eDwei8VGrNAKATDATgbYkU0McEAmcryVBnXzQIUJAzuGlpaWvvjyi6X/KL766qulpaVLly6BCtCJTlailUFuVK18x9UE0tPSoTBYamrqmjVrOByORCJhs9lMJvPvBJJtLAjAIfoV5EYV1ivBeiSkBiW5QUVp1UCqmP3DA0tLS48eP/7yP4onT54sLS1duHAhqYSMb1ZQGlV4nwwMsGHfIpCZnpGQkGC1WpuamkZGRqampsLhcGlpKRwOj5hRdkda1G4yUgfWtZzp37rHURSuWhuubjnTX3e4oXIMCE9MLC0tffnllz/EDCxeXqRXyT2nu0wHG/NGNsVZaHAn/xkCaalpSCSSx%2bOJxWKhUCiKgkqlYjCYv89AdAlxmK26rXucG6ZNReGqqn2e%2bsON2lbjyPjIdy2hr6N4%2bvTpv3jRWJuvv/76nxJYuLyQ419Xsc9eMWPDeaVggP3tJRTzxLFFvwICgbC8hBhBXbyVAXZwEmwMvF9eOl2/ZmSjste4ZqSieKZW5MscHtsRJfCDzMDlS5eE5tTNB52bdwNQJzdigqJbMRlggwFOnJ3Od/0rKyQQCECyzlwcICa55USXDO%2bUwCwchI2HsgsRNj7GJQatRQyODH14%2b8OPP/74yZMnj6L4/PPPHz169Je//OWdd965d%2b/er3/968dRPHjw4NGjRw8fPvzrX//66aeffvLJJ/fv379x48af//znGzduPHr0aPVcxQjMz8/HFeDxXinSyic4pUSXbEVILjnGKdL48/X5egaDwePxuKvA4/FYLFZKSgpIv2OzvC1P3WFUBQ3qoEHTYVR3GJXtelVQn9q7llwrHRgePP/i%2bb1794bD4eNRTExM7Nq1q7%2b/PxgMHjt2rL29fX5%2b/urVq%2bPj46FQ6ODBg6Ojo7t37x4YGOjs7Dx%2b/Pjhw4c7OzuHhoYeP34cW1SrCTC3yLW9hcq2yIiKtnxV0BATddAoa88r6v53npjWrgVZaEkAK9HOXBGkR4hwCVB%2bMagMPbBjcGlp6c5HH92/f//NN9986623njx5cv/%2b/U8%2b%2beTzzz9/%2b%2b23b9%2b%2bff369YcPH3700UfXr1//zW9%2bc%2b3atSdPnnz66af37t27cePGhx9%2b%2bODBgzt37jx8%2bHBlElYIgIowEC8X5RYmASy4i59oZyTYGYl2ZpKdBbJRuU6dRq2BQCFoNBq1Cmg0Gg6Hc7lcEKcjPdnOhrv40QAw4g2IDYq2s0PNp/uGFqcs0w39QwNXFq8cPHhwbm6uubk5FApNTU3t2bPnwoULw8PDDQ0NU1NTx48ff%2b2110Kh0Ouvv/7GG29cvHhxcnIyHA5PT0/39PSMjIycPXv2lVdeGR8f/93vfre0tPT06dOVPVA/6Nqwx9L38s7BS5Mji7Pb9rqT7BEmy9GoJ%2bIHsFgsmUwmrQKZTF6ORp/xxBCAg/KI2IE0ceeajB3riRbp8Ojw0tdLt2/fvnv37s2bN3/729/%2b6le/euedd1577bX33nvv/ffff%2b%2b99%2b7du/fuu%2b%2b%2b8cYbDx48%2bOyzz27evPnBBx/cunXr448/vnPnzt27d%2b/du/f48eM7d%2b48evToH6zQpctZvrW8rixVj1E3sFY3UCzrzoc4OM%2bY0VhKSViFWIb5D554xX4lWOmgehKojpBsp4HWJnb195w9czYcDp88eXJqaurVV1%2b9d%2b/e3NxcZ2fn3bt3X3nllcXFxb179wYCgZmZmRMnTpw5c6a3t3d0dPTatWsrK/67rND8/DwoNzneRomrJYBq8fFmSoKN%2bW0/8D0IJNvZRTurjOOV%2baObM3as57p1gzuG/ue/X3v9l6/funXr3Xffff/99z/44IObN2/euXPn9u3bN27cuHXr1rVr165fv37t2rWLFy%2b%2b/fbbv//9799666379%2b//WwLnL7ykceQVTlWv3VldMF5Jb9Ym25df5nsTgDl4yXaWIJhdNmMpn7FW7nUVTVUzHZof1A9cunixoLWiZLa%2bcq9r3WStoseAcAli0cTzEljZxHAnHwywN%2b8GzC801uz3tpzu957qKh2s2TkRjhD44osVnxr7qP%2b0/Eybf0vg6uLVwtYK/9me8mlL1T5390ujdQf8sdzyeTfxajOaBLDirTSYixcxo24BplGKqOV8MwM/SDQ6Pz8fv45AC6YgowkNKjpuzJQ/rxnVD22St%2bSq2wyqgF7dZtC0G1UBfaQcMOi6igiVwu0jwz8oAcYmmbrTqGrVK1vzlYF8RWveygvIWnOLOv9tStmTh3NJSF45yadAO4RwOw/pECAAPsTKJjbIQaWowZEfMB%2bYn5%2bPK8SjvSKMU0T0ylcLyavAeMSaBr0%2bX89kMvl8Pm8V%2bHw%2bm83W6XTLwRzEyQVZqNr%2bIuPOyrTBkpwdG70nOlO2F1Nt8rGd498VTj99%2bvT/voX7UazWfPbZZ99F4Oz5c8VtW2qP%2bPntmasjudXBXEokmEOsjuT%2bIZiLhdMIFz/OQivYua3xVG/Nfm/rmYHRxdmiqWpFU25sEz9DIBYR/OlPfyKRSCgUCovFxlI%2bDAYDgUCQSGRMg8PhoFBoSkrK3/72t2dM6soMbO017/zJPudce4KV/k8zsuc1oxAHJ8EaOe2Jt9IjJzwWGtTFBa2DDI1s//YSihH44x//CAaDQSBQXFwcCASCwWAlJSVOpzM7OzumjI%2bPB4FAfD4/ln/9UwIgAwLhE5IblKuTge9HINnGgjq4SJdA3JmD98kIfjnWK2E0a%2bmBFNBG3GA0J37ytydPVyE2IX/4wx9WE4BCoWvWrKmoqFCr1asJ8Hi8WATx1VdfrfTwxReRLzL/8suwDQxiixLtFsEc3KgB5X9/ApGTDBatWRs4N7hp1mY/0rph2rw2XG2Zay7bXjc5NfntJRT7lu%2b9/x6fz6fRaCwWi8lk0ul0CpmCx%2bGoFEpMw2KziERibl7edy2hxYUFtSN32wtu77EOrFcCqifFmykQ4HvGQpGU0hHxHTnD5b4T3bUHfYoeQ8UuW8Uee2UYcDgdP3/1Z5cvXrq6cOVHi1evLFxZuHx58fLi1cWrVy5fOX3i1Injx4/MHYnJ3NGjR48dnZubi1WPHj165uTps6fOLFxauLpw5crilauLVxcuL1xZuLJ4efHVn/y0p7tHAeQUz9S2nO6vmLXljlSUTNZ9k90/HwFGUJcQTSmTAba2v6hkui5reIOsJ794siZ/bHP%2b2GZKjRRZziJsERArRbQqGX6LAF3BEZhTSZViRo2CUiXFbeUnrCfFlxJBJThSmYC0TQRah0tYT4orIYDLaOx6NaVKiq7gkirFxEoRZZsUtZFD3CqkbJMgyplCS%2bq6seq0oZKNs7b8sc0Z29cbxrfifLIEG/PvKWWKDolExlLKFeDxeDQaHU0pu/JwDgnJoyC65Wi7EGblIm18DCCCW3kIGx9h4%2bG9MqJfQfDJ8V5ZRHyRKrlBiffKcF4pwScj%2buTkBiWlQYX3y9StenWoAO%2bTUhpU5AYlya/AeaWRfeWT432R/%2bK9kT22XPbJKY0qjFOMtPGhkVSWj7QLEDY%2b3iUluuUktwLjEmv8%2btw1uVQqlc1ms1aBzWbT6XSNRrPsiRUtecrWfHXAoGkzqAMRpxj7jTjF1oioA3p1q0HZGvGUEX1EE2mpas1XtuSrohpZS66xc5NxYIusOVcdMKha9YqWZbcqb86N9a%2bO9JavjHUSiHrfaEHdZohGA8vVWONnPLFerzcYDPr8fP1qT0wNakE2Gq5RBnHzkhysJCcL7OSg/RKwi4vyieAeQUyZ6GAmOphInxDpE0I9vEQHKx5gJDlZUDcX5RcnOVkQJxsEUJluDbNNB7JTExzMJCcL6RUmOljJLg6lVY30CePstCQnE%2bziIr/pOdnJRvnFUDcv2clOdLLgHj6uUZYAMMAuToKDCQKoHLdOl6JDIBEEAgGJRILBYCQSiUAgsFjs8hJitOkIPvnMjw%2bZX2hqPNnbdCpUu983ujg7vDDTe2G87exg/3y4ZLLOf6J7ZGG2/dz2ugP%2bkcXZrpdGzC80uY92tJ0dmvzRga7zI84jbTiflOPSCdqzwAA7ycZU9Bicc23t54a6zo9svzw9dHGy4/wO97GOrvMjO6/ubTndN3BxoihcZX6hyXU02PnijtbTA13nR2Z/fLjzxR2M5hSInZPsYIuimxiDjfhEtVrd3d2dlZWVotPFjhYjV0zMYCrMweME0tmBNFWvUdVbIAhmpw6sK52qE3XmqEIF6lAhO5Cm7StKHSiWd%2bdz2zJ0/cXKXkNKf5G0O1/Za0wfLFGHCjKG1iM9Qo47hdeekWRnQRwcrFci7MhWR3oo4ATS10/Vb9xllXXnK3oMuoFiRY9BEypitujITSp%2bMCulv0gTKlT2GhU9%2bpT%2bYqiDB3NwV85GEQiEQCh483/fXFpaevD5g4d/fVi2oQwMBq/kxMxkOyvRSo%2b30OIstEQbI85CBZnIcdFqnIUab6XHmakgEyXeQk%2bIPl3WRwsgc6Rlso2ZaGfwPGm89owEG2P5psfGiDdT48yUBCsj2gM5zkyNj/wl%2bkcLNdHGSLIxI09N5OiJMiP2NNkeOa5NABgrZpRAIBQWFh48cKC2tnbLli1CoRCFQkVmIEYA5RbRm7VYr4Tgl6PcIkZLCrctg9KojlkPSqOa0qiKNPBIYrcPkTuRBgW1SUNt0jBbdDivFOEUJAEsnieNE0hDe0SURhXaLcL5ZNQmNTuQjo8WiH4FvSUlcnIcOcqVkxqUpEYlJXqiLAhmCYLZCJcA75eTGpWMlsjChrq4And6WmoaKuoH4HB4fHx8QkJCYmLi3y/52B1pCRY6zif1n%2by2HmreMG3KGS5vPBUyjG3dts9tnwu4jnVUzNo8xzudR9uKwlV1B/3mQ42Ve1xlM2bn0Xbbkdam05GbPJRbmGBnCLzpjGatvEffeCpkPtRUNmMumaz1nuiKuPaJatexYPu5oa27ndbDzY6jbZZDzUXhqoKdlbUHfL4T3a5jwap9ntKp%2buYzfY2nQp5jnfKQng1oM9MzoFBoZlZWa2treXl5aWmp2%2b3WaDQIBCIyA5yONLCNBXfyEE6%2btq%2boco9z625H8UTNxhmrcaxy0yxQf7ChYpfVOLa1ZLKu6XRo216XNlS0ZTeQPVy2eRYIvri9aGcVGGAjnPxkgMX3pPLbMsB2dnSKlOUzFk2ocNMue81%2bb95oRfU%2bz/qp%2bs27gbqD/syh9akD64zjW5tOh6r2eUomazfP2h1zbeun6osnanBeKc4jATvZInd6Rno6DAbLzMzs6Ojo6uryR5GTk7N8vE7v0MXbGBAXF2SliLtz103X5Y5VyHrzjROVhp1bs0bKcsc2lUzXGcOVoq6cNWMVhZNVws7svPFNyj5j2lBJ6YxJ2pMHslIgTm48wGC7U9htaXF2eiLATASY2SPlkp689O2lW/e5csc2ZY%2bUSXvzM3dsKJ6qkYf0KYPFuqHibQc8hnCldnBtymCxMVyZPVKuCBkjthtgxTnoPHcsH4DHHDACgcBgMLFwffmKSddeyLCqOA4tx5FCtSjw9SKiSUq1yIkmCdEkIZmlJJOUUC%2bm2ZQ0q5JokhBMYqpVQTRJKBY52SzD14uoFjnHkcIGtHSbKt1XkN62lm5TxjQks4RqVZDMy10RTRKqRU4ySfH1IopFTjHLyFElySQlR8qyaFlCtsjYgJYDpNDsykxfUUFBAZfLjV0OiMVikUgkjoLP52dkZPw/B23emW3Yus0AAAAASUVORK5CYII=' /%3e%3c/svg%3e)
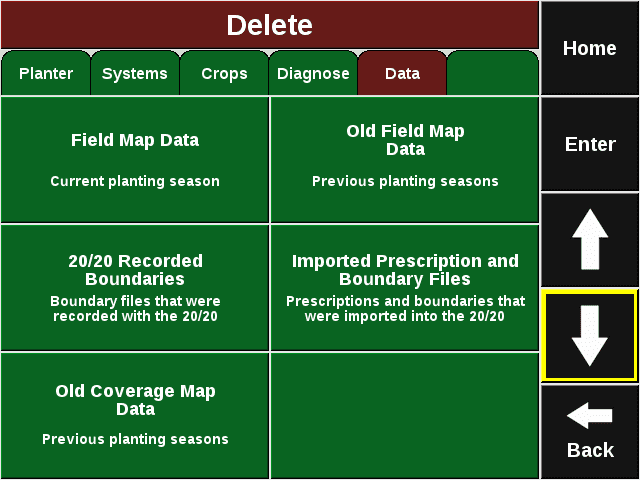
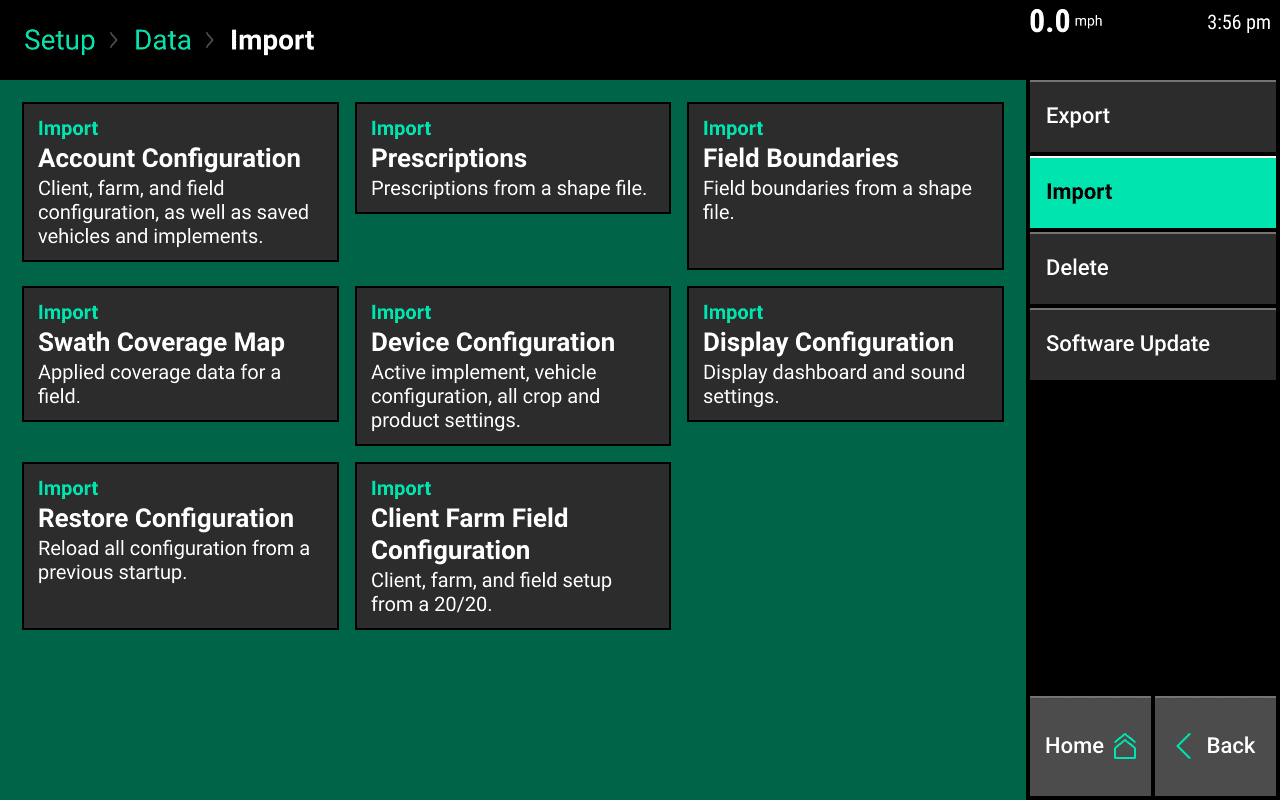
Display Checklist - On a Gen3 20|20 navigate to Setup > Data > Import
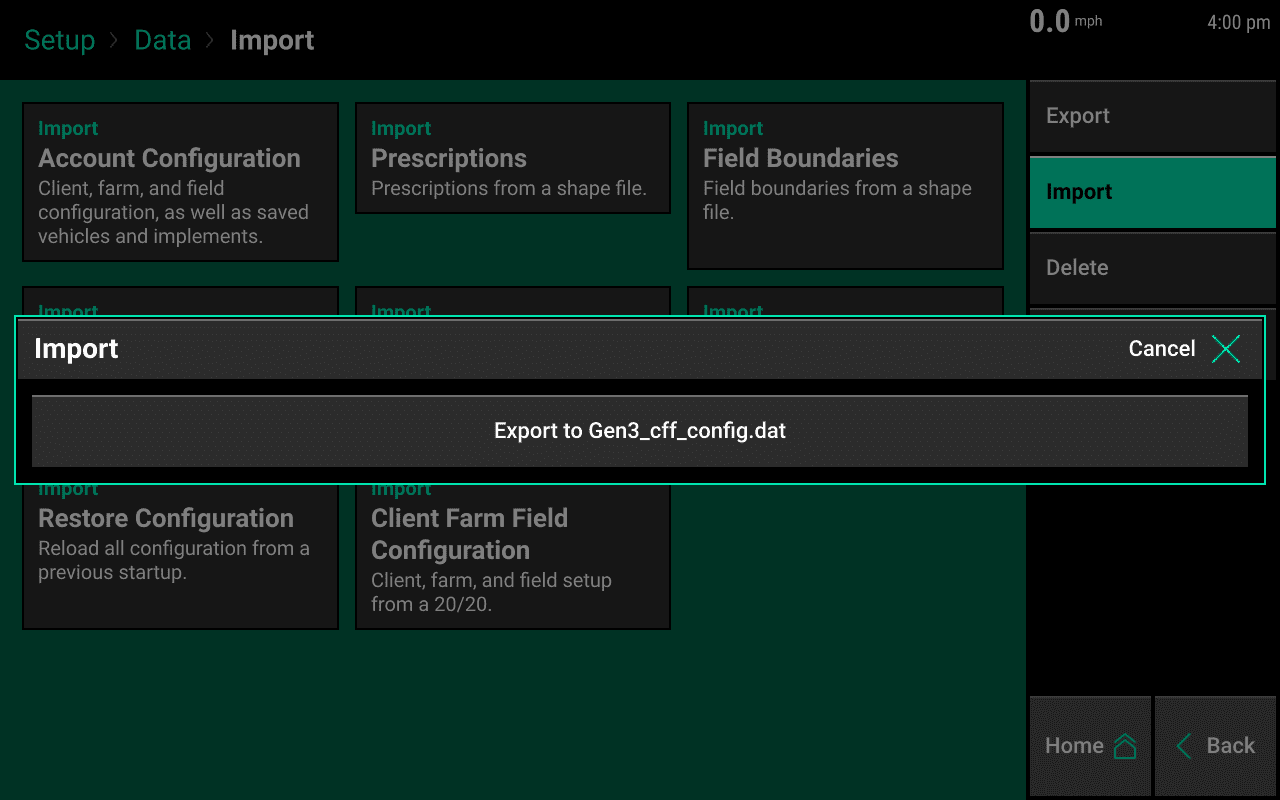
- Insert the USB drive with the exported Client / Farm / Field configuration from the Gen2 20/20 into the side port of the Gen3 20|20 display.
-
Click on the 'Import Client, Farm, Field Configuration' button and ensure that the import popup comes up and locate the correct export. The file extension will say cff_config.dat
' width='1280' height='800' xlink:href='data:image/png%3bbase64%2ciVBORw0KGgoAAAANSUhEUgAAAEAAAAAoCAYAAABOzvzpAAAACXBIWXMAAA9hAAAPYQGoP6dpAAAOpUlEQVRogd1aWW8bWXYuLZQbBrptWdZiSW2LLK5FsrgVSVHcdxZ3UpS4aaFESZbctsbdM20n3cD0H8hLggkCzHteAmQamKQDBIME%2bRl5CpBpIMiC5Cl5/oJzimXLdnfDdgdwxw8fzq3Lu3733Hu/OkVBEAT8f8fU1BRbh8OBTCYDl8uFGzduwGAwvFJ2fn4ea2trWFhYwIcffkh5AgTzOgRpA4JpFcKdBcwIU5hamtfy7XcxtXqbK28YjcjlcvB4vYjH49zhT4KA6Wm2siyj1WohEAhgaWkJ165de6Xs4uIiEyRJEqc1AmjiXgsEtwmC9WPMUKO3PoJguwvBZ8WUcZUr3717F41aHbVKFWqpBIsovvPJ/3gYZl7MmJ4C55G9mn/tVXdizM1CMMxq9m1h%2bL9oYwbTs7OYMxgwNzfHmJ2d/U7Q1iDMzs5CEA5zEA6yEPYyEPYzEPbSz9OUr2Mvg6n9LKYPc5g6mNj97PNyVG94BdzWa0Lv42p9fRyvA%2bprP43lkBsBtwc2hx12ux1utxterxcej%2bcV%2bHw%2bWK1WCMK4iDthGeKmH8awD8ZNP8SAzDD5X7RXYSLrdWE1LGOuFcWG4oFp068h5IP4Uh2T3w2j7yX43TC7JXxYDONGPgSz4n02BpPieaUNHVfbMLF1QdiNYynqRbNSxWBvD4PhEOlMBnaHAy7ZDaf7KlxwyzJEsxmCMMrDGJCx1qvgTr%2bC9WoaFrMZVtEMu8UKi0mEzWyB1SRy2mI0aVYU4bFLTMJ1NQxzYhMre1Us98swxkOw3TNyOauo1XPa7JCdLrglJ%2bQJ3E4XfBYH5jMKFhN%2biI0CVoZVrLXzsHjcsG6YYBHNWn/cljYuvY1n1iFhuh3F7ZALCW8AtZKKYjqDoOyFQzTDZbHBabE%2bh9kKt9UG08d3iYAc7OEADg4O0Ortotvvoz/oY7fbRbfXQ7fXxfnFBQ5Hh%2bj1ezg6OsL45IR/88keXoGZkoJKpYKTi/vYOxqh1W7hcDTCeDzGweEhhnt72IpG2S2dTickgiTB4ZTgsTlwIxPAcjaMo719HJ6d4OziHCenp9jf38fO7g5OT0%2b5PRpje3ubXdshSdwOted0OTHdjGC5Goe/ocJRzsBZyUJulOBrleFtqS%2biqcLfqcKajk4ICPkxPhxhOBxib28Px8fH2N7eZoxGWv5nn33Gk6c0DaTb7cLrlmHyuWAoh5FMpbC7u8tldnZ3eQLHTMABk5DJZiG5nPD6fJC9Hnj9PngDfvaiGxmFCWgWyzg8PMTRaMRtUd/0TEQSCdR3r9fjfa3DI8uQZDcMOR%2bmfvUYhv/6Wxi%2b/RqGf/ktZv/5N5j99utXQfn//g1mvvkjCMJRHpaAB81aHfVGA7F4HLVaDfl8Hul0Go1GA9lslslQFAX37t2D0WhkkAuSB8yVQ4hvRrDTbKGUzaFZrmK32eY0oZwvoFZU2TW3aw0c9AbotTvobu9gU5JxM%2bnHUjaESjaPWqPO/auqimq1imaziXK5jEKhgFKpxNDHQwTlslnYnBLmcj4If/oYwj/8CsKf/QLCr59A%2bPs/gfCvv4Xw%2b99A%2bPbr5/j9X0L4j7%2bG8DdXCGjUauz27Xab2SdBQQMoFosoqSp3SGTQQGhQtE3ymSzuuuyY6ySwEvFgLerHxwlFQ1zDWiyA9XiA7VrM/6zMatSHO1EfPg578EF1E0vJAPrtDgqlIrv11dObBM5V0BYg0G9kyQPmsl4Iv/45hP/5HYR//HMI//QXEP7tryD85zevgib/37%2bD8Hd/rBFgDXiw09Imvjccolatod1qoVGvY6fTQXd3F236fWcXtWoVoWAQwWCQzwDRJYHaEM5KEE6KEE4KL%2bKU8nQUXrITnBWxHPdD8Xh5W9BWkUitTeD8HlA5OtEltxuztTCuH6hY%2bcMxFp%2bMsPh0hOUnI6x8B5Y/P8TKF2MsHNQgCMd5vkZi0SiiiThiiQQik3Q4solEOoVEKolIdAvxpPYbdWp12PkgM8nPCZg6fQuclLjunYgXPqOVT2yP1QGP1f7akM02vgWWFCdiZgkRSUbE4YZitsFzT4R3w/wCPBsifEYLrKvrEHgFBikIuzENOy/bqAY9TbafhNBPaZbqUhunE5An6OnXxVkJHzS2cDMbxI1CCDfyQdzIvQYm5W7mghCGKSxGPBj0%2bhifn%2bHi0UPk1RKskgMujwwnaYEJaMu4vB6YLKQDxgUspAJYj/qxFvFiLR7AakLBGu3ThJa%2bCs6PB3An5ud9THUNnThWt3xY3/RiLezBalT7jfa7jpfz9DNgPeTB9WoE1%2btbWI35sUJIKlhOBbGcUrDCNoiVtPas52n5CpaTAQYtxu2wG15J2xb0wkOg80RP6896nslk0s4AUlTrOyrWu2Wsq0k4LFbYTSKLCLvJzNYxsSRO6De3zQGfTYJZdmpCKBbGaq%2bMtUEFYjwMaUOE3Wzh%2blajCQ7RwrCRsDKJkCxWFjF%2bsx230gEsxf0wqWmsdVWsN3Kwul1wGkWtX6MI24YJEqVNZtiNIuwbJhY0XrumJWZaUSxsypBEC0SLGRaLhaWuzWbjtA7SIrR1iQSj0ajpAFvYj93xCNluG4OTY5QrFTRaTZQrZVRqVX5WKV2tojfoo9FswK8ocDoklsmzahCZYgGt0xHUYRelmnZ71JsNvlr7wwHUclm7TTodtDvbLFMlt4t1wM2sgqVMEDuDPsqjIdoHQ5RrVRSojYbWxmA44PqlsspiiNrhNiYrOr0dw%2b2IjGwswfXoCqdX9s3NTU7T1UmxAjq8iQC6PUR%2bmyUCQj5cnj/A2XiMx5eX2NnZQb/fZ/FxdnbG%2bOqrrzjv0aNHePLkCQsfyWaHeUJAsVDAZ48ucXY8xsl4jF6/j8FggPv37%2bPBgwf48ssvWdB88sknePjwIffhkmU%2b8G5OhNC4P8SD%2b%2bd4%2bovPuRwJLr2Ni4sLboPu/vPzc/6drmzdrWe2Y1gIu9Gu1DA6PmIVSeOnq5vqUBs0D9IR5BV0hYpMAOkAxYOKWka1VkO9XufV0zVAp9Nh5lkX1GocEKF82SPDRR5AQqgSZqZJvGRzOSSTSU5THSpL6VQqxZ2TqEkkEuyedJWR%2bxIBi2kF5WweaqXCHkerRSQRqD5NhMZEnkTIkx5ptXiVya2ZgE03bxGTKPLkCLrr68/ULwVyyAuMvAWOcrAqXpbCJDNDwRACfj9bJaBwB6GQlhdUFLZKIMAuRHtYvEIADZLaqDfqLJw6Ezcl4USDpxUjq8tZuseZgKyCxZSCllrhlet1u6xBqB9y2dAEfp%2bPLeXrWoSkMG3Fud0kBPMqB3NmZmcxMzPzvZienmZMcSjtOI8NnwvxWByRWAx2ycGwOTRrtdth0/PYSpx2kAghFv1uGMohXnUSUqQQaavQ6tNEadLkVVtbW7wX6aUomUqyoiOR47FJmM8qWEgriG9uYSsZZ%2b1BmoO0BvWpw%2b6UXhgLweF08pgMRIC48hYRoZMipgbpiQ6IY3qQwnT/CgbpF5%2bvopfiQMZcLYJIKIxSoYhivoBELI5MKoVcJoOyqqKQy8NutcFmscJhs8FO7u/QTmLZYuPJ01kkdCb6Y2K/t9%2bXxjDdS2paxLisTWoSJH09nE4k7Ljwon1dnJYwvZ/FB6UQ5goBGAoBXCsGMVcKwlBUGJTmu/67UA5jdjcB4VyFcF9HeQL19XCmQjgvQ9jQCXgTDzgu4E7QDTHkgyno1aI5PjcHOkxeF6d1exWcJzuxqrgx14ziXtiLjWgAxqgC41YARooQhag9L4xBD0eMNCvjXmACReZ2PiqGtYmM34D4q6B6VP%2btCDjK82DXemUs91SsVVKwkIAhWJ9HhPSIjB6dIXf2OpzPIkKWxCbW9utY6VewEQ3CSQKIRY9ZE1bUhtEEJ2l3iuQ4KCLkhM9i5wOQPeCKV7029DpvTcAoC%2bdWEA8fPcLweITDoxHf4dudbb6C6FSmiBDF2CjQMTo64kAHXVV0DVLcjg5BOu0f/OwS%2b%2bNjPgj39vc4ikOChQIZR8fHuHhwgUq1AqvNChe9xrpdkG0OLGTeKQE52EJ%2bnB4dcySGIjo0abrS6DQnMUKgiBBNhEQFCRo62T1OF%2bsAJiCV0uqPRlyfAipUlkiksnQbUNukyPSILWl2ugZvv1MCjjQd0Gm1WfBQbI%2bCHgQSIHSH68ERAgkasiSIMskUNjwSZtUQlyV1dnb/Pr744gt8%2bumnrL5INT5%2b/JjLr6yssCghJUZixDnxgHdOgC3kR7ezwxEhEi9EAsX8yAPIRiKRZzH2Z5EYkrEuCku7NCEU3mSySO1RfapL9z4RSd5EXqCH2SiP2qQ7/CfgAXmYFQ/CoRB8SgABRYEv4OeXHT8psXCINbsepaFV42gMvXI6nfx9wFAJs3DZ6XZRqdX4ZYTIbLZb/JzKpPnMKJZKyBUKqDUanGd30WEoYSETfIcEHBcgSnbIJitc5u%2bAaIVssUO2vgqv2Q6zS8KcGkJMCWG7XEM%2bnkQ5k4OayqJeKGHLr8B%2bz8SvtATJaNZeZUULuz9FZuibwLsjYFzkLzMLuRBuvQHmyWaDXHeml%2bLY/kdpP1t6uSF9T%2bn5XBAL%2bTDjVj7E0NPzlM4o%2bKAV0ybwTgg4LUG4KEN48JaguqTEHlQgfFLR7Cv4oTYqz1f/TSb%2bQwS8/GH3B3EyUVI/Bj%2b2DX3yP8YDSArf5e/9b4jTt2D9pwQmQIssX5eMWJq/hdtLi/znh9uLt9nSv0LoHyG3F7V8HTdv3nw/CJg6VSEcZWEtxPnrMAVMKPBSrVTQrNa0AE2phHqtxvmkWejrUzwef/8I2O%2bRjO9gZ7uDcruJwnAXyXgchbIKtd3ksDnFLUjfxGKx94SAs%2bcE/PzRz/D506f48ukfoHL/CJHHYyTiCWQbVWT6HXx6eYlffvVLXF5eIhqlr8PvkQfYigm0a3WOXpNcr9XraLRbLN/LahmNZpNdn0DqNJFIvC8ElEChvbuJIDKxBKLxGO9vcnFaffo7DElvPY/zEwmW9v8LXJ/F3GTBnJMAAAAASUVORK5CYII=' /%3e%3c/svg%3e)
Display Checklist ' width='1280' height='800' xlink:href='data:image/png%3bbase64%2ciVBORw0KGgoAAAANSUhEUgAAAEAAAAAoCAYAAABOzvzpAAAACXBIWXMAAA9hAAAPYQGoP6dpAAALGElEQVRogd1aaY8bxxFtclfa5bUk5z5IDoeci%2bQM72t3JRuGjSDwgQRyHGflWIENG0ocILBsxUDyB4z86hdUDYfLPSTtrgQL0IeH6qnpru4u9lH1hkIIgXcFiqLAdV1omoaDgwPk8/krdQ4PD1Gr1VAsFnH//n3SCQjpCEKtQdQrEOUCcqQrHaZ6pQpRKXJjauh2OtANHa1Wizt825Nm5HIsdV1HFEUwTZMnuLe3d6VuqVSCqqo89mKR5yXSiRsShFaHkI9SBxQOIOQqhCFD1CrcuHpURRgECHwfXteDVK%2b//cm/NvK5S94UYB3JXf3e1eW01dNS23sN5N%2bEjRxy%2bTz2CHt7DNoCr4IQow7E0IVI3I1sn5d3sdHlNvUzef6%2bfRFZm5dht9%2b72ti2b6NkazA1HbKi8BKns8AwDN4al0F6WZYhxKSLsq2j3jBRsw3UGibqpn4zGBoqto69qImaldpg2MY19TXUjEswNUiaivtdGwcdG5JlnI/BenG/uzbqGyn6LZSaBiI/QDxMECcJ2q6bOkLXoGoXoek66pKUroCaqaMS%2byjHPo78NiRJglyXoEgy73OZn%2btc3oWuqDyAe54NyWmgnAQoxT5qLRtytZa2rUssVVmBrmrQVBX6BpqqwZAUHLYtFB0T9bCLcuKjEnUg6Rrk2nn7zBYhs7GViopc1ETR0uAYJoKuh27bhaUbUKi%2bJEO9BE2WUT%2bqpg5QbBPD0QhRPMAgjhHHMQYDKg9YzudzjEYj1o/HY0ymE35nkBcNDTnPgu/7mMxnSMYjPolH4xEmkwm3S5IEzWaTfw06gTMoNAFZwUHbRMm1MU6GGM2mmM3nmE6nGA6H6Pf7XB6NxzzGXq/HS5vabm1pKnJhAyW/BTP0oPguVN%2bFHnowIh9G5F2B2Qsgt5vnDpiMxjxQ6pQGTh0RsgkcHx/z5KlMOnKMoaUOyPs2nHabdVSnP0gHPZ5MeNAEup9poNmeNEwDhmnyKjpwLXZA1PXYNtnIbNEzjYfsUd/0I2xtbKSqa8i7BsTHa%2bR/%2bSvyz75E/qcz5H/8Mi1fBumfP0bu8e8gxLgDydQRBSHCMOT7PQgCdDodtNtt1tHgyRmWZaFarXI8QKAlSA7Y82y0Gg30owie2%2bF9OIh6XCb4nS4vy8Dz0AtCDGmF9XoY9PpoqDoOnXQF%2bG4HQRhy/57nsaTVRKuLxkO6bre7HQ85qOO6kFUVexsHiL99DPHJCcSnpxBPfg/x8xnEj19CPNvBj3%2bG%2bPdjiF0H0P1OXifDJLnjIOAOqWPSkzPoOYwi/iWo86qmYK/noNzQUWmaOGpZF5DqTFQIzRSp3kC5aeDI1rHvN1ByTMRRD12vy8v6Rac3gbYAISvTCmAHfHoM8d%2bvIf75COJff4J4fgbxy%2bOroMn/5%2bvUQeQA2dT516OJD5OEPd%2bLIp5wv9dPHUPv%2b31%2bZ1sWrwY%2bAzQVZENMPdCNcgXTa3TX1Cm1TD60aFvQVrl8al%2bP83r5wMa9oYfygwmKp2NG6WSM8jUonYy4XmEUpA6ga6TVbKLptNByWmhQudWC3Wjw3nbaDutaTiqpQ7pr6Zeq6zsOuAsmqSw3DBg1mU9sOhhvBUnmW6BkqmhKKm%2brhqLBIlvVOoyadAF6LdXJlSMIHgQFHYPWNXCu18ebQCWTd518hpmH/bCFw46Ng01McJCVXwFqc9i1eRzFpoEkTvg2mq%2bW6Pgenw%2baYUA19HPQ1jEM1OVNHFBopAFN2dI4KCpn5ZegRNLUcNjQ%2bAoqm2oKQ03rZM%2bvQEVXsNcxsd%2b12GbR1lBs6CnsHXkdtu80iF4TBUOBvolfVEnawW4MQO9TXb1ag8itepCHEZSTCZT1GOp6DL3nw%2bwHMAfhS2H1Q6hJiPJyAH2WQH0wY%2bjzBNYN2hPsXoDqrI/atA9jPYF6MoV2MoU57LEN6uNFMLcyQOE4QXUSwegH0AYBdEYIjZ77PkPt%2b9D7Ac9PTyLULAPi3sMhpu%2bdYvHwFOPTNSYnaywenGK4mCGZTZHMbwCqt5ghXs4Rr%2bZIKCC6Sbvd9rMp4uWM25OdW7XfsXFZN14tMF0vMVkvMVuvkKyXiE9WiI%2bXqAcurYAIn/3xD/jl5%2bf436%2b/4vlPP%2bHnZ88wm0751E/iGMngFdjWGWywq7sh4t32Gxu3bn8Ous2iMMSnn3yCfzz9O558/QRPzh6jf7yE/9lHGEzGqHttiHsPEgSDPl9zs/mMrzy6/jzK%2bT3vzcC/JK%2b8988l4yV1bwm%2b0ns9jmso1umGAbpRCD/uo%2bo5EGIR4rBS5oSHojtOhGSZQbH7XZG1z2y9DNTni%2bq%2bif55TjvzogOwUK2kbBddQZR5jSnmHw45FyBQ3P0mkMXzu%2bWsD3omOZvNtu%2bzfCN797r9Z33tzovmKhk6RL1MDvA5mqM91KcM8A2BQmXaSh9%2b%2bCG%2b//57fPfdd/jL2Rm%2b%2bOILnJ2d4enTp/jqq6/w%2beef45tvvsGjR4/w7bff4ocffmA9vf/ggw/YxjY7fQOgRI3mSjmMYAdMPSYlxnFy8QC7Cy4fSnGMUZJguVhgvVxxxjkdT/iAJd10MsFsMuVfZD6dsX61WOLk%2bBhzyiaHo9cbzwvGOE4SXvWiRg5YRrhfr15kajR1A2WnfBVVVeFkqEZSV1HN2uvaTlsFR4qEiixx/SNV3j4fKVSWUSUdP6f6ilTn56ois%2b0bQ3s1svHel2sQKp0BywjFsI39eQ/51QD7Ix%2bFlokiwbFQaBpcJllomjhkSToLR24DhW4TudhFoedi/zhmG/fDNic3VJ9slRxra6vUtlHpNFFxmyyP2g3s99oQqxB0IIvlDhY3QZCC6jdViGoJQqqky/tabN7R5IuHEEQoaraJ9WKZkg90SNF%2biXqIKedOhljOZhgRU9TrYzoaYTYeI/Q8GLICmVJRz0LHaWO5XKaH1yDGiGLy4YjtUHk6GmM5myP0fA5HjQ2dZUoKp8J0GOc4O7xtMrXJKGc%2bxFH6/eJ2GHcg2ybvzewUptMyy/kzRmd9fLw9nYmhIeJC1zQmO4kRIvJkt32n22Eaiw4dOsgicuZkDLdzkagkRqjgWuyANDW%2bS0a5cUCtdE7t38oBloE%2bMTiet2VfMiKEAggCBRQEmmjGGLlOGzVdRd6zue5iseAr7cHDB1iv11w%2bPT3lMrE45XJ5G2cwP0gOkBUU2zsOuK0TtivAO3fAXVbAoJ8SH0RCkhOyq4xko9HYcuxbJobYGVoBRIn5Nhq2zY7KnEhtyVnMIIUp3ZbRbCTJZkaKvnUH1E0dtm3DsEyYxPSY59KybZ7sdSwNc4KmzluAyBKKI4hG63S7XM5oNZo0hbhdz%2bN3tH1Ip2jq1S3w2zugi7pKeXTKxlxBXYYuXc/EEKdPMQSTopaNnh%2bg03KY3PTaLsKOh6ZpQanWodRSqDUplXUptVGT%2bJvA23PApMtfZgqujULn5iAmhn45apuL28ztZzh0LUZWfqmNtoX9qPUWHTD1IOb%2b6yGzsbhj%2b9e9AS474Fa3wOQGrO1vgd3J3DUOqN4lDpi%2bJqH5trETPN1TaygdFlAsFfnPDxnoXyGFQuGCLtOLd8IBJMcu5G6Lv0rRjUNXMf2RIwoCOI7D1zMRIqTPiJJWq/XuOYA%2bu/X6ff6g4/cidJMBnFYLXWKYehFnhFlq3HoXHXC8XOHk9BQPT0/hz8ZorCZwWg7cMIAb9zktf%2b/997FarfiL9TvmAIc/vlLwxaE7RaC9iIMu3/M5v8lCeopMHYc4wbc9gTfmgA6qjgW35fBnPVreBPr1KYSn0DvTsd5J9f8HBJoz%2byJuWGAAAAAASUVORK5CYII=' /%3e%3c/svg%3e)
Display Checklist - On a Gen3 20|20 navigate to Setup > Fields and ensure that the Client / Farm / Field import is correct.
Transferring Prescription and Boundary files from a Gen2 20/20 to a Gen3 20|20
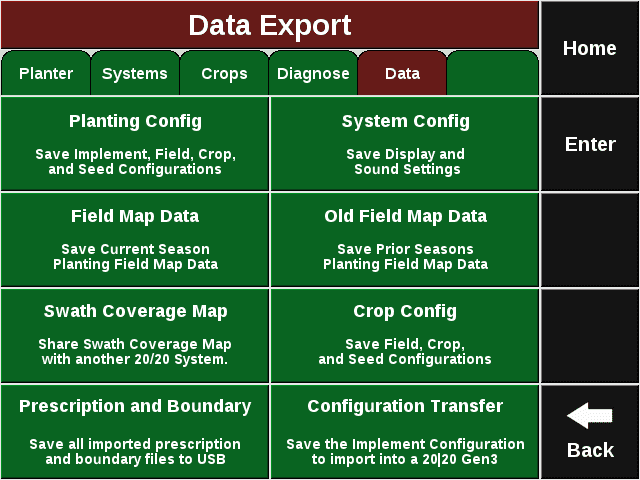
Follow these steps to transfer the Prescription and Boundary files from a Gen2 20/20 to a Gen3 20|20:
- On a Gen2 20/20 navigate to Setup > Data > Export
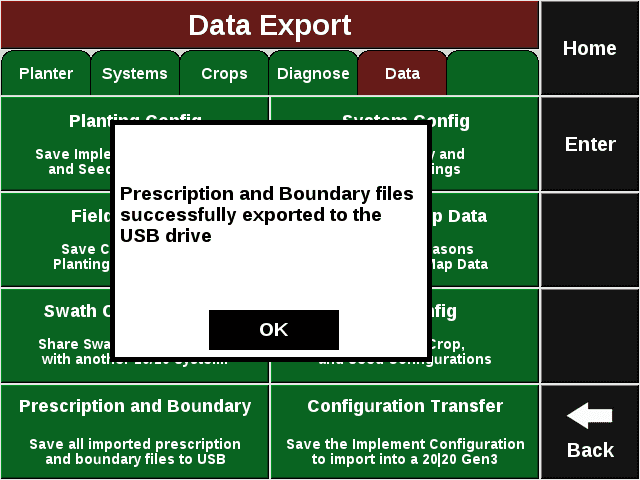
- Insert a USB drive into the Gen2 20/20 monitor and click on the Prescription and Boundary file button.
- Ensure that popup comes up stating that "Prescription and Boundary files successfully exported to the USB drive"
' width='640' height='480' xlink:href='data:image/png%3bbase64%2ciVBORw0KGgoAAAANSUhEUgAAAEAAAAAwCAIAAAAuKetIAAAACXBIWXMAAAsTAAALEwEAmpwYAAAYAUlEQVRogbVZZ1Sb1/kXU1sC7b33FmJjQBJgDDYYD8zUfPVqI0BiI4YwMjbDMt52bLDjVcfxALs7HR96%2bj/90HzIaZw0bZo4TdPWJ6lX4sRZ/I8kQqmTts45ze/8js59n/e%2b995H995n3AuZMpT1KaSDGuWAWvHs7FfJu/ickETYr5KHpKKQVNSvlPWr5J18TlAi7FNIe%2bSSHrmkTyHtlUt6FdKgiN%2bvlH2rLgY0yn65ZKiqor6%2bXq1W5%2bbm6tYhNzdXq9UajUZIr1JmJeIcVBJAIT4jbSS8m8M85nSMGcqdDNpgUf5wSaGLRXez6EcB23iFwcfnhNSKTpnYL%2bB2SsUBiTBau8nL49hI%2bGfvBaCS7IQsp0al0WoRcHhWVhZ2HbKyslAoFI/HgwxolA4qyc2kuRjUZ6GbSQNIuIF83Q8PHbwUHvrt92/9fOH0z04/9%2bsXLo%2bWbfi/Ky8cBWwvnTq5NL33pedOLs/O/OT4saWZ6e8fiA3k6QAS/tk7cjFpTgrRm5uTl5%2bflZVFIpGIRCJ5HXA4nFgshvTJxSAR76GS3RTSeoJkvIOEe0oYJ5UMELK9LPpJBzBVvfGUE5zf1XjU3H7KBfbIJAeaG6dqq6e31F6LjJ9ygdO1NYfbWsdLSyaN%2boCQBxCyXDSyi0p6igAR5yQTv96Ri5DtUil0ublYLJZIJGZnZ6NQKHgCGAwGh8OJRCLI2KZqk1RoU8msSqlFIUnSLBf7c3VdBfnmryTrXwXy8zpycxvZ9DYht4nDaOGzmnnMJg6jXSrwKBVupWIXm%2b4tLTLLRC08VguP1SbmtQm5nQX5Hp3WJhUBcgkgl9hl4lXKJd0lRS6tyiwX/0tfSqlZIujZXFtQWIhAIAAACIfDJpNpaGiot7e3vr4eiUTGZ8A25YG1sKBNDEQLG9nKSf7CWliFnRs39zWmN9GRrdw1OaqVC21hGoN1xmAdwsRFtfHQ7Xy0KU6MSYBo49QNNhV0VmW0MOHNTFQbF9XOi79t48HbOTt7WzqLitro5DYGpZVGbqNT2hnUdhbNymKE7K0CXxGihY1tF2Da%2bUli2wWwFhaw16vfUIZEIktLS3fs2NHY2AiCoN1uLy4uRqPRcQXIgBzm5hXtrmP35BM65IygjtqlQXkEaWYaZBdJNLSBHFARAwpGMIcUUJECKlyHLKWZnGqmwZxcTm8BKaDK9knxfjnOJ4W5OJBGYrZbIhrcwAjqsrwSYkCB88sIfll2SEXeSAYJOJBC6FUr%2brWqoFzSKeI7GZQAiVQszYaALATIga0jHOSmOhgcd05eYglhsVhEAtAEsFjs6hJiONU4v6z5iLv74ljg/EjPpYmhK3soARXczkGauNsOAt6zg6FLkdClCLjQEzgXbjvug7WxkHYe1iPeesDacMDmOdM/enW6%2bYgb7uRlttJzwxt3HXGFX9y79%2bahjnNhy8nOrnMjljMhwVaek0GzkbL31Nc%2b3997fWbvheEBr4jnI5MNuYwMJw8J8hDriAT5GQ6WyFeQn5%2bfnZ1NoVCSe5fyFfB4vEQigVBtshQrLdVEhQNcWJwcqJ2dZqWnm%2bjpTdRMgE3v1KJAAdTOzrCxoHY2DOSmNVHTTfQ0KwPh4EEBNtopJPtVmXZWhp2VsoucYWEiQT4M4MgH9Vi3GGpnIwFeqotDrSS5sTg3Du8jkTsoVD%2bZ0kGlufD4Tgy%2bTEqA2BgZVkb6OmZYmRALhe3UqlQqGBSGwWDQ64DBYBAIBIfDgZTvbpCH9ZrRCmXYoBwxKkcMqhGjdrxKPVKhHjRoxioVYb1qpEI9WqEZrVSPVKhGKzRDRvVIhWasUhmOV1aGDfJwuWrEqBgx5A9V541vSj5KhkpX2wwbVJHK4m6DubnM0qY3tZSZm0tNcZaZWsttzeWbHXrlWLx91YhxjeqRClm4vHJ8R3NTc0lJiV6vL18HvV5fWlpaV1cHkY2W4zxSUoeS6FckSfDJoQ422iVAugRIkIfzSwmdCkKnnNCpwAfkxMQvPiAnBBTkbjU1qEmSFtQSuhW6vkpdpJrQpaAFtbSgdu0tPiDDdyvRvUpEUIbqUSBDckyvKvmY0SGEegUYlxDtEhK%2bGgPRryD5lVk%2biaZTb9AbWCyWQCDgr4NAIOBwOLm5uRBGjy7VwoACnEw7O9POTrcxUU4hcCq4ec5UGm3YNNtaNFBDtSrIZimlXcQANLh2Ed%2bZWxneQbUp0%2bpxkGooZBM8QQSkOhO7hY7dxYRszIw/rsrj5IA52FYeySSWeYsZViXXkYNt5pDbxWJvYeFobfV0s/lEx4bJBriDl2FnJUcCtXNSbHQ%2bmKfT5iBRSDwej8Phsr8CDofDYDB8Ph/C7svLsLEQIA/u4MId3Ew7i%2bhXgAs99lPdozdmGmeAppbmo0ePTs9MT8/N7I/tn56dORCLHTl4eG5udvfe6NieyPieiTVO7Nk9MbV7vSTJ/bHY9Oz0zNzswfmDc/vnYrHY1PTe%2bUMHPW739rAJONvT8fzw8Z8/j/PKMu1shCM%2bGISDlw4wha6CuBXKiscOSeeVHD0ej8/Ozo5boTUFoAA7E2DHNzHAgZjIqVYa3MWDVKaNTUZWVlY%2b/ezTlf8pPv/885WVlevXr0MqsOkgK93KIHeo1v7H9Qrk5%2bXDEYjc3NwNGzZwOByJRMJms5lM5j8VyLSxYACH6FOQO1TZHkm2W0LyK8l%2bFaVbA2tiju4eW1lZefzxx5/9T/HJJ5%2bsrKxcuXIlo4aM71RQOlR4rwwKsBFfU6AwvyAtLc1qtQYCgWg0Ojc3Nz09XVtbi0Qi42aU3ZeXsJuM3LFNXRdGdx5yVE03bZxu7row2vacv3EKmJ6ZWVlZ%2beyzz76LGVi%2bsUxvkrvPD5iOd5RFt6VYaEiQ/5QCebl5aDSax%2bOJxWKhUChKgEqlZmVl/XMGEkuIw%2bzW7TwEbtlvqppuajribn%2buQ9ttjO6NxpfQp9%2bwhL788stvFH7xxRf/rlry7ZdffplUYOnGUolvU8MRe0PMhvNIoQD760so6YmTi34NBAJhdQkxenWpVgbUwUmzMfA%2bee3%2b9g3Rrcph44ZoQ3WsVeQt3D01mdgD38kM3Lh%2bXWjO3X4c3H4QgIPcuAlKbMVMgA0FOCl2Ot/5n6yQQCCAyPpLcYCY5JITnTI8KEFYOCgbD2MXomz8LKcYUo0OR0Zfu/3aO39%2b51ECT548efDgwZ07dz788MNXX3313r17Dx8%2b/PTTTz/%2b%2bOOHDx/eu3fvj3/8469//ev79%2b8/fvz4o48%2bevz48R/%2b8IdktSdPnrz99tu/%2bMUv7t69e//%2b/ZWVlatXr6UY8XiPFG3lE0Ap0SlbI8kpzwJFGl%2b5vlzPYDB4PB53HXg8HovFysnJgegnt8tDZeo%2bo6rXoO41aPqM6j6jskev6tXnDm%2bkmRTBvtDVF69euHBhYmIiFosdO3bs8OHDfX19k5OTfr9/cnLyxIkTv/zlL4eHh8fHx%2bfm5i5cuDAwMHDs2LGxsbGjR48uLCyAIDgwMBCLxZaWlq5cudLZ2TkxMRGJRN54440f/OAH9G1S7XClMhTvUREqV/UaklT3GmU9ZVWD/80T03q0EAstA2Cl25lrRLuFKKcA4xND6rEjE6MrKysff/zxgwcP7t%2b//8EHHzx69Oidd965ffv222%2b//frrr9%2b%2bffvzzz%2b/e/ducgY%2b/PDDhw8fvvvuu%2b%2b///7f//73N998869//eu9e/fu3Lnzq1/96smTJ5988slHH3306NGjlZWVa9euQSqzYB4uxiXMAFhIJz/dzkizM9LtzAw7C2KjckGdRq2BwWFYLBazDlgsFolEcrlcCKcvP9PORjr5iQAw7g2IfkXoYqTz/Ehkec40552cii4uLC4uLr7wwgvnz58/dOhQLBZbXFycnZ2dm5vr6%2buLRCK/%2bc1vLl%2b%2bvLi4uHv37kgkcubMmWg0un///unp6cXFxZmZmVu3bl28eNHv98disffff3/NrN24fr193LnlkGXkxX3j12ejy/O7Drsy7HFNVqNRd9wPZGdnk8lk0jqQyeTVaPQpTwwDOBi3iB3ME/dvKJjcTLJKI5MT9/5x7%2bWXX37llVd%2b//vfv/fee6%2b%2b%2burvfve7d9999%2b7du3/5y1/eSeAfCbz88stvvfXWBx98cP/%2b/b8m8ODBg7t37967d%2b/Ro0fvJZAc%2bqoVun6jyLuRN1CkGjLqxjbqxqplg%2bUwB%2bcpM5pMKQnrkMww/8UTr9mvNCsd0k6CtBEy7TTIpozuvuCPfvDDWCwWCATOnDnz0ksvRSKRU6dOLS4unjx5MrkXv9GePosVunr1KqQ0M9VGSWklQFrxqWZKmo35dT/wLRTItLOr9jUZ9zaW79leEN3Cdeoi0YlHDx7%2b6U9/euWVV956662//e1vt2/ffu%2b99%2b7cufPaa68lHeqaAk9p8h8USypw%2bcoLGkdZ5Vzzxn3NFXsb6Z3aTPvqYL61AggHL9POEvQW18Us9TFr42Fn1Vwz06H5Tv3A9WvXKrobaubbGw87N822KoYMKKcgGU08qwJrmxgJ8qEAe/tBwHyio%2bWop%2bv8qOfcQO14y76Z6aQn/nId/usf/IwK3Fq%2bVdnd4Ls4VL/f0nTENfjCnrZjvmRu%2baybeL0ZzQBYqVYawsmLm1GXIKtDimrlfDUD30k0evXq1dRNBFpvDjqR0GAS/SZN%2bbOaUX1km7yrVB0yqIJ6dcig6TGqgvp4OWjQDVQRGoUT0d3fqQKMbTJ1v1HVrVd2lyuD5YrusrUByLpLq/r/a0o5VIZzSkgeOcmrwDqESDsP7RCgAD7Myib65ZBazHj0O8wHrl69mlKJx3pEWaCI6JGvJ8mjyHKLNX69vlzPZDL5fD5vHfh8PpvN1ul0q8EcDORCLFTtaJVxX2PeeE3J5FbP2f6ciWqqTT61b%2b%2b/C6e/%2bOKLe1/D/QTWSx48ePDvFLh4%2bVJ1aEfrKR%2b/p3B9JLc%2bmMuJB3Oo9ZHcvwRzyXAa5eSnWGgV%2b3Z1nBtuOerpvjC2Z3m%2baq5ZEShNbuKnFEgGzG%2b%2b%2bSaJRMJgMNnZ2cmULysrCwaDodHopASHw8Hh8JycnCdPnjy16ddmYOewed%2bPj4Cne9Ks9G/MyJ7VjMIcnDRr/LQn1UqPn/BYaHAnF7IJFolOfH0JJRV44403oFAoBAJJSUmBQCAIBKKmpgYEweLi4qQwNTUVAoHw%2bfyn3MW/ODIDCuUVkv3K9cnAt1Mg08aCO7hop0DcX4L3ygg%2bebZHwujU0oM5kK248URO/MmTT75Yh%2bSEvP766%2bsVgMPhGzZsaGhoUKvV6xXg8XiPHz9ODnqthWSGdPXFFxFbGMQuJdYlQji4CQPK//YKxE8yWLRObfDS%2bLZ5m/1U95b95o3TzZbTnXUTbbNzs19fQsn/8p0/v8Pn82k0GovFYjKZdDqdQqbgcTgqhZKUsNgsIpFYWlb275bQ8tKS2lG664TLs9iX7ZFA2kmpZgoM%2bJaxUDyldMR9R8nueu/ZwdbjXsWQoeGAreGQvXEacICOn/30pRvXrt9auvn95Vs3l24u3bixfGP51vKtmzdunj977uyZM6dOn0ry9MLCwuLC6dOnk48LCwsXnj9/8dyFpetLt5Zu3ly%2beWv51tKNpZtLN5dvLP/0xz8ZGhxSACXVsdau86MN87bSaEPNbNtX2f2zKcDo1aUlUspMgK0drarZ31a0e4tsqLx6tqV8anv51HZKixRdzyLsEBAbRbQmGX6HANvAEZhzSY1iRouC0iTF7eSnbSal1hIhNThSnYC0SwTZhEvbTEqpIUDraOx2NaVJim3gkhrFxEYRZZcUs5VD3Cmk7JKg6plCS%2b6mqea8SM3WeVv51PaCic2GvTtxXlmajfnPlDJHh0ajkynlGvB4PBaLTaSUA2U4h4TkVhBdcqxdiLBy0TZ%2bFiBCWnkoGx9l4%2bE9MqJPQfDK8R5ZnN74I9mvxHtkOI%2bU4JURvXKyX0nxq/A%2bmbpbrw5X4L1Sil9F9itJPgXOI43vK68c741/i/fE99hq2SundKiyQDHaxofHU1k%2b2i5A2fh4p5TokpNciiynWOPTl24opVKpbDabtQ5sNptOp2s0mlVPrOgqU3aXq4MGTcigDsadYvI37hS741QH9epug7I77inj8rgkXlPVXa7sKlclJLKuUmP/NuPYDllnqTpoUHXrFV2rblXeWZpsXx1vrVyZbCSY8L6JgjpkSEQDq4/Jyk95Yr1ebzAY9OXl%2bvWemNqrhdhouA4ZzMXLcLAyQBYU5GB9EqiTi/GKkG5BUpjuYKY7mGivEO0Vwt28dAcrFWBkgCy4i4vxiTNAFgxkQwAq06VhhnQQOzXNwcwAWWiPMN3BynRyKN1qtFeYYqdlgEyok4v%2bquVMkI3xieEuXibITgdZSDcf1yFLAxhQJyfNwYQAVI5Lp8vRodAoAoGARqOhUCgajUahUNnZ2atLiBHSEbzy2I9Omk8EOp4fDpwLtx717lme370UG76yN3RxfPTqdM1sm%2b/sYHRpvufSRNsxX3R5fuCFqPlEwLXQF7oYmf3%2bsYHLUfBUCOeVcpw6QU8RFGBn2JiKIQN4OtRzKTJwOTpxY3/k2mzf5UnXYt/A5ei%2bW4e7zo%2bMXZupmm4ynwg4F3r7vzfZfX5s4HJ0/kfP9X9vktGZA7NzMh1sUWITZ2XHfaJarR4cHCwqKsrR6ZJHi/ErJmZvLsLB4wTz2cE81bBRNVwh6C3OHdtUO9cm6i9RhSvU4Up2ME87UpU7Vi0fLOeGCnSj1cphQ85olXSwXDlszB%2bvUYcrCiKb0W4hx5XD6ynIsLNgDk62RyLsK1bHW6jgBPM3z7VvPWCVDZYrhgy6sWrFkEETrmJ26cgBFb%2b3KGe0ShOuVA4bFUP6nNFquIOHcHDXzkZRKJRAKHj5ty%2bvrKw8evjoow8/qttSB4VC13JiZqadlW6lp1poKRZauo2RYqFCTOSUxGOKhZpqpaeYqRATJdVCT0u8XZUnChBzvGamjZluZ/DcebyegjQbY/Wmx8ZINVNTzJQ0KyPRAjnFTE2Nf5L40EJNtzEybMz4WxM5caLMSL7NtMePa9MAxpoZJRAIlZWVx48da21t3bFjh1AoxGAw8RlIKoBxieid2myPhOCTY1wiRlcON1RA6VAnrQelQ03pUMUruCXJ24f4nYhfQQ1oqAENs0uH80hRoCADYPHceZxgHtYtonSosC4RziujBtTsYD4%2bUSD6FPSunPjJcfwoV07yK0kdSkriRFnQWyToLUY5BXifnNShZHTFFzbcyRW48vNy8zAJP4BEIlNTU9PS0tLT0/95ycfuy0uz0HFeqe/5QevJzi37TSW76zvOhQ1TO3cdcdlPB52LfQ3zNveZfnAhVDXd1HbcZz7Z0XjIWRczgws9tlPdgfPxmzyMS5hmZwg8%2bYxOrXxI33EubD4ZqIuZa2ZbPWcH4q59ptm52NtzKbLzIGh9rtOxELKc7KyabqrY19h6zOs9O%2bhc7G064q6da%2b%2b8MNJxLuxe7JeH9WxAW5hfAIfDC4uKuru76%2bvra2trXS6XRqNBoVDxGeD05UFtLCTIQ4F87UhV4yFw50FH9UzL1pjVONW4bR5oP%2b5vOGA1Tu2smW0LnA/vOuzUhqt2HASKd9dtnwd6vzdRta8JCrBRID8TYPHdufxQAdTOTkyRsj5m0YQrtx2wtxz1lO1paD7i3jzXvv0g0HbcVxjZnDu2ybh3Z%2bB8uOmIu2a2dfu83XE6tHmuvXqmBeeR4twSKMgWufIL8vMRCERhYWFfX9/AwIAvgZKSktXjdXqfLtXGgDm5ECtFPFi6aX9b6VSDbLjcONNo2LezKFpXOrWtZn%2bbcbpRNFCyYaqhcrZJ2F9ctnebcsSYF6mpjZmkQ2UQKwUGclMBBtuVww7lpdjp6QAzHWAWR%2bslQ2X5E7U7jzhLp7YVR%2bukw%2bWFk1uq51rkYX3OeLUuUr3rmNsw3agd35gzXm2cbiyO1ivCxrjtBlgpDjrPlcwHkEkHjEKhsrKykuH66hWTrqeSYVVxHFqOI4dqUeDbRUSTlGqRE00SoklCMktJJimhXUyzKWlWJdEkIZjEVKuCaJJQLHKyWYZvF1Etco4jhw1o6TZVvrciP7SRblMmJSSzhGpVkMyrTRFNEqpFTjJJ8e0iikVOMcvICSHJJCXHy7JEWUK2yNiAlgPk0OzKQm9VRUUFl8tNXg6IxWKRSCROgM/nFxQU/D%2bWNeK6oFXaCwAAAABJRU5ErkJggg==' /%3e%3c/svg%3e)
Display Checklist - If the Gen3 20|20 is on Limited Release 2021.1.0 or newer software follow these steps found in the Prescription Editor page. Prescription Editor
- If the Gen3 20|20 is on Production Release 2021.0.0 or newer software navigate to Setup > Data > Import and insert the USB drive into the side port on the Gen3 20|20 and click on the Prescription and Boundary button.
Transferring Planter, Sidedress and Combine GPS Measurements from a Gen2 20/20 to a Gen3 20|20
To ensure the correct GPS measurements, follow these steps. It may be easier to take a picture of the monitor or write down the measurements.
Planter:
- On a Gen2 20/20 navigate to Setup > Planter Setup > GPS Setup Selection
-
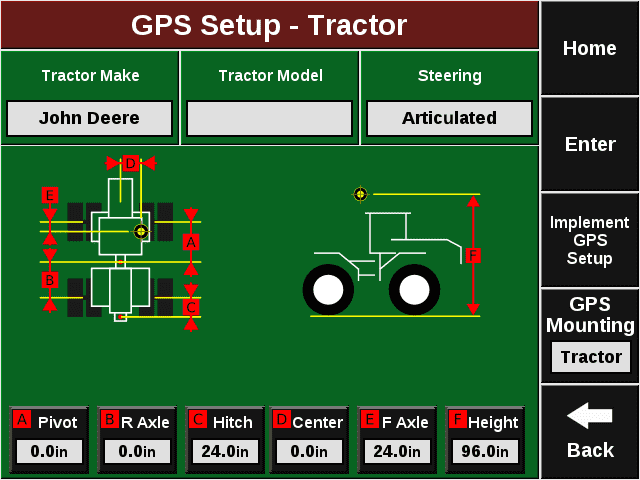
Click on Tractor and record the following that is acceptable for your Tractor:
- Tractor Make
- Tractor Model
- Steering
- GPS Mounting
- Measurement A
- Measurement B
- Measurement C
- Measurement D
- Measurement E
- Measurement F
' width='640' height='480' xlink:href='data:image/png%3bbase64%2ciVBORw0KGgoAAAANSUhEUgAAAEAAAAAwCAIAAAAuKetIAAAACXBIWXMAAAsTAAALEwEAmpwYAAAXoElEQVRogc1ZZ3Rb15EGC3ohiEaAwOuoBEC0h0IA7KSsSpEAewPRCXaCBEiQVLEkUo5KZHXLVrEsSpYlSqKKLWuVxPJmY8fOWslm/2yKcxJbthzbsdfO5k/27GrPA6hqyXH2V%2bZ8B%2bfx3ilvOPfembmPtLWyLKnTpIz6SYPuWzCmVsTVijG1YkSOjMiRUQU6adCNyJExtWKiWDumUWYeElr1uFY9adClTMVJfdEIBo%2bpFUmdJoNxjTKuViS06oROk9Bpvt3ipFE/oVVP1VbX1dUZDAYcxy0PEI7jJpOpqqqKlNAX9Qh5IYkoKBY%2bHhKRX8h7uqZq65pVm5fX7g/07Ghq3NXaHCgQ7Gpr3bysOiIVT7scM6WugIg/olWP6ouCBYLuPNaAAj0UDa8vd/fLkX450odCSdy0sbpiSK0YUiuGNconWrxrNyDgRozFRpOJQadzudy8B4jL5bJYLBRFSZNGfUgi6gUKozLJYxEpLBhUoKc3rDs2MnTj%2bIsLmze9lBi/cfzYqE7zysb1V/ftfXvh7NV9e988cfzUTOry93f%2b8OiRhLF4Y1VFHwKeXjd9MjVxet3Mv/3TtUs7d8xPJN548ejFHdtuvHR8b3dnUMTvBaVPshsFCiNiYR9uttpsXC5XJBIJhcKCB4jH46lUKtKkVhMU5EfFwkiB4PEQC0OC/M1VlQd7fLsavbFC8YRBfyjgH0DAuWU1e1pb9nd1bKmu3NvWsqel%2bcy6mcO9kd7CgmE5EhEJZuzW9SWOLVWVR6KRPa0tc8tqvrdq5Z6W5l3ehjGNKsTnfrvdMD8vZtDjVmteXp5QKMzPz2exWPQ0cTgcHo%2bnVCpJyWUVAZM2YjWE8eInIYIb/HpVlwr1FclDFn3IqOtWYyGzzq9Xd2uwbjXm16t9WkWnEh6tKQ%2bZdUGTNmjSRfDiQLEmUKzx69WdKqSnSBEo1vRolb4ihU%2brCJl0Yfy%2b0QhuiDzwJwGrIWQsGlhRY7XZmExmMBicmZnp6uqamppKJBJ1dXVMJpOIgHXzCjCOowkHMm6HxqzImA0Zt8NjNmSM%2bL0HLFGCJUuwpBMYwx2TK0o2rQbiOJZ0ookSeNyOJhxplECj%2bH3xuA0ZJ9RiiRIoYXekVjieXg2N2eRJJ5YsISyO2aC4lWBOixD8Y3ZkfAnouAMYw50TK21WG5vNLi0t9Xq9TU1N4XA4EAg4nU42m004IB03Z/kKKUGQHAC4MRUjjJIDIDuqpIcRZgRjRxXEQxgjB0ByAKQEwCy/BIqYoDie1SMhBwBaCObG1NQgRAvB7Kg8w8xJi3N6FYwwyopgZD%2bQ5S%2b8J5WxRQ4A1CDEiSoZYYQcANhReV6vkpI2kZmlBECSX4KGLVYLntm4jDRR05SXl7e0hOCkjRqAWBE5OQCs%2bn5X6MhY5Fii54WR/uOpymcaR%2bbXz17aPfHKlqZ9YW6vih5CKCEIi1mxcQclCFGDcOGwsWlfpPPQwOjJ9bHjE92HBmu3tW68sLPnhZH4qY2x4xPm9cvIfoAahu9KgcwwxoxglAAIxvHhk%2bsSpzf1H08FDse7nx8aODGtSDrJAZAZwYj/WghU9tptVlt%2bfr5YLM7sXfFd4vP5arWaBCat5ABIj6CUEMzuVUhHTGjCIRk2gHFrfp9GPGRQTrixhEM2amFEUFoYyQ2BaC%2bOjttzgwA9jNIjaF5MJRs1owlH4YgRiOP5fRpg1CIdMUNjVjCO58VUtNCjUrQwQg3DrKhcOmqGx21owiEdNQsHdWVbGyTDRnIQpIcRehjNCQGKqM2gL6bSqBwOh/0AcTgcBoMBwzAJGrNSOgFmD8LwwQwfTO6UkTullE4ZpQug%2b2ByhzSnvTC3Q5rbIWX4YKYPoXTL0CiOxu2UTllGit4NU7oAcqeM2g1SugBaN0TpApbQCdC7ocdKMXwIvRuidoHkTlluh5TSBVC7wOw28b2XYfoQcrdMGbG1NLe4XK6KioryB6iioqK0tHTNmjWkqon6l185vXD5wtnFhYWL5y6/fuXCqxevXHt14eK5MxfOvvaDq69ef%2b3S1ctXrr929uK5c5cvnHjlpMlfVpVY%2b/KZ0wuXz5%2b9eC6DhbvIPN8beZLUwsVzl65eXrh0fvG1S4TRK4uElWuvvnr96tnFhTMXF85fvnD8lXlXoNZdUQqBkFwuxx4guVwOwzCO46T6TV0fvP/727c//uSTT%2bZPzM/Ozk5PTR0%2bfPjK5Ss7duzYuXPnrl27jh49um/v3g/%2b8IdP//jH93/zW3ukes2G9g9/94fbt29/9NFHH38rPrp164%2bffPL%2bb%2b9LffzxR599%2bumJEyfm5ua2bdu2a9eua9eubd%2b%2bffOmzRs3bty%2bffuxo8c%2buX37k9u3f/2bX1f3rtEZ9WwWm8/n83i8/LvE4/E4HA6GYSTvFt/nH3769Zdff/bxp29c/9Glc4uLZ89ff%2b3aL9/7xQ9fv/7axSuvXXr1x2/88/XXrv3pj5//%2bcuvb3/wsSNSU7%2bx808fffbVF199%2bfkX//n5l9%2bCLz/74iGpW599/eVXX3z6p3d%2b8tNL5y%2b%2bcf1Hr1668uYPbry6eOWVU6%2bcP3Pu8oVLb//4ra%2b/%2bOrrL7669cGt2tjaYosxn5vP5XIzySvz9nw%2bPz8/nziF8OHqgS1jozsnR7ZPTO7dMLX/6akDm1L7No4/OzOxd8P0/k1T%2b59O7Vk/s3fj6PaJsR2p2OyIttthHaodmI1npP4m4o%2bTSu5eN7X/6cm9G1L7N07s3ZDat3H6wKapNJJ71g9vS8Z3pHpnh01dbosVZzAYOI673W4YhtVqNQRBAAAsOaAdLaM2SJlNEKMRpHlldA9A8wB0bxoeILcJzGoCSa1QVhuU0wyRWyC6V6aMOhR9dppXxmgEvyNoXuARKbo3bchz/5fmIawT8AKMRpDZCFK8UnNvpcPhyMnJ6enpGRoamp2d3blz57Zt21auXMlkMoljVDHt4vapBUM63qCWN6jl34VgUMsZ1tm6lRU%2bZXQFmKyQVfQoSjsUnGFdXkzJiSn5D/P/TXDuSn1HCAZ1nAGVdtBtxa1sNhtFUZVKpVAolGmSSCRcLpeIAJjAc3sAegihBWF6AGIEIFoQpgVhZgAmxVB/Sf5BM/WfsOyfsbJPVjNTxnxSH8oMEAzUNGjfGfQ0/h5%2bJCcgk0dsVpzIxJlFf48EAsHSEoKSVrIfZIRRegghxTBSDKOHEHoIYYQQahAS9ersc6WBDfbqoEY7U0jzIUSKCf1/QA2hlBBKCyLUJ4MWuM/PCKG5QUARtVtMZiaL%2bdhTSC6XEw5Q/CCRU0PIyuXiVcvFS/JhNNcv00zVKKYMRVuK9VtqNRMFuQGMmXaAkcbf9fYFQVlhsJATQwT9MP9xyB%2bAmYP31d5zoLysXCaToSiKPEAoioIgaDablxyghlFuCLnAJV/nkjkhhBpBmGE02y/VTFZJxhTKabl5faV6QkQOYIwIYSM3gmZHCZ%2b/CxghhBzGyvzsGh9dPAIWTUpVE1L1hFSTkmlSQAbKKcA2Lm0OF9CjCD34kAMtzS2lpaWVlZUVD1NZWRmRiTMOENwRdMaUP43zyM0w3yDjV0AFOGgdX8YckDP75aUbalweCdsFC4wyqheWtwHmeinlOy8nWgjNC4GiKJrXq82AHdGQ/ViuH831o%2bQelBTCiutl24u493Tec8BYbMjOzmYymXQ6nUajZWpSJpNJoVDStVDaAVYQIfVjyXLeeC2f1gHLwQLAhK6It7c9N6xat0w%2btaz9SF/P9mbELlcjQlYbNLxScMDCIfVjzOB3C0IYzfED8qTbuXm1ZtKtSZWWzdWLBrT0IMwMo8wwEXOxD7J6pTlRlPFABOQRm9NRYrFY9Hq9yWSyWq3FxcV6vV6n05lMJq1Wez8C9BiyPC5eMSlxjBcuW8Y3VYJ121slkzrRqJo/plPFClsmrYZaudvNL%2b6V4lOyuoiYOoAwAt9xFaFE/TxqkQ6bsnxSUqdQnnTm9aqyfVKyHyD7gdwwIvbB9gZp9oMOhAgHHHZHe3v79PR0PB4fGhry%2b/3hcDgUCoXDYZ1Ot%2bQAM4iS%2btG4hx9v4UN9gNUuLPEC/YebNRsQZLJAnASMfvpIUlPoUvNFEupqZNDG2wuxWEGE%2bq2rKH3aQtQgdNcBHBixUAKgbMRcNtegmSyD4zZ5womO29kxZZ4PKG4GsqJoJqr3llAmD0gkktra2mAw6PP5nnrqKX6aiI5saQmFUFIvOmHmJSw8kh%2bjeeGcJqjmmW7uiIMUVJBCStaAufaZDkYnwmiBqQH0qIz%2bM0q2IACTw088jmghJC%2bqFPRp%2bbEiahDO7pGCo7hqwp0XVYKjFkXCqRh3wnGreNAAjeDqDTVuX5HPzWOlBR9xgJumysrKzs5Ou91eVlaWOUyX8kDaAYTUhyWqeIlqHj2OiIfg/H4pHNeYn3ZXPbN8%2bfdWWzdXYAldXq9UOITwBmFNEFjeJCH3LoX78UdnAALGccOWZcWba3UzlbyYpnDYVD7XULplbelsg2pdmX5TtTRhIbrH7sLcMf2eOvzfSSRdO5SVXkX3HLBZbXQ63WQ2%2bf1%2bn8%2bXcUOtVnM4nPsRYIRQcgypi4nX9olV6wDdjNS4Hlq72123u3TqpbbN812NB6rqd7tNGxD9tBTdCPb2CObquDmD6BP3QBBh9GK5ywUkIYkEZwG9pvp9gaJUuX6qsmyugdurJplopHxSjoPNiGCMIEzuU1a1q8at3LzgoxGw2%2bwcDketVi9fvryhoWHFihVDQ0MajYbL5RK1UMYBWhhlh5B9hYyDMgbDh%2bZ6Qb5Pq0otAyYqpBPleaM29boV8lSN0K%2bnegCSH1u%2bXBJ2CbMj6OPXTxBh9GE5tQIuh5uKT7TVN5MYJO14mW66UpeqgJN2Ephl1VvmNm5RI0qSls6MySkhmOsD9S3f3AM2o8FIp9NZbDaVSiWTyVQqlUKhsFgsJpN5/xjNOPCsjPkswmTXwfliCexSyYddonGcP2ygx5TIVCkUL4HLNAKROKsOqVldGHQLs57kQAhh9SlIAtL2uW137tz5n//9n3J3OcnB5Y1oiRa5RcbisH73/u/u3Lnzs3fezWGSad0gpRcTd8OOhkeP0Uwiy7SUbpfLWVJS4nA4nc77LeWDS2hVTLJ6SKLtlzpdfL1biY24BGMm/rCRHlPCqRJgvMS%2bQlXq5qsHZDOdvBdq2JQBlP7YJRREWP0KkpC09enZO3fu/PW//1pa4iLZGKwBOSOCUJoLmWzGr3/1qzt37rz1Lz/JYebSe0BaL1rgg8xNsm86UFFeAQCAUqmsqa6ur6/3eDxr1qxRKpUQBFkslocS2RYXd1NFPrMTUsEiBEddvqfKZxsLJ53MIVPlXKfNtxKxKSCgQOiB5uX039KzhE86hYIII4aRl4sYdFYk0Le8chUpL5fcheQG0NwelBqRk1CaCikaG56ACxGSjkmMhDB9vex72kczsbLXbjQYc3JyZAAwMDAwOzvb1NQ0MzMjkUgYDAbRUt6LACWMaJoAVStAbYJ5Jhm3EpRaEbTP3va9tuQhz6pnHKUNgLm9EF8jUQ/KttblLdgYeTGYShwXj80ACDOGYn6BwEISl5OL4oWaaVAzuVT5FE0BYB2DZyQhXnbRNJiphRxj0q6AiPZgLRQCsTBeU12j1%2bsVCoVarS4qKhKJRFVVVSiKCgQCjUZzv5xmhJCcKEpEMITQIwRoYTjbL5OP4KZJKycm5Q2CgiFYNAST4%2bjAU4Ld9ry/WUrwhxBxUikal/MHYH7fg7UnJIxj4gmlcBTl90H3qlHG0EPVKCUCSbt0yURy3759c1vnUqnUwMBAMpk8efLk8PDw7OzsyMjIQ/3AN4tkYm8EoGw/SAsg1LsgBxFJB4S1ANS/VUEQ/P40At%2bo/h83TnukH0hHoLamVqPR2O12p9PpcDj0en1lZaVKpfJ4PM3NzQ858KQ67JuzlDBRvX7HUvT/B8bdPWAymqamp15%2b%2beUTJ06cPXv21KlTL7300uLi4sGDBx/tyP6hwEgXc4qoDbfgi4uL8/Pzhw8f3rNnz5EjR3bu3Llnz56bN28uNTT/4A6YTeb5%2bfn33nvv6uuvv/zyy4uLiwsLCxcuXHjnnXeWqtF/XAeCRB4odbmdTqfH46mvr/d6vZ6GBo/H09TYWFtbazSZMscoxAxjjBD6MDJ7Gv0m7hl4HL5l/O/Txgxh9zKxzWazp8nhcBDPadisViITgwmcFJRmRSFyBKJEYXIEJEcgcgSkRCBqGM6KgFkRkJKevQuQGoEpYZgUAbPTzJQogaWpMJwTJkTuMT%2biLSOSHl8C9b62B0UgSgTODsuIWwmzhc1mC4VCDodDo9Ey9%2bw8Ho/L5RK3Eti4w9BucnXZVB043FQsbzNhbSZlOw606fk9KnunzdZpJcbbzVirCW01KttwUbu60FdU0mk3dFnlbWakxYC1ElKqdlzSXmTottg7rKo2M5YG2mpUtFlkrTp%2bj8rWabN0WtEWo7wto82U1qaRpLUVd%2bBoqxEjXsCMtBoVzea8dgyL2Wy4lZvP5fF4BoMhlUqVlJSYLZbM1SJRTivirgtCwe9IuatR5VOr6py43WrCHQYrBxKqm4pu0Dlv0pity1cZDWa3zekucTm0ON0sKV2h%2bjybucBkFxvMT1XVuu1Ot8OlKERFOHQKlPyeRG4x42bcYTNY3CUup8kuUsmUjeq3GJx/pTHWlFeZDBa3zemyO%2b1FFqpRXL1SfSuLcUkgcrnKbCbcbrZVlle69HZmSYF8yG6zWFksllwhv/nezTt37vz56z//5b/%2bsmb1GiqVSpTTyrhrM59zgkQqV8iXrV4dDAb6B/vrVq3JlTDlzZrnKJTnKORAe3t5dVVHZ8fo2Gh3SwcDl5hXYFdJuRtysstraqLRaF9/X1tHW3GRnmMs2CzjnyeRmlyutp6ezs6OwaHBsZE4X10Ie1VHKJSTVOqK6ipbSYk/4I/1xzqb28gGoW2l4gekrAMiYTfRMXZPTCSTqYl2TyvdKZQPOawW4jOrQCCoqal57uDB9vZ2r9erUCiWGhrVqBOBAYWMKPdAEFSpVCiGwjIoD%2bGLG1VooVQJwwiKKpVKuVyOyjFAJGUaBNJVKnmBTKVUyBUKFEW1Wi2KoRKBWIDLFEUoKpEWFRWp1WpCBMMgGcSG8sWNKqRQqsIwuUKRuWRWKBVggeyuNkCtJq4%2bYRguKyvT6nWFPDGtRKAYcljNOCf9nZjJZGZnZ%2bfk5OTm5t7/yAdGjU1tze/d/Pmh5w%2bdPn36ueeeu/HmjV/e/DfnqrJsN3dyMnXzF7944YXnjx8/fvjw4Xd/9u67P/4pzyblV0MHnt3/ytkz%2b/fvP3Xq1P79%2b995952XDr/IKMpvCbTffO/nhw4dOnXqVFrbm7/8%2bS%2bdq8qy3HmpydQPfvjDbdu2LS4u7t69%2b%2bq1199%2b8y2%2bXSaohvZ/f9%2bhF54/cODA2bNnn3322bffeful51%2bk2HmKIYcdJ1pKR0nJ6OhoXV3dypUro9Go0WhksVhEBICIoaun69atWwefO3j8%2bPG9e/eev3D%2bow8/qvDUkJzs2S2zH3z44b59%2b44cOTI7O/vWT9/%2b4P0P%2bHYZvwo8efTE2XMLO3bsOHbs2K5nd1299vri2QtMTX5PX%2bDDD76hraGGVMLaOrf1jRs35ubmzpw588wzz7x4/MVf/ft/CEtAfhV46uj80WNHt27dOj8/v2tXWtvp8zQHP%2bMAg8FwOBzJZHJycrI/TS6Xa%2bl6HRmyFuk09XVrvR5v/dr6Rm9jQ319/ao6sUaWtwq0GE1NjcRIQ319o9fb0NCwumYFo5gvXIaUWV0NDQ0Zfm%2bDp7GxsczhyisW6WzF9avrvqFNmtZm9jR4iMG19V6Px%2bv1rqlZmdFWbnW1tLZ4PZ56Ysrb2OStsLlzrFx0yGYxEpe7vDSxWCwul8tms/Pz85c%2bMVnjtYBbLrKCQitA/OKAiAAIVCvlHWbAJSdGrGBmSmgFCiwgtLpI3myU2pAH%2bAmIrRBWp4er1EILwflYbXeZQZEVEOIPaRPgMmLKCmZ4CnFYulbtGFxWXVWNIEjm44BKpVIqlao0YRhmt9v/D8eHaSjVfYjkAAAAAElFTkSuQmCC' /%3e%3c/svg%3e)
Display Checklist
-
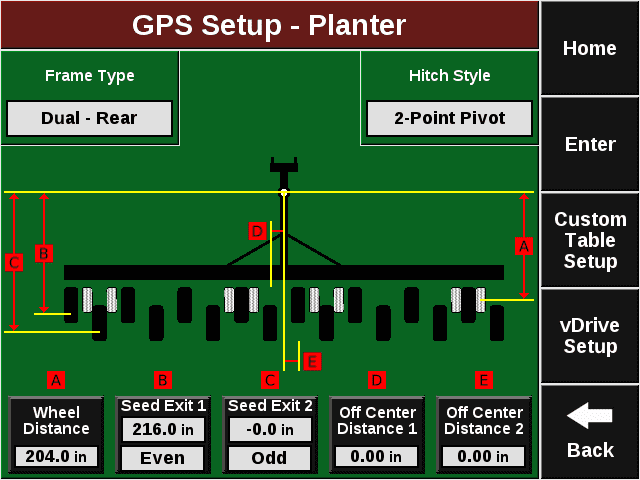
Click on Planter and record the following that is acceptable for your Planter:
- Frame Type
- Hitch Style
- Measurement A
- Measurement B
- Measurement C
- Measurement D
- Measurement E
' width='640' height='480' xlink:href='data:image/png%3bbase64%2ciVBORw0KGgoAAAANSUhEUgAAAEAAAAAwCAIAAAAuKetIAAAACXBIWXMAAAsTAAALEwEAmpwYAAAYvklEQVRogaVZd3Rb13l/2HjYAAECIMZbmCRAzIdBgBMkJe4BcC/swT3AKWpLdiVTtixr2LIkS7IrSxQ1KcnucRondtr6eMSprTbDbpo05ySNm6RJ7LT9p03PA2lbri3Xsn/nd9657%2bLe34fvvXvvd%2b/3gIcry%2bZMxkWrecFiui%2bt5hmjblqvmTFoJzXwlBad1CALFtOUFp3Wa%2baLi7KF%2bo3CbJEhW6hfsJgWbcXzxUUTKDSlw2ZNxjmTcbbIMJtrtlGeMxm/zGLO6HyRYakm0NzcbLFYnE6n4x44nU6bzVZVVQXMmgvDElFcnh%2bTSb6QcXl%2bWCzcXu4/0NayK1B5PBY51Bk6MtAXk4oPtrc%2b3NSQVMrncMeuQEVMKp4w6qbNhTGZZJDPSUPKp9LJI4P923yeDKyaLDRMF5v21FSNatEJo25cr4lKxfczSlCeHxULktZiq83GAkGBQMC/BwKBgMPhoCgKLFjNcXl%2bWlWQUsq/hM8tzJ/Pzrx08qnrjxw4l53%2bzvlzcw7r2amJbz198m8uXbx95PB3z5%2b7uGP5haNHvvX0U9u87mWfd9GNv3Zl7bmFub8%2bfeqNmzdeOPbE%2bqOHvv3MmdeurL189pmD7S1RiSitUtzXqKogKZMMO%2b24yyUQCPLz8yUSifQeiEQivV4PLBQZY2JhSiZJSsVfyJRMEssT7PSVPBkJH%2b4IjiHQtFH/VCwypdfsLvMf7es51t%2b7L1B5uDP0RG/PlV07T6dSI5ByDFJNaNFdpf50gfT4YP%2bZTPpAfd3eyvJDrc3HBwcOtbaMY0hcLEze325SJknk8TMWsxPH%2bXy%2bRCIRCoUcDgfMgcfjiUQinU4HzNVWRG1FSdyScBbfl7glUmwYMKCDRk3cZorbzAMGLGYrihQbBw3YoBELm/XhIl2/Dp6sLovbTFFrYdxuittNEbM%2b4TAPGrEBPRIx6aNm41CRdtCAhYt0cbs54fy/RpNOS/KTStwStxaO1lXjLhebzY7FYsvLywMDA0tLS7Ozs83NzWw2m3gD%2bN469bQTnfUgWTc0g0PTOJp1wzMuJHeFpnFkxo3MuNBZLzZXgs16oazLnq02zJXCWTc25yU4SxAlyiXQFJ6TItSQrHtDFpvzorMe/WKZfffWjVuifdYNTRPmNqzAM65PuNk361HNOEvm6124i8vllpaWBoPBjo6ORCIRjUZLSkq4XC7hgCJrJw0V0GNqakTJTWkEGT0tquYkNYwYBMYRflpPi6iYcZgWVdOiKnpUTY4q5JEidhShRpW0qOpzJJp9ntSIkp3C5NNWcpiwtVHJS%2bsEGQMnpRGkDewExklq2AmUncQ2lOlRNRCRowkH7nBuTFxWDowc%2bHz%2b5hCC51z0KMRNaUlDBdUHOiOnptJn5%2bOns5lzC%2b7dDX1PDo8%2buzT27Db7jlpqREk4loBVcasgoQMTCCuBfkWCcUQwrFdlnYwYxE5izDgsHDZMXdg58/zunuPD3cfTzY%2bHF1b3T/7ljpHzS8KMgRmH2QmMFlfr0m4X7hIKhTKZbGPuyj5GXl6ewWAA1HM4LaoGkygjAfPSOtGIEZv1FkzYkKybl9bJJyxlD7ehsx7RSCE9DoMJlJaAlHELP65lxmEwjnxFMmMwP6NTZh20GGGLmUDAJCqfsCmnHLLxYsmoSTJm0syV2HbUKCZtnBTxmMAESomrtCmXxVzMYDJ4PB73HvB4PBaLBcMwAM3g9H4VO4ywhmBWGGEOqKm9CvqAitavBIdgcBAidUspfQWMATVrCGYPwYwhtTJa/LUc0Cun7Yx%2bFXsIZocRcAhmDKrp/Ur6gIoxoGIOqhkDKmpfAa1fyRyEcrYQ2qBSl3R1dXb5fL6Kiorye1BRUVFaWtrU1ARUzbc%2bf%2bni2vrVyzeuPL928cadm3e%2b9eK1W9ev3CRqVq%2bt3XnpxdsvvXD99o1L19eurF97dvWCfaCUFSdGxQMwhjDTSMVs88XVS2vr1y5dW71y8%2bqlq6s37ty8fufmzRdvXVm/dvHKpSs3r958cf3mi7fWbl69sn7t3KXnfNEaf0UppIY0Gg12DzQaDQzDTqcTaN0z8C/v/%2byDD379/nvvHTt67OwzZ0%2bfPr1n9%2b4f/fCHV69c3b9//5EjR1YeWbl69eq/ffDBr375y396//2SeA0Ye4DHD8YRVgyhJ6HmXb0/f/%2bf//3ff3f71q2zZ88%2b9NBDZ06fefTQow8//PD5c%2bceeuihY0ePXV69vLKysnpp9Y9/%2bMOPfvyjQLrJZDVzOdy8vDyRSCT8GCKRiMfjYRgGBPcN/eYXH3z4%2bz9%2b8Mtfv/rtV779V9%2b6cvHyjbVrv/31b3747j/%2b3St/e/v6%2bqXnnn/rtTf/9IeP/vjb3//qF7/0J2qZD%2b4ALQm17hn4zS9%2b/R8f/sfbb3z/zdfeuPuDd199%2bZUX1m%2bvX7v5ve%2b8evcH777xt69/96%2b/c%2bv6%2bpuvvfFfH/3nL37%2bLzWZlmKHVSgQCgSCjeC18e/z8vKEQiGxCjknAqP7ZqZWFqZWFuaO7Fh4Yue243uWju2eWpnPPrZt7siOpWO7l0/snXt8%2b8TBuelDi8MPTRl7cE4ce9A5wM5o7ONVY/tnJlfms4e3zT2%2bffbw8vwTOxeP7lo6tnv%2byI7Zw8tzj2%2bff2Ln0rHds48vTz2ykN4/aRvwO3Ani8VyOp1%2bvx%2bGYYPBAEGQSqXadKBoqozRpmB3QKyQmtmuylHJbFeyQmowqAaDKjBXAwZVrJCaqAyp0biTm7j/JE7cc73HAV5KC2ecGzqELEE1GNyw%2bOntJ2SHIHpQYU9XejweCoUSDofHx8f3799/6NChgwcP1tfXs9lsYhnVbvMJhg3icVPeWNFXJC%2bju%2b9fj8DMAQhMo2C/Goz93wa8jO6rWxGPmXij%2bqIxP%2b7EuVwuiqJ6vV6r1epykMvlAoGAeAPqWSc1rNp4SF%2bdX%2bxAEmUOQhQlSIFYVD338xP9wUzEEEpUqUm6cCcRiTcG/ScQi8WbQ0iVxamDakYMpUcRRgShR78pKVVSgE%2bjNsjpsW%2bkw4ii5LBKk3Q77HY2m/2Fq5BGowF025y8MaVsHM4fgwQTsHQM%2bkacgGQpCHbJpeOwdPybSY3BnAll0YirvKxcqVSiKIrcAxRF1Wq13W4HanZZZ%2bN8625l5VLBbCLPsVPh/Aa07VRUbC%2bY2Ka3LSrw3d9AZ5eicrFgOsF3zeChUJff5ysvL6/8GFVVVYFAoLy8nIjEhWOOklopkNDk9cCldQVAFKMOoZTw1yEpjAJDmCAOFQVAoAuhRr%2bmDiWMAlEsrxfxbM1XpT32YgsIgiKRiEKhkMlkBoNBJpMBAKBSqQiCAKYph7VdRh7G5EOQI6SgplFuHGEnvg6FcYQdR/NH1LZGFrUf5qa%2bpg47gTCTiHwItgal6Ki3uMhcX1/f1dXV1NQUi8X6%2b/sjkcj09HRVVRURiU2TDnuLDMhg8kHI3aagJFHW55a//zfKUlKovku5JqDv8Aoq9xTYalmUMMJOoZ9fSb8i6QkkL4LoOuXKMa/NVOxyu4LB4MZRJhQKRaPRqamp6upqYhJvOEBKY%2bIIbO5WARmU/YBW2TGEnEItIeU7AOlpPTiQ4ZV46cCWAnYCAb%2bWD%2bwYQkqh7jbFDM5zh51Ot5tKoXi93vb29ubm5mQymUgk9Ho9g8EgTmTGKae1TQ6Ma1trpE%2bpWdaQkpxE2BEYjD4AmUmUE4FFNTJFndi3LDHUsCj1BYzafEa7gohuCeSB1LhhCBjVbHMI/xUA5mtN%2bhK3gMPFMKyurm5hYWF8fHxpaamqqgoEQSISjwcLbwopul71pEv0UwDors4HJrTcEQ1r9CtzRAMOQIzmAlK3WjiLBR5RFG5l09Ia9ijGDCkZLQXMCPwAaqMazogGGNU0bJUdQZm1PXabx82kMwKBQHt7u9/vDwQCPp8Px/HNSHy4WvsRALTVybAe1YRXJI3A1Fop1cSn24Q0q4BmI0i13p82AbWQR5EzqWY%2b2S7ieQVlgxwDTgOMfLpdSMdFVAOPIgepli8VsQpoNuHGlSiY%2bdRWRV4S1XXLC8Y8JS4Pk8lsbm5eWVmJx%2bPz8/MnT54cHBzczAuVZ2yd5SJeFBFGYHOHChjT0At5AAAAJOBTUEgA%2bd57AKB%2b5pZEJZFoRA2bDZSVArpCEgCQyJSN3z6W%2bmwXQpDy2ZqcFRKJaE7xiwsSqL1VCmfctmIrk8kUCoU8Hm/jdI8giEQiAUGQWEYNU86idjkwrJEP5FahDAa2FNCq8/UZryCsy48WapI4pUrMbFUQY30AAsMQs0dFr5CAvWowDFP7ldphtyJoBGvkhrSPF1U7thXYFhRAhZTTojSNlTIG1FgSVwyZKRV5uS4QIRKFGS0F9GopcZs7QJpGSsFqmaKjSJ3AgW4lKYyK%2bxF7g1SV8fR0dPpygYxAWVl5WZnf7y8rK9s8UpomHY4WGSmDSQYgU5sSGNFQtVyAAzx6/gnrQqBupXff6YMAANDtItakljWMscY19FoZAACMlgLuhB6IiPdcWunv7BXwBU9dOMVIaSQziGu3EiADElvB%2bTvPM9LwrucOBsf7AAAAW5SsMQ1rBGONaSgGLolJARMoYxgRThZevH1ZwBf0dXbvf346f0ag3Y7gE8rhHr5lAi8rrVCrVBsnSTSHjTIEQQ6HI%2bdAMxEHNFF1slEszqIiGwfgAY8%2be9TciAfijY9ffhIgAXSbEExjNJuQ2aNm1EoJB9oU7C4Y0AFLp/cOdPfzefyTl05Ty/LzGvJce1QACRDbCs6tPUe28HYfe6h/IQYAAKtNxexU0uxCMIVS9FwSg8xKorRKCatKfmr1GZFQ1NvRte/ZSaEP0CULdIsQNiu3jeM2q53DYQuEQjabvZGbEAgEGyOKiAPGCUdhqxxIYLoJVcuMzLZXXVTLooppmjEfU8QRIGLdRAlAAQirYYh4FWUSRoOccKBDSfdLAADAxl1Si4rCoBZNlQIyFh9j4HtVAEAG7XlFI34AAJDaQkWfGQAAZkhJLxUThUE11cgl0clgCiUrQEoBaJzwUxhUqUUNjXqI6YCL6WktMKTGkm7c6eTx%2bQqFwu12YxhmMpnkOWxupz1Ze6xeKJmA80Zg9jAsHEX4Ibm4LV80puCpqSQVk5okHjmzU8nsVQEAQPOJiUhZKQETCM2XRwIAakRFbZfTt0ipKRUgBwUaBr5PBVTKmF1Kchcx2EglAlpMTa/KB%2bMIzZ9zoId4FfQtUjBNOEBWgNSUmlAIymkRFZkE0L15nBENLarSpd0Ou0MkEi0vL2ez2e3bt8/MzCwtLS0vL4vFYq1WC/j226oXJM6dSucuhWuXAt%2blcO1TOvep8D1Kk59OQ9lgCiNOWBmM2U0MDHqpmDWqAZMoa1RD84kBKgkMw6wMBqZQdhoDFCyBjonvU1ETGHsEY3arATJA90s%2b04VMOABmcrJplKxikVUsVpq4Ja5hGKCQaD4xe0RDjaq0KffGiay0tLSsrMxqtZpMJrvdjuP4ZmpRMeMCBiFqBPt0MziUYwQlh9TMHjURRze2AzGEeA9haLMmgTAHIWancnMLkKuhdaulMWXxDqV2QSUdhZhRhNGpBAe/rAuzV83svcdKPGdlEGIlUGqMcMDtclOp1FAodODAgVgsls1md%2bzY0dHRsRnI4DmcSWRzUTaR60QYSUJ0c1eYQsHkZxJYjBRKu7cmgRK7nXsaUBOoZAp2Lyjc2xTLZYI1CdPUpyanNzeIzDhCT6KMz3YBk59aYcYRWgJhplAwgbLimw64nDibzbZYLPX19R6Pp6qqKp1O%2b/1%2bPp9POADN4bSImpVAmXGEE0NkEZgXI4S%2bIDUSRwRRWBqBv2S3JxyCVaNQzZSscVJ%2b0sx6HwC8QQWQ2twgsmOINAILovD99Hm5BhuNP3HAYXdwuVy%2bgA%2bCIIfD2chRbwQ1YhWC5nB6BOLGUSCjaaiTv0MmT3jEwIiGFyUkNjfMcZQTQ0kZzZxV%2bF06xdemJKUxTox4SLlfiWMAI4HmRZGr%2bcwXpUxJCmGMoKohGOlVc6MwmOtOTmN4m/Jv6JRlqxDIaD7pDub0eVEEGNGMesRvkclNdXIgo%2bHFUFpMrU25S31%2buVwOwTAEQZBaDX0MhUJhtVoB1ZyTFFMwk2pgBKlpzP8eDciUCIBxBIyraUk1M4HQ4xA5rmLE1cAwNGnlvEgDHG1SIK2ixZS0JDF2aQk1Ja4kJ9XcmOpCPmVNQmFHVaSYipRQkdMwI9eAmYSAEcQWlH%2bbCczZucAIzEhs6jPicE4HAibQtE/4OhXY2pAPjCBETaJAm3Z/ktytqKiorKysKC%2bvuDe5q8uWaPscxkE31mNHQ8W2kMXYZUe7bYYBl7HPxetHZTGTPV5ROOQxDnk8ifLKRIU15relK%2bzJCl2/kzUEa6JOW7zMOOguCntLExX%2bZGVxzG/PVFpifmjAwomg%2bkEX2mlRh8zabputw1bYZUO7rViPTd/tFPVrJTGjoRdHOi3qDrOx22btsGq7bWi3Tdtth3sshojb7nBwORyxWMzlchkMBpfL5XA4QqFwcwiZx0thJaSUKry4p625ze8vt1vs5SWlGISqhAVgtQwJmmdTUxNjE%2blYKhlLxaKJ8czYxMh4b6i7JlBNbZN5m8qyI9PjI2NTY5MD/UMzU9l0LDWaHulq6XBs8bK71UaDobaipq%2bzp6zEX1Lit1sd5SVlHpfHpDay/TJFZ6FVY2rY2tDV1lHiLvG4S3A7Xu4r8zo9SqVS12bDPS6hQCASiSwWy%2bLiotfrtTscG6lFYjdqGvdLZVIOl9sebM8MZzq7OodHhnv7ejk8jpDNZ9bI5E262rJAT39vT093R2dHMBTs6e3p6unq7Oyw2q3MTiXmN7Y0NPf09vb29bUH27u6u/r6%2b0IdoZaGZrkN4vYhqA5NpzP9A/0ej6e5uTkcifQP9GdGM35nCdUjlIZ0bhueSCU6OjtxF97d093Z1ZlMJbPZ2XyFVNNqcXndHDZHo9V8/63v//nPf/7wjx/%2b6aM/NTU2MRgM4kBDOCCV1tfXx%2bPxgYGBjWtDY0MwFFSI5cxqqWQrev6pZ1bXLj/yyCMrKysXLlw4efLk9evX7757N5aIAfUCY2XxO2/9/U/ee%2b/w4cPnz58/derUjRs3Xn/j9X/68fu6UhMjpKiqqers6MxkMkNDQ6lUqrGxsbW1tWZLjd9RwvDmiduw5i2NY%2bNjTU1No6Oj/f39ra2t7cH2QFXA6rTCjUUur5vP44vF4urq6idPnOjt7Q0Gg1qtlsfjEW/APFEqyhOZzebKysrq6uq2trbq6mqfz%2bdyuwQgD6yRSerQYytHLl1efeyxxw4cOHDixIlTp06dPnP6Oy%2b/HI6GgQahodz86suvvPnWm0ePHj1%2b/PiZM2fOnj1754UXvv/6W1p/EatLZXParBZrfUN9XV1dU1OTx%2bPx%2bXyGQqPDaAX9%2bflBrd1krais9Jf629raKisrA4GAy%2bUyFZlgDYK1FOMeF5/Hk0gkbDabTCZTKBQqlfrpRz59xmOxWurq6vx%2b/0bCqKKiYsuWLS2trT6nlx7IV7QYelo7F5cWs9nstm3bduzYsXPnzsXFxexM1mwxM0IKQ4U5HU9Nz0zPzs4u5TA7OzuTnRlOZPIKZZxe2IHb6%2bvqyysqAoGA3%2b%2bvrq6ur69vaWt1mR1Mn6Sgy%2bjDvbVbtmzkqsrKympqahobG1uaWxAtirYUu0s8IBP0eL1TU1PNzc319fWpVMpqtXI4nNxn1oGiufn5u3fv7srh3PnzTz/99K1bt15/840rFy6TSgWqVuML127/9J9/ury8vLq6euLEiX379q2vr//ut79raWsBGkSloar3fviTn/38Z2fOnNmzd8/09PSpU6d%2b9a%2b/%2bsd3/kFmUQONeYvLix99%2bNHhw4dXV1enpqbW19fX1tZ%2b/4ffrz17ieoSiNuwO9du/f277xw/ceLJJ59c3r79pZdeun3n9v/89/8kR1LSKrSk1McCWR6PZ25ubmFhYSQHn8%2b3mV6H49bqQGBhbj4SDo%2bNjCZi8dGR0dGR0emZ6aHOflK5QNakvfD0s2//4Aennj518fnnz5w%2bc/ixw2traz/50Y%2b3bKkFGgWuZt9rr/zd22%2b/fenipaNPPHHgLw5c%2bMsLd%2b/%2bw/defjWvUEYNyeoa6h7e/3A6lUqnUol4YmZ6Jh6L7923dyjUR3ELxEEs1hfetWtXPBZPp9LpZGp6ciqVSB78i4PuEo9iq87pJrYSohw4HI5AIOByuRvnASKx5Z6oKfAiMhek8KIFHkThReUeWO5BiKsTgjrNWJfVGLCYGpyOthJbi9fRVoKHSq0tnsKtNqyqEBq0aJsshbU2U73D2uJxBv14qNTW4imqsxdtsUFbjGjEri7TiR3KAg9C0IvI3IStfFxN6AdNWJ%2b9AIfzcfVmAw8ic8MFXlTiVEk9kDcaCFQHEATZ%2bDig1%2bt1Op0%2bBwzD3G73/wJBoK4jrEjcFQAAAABJRU5ErkJggg==' /%3e%3c/svg%3e)
Display Checklist
-
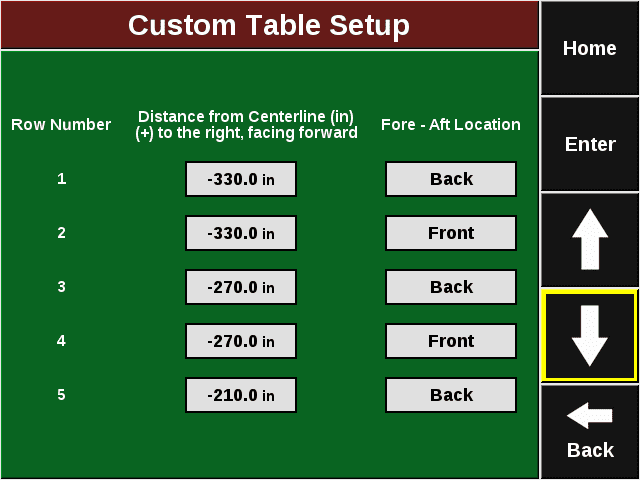
Click on Custom Table Setup from the Planter Measurements page. Record the measurements of every row on this page if you have ever changed them from default.
- Distance from Centerline (in) (+) to the right, facing forward
- Fore-Aft Location
' width='640' height='480' xlink:href='data:image/png%3bbase64%2ciVBORw0KGgoAAAANSUhEUgAAAEAAAAAwCAIAAAAuKetIAAAACXBIWXMAAAsTAAALEwEAmpwYAAATJklEQVRogc1ZCVRT17o%2bCiSQeSYJIQmZB0CGJAyBolatQ0lVxAGEjCcDqMiQgIwioK1VkUGUUQRxtpO2iiBTBYeqeJ9za2sVFQfUe1u9r/e%2b9vLWSZALFtB731t39V/fOmtnZ/97n//sf9wb2DDtHZu3eI2fT8YU7/GQ7itN5nNShLx0H4nVW2z1FqeI%2bGkSAdSWitLEgnRfqVUqSuKyrd5im7c4VSywSkVWqcjmLc7wlSZx2an2Maki/vBgq1Q0wYoQ/HzSpaLMme%2bqVKopU6bIZLLAESSTyfz9/adPnw5YfSQaMsFAo%2bip5DGhcycZGbTNSxYVzJoJelATuewVfE7etAhboP9KIS9JLLAG%2bBkZNFugX6XZuFLIT/aRbIicZw30y5sWYfFiggxauSY%2b5x2lkUHLnRqeESTXU8nJ3uIkiVBHIY63KAQaRUfCGf18/fz9EW5uOBwOO4JwOBwKheJwOECGn4%2bBRjF70k0M2u9h9qTryYRsZciBvNzimKVfbNr46Yb17fU7T9ZWHysvPbatrLmivOfg/uoES7JUtC83uykjvff4sc7djUe3bjnzyeGOxl2rxYIvNn/8VVlJz4H9x7aVnayrObhu7ZEtm74qLUkS8kEa2TTO0iZPupFKTpAFyBUKHA5HoVDIZLL7CCIQCEKhEMiQivUkvIlKNrqTxgRIIVo8qMVRCze8N6sifnnxwgVlMcs%2bmjenOGphyeLoDe/N/GjenLywUBOVkq2Qb5g9q85iqYhfvjFyHjRgSbSZ7r7pg8iSJdHlsTGF06eVxyytiI87mJO1LS4Wmp9CHG9dI5UMErGWKT4yuRyLxZLJZDwej0Kh3OyEwWAIBIJAIABss6bq/KVG%2bRRQ5jsuAn3VEp7GWxAv5qml/HgJTyMVaKQCtYSv9RFqvIU6XxEY6KP1FWu8BXFCr3gxNFgtgUaCMl81xMiNF/O0PiK1hB8n4ibPjND7SQwB3hMtKp9i8JOsmDNDrlAgkUi9Xp%2bdnR0XF5eZmWm1WlUqFRKJhHZAXjCHmSLjWIO90oImANcWwrWGQE%2boEcqB2qFcWwjUsIY42DnWYHu//S/r0F%2bjeK3BjhnYyTKO/S%2bv8cFJC/ZMlYWmz1XIFWg0Ojw8PCoqKjo6GgRBnU4XGhqKRqMhATzSAiap6TA900Xn%2bR/Em5eD6ZiAlsYBA%2bWBMofhIuwEtxMWix1SIbZNAdOxkEYuAuT8oYAEuS4GpsAcpJAr8Hg8lUp12C71FRGJRJFIBLBschctEwFy3AxefyggDBxnvSffpJji6wt3hWMwGPQIwmAwCASCzWYDTJsc9nYCwPUsN4OX64geVwPb0TlqgJ7tarBDz0YM9UPtf1eAoCWLlyiVyqlTp0aMoKlTp4aHh0dGRgJMq3xSPA1a1Q6YjuVYG6ZjwvXQ%2bzneGGnk4i0ipJGLMvKg2UGOq56NMvKICRJXPRsJct0MHIJF7Gpgo0w8hwLgLELHnBiTAAlykUau482cNQy4nmWfmY0AOXAdy1nr6WqAJHz1DkxIYD3bIcC0qdOYTCaPx%2bOOIB6Px2azZTIZwLIpOKlB5BXeWLMQaxbSk/wwJj7OLGSsDiAkiPEWMcrIc9F6MpNlcTtWaqpXa6qSEnZlzN4U88FWbfC693U1KfNLtEsrLMoC1ftb4uaXaKPLjSsaMj/Yqkluyo0uNyoLIheW6rU1yf45Myep6UgjV5geRkiQ4C1ijInvomO6r/QV2JRoEx9t4mPNAqxZwFgdiLeICBaxi4HJNykC/QOQKCSRSCQQCPhXRCAQMBgMl8sF%2bJlKQ22qvjZ1dVOuaqvaUJu6ane2uT49de/aFY2Z6uokUoJ0ssZDYFPO%2bGjxe5uWTf8wOqrMMG9LXMT6hb5Z00MLIudtWT5nc6xP1vTIYrWyUDXtw%2bg5m2KC8ucuLNUrC1VTN0S99/GyaR8umvHhYriehbeIl1WYNVVJpnrbux9Fu6/0XdGQmXGgKGL9wsXlRnV1UlJTzoYjZfqaFENNqpuJwzPK5TI5FgflDo7g5Xh7IpGIx%2bMhL8SyKeA6Ft4iIidKcRYR1iygrpxCSBDjzEJSohRnFiJBzmQ1PSh/7vwS3XsfL4sqAyOL4%2bN2rIguB4Py561szErekxe7I9E3e7q5PkNTvVq1VZPYkKkqVkeV6Zdtt8TuSExsWBO7PXFBiQ5jEtj1BFoObxFhTAKsfRW0iY%2b3iEiJUkKChJzoTV7hTUyQ4M0ihxEr5Ao3BEImk4WFhbHZbJFIxGKxPD09hwRgWuUudhWE6%2bx6OaT9UMPxdKgmIUHiWAZt5CNBLgL0Qpq4cAObkRzISA50AzkYiwBh5OATxK4g2zNZxkgOhOtZ9pEcJMhBQcYzZAOQ/YBerqCXm/0JN7CHG64gG26A4ApC6zpsIFgR5OTkpNFoVq1aVVRUtHnz5o0bN86dOxeJRP4LbnSkh4F%2baljOyz2cl3tMiqFOjqE6xdInx9KcYj0mx9CcYumTYqjOcR5uhqE5HW5gyH2BXnDtEO8wJsfQJi2DGJ2X04c6Yz3gapaz3QbkMjkajeZwOEKhkM/nC%2bxEo9FwOJxDhUYJ4PjwE0iCNHAm6T0UCe9WN9bt2Fdbta%2b2ev/O2oO76g7tqj1Yv/NwY%2bW%2but2f7J2fHgPEkB0u6/e8NY112/fW7NhTU7m3pnp/XcNnTbu/2Fd3qKF6/87tTdXbdldBM9higGV4UUKIIxI7lH6YSCTSsA0MCYAwcBzeRpY320nDGG9PUCAX0Lh/kBXz9P6T/v7%2bI59/UbWjcvPHmz89/GltdU3zsePnz1/4xy%2b/2UpzgUVYtJk/Bm927LP7A/39/Y8fPb79w%2b38vLVNu5sa6neVlZReutj7dOBpX1/f/7z4W0ZZHhCFFCcqJ/BCPB5vtAA6psdq/ynZM1y0nhMJoHZfkL385cOfBh49Od3V8%2bXnRw/uOXDiy%2bPHvviyrfnkpQuXBn8dXFO2FojCjCEAxBv38uFPzx4//fOT5w/7%2bg/tPbC3oamxruGTA4ev/enqi2c/P37waPCXwazydUAUQpKojHgngsFgcDgcrxHE4XCYTGZAQMBrKsSB65jOGgbilfqOGSCd9J4SY2jGlhxraXbm9oKcqqK8mg05VUW5VUXZlYXp5bk5FQXvrJoHxFGHg9eYvNaSbFtpTl71hrU1G/LrPsqr2bBm29q0rVmpWzNztxdGrJoHLCeJLCFjRuKIiIihSPyaDTicxhuCPMhxUdOABTBgARz4wAVQOdvhAuEDGDAf6nRZTkJAb8%2beiHcBHBo8zKtyhtgd/dAMZBeQxTcp/Kb4ubq6YrFYRzrkeGKxWCQS6eXl9boAcD3LRceceAdcDEyW3j8qO35BXlz0Ou3iQt2SIv2ifM3iAl3UWvX83OVL8nXe5jAntcdrevga74LcuKi16qVFhuh12kXrIPZF%2bZoFuXHzc6AZfMzhQLy70BzsyEbpdLqTs3N2VnZRQaGzszOdTh8jG4VBgd2HmxbyBhvQuEemL3148/7d7%2b%2bc7uhuOdrc/Pmxi6fPdzS3Xeu98t3Vb//66Oe0zVnjGfEQ760793%2b4d6336pefHDnffbb3zIWe9lOXzvY%2buH3/hxs/vHz0s3VzNrAIMmK5TA6FYSxWoVA8e/bs5YsX4WFhaDSaSCSO9kIgx0nDENiUUzcsBNQ0e342rhGrsmOe3Ht8917f/gP7i4uLs3OyK6sqtxRvqa%2bvbz3Z%2bo%2b//ZZWmj22AK947z249%2bTJk3PnzlVWVRYWFhYUFGRlZ332%2bWfPnz//8c6Pv/z83%2blluQ4vJJfJHdVw8urkX//%2bP4O//WNNRgYKhXpdAEd6jDLyUEaeI1qNHQdALqClTU9Wfd3W2XGqs7Wttbm1%2bcTJluaW5pa21hbo54ne8xd0%2bQnAEgLaxBuHt6utq729s72ts72ru8s%2byYmWttbWttaOzo6W9taL31zQ5ycCizHihFAoF7IX9VQq9eb1G31373p4eIwRB4YD2Ztzd9ALofFCL%2beg4ziYeC5WzRsGJp6Ljof6kfFv5h0GJp47jOFOZLyXkz2VcAhAJBEpFMr3t77v7%2b%2bnUWkEO/1/CuBYHrXcCxXn9S8JgFXzhsUYKdWwAHYjxlEoZCrV/XTP6T/1XqLTaWQyiUQiikTC1wVAgtx/SYVa2lqPnTh%2bvKW5vaujpa21%2b0xPx6nOC%2bfOv6UKtXe2nzh5ovNUZ2d318n2k232ntbRKiQV%2bwOAGxyOg8GwOBwVj6fBYFg4HOfkhGIwOK8ZsYcgXTlr41Ignvo2Rtx3v6%2b%2bvr68fFvR%2bvUNjQ3FW4sPHjrY3dP92y%2b/WktzJjbi%2bw/uP3z48NatW2nWtJLS0tKyssKiwrNnzw4MDNy5e2ekEackLzDo5UYw1AiGjEAoaFAYjXNG7QBczyImSpgpMtj4oeA1V/h1a2dP%2b6lTrV2tR090NLe1H2871332l4G/pm56kxv9/s697/tu3/jhyKHPv/r06Kf7Djd/cezyN3%2bC3OhNyI3aNmcD81GKjJC2k/6pqeQ1azwyMugWCzIhAZmRQc/I8Fizxr2i4nfptKMemCgMjw5Gi9dpoVhWoF1SqF9coFtSqI/KVy9%2b60C2MC9%2baZFhaZFh2XoQ4l2rHg5kvpYwYBlVmSPfslkIABgXFwIMRjIYUtTqlS4uRGdnAgDgtFrP36UShv9wKgF7xWufZP4/UwlYHBnQsIMzAyu2iTEYHMWdyGJ5DDx5fOfH2wwGjUIhkkiEhATWKAEQIAem9XTWvP7lxk7IiqGELGv7upzKorzq9VnbC3KrijIr8q2lObkVhW%2bTzKVtzcooz8utKsqphLLA3Or1mRX5/0zmkuYBS8jKHMW2cjECiSORoHrgzu0fr165isViSSQSDkewWFiv1wOsFFlg3ntO48swnBK/6P/Lnwee93R1Hzvy1eH9h86cOn3syFdXLl2%2bfev24N8GM8vzJ06nnz5%2b%2btPTv9y68d2Xnx09ebylo6Xt6KdHer%2b5%2bOL5UDqdvW0doEKG5wVvKxcjkTgikTBnzpxnA0/77z%2bYOWOmoygYLYDdC0nWRIQXzYfOP95U0Dy7P3Dv3r29TXv27N5TU1XTuKuhtrpm/959nZ2dg38fHNcLvSpoHvT3DzwZ6L3Y27ircce27RXlFSXFW1uaW54///Pdu3ehgqY8D1ChHAKgUAQkEpGSkjJoJ4vF4ubmRiCQRgkwpKBvUqGRZWHlvtrKPTXVe%2bvqDjZU76utPVBfs3/n9j3VTYftBeH4JWVtY92OvTU7mqqr99XtPNxYd3BXzf6ddQd3Ve6BJqzYXdX0yd4FthhgESEsJwjaARTO3Z2MwaDOf3Ouq7MTiXSjUMiv78Cwkb2xwLcrGxOIpdjhDiGGAsQ4nvbOGLLLOEXpaF4KhGXkIUYHrwMxZJiGAahZIVmykq0iAMBgsZTJkxGBAUpfX4WTExKNJsNgOBD8nRdyHPpNLAAcZBPVQrExRGQKlpiV3gnhUotSYg6VWpRiE9QpNSupGumYwWSIFwwRmYbgnRguNoeKzaHeCWFiU6jIFCI0hUjNSrrGG4jzUGTIDx/ymzWLrFLRVSr67Nmk2bNJKhU9MpL2/vuUgoLRqQRczyIlSikrfCaQwa7H1Lm2xd9f/u7bm99evHCx%2b%2bvuc2fOXbp46dyZc9evXr98%2bcqjuw%2bTPk4HonFj2YCd98p3169fv3HtxrUr1zraOq5evnLlvy73nOq%2bevnKzes3r9hnWP1xOrAIJVkRmpqyMC4uSKMJ02rD9Pp3tNpwjSZMowlTq0MMhrmjjHiSmh6QO2vmxiVvSCU07qqsmEd9/Xf67lRWVebm5ubl5ZWVlxUWFu7cufNke9uvv/w9tWTcSKzKinnc97Dvft%2bD/gc3v725YuWKtflrc3NzMrMyu77%2b%2bvGTx7fv3P7rTy9tZTmOVMLXRwaDYTAYMhyOdnJyhcMxMBgahSK4ueFYLN4YNoAxCSZI5kZ%2bxatXr/WcOtXV0dXV0XWm5/TZ02dP95z%2b5tw3T%2b49WrXR9pY70NXR2dXR2dHWcbq7p/dC77c3vh25A%2bLEUIUcqsgIRIKf35TMNWtCQ0NkskAmEzpahK6Yfn8y98Z0Gg6yCWqBWB8sMkLqDsESJjUrJXaITSESYyhVLYXpWGPawBAvOASpJcw7IczbPgNkQmCwEAyWGkNpaukkrYfjhgaFQvH4vIsXLg4ODv78088vX7yMfD8SDof/%2bzc0cJDtpGcMQfeqMQIwA2v4aHEiXv3Y7E56BtzAHj5adITeGTNm7Ni%2bPSYmJioqis/nYzCYsXfgLYF4E/4vvIgRNzRymRxjLymRSOTkyZOdnJycnZ3/ecn3h78jC4KO193cgkNCkpOTVSrV3LlzTSaTn58fCoWCdoBtvyNDQrmQ1x8KSAPHRe8pMCmCFAoEAhEcHGyz2TIyMhLtpFQqh47XGbbAyVoGHGTDDKw/FOAG9iS9B8ckD7Af7jqqeBQKhcPh0Gg0Ho8fumIKTJvB0PiyDQEsvf8fCmx9AF3nE5ww89133/Xy8nJcDgiFQoFAILQTl8sNCgr6X86ILT7wHCdhAAAAAElFTkSuQmCC' /%3e%3c/svg%3e)
Display Checklist
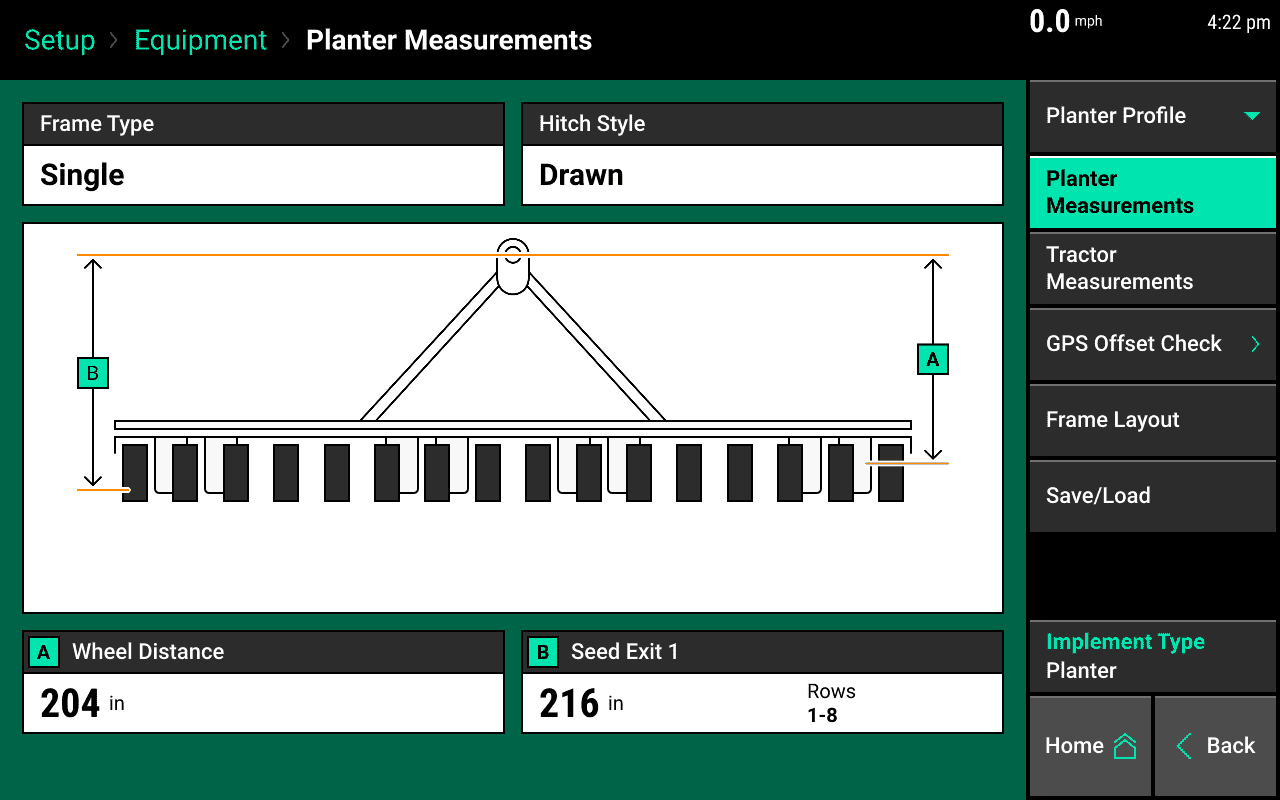
- On a Gen3 20|20 navigate to Setup > Equipment and use the Planter Measurements and Tractor Measurements tabs to fill in the information recorded from a Gen2 20/20. To enter the Custom Table Setup information navigate to Setup > Crops > Custom Table on a Gen3 20|20.
' width='1280' height='800' xlink:href='data:image/png%3bbase64%2ciVBORw0KGgoAAAANSUhEUgAAAEAAAAAoCAYAAABOzvzpAAAACXBIWXMAAA9hAAAPYQGoP6dpAAAQBklEQVRogdVaCVSUx5b%2bm83MSRxNwDWyNw30xi4C3Y1AL3RDsws0q9gKLnFD0bg8E2di8ibvGWMSfcYXM75JPCejIsqOa6JGAREQF%2bapGPcNVFAWWb85Vb0ILqOCb87Lf85H1V99/3tv3bp161YVDMMw%2bL2DxWLR0tXVFcHBweDz%2bRgxYgTMzc2foR05ciRsbGxgaWmJ4cOHkzYGDHsCGK4dGIfxYMZZwpRhgTX6XV2b7Vgwju/raEjpNAEsq5GUmUgshlwux6RJkyCRSKhg0haqDIWHpye8vb3h5u4OsVhM6xN9fREYGAgnJ6cBig/ZACYmtBQKhYiOjoaXlxdGjx6NYcOGPUM7ZswYsNlsuLi4YNSoUXoDkI67O4EROIDhWMOUMB35js4Anhwwbmwwzja6dxcbsN4dDhOGAZ/HgzQ4GEqFAqFyBbw8PeHv54fIiAioQpW0TRwQgPCwMFoqFaGU3k0g1Cn%2bT%2bA9DGNuOrDBhAXGwgyMqc6qz4WBZiij9paFjsebgrkpTMzMYGFuDgsLCwoyBczMzIylAeTd3ELXxjDpUjBpIWCSAp9AI9EhebLut6eRGkzBSguBSbrUCFaaoS4b0G6SIaflABmJYh2Sg4z8BgtWKtEpCGMmCuApcIMrl0tdnMvl0mlJSh6PB4FAAHd3d7i5ucFTIASHTkWtHDb%2bnhApZfCSBsIzWAxfRTAmyoMhEPvBwVMIR6/Bw8FTAItoEd6f5I7AcCX8lDJMCg2BKFyBSaFSuPp5w95DMCQZjp5CsOLFGOXvhilRMUhJT4MmKQmxcXHQJCchUaPB9MxMGp9c9EZxDp0MexdnMEyGFHY8F8SpI5GUqMGUmFhMFkswOzML4UoV2PYOcHZkgzMI0O8cHDEszBe2PBckx8VDk5AAlSIUMZFR0KZPha%2b3Nxzt7OHMdhqSDFa0P0b5CuDHFUIqlkAmDkSQXwACvCciKEAEqTgQPm7ucHVkg8fmgCcQwMHWFgwzTY4/bd6IooJCFJeWYN/%2b/SjbuxclpSXYk5%2bP4pISFJcUvzaKiotRUlqK/IICsGfH48/f/QXFhYUo3VuG/QcOUDkFhYUUQ5eRj9FaNd5T%2bMErPhLcWBV4cSrwY1UQqOXgh8vAC5dCGKmAR7QK7lFKeMao4DzZHwxLq0B5/Wn8cvAQdubmorS0FDt27MDjx4/xpp5Jf5iF8vo6HNy3n/InBj5w4AC6u7vfmAyn6dFg1s3GsIotMM//D5gXr4X5oW9gfjMf5rcKKMxu7IHZtTyYXdkFs7tFMC36s84DDp0ox%2bULF3H82DHs3pWHX48cxf1799DX04vuzk50d3YNCr3dPehobYPnUi0OVZXjyoUGlB8/jvJjx1BdVYXm%2bw/Q19MzaP5Et77uHrS1t4OdEQHmi9lgHfsWzNblYHLXgCn6E5hzP4Kp3wbm9H%2bBufATmOt5YK7mgmksBFNMDKBVQLB4KqSfZCNkTTbkny2G9NNsiD%2baA/%2bVMxGwctag4G8oV8zEiEw13HIyIP1kIZUh/XQRQtYshHjV4GWQ76iMP8yG30dz8FacGMymbDCVm8H8tBrMnj%2bCyf8jmB3/Bua/V4PZtgrMoa/APCgB01gApnUfmAPrdR7wRe6POHTqBIoqj6KsuhIlJytQWl1J60MF4ZP3y0EUVR5D6ckKytuAocjYV3sSZSfLsbe6HIUVRzB2RiSGaaSw/ngW3l2YhPfma2CZnYKxy7QYR7Bci7FLMzB2yVSMyUnH2OVaWKapiQFkOPk/Z59Mpra7QHcz0PcQ6B0KWgA8AlrvoL7yIDruXALQDvS0DJGvHq23AfQY1XZclILhXHuofQKQHB6F5LBIRAaGgPe%2bLbjjbcAdbw2%2btR3c7dhws3OEh70TOOMn6AzwS20VZdLT24O62iq03G8Eeh6jp7MNPV3tg0L341aq4IW/n8X1Kw207Ot%2brPt9sHw729Hd2UZ1q6s9gebm%2b1Tv9vZ22C3QYLiXC6LUEdBmZSJlajqmaBIhVykhU4ZCFaGGeHIgXAV88IQC8N3d4ODE1hngSF210ZJ3G5vwuLOL1vteIwr39aPv1Vfu3X%2bAysoTuHHzJqpranH5ytVnaF9HRn96omeHfqUiK5bdwiT8q6cLYsIjaOIzZcoUxMbGIj4%2bHgkJCUhKSoJCoTBmhXySBzg4PGsAomxHR4dOWF8f%2bfNSEDoDbV9fL/22paUF1dXVePToEXpIpO/uxunTp3Ht2jUj7yffvJqc/vxv375t1LO/AZxs7THBegJsbW3ptpfAzs4O1tbWsLe3pztRsm3mcXn0/RkDtDQ2oadL7wFE6MtGxNCBfvRtbW2oqanBgwcPBtASI5w6dQo3b94cQN%2bfx0uEGenu3LiJjvZ2owHsFyZhuKczQoOliIyKglQqRXh4ON2ui0QihIWF0S17UFAQ3IRC8Dzc4cg2TIFTJymjjq5OHKirxo2mxlcywPM6T5Spra3F3bt36Xtvb%2b8AOvI7MU7/31/VCL360T/fdBtj93yBzfUVOoN3tBs9IFY/BSIjI5GYmAitVmucCmlpacjIyICHmxtcfbzgwHHSB8FTuiB48moDmJ%2bW49/PHqbvnb09RsX%2bLxg60dXVRUf41q1bz3S%2bP53BQ%2b7fv/9cupfJudR0B/y89fjh/MmBBvBygYDjAicOh%2b4GORwOdXlSd3Z2pnUCEgcEfP6TGHBY7wF3HzZjyfFCHLtJlqzXe4iCZ8%2beNbr3y57W1lbU1dXRcjDPvZu30Nne8cwU4DlxwNZ3lBigf8dJ8COgMYD3ghjQc78FPe2P0drWirbWVqogGbH%2bpQEkwBnqZETr6%2btpYHqazoD%2b7Z2dnbh69SoqKyvR1NREl7L%2b/J4nl%2bhDaEgsuXX7Ntr7B8EFGozwcoVaHgp1ZIRx/htiAYkB5MjMYARyNuDo6DjQAL19fbjT1Igz586iqKgIxcXFtCwoKKBlYWEhSkpK6IbGUBrqBpr%2b9AQGGgIDT/K7gVc%2b2XEWFw%2bgM/A00OzZs0f3XlSEXXm7cbK6Bo1NTy2DCzQY6c2FLDAIMbGx9GyQdDoqKgoafUwgBiBnAQSk7vi0AchD5iWZw9OmabF9%2b3aqNGFARmvGjBlUKTJqqampdCTmz5%2bP3NxcusTFxcXh0qVLyMzMxNatW3HkyBGkpKSgubkZq1atwueff45z585RZUisWL16NTZu3IjLly9TGcQT1q5di3Xr1tHlkqzlFy5cwMqVK7Hm009xpq4WWdMzUFNVjr%2bfq8PDlmadATp0U%2bBtdyc42znAzt6eLn3Exck8J0sigWFakJJMDRsbm4EG6EMfGhouovnBfXh7e2H9%2bvX44Ycf6JwhHfPz88OWLVvoCBFGJOiRpeXLL7/E0aNHqUXPnz8Pf39/fPbZZ9R4pK2xsZGOyMyZM2luQNbk8vJyGpVzcnKo8YiyN27cQFZWFmbNmkU7Tk5vyW/EiOnpU3Gu5jjilGKcPfEz0HYHXe0k3QY6DR7gw4W3wA0uXFejmxPdSenh4UGPwgwg7xwOx2AAXRDs7e7End9Oo7v5GuKjw7Hp2834/vvv6TpKOjZ58mRs27aN7uV9fHyoAcj82rRpEyoqKqhbnTlzhrremjVrUFZWRo/DycgSj1m2bBkOHz5MFTAYgHgB8QqiEPG87OxsLFq0iBqctB0/fhwLFiygy9fx8gpw%2bUKUV5zQxSt9ykkMQDzgHQ8OYtURSE5NQUxMDNWDeBYpyagbzgcNZ4UOT2eCJGPTuUIvLl/%2bjWZzZEoQFyXuTpQi7kwCEqmTyH/lyhVKQ4LYxYsXqVHIdCHrPGlraGigfK9fv04NQb4lbWTeEjcndKRO2mhwu3WLZnmED%2bFHAiDxIEJLAufl336jfOmA6ZdF6gELk2gQlAcGISw8HDKZjAZAtVpNB4502DD6ZKDI4agTPRTtbwDDeox//ufp5MohOxnmXDuMtxwFy1FW9NKDXI5YWVnRcvz48Rg3bpwR5N3KyuppA/QY083%2byYmh/v/V9irfGIxADdDRAfbiVDAT3h3EHcU0GX6u1c2px12d6Orp/v2gu5umxyRncSQGsLakN1b04uaVDZAhw6nz9fi9P8456WAmvKfrFOt1PECrQPZ/foW/7svH%2br27sH5vHr7evxtf7cuj%2bHrfbvpuxL7Xx4ayXdhQugvflObqeOr5GPgPkPMafMl33%2bzfg3UlO2E1Lw6M3WhYMAzMGRbMafkszExMjVdkpqbkWjBDBkbtCybCDxYiAd6e7AFTP1cMEwnwlkQIiwA%2bzAN4MPfn0dJCxKdtrwQ9LRPuBUblTeUMEwtg5selst4S6/j/i8Tt9fg%2bxZ/oymgCMcbfHYJgMTgRUjirZXBRBsMlLASuyiC4hEvhqgqGcKI33Q4b8wCT2ACYZCeC%2betiSMRiZCWnIT1Bg7gwNaYmJiE1LoGWmuhYeHEFYL9vDY6NHTjWrwZyQPFOkAdYOUlg1s6mt07axGRkaFIQr45EWnwiQvzF4Nqz4TTB5lkeVJatHi%2bQM8EWrCg/WPkJIVCGwC4jBvapkXBMCINdshpOcgkc4pSw0cbC1dcbfFfuk70AKzUYipXzMf3HDfhw5QqsWLECy1euQPbixchevAiLl%2bQgZ%2bkSLF6yBPMWzMecDz7AnLmvhg/mzsWsD%2bZgdLwUio%2bzMeNvX2PJsg/x0ccfY8mHS3X8c3Iwd/48zJk797k8Zs2ZreM1b%2b6LZcyejbdTZLD0FUCjjkLW1AxMT06FJioGAjaHbpH5zi7gO3HAc3UFlxyJGRMhrRy/Vp9Axf5D2L5jB72yun3nDo2wZJEhUVaH18sPDLSEj9fyTPxaU4WqQ4dx6OefcfjoEbQ8fEhXnf7ng897Ll5qQHVNDRpI4vUCGZ1dXTQRIqmwj7snvH196T9jePn4QOjhDi6fB4FQCKH%2bZnhAIsTSylFVfwbFu/Px1dp12Lb1b2i8cQvQJVlv5Jm0YiYqz9bhQEkZDh84iO82bkJL071XkvHo3gPUVT3ZrL3osZuvgXWwLyKVKsjkcroVDlUooFaFQSQWQS6TI1wVRg9GCUh6HBAQoPOAhd%2btw8bCndhYsgub9%2b3Bt2W7sak0DxuKdmJDce4gsRN/KdmFrwu2w2ZuPBZtWY%2bNRToZhO/LZehov8jbhk%2b2fad717c/Twa5fXKQBSBdk4y4KVMQHzcFYbHRUCQnIFAsgTxMBWVsNJI0GsQnJNCTYpFIBIaZrgCTGggmWQwmSQRGE9APoiEiQMdzmgxMSj8ZA%2bS85HvyDdHP8P4imqnB4CjEWDR3PnKWLsWKpR8iLCsDfgu0dMcaEhmOYE0cFs6bh1UfraLb%2bADqAdMVMMlUwiRLZYTpGwThx8wIhUmmalAyKL3%2b2xfRmM0MA5MRAmeFBDHqCLoZIrtUdUQEImOi6WZIpVTR02KyOSIgZxISiUTvATNC/7GY/o/krQCLlNNksJH4IFgkQYBYRP8zjbi4RCyhaz45yzC00XaJhAbC/wWWYeDkAq/EdQAAAABJRU5ErkJggg==' /%3e%3c/svg%3e)
Display Checklist
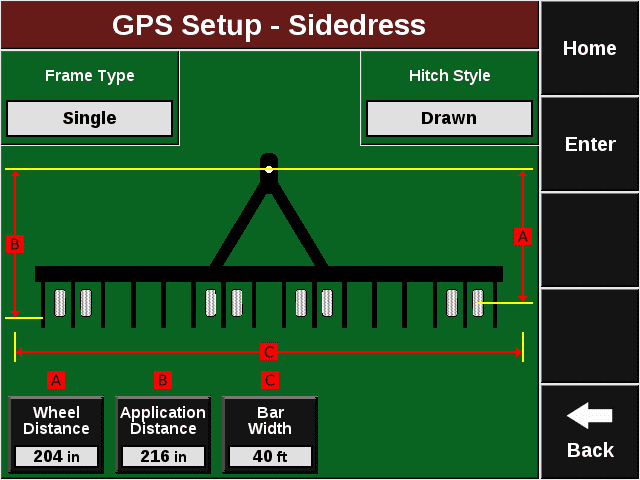
Sidedress:
- On a Gen2 20/20 navigate to Setup > Sidedress Bar > GPS Setup Selection
-
Click on Tractor and record the following that is acceptable for your Tractor:
- Tractor Make
- Tractor Model
- Steering
- GPS Mounting
- Measurement A
- Measurement B
- Measurement C
- Measurement D
- Measurement E
- Measurement F
Display Checklist
-
Click on Sidedress Bar and record the following that is acceptable for your Sidedress Bar:
- Frame Type
- Hitch Style
- Measurement A
- Measurement B
- Measurement C
' width='640' height='480' xlink:href='data:image/png%3bbase64%2ciVBORw0KGgoAAAANSUhEUgAAAEAAAAAwCAIAAAAuKetIAAAACXBIWXMAAAsTAAALEwEAmpwYAAAUHklEQVRoga1ZaXQU15UuqZfq6qreu9V719abpJZ6rd6k1i4bSUhCtHapu6Ve1S20Sy2JRQgMIWDAGAMxYOMYO7bZbIPtmDgOM5PJnJxZ4vkxvyaJ50wcHBJIwEvyJ/Ec5pRaYAEKQTjf%2bU6f2%2b%2b%2bd2/deq/ue3UL2FNdkbUUzttK5qyWVWgrmSo0Tpr0U2bDuB6bMBDjenzOapkwEJMm/Wxp8XSRKSfMFJuni0xzVsu8vXS2tHiMQKeLTNmSoqlCw4zFnC0pmi4yTRcaZyyFX7PYPFtStLrfJdezxebN9bUtLS1Wq9XlcjlXwOVy2e32mpoaYKakaEAmjisLYgrZfYwrCwakom2V5XvbWhdrq4/FBg90th8O9cXk0n0bN%2bxpbkpqlFnKuVhbFZNLxwqNkyVFMYUsLOSltKqj0YEddTWTpcW7G9fNuZ0pnXrW7dzb2rJJj4%2baDSNmw4iRHDMbUzp1VC590DVNZUFUKkzaSm12OxeChEKhYAWEQiGCIARBAHO2kriyYEirSmmUq/LVudnT01M/PHH87af3vjw9%2bY%2bnX846bd%2bdGPvw5Il/OfPGe4cP/dPpl99Y2Pr%2bkcMfnjy%2bxedZqCgfKzR9cPw7l/bv%2b4eXTn148sRPz5/78IWTV1469eNXTp/ftfOn586%2bf%2bS5K6de/Mnrr50YSkUESBrVrOJaq0oqZBmXg3K7hUJhQUGBTCaTr4BYLDaZTMBccWFMKkopZEm59D6mFLKYRLi9zP/84MChjuAIjk4Wmo7HBidM%2bh0V5Uf6eo729%2b6qrT7U2f5cb8%2bFxe0vplLDqGYURzMa1aH24KH24MGNGw53dz3b1XmgbUnobN/m8xzu7tq3fv2Rvt6j/X1P1VQNCnkpRcGD3pMKWUIiSFtLXBQlEAhkMplIJEIQBFoCn88Xi8VGoxHIPlEVtRcnKWvCVboKKetgqTlkJsKF%2brjdEnNYQmYibrdESwvDZjJcSA6UmAaKjf1GbLyugu5gK4rbLQlnaaTYEC7SR4oNkSL9HcEwUGSgBxbqByzGXPtgqXml66TLmnTd%2bUtZ47aiTQ11lNsNw3AsFtu6dWsoFNq8efPMzExLSwsMw/QMUE816CZdxIwXn/agUxQ6SRHTHmzKjU97sGn30l8vkfWRWR8%2b7aG7Zb2OqTrTTDmR9ZIzfnLGt6T1oxPUkhHaDj7tIbN%2bMusjZmgVOePDZ7zmzRXOneuwKXdORRuc8WLTHmyS9oJNue8yZ4GY9mqnXP7ZRjfl5vF4gUAgGAx2dHQkEoloNOr3%2b3k8Hh2AetqRF1GxYzrmoIaX0gvTJlZUhyT1YAyF4rhgyMQa1HLiGCuqY0W17KguP6pWDhbDUZwZ1bCi2hWkO/w1Mgc1cIpUTtryB2hfuUb%2bkFGYNiMpvXDIDCdIJKmHEwScJHOW2VEdMKgkEk7K6co9uNwlgEsQCATLSwjLutlRlJcy5EVUdXs7B1%2bYGPrubPzF6fTLc54dTX3PZza9snnklS2OhSeYgxo6sASmjduECSOUwLkJ4hEJxXFhxqSddoExFE6SnDgmypgnXts%2b9fqOnmOZ7mNDLc8OzJ3dPf69heHTm0VpMyeOwQmSFdcZhzxuyi0SiRQKRe7ZVdyBRCIxm82ALkuxojooSYAJjD9kFA8XkjM%2b1Zgdn/bwh4zKMWvFnjZixiseLmLHMShBsBKoJm4VxA2cOAbF8UckJ4YJ0kbNtJMVo31xEjiUJJRjds2EUzFaKttkkY1Y9Fm/faFePW5HUvRtghIEI641pNzWklKQA/L5fN4K8Pl8LpeLYRiATlHsfi08gHMjGBRBOWGUHdKAYR2zT80J68CQLq9bzurXcMIoN4LBEQyM6DTR0scKwKSZdIB3fHEjGBjSciK0C3a/lh3SMvvUzF4lO6SFlrRwBGeFNcaku6uzq6ysrKqqqnIFqqqqAoFAc3MzUDO74fUzb5x/581zFy%2bcu3jh/MULZ98%2bf%2b7t8%2b998P1Ll999%2b72L7/7gvXNvnz938cLZixcuvPPWK2dfc4QC3Di9KtbAGM4ZwqtmWt44e%2baurwuX3nzjwpmL37%2bY8/XuB%2b9d/P6lnCrn6%2bUzr5ZF68urAqgO1ev15Aro9XoMw1wuF7BhZ%2biTj//32rVrn3569dOrV29cv3727Nldu3Y9ve/pvd/eu7Bt4dLFizeuX//0Kq393bXffvzLX/rj9VBsDbcfiuPcGM5Ooi2Lvb/%2b%2bFfXrv3m06tXf/vba7/8xS%2bOHTt27OixgwcPnjx58plnnnn3nXev/%2b53d339/Bc/rx1qtthKeAhPIpGIxWLRHYjFYj6fT5IkENwV%2bf3V65/f/PzWjZuf/f7WFzc//9m//scP3r381tkLuxafunDm/H/%2b%2b0d//OzLWzdu3rpx88tbX1z79W/KE09w1h4AK4lu2Bn6w9Ubn9/87NaNm5//4bMb167/85UfX/ngR2%2beOX/lgx%2b9dfbCR//2s8//8Nlnv79F%2b7r5xdVPrtanW0udNpFQJBQKc5tX7uolEolIJKKzkGusdtOuqYkDc%2bNPz%2bY4c2jb/JHFzUd3TB6Ynz%2bymH12YWxfNqea3D%2bf%2bdZEYQ%2bFxOlMsupSobnaMwCn9Y7RmpHdX/ua2D%2bXPbww99z2Lcd2zh1Z3Hxs58yhbXcvY3L//NDuMXuo3Em5uFyuy%2bUqLy/HMMxsNqMoqtVqlwMonghAG9W8ThTp0OUIt2u5QQ03qEE6dNygBm7X3lXR2g4dmXAJkgZuAoMT%2bP3MkHCaeLCdG8eEQwY847zPGpd2tORuyelKLa9Dx2lXO4eqvR4vg8EYGBgYHR3dvXv3gQMH9u3b19jYCMMwnUaJ%2bXJO0szPWHjp4kckJ2FiDBCrcJAEUG6eVciIkYzIKh04CdOje%2bGnLey0uXC43O2iEB6PIAiTyWQwGIxLUCqVQqGQngHHTrtna4FzQe1YUD0inQsq13b1faR2aGyzBfXVioommX2rglrUPNjHuf1RvdgXVNQ2lWurzD7mcjoooUCQW/R3IZVKl5eQed7VuUGCZlDZKCofeXwqxjBRQml14KZynSSjVoxij29qBBWPYdaYtr1NTIx4nDYHgsCrZiG9Xg/gU5R9vZw7iLOiOPuxOYizUySzVQ0AAAAxWb0oO07QjY9rkBHDZf1YaYtcl/ZWV1RqNBqCIPAVIAhCp9M5HA6AmKbsrXJeDOesaWN6kCkivwBk4ghDzmGYeFCGXDUdPSLZCVwewaxtcjTj7e7ofNhO/HcIIIpDwyQrIM3jMKA4Dm6k5wFsVUHpx4%2bBncAVYcy%2bQY5mPPZSG4fDEQgE/BUQCAQwDOM4DpDTlKtFLnjsAGL0sYwTRvMgBisgpW98mmSaePkyEEqt8bgRvycA8SBu6lRqhr1eF30alcvlBSsgl8vvnEZnKUOnCko%2brrMYffuZBmT5ilfGUyaBhh9nErhxnJEkKlvUox6%2bLUY5XZSAT79SSlcg94ZJZ6GWwdKDGKeiVQ0MEfBancVwKE2Czap71syKFcXppw/Pa40BjuFAmjxm4n0CAANt1iKvW8Tn/9UAtq83/w8ATHslwLCeN4gtnwUenUkiXwoyTTz66qP3tstAhgHhZu5tfwRyo3h%2biuisKTik5/jDLjtFCR8SQCBtn3Dyi7q0zAwJD5PcR2eG5E4YWD5JHo8JJQnuiJ5uuasa03O6tQArD2xWcccNX6sejewUIYrixm6lepPX43Txl6oSqwegy1KmoIJeCa0qlkfMKpOw/Kux7EFByvJL8jgMhpbLrpSxfPf28UnYFbI8IStfzGYFpCy/dOWovyH4pcxurXIAd2yQo2mPl3roQ0xOU871csGwnuEQ0dtQfh6wJuQt8e%2bIPPqHUVegiBO5NOp4eBrN7QP8FAm2qZk2IW8jitSpmQ6RsA3n1CqYDhEnqGHXy5nFfLBNza5X5ASwXsEo5vM2oHCNMr%2bIJ2zFoCdVTIcQbFWD6xQMhxBp0fGe1DCKePwmHbdBxSjmg80qsEHJvE9oUjIdIrhJw2/UMRxCfiPKadDmWYX5vagkgpvbFLqMt%2bfhGxk5Q9na5IIUgYRxwMfe9PzcyMEsUAa/ePE0MegEqkXwuIET0rF8EmhEzwmjOQGO4ICTHX52eO7IdsAGHj77vGe%2bAajgw5v0cJQAyqDI4ZHsM1sBG/u5CyfKsk0ABcNpPRTD6OFDxLKQoosoQABpWux56qV9gJe76%2bS3Ova2Q%2bsQyShujWsH1ovIEU9VRaVWqyVJklgBkiRRFHU6nQA2Sfnq5FCUZHUTgC1/%2b3f3LD67C3BxLl/5wBx2AwEhPKzndOtYHjE0RHJ6lgW4FwesjJEjs0dfOw5YwTOXzldnW4EyBE7pkTABuFkTp7Y9ffwgYGG%2b9eGl%2btmNgAOC4yQURunhMXxZiOJ0tD6oe1fsxCsnAQfnxTOHZ08EDf0gtaAp26aunZU5xinb0mFu5UnunsOcf4c9GxP4FjXUrBKqg%2bt3dD052QaU8ZNHpxS9hfkVYu4mPadHy6LEUJrk9OpyArcXBRzcwNaW5rluwA6H92UMSTpaborkhjHAj1TtaGuZ7wGsnL49qcJhP%2bBE6DpABGVRIjrZ54QYnTGBMr5jorZ9YQDwIR1PxUpG6gCvgBlaersYRMmkh3It10ZXz0KGzS7%2biEY%2bhssTGqRZyUjqGJ0KsEGZF1ODvRqwQQFlSE6/jl1TAA0RKwWwRs5MaPO75GBtQX5UxQppwAZlbhvmNCiZUQ2jT8WuKcgLKdlhLT0qjkMD2P1CFAMblKwBbX5YCTYo80NK9qAGalLCMQxJEOy41jj0twLAshQ5o2QlifwowYrjYJIAkwQ7gXNSJDtBCw8hmCQ4STIngEmClcA5SRxM4qzlFlrFSZE5gw%2b3Ay7bWe7MjOH8EVw/r8TjHrfL9bAA0Hmqek5W1KeVhlFFGJU/FhVhVBpB8X7dSyh3j4WvjKAFOVXkTp%2b1CIoIKgphngGNf1uBNu71UA8NQLOZ2jAuaWtSWNs1rqDaFtQ4g2rXX6EjqFm1AxVU29rVNa2q/84DrojZnqD6IUb%2bJqmg2hLUDLQWVM/J1Amv5%2bEzgGUpJK1hDpGMFMFKEuIYzkkQ%2bSmC8QDzU3SZVkRXeFbXspKErVNj7NY%2bqF0r85MEO03whjX6pMfldCK85cLWXUgkEoFAQGchXZZiD6CCKAEM6ZsblP/FyJ/wSoGMXjiIIzH6fArHaIEfJZhD%2bjmb6MdsRmCDhpEi%2bVEi1wGJEbwYAcUJ6SD%2bhhK6qICkgzg3TjfetfBYJBhRrSHlCZSVK5VKFEV1K4CiqFqtttlsgDbryoupOUkdMIzXry/4CQtI%2b4XAKA7FdaykjpPAwTjGSqJgQgcMY1NO/g85gCuoADIYmNCxkihEP4UoK6nLT%2bn4cd1ZJfttBYsX1zFS9HAwubYCHnTPWwHBjNEB3C3uVlVVVVdXV1VWVq3ciY3TfkOfszDsIXscRHupvd1a2OUguu3mkLuwz83vJ%2bXRYmOXQ99D09xhdXY59F02ottu6HXiXVZ4AMcj9sJ%2bjzns1vc6Le1WS6fd2Ocyh9xFIa%2bmx8KJot8wAKfDiSCIVCrl8XggCPJ4PARBRCLR8hIqGQ1gGlQjV/sob1tLW3l5pcPqqPQHSJTQilRQnRLbaKlxVdhKrJTNWVddV1xcUltZE/CWUVanUW9AulGjv0grUasKlPYSW21NvdNBFerNGoUaLdBKDcq1VlGh%2bwNwUy5KKBKKxWKr1To/P%2b/z%2bRxOZ660SH9isoyWyxVyhMfbGNyYzqQ7uzozw5nevl6Ej4hgAVhXgG60ZAZTW7dvGxkd7e7pDrYH5%2bbnIgMDsVjMW%2bYDO9SY1yDmi2Ae4qJcyVRycmqysKiIi8BSsYRHSr5xAB435UYQRG/Qf/Szj27fvv3lF1/%2b6Y9/al7fDIIgfZymA5DLGxsb4/F4KBTK/Tatbwq2B9VSJVhXoGoxYXLt7PxcIpGIRCLRaLSnp6ezq6uxoRHhI/x%2bAvMaRYiwsKhofHw8nU5v2bIlmUzqUJ1MLBXqpd88AGppJ5ZKpXV1dc9/5zu9vb3BYNBgMPD5/KUZGAuIJRJLsaWysrK%2bvr6tra22ttbv93u8HiHE59TJNa1mGSIpKy/z%2b/0NDQ1PPvlkIBCoqqoqsVg4MCQIkZjHADLYYol43bp15eXlra2tgUBALBFz2RD/7zEDlIvKvZHBMJyfn89gMJhM5tcf%2bUxpr9VqbWlpqampCQQCuTCamprWN68vc/nYtfQMVHkCTeubKpZQU1Ozbt26hsaGluYWc1Ehp1ND%2bExNTzS2bWyrq6vL5Yr6%2bvoNGza0NrUUFKnBKJr7yPdNlhAEQV6fb2JioqWlpbGxMZVK2Ww2BEHoGdCGS0ZGR2/fvv3OO%2b8sLi5u27btzbfeev/y%2b1/931dnTr/OqBTLG8k3v3f%2bL1/95YUXX3j%2b%2bPFDhw79cAm3b98eygwBDUJLrf2Tj3/11f999eqrr27duvXUqVOXL1/%2b85//fOPa9eJKGzOkQpIkd6lYsibCcYIV0xpTbo/bzeVyvV5vNpudm5sbXkJZWdlyeR2L26uqqvbv279peDg2GB3ODI%2bNjqaSyb379oU6%2bvKrRLJGMtod2fPtb8ejsVB/KJVMjY6MZjKZ/fv2%2b8v9eW0y3Gfakt28Z8%2beqcmpZDwxOjI6MT6%2be/fuHVsXVaW6/AE1mMDYcXStBONYXkxNpCiH3QEvvQ%2bIxWIEQYRCIY/HE4lEy5%2bYPGP1Kh8hdWqUXlztI1ReXOnBVD5C5tIqXSjaWaLvsqsoTOrSqry42k%2bqfATdwYtLnRp1GYlH7GRTicyhlbm0iqV2pQdTeDCZSytzanX1ZjRmfzxiMYcqWuLN1NfW1uI4nvs4YDKZjEajaQkkSXo8nv8HYzcUBh7cRmAAAAAASUVORK5CYII=' /%3e%3c/svg%3e)
Display Checklist
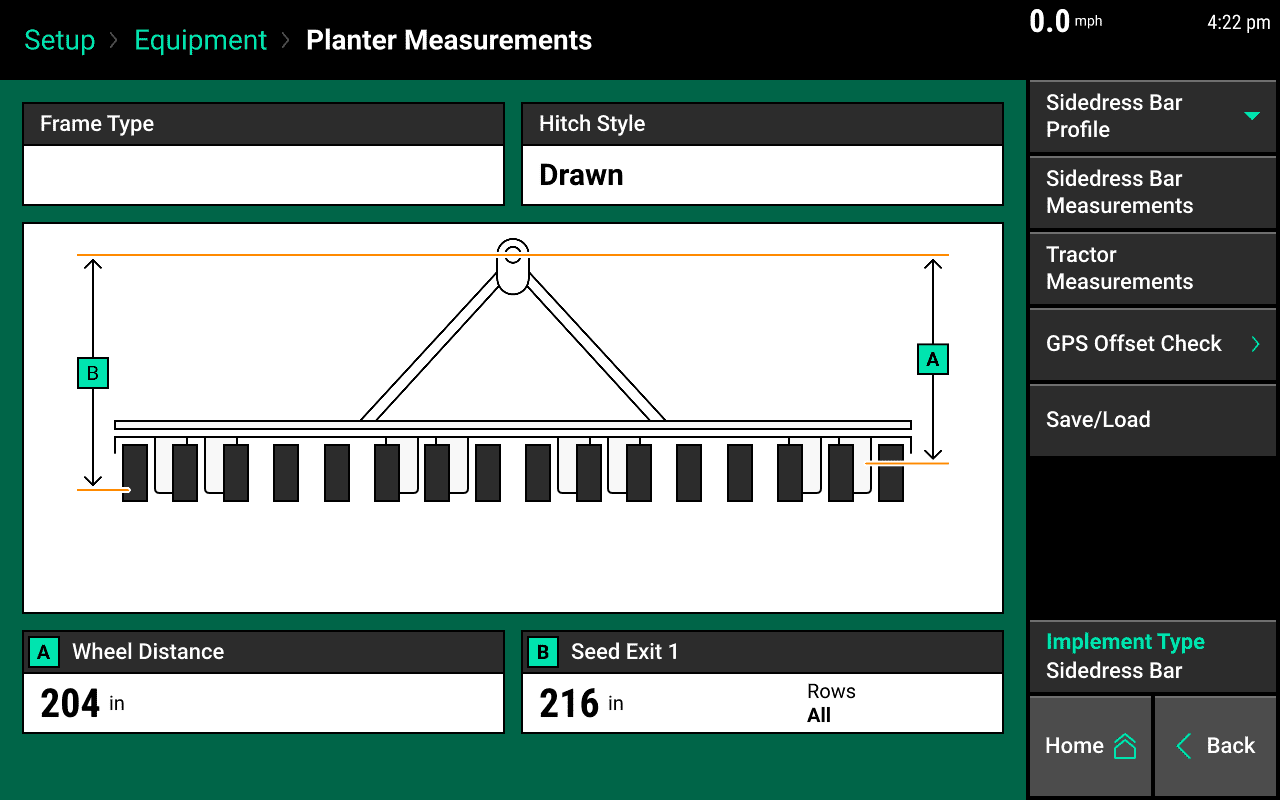
- On a Gen3 20|20 navigate to Setup > Equipment and use the Sidedress Bar Measurements and Tractor Measurements tabs to fill in the information recorded from a Gen2 20/20.
Combine:
- On a Gen2 20/20 navigate to Setup > Combine Setup
-
Record the following that is acceptable for your Combine:
- Combine Make
- Combine Series
- Combine Model
- Measurement A
- Measurement B
- Measurement C
- Measurement D
' width='640' height='480' xlink:href='data:image/png%3bbase64%2ciVBORw0KGgoAAAANSUhEUgAAAEAAAAAwCAIAAAAuKetIAAAACXBIWXMAAAsTAAALEwEAmpwYAAAUCklEQVRoga1ZCVQb17kebQi0omU0qzQjAUJCC6vY90VgVtuADBiE0IIWdjCJ13iLazDgBXCTLvFLlzRd0tqAsWsWm2yntZ3EeUmcntP30vacNHk9p32vTbzWSc07IymC2MZLTu/5z5yZf77/3vvN/e/9/zsXcGDIY4odgVplUjsKN4uENpnUgcJtEGiDwBZxZCsosUFgKyhpg2UODGmDQDsCBTRWicjmh1HmoCQgj9OcE0dtoGRbYYFAIAAAgAasUR639yjsJhXjrdaR%2brof79h23Ono0evGbS3bMtO/VVO1p6SoLyF%2bV35ur1HfBkNbUpIPNzU8nZ66Izd7b6l5j7n4aEvznpKi/RXrtmWm78jNtqPwv42AU4455egjRIHZEVmnVv3r7zx/ZnLypV07pg6P7czPPXloeHZifHZy/OXdz8xOjr/6k5e%2b2%2bHt1KpHLLU/eGrw5d3PLP7HiemjR345fPDCD1/81aHhU6MjCydeeHnPM49uUY66FFgbJN1eXBgkQKMo0Gg0ur8EHqlik4jbJJLHEZtI1K1W98XFtfAFndHR7SjarVZ3RkX7SLIrJmYwIXG4psZHkjaRyCGT9ev13bHqrpgYH0l0qFS9Wm1ndJRPqeyKpvA28aMbtUulVj5/a3Z2iMBKp1eX7bXr%2bqsKBqoLB6oLt9QUDdYUD9YUb6ku2lJN3fuvgXvqsa8it7c8Z%2buG0sGqwv7K/L6KvP6KvIHKgoHK/P7yvL7yvIGqwsGa4oGqgr7y3P6KvP7K/IGqgv6KvN7ynMGqoqeqi/oqcgcq81e1VRRq4qtWgjJQQ4G/5bUJhUIAAJRKZUtLS3V1dW1tbUtLi0KhCA7LhrFNCl%2bMutcQ3R1HdKgxjwr3qoiOGIUvGvOqyM5YhS9a4YuW%2b6Jxb1Rsr0HZpcnbW5K/t0TZqYnp1Ud1xyl8MZhHJfdFk52xuDcK90apujS4N4roUMv9tuqglTlvr1nZpYnp0au6tHJvFOalrKhGqZsYskMt90ZRQiljYnsNZFds%2bf71gREQCARardZkMiUkJGRnZ0skkiAB877ySCsI2tHivWW1o5vWD9W2TtjbJp11ow0bDtWXH6jq%2bF537YjFftxV%2bmwl7JSLbVDSYFryYJqoVUZ4ompHLFUHN9SPNji/7W4%2b1moZazTvL994yLL5qLV2xNJwZLN53zrYsWIltEpju3SWsabqgxssY02u5zwNhzdbxprM%2b8pbJ%2byu5zy1hyxtk86Gw5tJb7SwFczfXhQgsOYsLjtQKbUjaDuRt7uo8WiL5XCjddLeOumoG2toPe5Yd6DK/ly7dbLN9bynbqwBdROQEzdtzTRtzQQdqLJDXTm0vuFIc9Mxa%2buko%2bmYtXm8deOopexAlfN5T82h2pYJ28YRi8IbJXNgpq2ZqVszpXYktke/cdTSeLR505Em5/Oe%2bsONrZP29YdqNx1psk7amydsrccdliONpC9a6kQLd5ojIyMBAKDT6YxVJTCV6XQ6ULqvgrdJJGtBBQ0SjkUYUS8MrxOE1/I5FiEl9cKwWm54HZ9dx%2bNaIsEWRNgoSR5MTx5MFzZKpc0wb5PIbyXgWIRcS2R4HWXItUSyayl8RL2AsmpesYpslEo2Q1xLJKeeqjy8TsDdJIqoF/AbxNxNkeF1AqoDVG2UlaBJkr%2bt%2bBEj0Li3%2bUcnfzxz/vSphamphemzr56dvTA798bc9OLMqfmpxd8szr85f%2b71udml2an5qanFmVdOv1K9fUP19g2vnH5lenFmamF6emF6an7q5LmTJ%2bdOzb05f%2bbVs79%2b49yvXz83HXi1MD29OH2/VcBwemHm5Nyp6cWZn8/%2b4lfnTs4sznxlNTVz/vSPp16y7GgwpZt0cTrDGgVwDXv%2b8dk/lv3l2rVrU6empk9NLcwtvHvl3ZO/OnnylycX5hZeX3rtH38PYr68/WXrQXvrQfuXt79cXl6%2be/fu8vLynX/eefvy20sXlk6dPHVh8cLszOm3Lr8VwAcA91ot3w29Or9w/uWXfvKzn/5s6cJSSBm4fn7tc9teO4iAPC5PIBQ8sAC2Z%2b2f/vnT2zdv3755%2b6P/%2bmj61PSl315647U33v/P9y/%2b5uL8ufnXX3398m8vffrnT2/duHXzxs3P/vpZw56mhj1Nn/31s1s3bl3//PqNazeufXbt6vtX33nrnYW5hbcuvfXa0msXf3Px%2bufXb16/ef3z67du3LrX6hpldePajVs3bl15%2b8prS69dff/q1fev%2bl9R%2buufX//nzX/%2b5X/%2b0rhjczgv/GEu1DbqtO5v84x2tB/yuoY9PRP93cd6e8b7Oo90dx/r7Zsc6Jno7zrW5xntdA173CM%2b%2bwFn3T5L7X6L/YDLPeJrP%2bQNSMeR7s6jPb2TA13HegOVhF75rVy1%2bx9g1X7I23m0p3u8r%2bNId8eR7tV6z0hH6wHH5metfAHfT2ANBqnbMvUDiSHR9cfr%2bhMCEue/1/fFGwfiDVsSjAMJxoHE2KcTdbsyk7Z/zcpvmLDaljL8OiBla0bK1ox7lPpgi0HD1XrDQJKm31A/3BiYxGw2W61WCwQCsVgsEAio9SdQZHYMsuNrCezAOXZF2m6ocDeofQqNcCiM62VleZFKCww65Q8xvF9AOwra0cfHww65qFWWuy2YCwkEAo/HY7Vae3p62trauFxuMJBhLnItQV2kop0orkS7B6Ulh5H2djC7Gj0Gs6cA4CmDgNuhIpxr2t4r7U%2bod5F4uxK0Y4U7zKFciOkvYWFhK58fAADURTxEcDehbpBbd8vKRuCqHohsUgzh4acBwJso5HUo5c6H2a4WyBG8QdoJmZu63qNH7xOsnZTa0RCBNSfxvWZ%2bQdspwdpJ3E1IXGT8Nrx0P2zaiYmcyqgWPGEjorApKMxjdB3xf4W4PrnMTXUddyjUVjnqUAQe43rleDuF%2bXcQcBKom4TrMagQAs2wrAiCyhFZOQybIWEhktoqMTWKxUWURlyBSHJAyAxTJo8iADsJpU9RcwhObsZxu6LDwD8NAL0GAW4nkpvxmkMQ6VPAzrUIIIU7zRiGcbncNePAio2DwDuVoixJuCicS/A4UAQX4XAxDg/nMEURiWU8XW4ES8bhwhFcjBMuYnNwDtIqR92PJkD6FNXDcH0VZKpHnyU5bwPAMZKTVI/WV0E1QxDpfRiB4mfK0tPT4%2bLi1ozEq0cA9yl5GmrRpTFpNGrTQ6MBNDqDGryoJDZhDKNe0SkNjQbQGXRoI4p5yYePQ2AEqodh0ENGdqvS61FrpthUj4p6o6AeZc0YrOwiYGrKElg7ga8SuZuUOZ5wDmBOIhxk34MOzPiULHpSBnUXXAD8AHGeFOtQPoCAc0Vgh9%2bFDiNyNyEtAfnFILsE5BdKJTkSsEBStkWM1sJwm0JiI6VtlEhsQQFtSkELWrDjq2x0JQH9Wrl3EgsMwgg5h6PicmP5ESSHRg9SAUFAKgYAFoOn5XNieBwVl6PggJXw/SOAuUnMp8Q6/OIjEa%2bSbJeXbRFLy2RsGZsOAEwaQPd/gTAWkFXE5EYyBBVI7V5x6Xaw9ABSNQRX%2bqVsBC06IFm3p4THf6JVqN3fAw8pWQcJTSI2zKZaC3x0Go2j4gozxWANgncoMTf5gIXITUKbcXExKM6XiPOlErNMUgUjheLsEhadBjAZNAYNCAg9QKCYxRMyAB47N5cWraaDUWytG9X1yWP6FRYrnOiRFTxjFjwRgZCwIMqX6BGM0CDQWXQGnwkAAFfHxwOec4/zOAmsQ8nVUrOIr%2bULEoRhQhYAADwuLaeURfUbWBGKABPIKmFFhAOcbLCgWwyn8jkZUtCqgJ2ksF1ZUYWSjXDOrieMA/cSCKOHLGkMGj2C8TUC9y8dblKcLxVli/FOJd6pDPdXEiBA93/1ewmYWREsgE7wyp4Sq6olkk045QJOAnSTRXWYsgXO2/lNCXC0PKaQRWfRg8uR/4cMg8NkCpnCNBHmezABKnj7KNfH3CRkwRhMqlkeZ%2b0RMLM4ERQmO5%2bOp3DEdRjmJnEnEeklTZtwyIbk7TJHCp9kEq84g4cE1yOh3gcciclnITb5I4KXkwopmIciwAyjrx6BNQgAAABkpQOwigU2K3AXIfaSJSXgYZBtM0TkfsMRcBKYlwQ3hAjQgwQELMSheGTwCtbgJqWVMBsJ5/No2Q9yIWbAhdgASy9at1Wi8WKQV6VwEdwO5WC84AoATHIB847S9IwM3WMFsvsJ1MAPGIG2x82CqMjYpQQbcIGIkW1mhlwoQAMAAAYTyDSz2GEAIGCbnTyiSMhNEWE2uaxHlVUB7SG4dSZu3q5SHMO4nMdJJe5bT/jx/jyWirvBQgWvUtlDJsD9X4EKGiwgZ91Xc8C/hgZ2V0wmkFHCEkYymAAjq5ghFvtZcRnSAqnQRyY2ycE2ag58UxfyKblxq9IKOo0eRjlSZK4E73w8Av6owoLCOWFATkUYDQA4UVxZHQJuQOAMkZAGiDn0whr2c1LmCwB9m5UbvV6CawRSGTtCGhaRLCyuRqKs33gVclLptKwO5UTzGDxq7QcAIJzkSCohWR2KeR6R/6z6CqQgS8INB7KLmQwmDayC8S4l6iWTm/EcHT9HFmauDj/Jo08DwJCVt64dN1diJgsOtRK8FkW1GSEb4OydZuE3W0ZRpwLvUgmSIwWpIn68kKvhSysgvFOJue%2bLXw8V2EVi62UlHoFsA4IGmDsIyEOKm/EII7%2bsLaJ3A2%2bHWdA5Jso/gMZvw1J2YRnbsZRdeFMXnD0gNe8t4X%2bzSByMSkUgYpPjXSoqvfH5m3%2bS3gcE95Gx/dTCGrLFnATuIVGPMuVpLGcISx3Giw6gxXuRgBTtoyTvAJa9R1qxr/jJcqFg7aFeevwJz4P6jbkoGPbIaeCidmGw/UFe6iJkdhK0kbJWQuq/gjYikJNK20hZm1JoRfO3P/mWUuwjBZ1KxE0%2bvFsSHynoUsKPgkm9FAzykNiDdy0EtQ1wEZCXFHYrIS%2bJh5RuEnzS/YDfZYl1ZtCaJYlqxtfqHOYiZO1EQTnUminWNGKQe43OuQipm8yshu3pImM9KluLg5OQeciUjUhbqihlIxKCBbeUO8xisZgG0Jgs5gMLRQB2yiEHDjmov0BSO/ZTCeu/ASCrHBR65Iid0kMOHHEqQjDEgQtc8sOK8A8BYGOBiOtVrMBcKzDMjrM88t1a7m0AcKQJInwKtA0L1YY4FUFYGxbeoRhIFn4CAIPJQnaHAvPDqLOINuieLaXRaDQYjfdG4uhOrabHENujj%2b3Rx/Tqu4uI8WQ01aGN7jNouillbI9e7lapOmI1vRRM06NX9hnay5THE5E8q1o1EIRpeg2EJ1rpUwdgcT0GYouxuVr1QjxS1hij3GLU%2bqvS9BpIbwzpjQnAtN16cotxY130d/VwbV00ucWo9dem7TXiHmXBjhKxP8KxWKywMGpPy2BQkZXBYARHIMqnMdet05n08ZmJ8ZmJcSY9lhoHpunUKTpjRgIlmYm6JENMtaa4pVSXbIjPTDRmJGiT43BTnDQtLipFa0gz%2bmEJhpR4daW2wFqs98PUiZoYo5pI1YlTtURSrCZJqzXpjZmJ8akJUSXqXFthQlpisH6TXpGkkabHKZI1Oj/GkBGfmJGMZxB524InNIGfWUmJiaMjoxAErcwBdWecPt4QyFepP42gLIZQaVTRckwePNn0Z0FIDp5YkBKCyTE8hlTpotUqhZITwQnB4FQ0uSw18KiP06WlpuEQmhinTzImkAoSkskCjUbGiZMrTSErUArG6wxaVYxRq5dKpCE9IKEV7CgJTmIA2L5t%2bxd3vlheXv77//4fiqLBX4sxXXGGJOMKAUim1WqTU1KioqICZoG60Bx5YuEKAQzHTSZTUlJSQkJCRETECoF0LHkdRQCgAQajITcvNyEhITU1NTc3NzU1NVRnpE5iqklb%2bToIkpWdVV5RnpOTI5EGCVAZk4yxmkBVVdXVD65%2bcefO2TNnVg751F06jV5rbW45ceLExMTE2NjY8PDw0NDQ6Ojo8ePHJycnj3/7uByWg%2blwXJZ%2bfWXNiy%2b%2bOD4%2bPjY2dvDgwQBsfHx8cnLyO9/9jk4dJ04ENTm6wtzCH/7oh0NDQ/v37x8aGjroLyMjI2NjYydOnMg0ZYSrOHpzfHZa1vdf%2bP7ExMTIyMj%2b/fsPHz48MjJy9OjRiYmJF3/wYrm5HIgAip8pW33QLRaLW5qb2Wz/r5NAie3Sx%2bo0v/j5LwIHKr///e%2bXlpb%2b%2bMc/fvDBBzdv3gwos1KzRCkSdZrm2NjRwPHJ3/72t8uXL3/44YeffPLJ3bt3//Wvfy0vL9fV1PH1kcrU6K1bnqaObe7c%2bdOf/rS0tPTee%2b999NFHf/jDHwK19XT00DCGOl/T19UX0Hz88ccLCwvvvffe7373u48//viLLyg/2bNzNwAA5j3lj4gDsd16jV67fev2y5cuLy4snj1zdnpq%2buyZszMzM/Nz80sXlpaWlmKVsdI0SJup9zo977z9zuLC4vzc/Mz0zOzs7Ozp2fOL588vnn/zzTfTk9NFCVJ1lrahdtO77767ML8wd25uemp69vRsELlw/tKlSxXmijAyXFdirCqrunjx4vnF8wHY6dOnz8yemT09Oz83f%2bXKFdvmVoAFlOxeF3Kh0tLSvLy8pKSkrKys0JgA0R3aWIOGys7ZTAaLwWQzWeGswJURFtRQzp2D6XKpuc5isyhlWADGCjyGYLI0RF8cvxoWFh7GYq8gmWEULFIvNpYnUmtimN82AFtdYRiDyt1h%2bkokBoDq6mqXy1VcXFxaWvq1SAw34GA9%2bhCR1SOwVQ5vloP1yMNgdSjcgiPNcrDuobXVoXAzjrQoHg6D6jHRJtkjU4n/By4DN4glF7AGAAAAAElFTkSuQmCC' /%3e%3c/svg%3e)
Display Checklist
-
On a Gen2 20/20 navigate to Setup > Head Setup select each head and record the following that is acceptable for your Combine Heads:
- Head Make
- Head Crop
- Harvesting Height
- Measurement A
- Measurement B
- Measurement C
- Measurement D
' width='640' height='480' xlink:href='data:image/png%3bbase64%2ciVBORw0KGgoAAAANSUhEUgAAAEAAAAAwCAIAAAAuKetIAAAACXBIWXMAAAsTAAALEwEAmpwYAAAT4klEQVRogbVZeXBT17m/2mVLlmTpXt1d92rfvcs2xsa2bDDejVe8yZKs1ZZX1hgeJVBCgCQs6ZISCDsmQIMxEDZDUyhpaN60afKmf7TTmc68vLw3Q%2ba9UkIgbRK/uZIsA8Esea9nfnPn3HO%2b75zz03e%2b7ztHF%2bjF0e8NtxLsgRQ9kCJWccOQF4U9iNKtBLvlsh5I4UGUPaDci8LfY3AfgbkhxQvOUolEAgAAC5ijfM/VE5gHUb5UX/taR/sPyp2rC/JX5ubs6nGtzHPs6O5aXZD/8pKGdc7SkXT7OmdpxGTwoHAvgf1TCPhI3EdizwncryJ6lIpDY6un9u69vGf3xCtbL725%2b/LePS8UFZzdtSOKncc3bpjc/tr7J05sa212gakBinyuufwq3AODY%2bXOOAEWQ4HFYrGjJfbKFLdC7lEongtuudwtZ7QCOB5SkQM63bDZPGgwDJlMfgQZNBgiWl2Ypgd0%2btU5Odsalvhg2COPKz77LF4QdKWkrC4sTBCYXfSDZaypcrS2dFmdc1mdc3mdc0V92fL6cuZZxyBWiTaWxWRGa0tXLVm0asmi0brSZbWlozUlI9XFo9XFy6pLRqtLltc5R6oWjNaUMF3VJSNVC0aqikZrS0frnAmtFfVlK5gpmFlW1Jcvjw4ee41W4s8VDeUj1QteCrulUikAAGq1uru7u66urqmpqbu7W6VSxc3S%2bOpSVZ/eOJymH7JpBy2qfj0R1uAhtXrARPUbyD6dqk%2bPhzXqiMkwZDcM2emIqXj9wuL1C%2bmIyTBsNwzb9MM2RqtPS4S1qn69btBKR4xEWEP2afXDVsOwzTA8o/XiQjpiZIYNa2MCeFij6tNR0UnVEaOqT09GX1XReamIoWpjQ8wCEonEbDY7HI6MjIzCwkKFQhEnsGhDldQFYX5K4UYylzs8P/I1bmvt3NnTsKXZtcvj2uXt2NHdtdNtG8lUuBHUp5K74awVeVkr8uRuGPGRkBcjg5qBPcMNW5qrX6rv3OGq3lTfsKWpYUtz3eYlmJ9SenHER8rdcPaKvMzlDtSn6t89WLt5SePW1trNDUu2NjPT7eipf7mxcE2J/6ehpm2t7du73K/3tr3WqfThC16I%2b8CcXrx4U43Ci5JhDeIn7csyG7e1%2bt8IDrw1VLmptvW1Ds9PfO4f%2b/xvhLNW5sI%2bggxplD7CsarAsapA6SOIkBoLUFSfrmNnd%2beunt6fBpdu73S%2buKj65QbPj/0Dbw0TITUepImQmtFaXZCzKh8PUu07uz0/6a3f2ti%2bo6vzdVfb9o7mV9tWH1nT%2bEpL47aWtu0da4%2btC%2b3ua3m1DQ9RJWvKZTIZAABsNpvzQIm5MpvNBio2VKe0pSq7MagLSe2AklqkwuYUfqMopU2e3CblN4oETWJBk1jWDkLdKNSFStsV2Svys1fkS9sVUDcKdiGKTjipRZLUIk1ulSY1SxjFFqmoVSZtBxWdMNiFQN1xrZwV8yRL0eRWKKkFTG6FRK2QqA1MboGEzYrUDhzsooRNYHIrKO8kpO2YqAWStCOlYwufYoH2F7sOnTp85urZU5dPT1w%2bff7a%2bbO/OHfpxuXJK2cmLk1c/eDq5RuXL16/yAhcmpi8cubk2ZN1Y0vqxpacPHvy9JXJiajW5NTkmStn3rnwzoXrF85fv3D%2b2oXJqXjXxOXTp69Mnjx7om5sad2Y%2beRZ4MxVweSUYPIK/9QlBheuM5i8wj33Hvfidf7EZcHEFG/iMu/cL4SHTwMta4od%2bQVWi8U%2bRwH8W0J/vf3X6Wi5c%2bfO6YnTkxOnpy5NffS7j069c%2brUz09NXZq6/t61v/5PXObr%2b1/3bPb2bPZ%2bff/r6enpb6e/jbV/9dVX7//q/V/%2b4pc3P7j50W9/F2tMCHx9/6uezQM9m3Vf3wemp1nffANMTwOffAwcPQL8%2bn3gyhRw7Cjw85MM/vIXpisqwPrbHcD9YiGEkmJRskQqeWwB3D/0fvbpZ/e/vH//y/t//tOfJycmf/PBb3517Vef/P6Tm7%2b%2befni5eu/vP7hB7/57NPP7t299%2bXdL2/fur10fcfS9R23b92%2bd/feF3e%2buHvn7t07d%2b/cvvPxRx9fnbr623/97e9/9/s7t%2b/E2r%2b488W9u/du3/rvpev9S9fTt28B9%2b6yvvgb8NU94M9/Am5cB359A5i6BLx3Fbj2HnDpAvAf/w7c/xJgBL5k/9d/Au1r8oVi2ZO2kOcVn2ujJ/RKf2Br2L8lNPT66ODO4aFdI5Htg4M7h0d%2btCzWEn414t8SCm7r827yN21sbdrY6t3kD27rC2wNxxDcGo5sHxx6fXRgx9DAjqFEO9PFaPmaNrY3bVzs3WQKbrMHttr8W2x9r9kGd9oGd9mGX7cN7bINvW4b/pEt/KrNv9UW2GoLbbP3bDJ2/rAlRcLkAeCxWQwAgNyxAtuKzASsyzKso1GMZFhG0i2j6Ux9WYaNQWYMOavn5ayel3hNwDqaEZcfnRV%2bWGu%2bbdksrMvmW0cZWEYfqMz02pcVmkbzWrZ0xJxYIBAYDAaJRCKXyyUSCRN/YgXsQqE2FOpAoU4M6sKULgz2EnAvgYRUSICEPQTz%2bjAgLwZ5o2LPA8iLR7WeAmTmifTiqT1gIg9IJJJQKORyuYaGhjwej0gkiicymSOVAwC8JC5PyOElcfgSbhIsTFYli/ViqAHFgzTWS2G%2bOHA//U8F5qfhEI2GaDhIk3411Is71yxKnIW40cLn82d/fgAApNkyFpMmWBwAiIEdBZfHhlswclhDRNQJ4GEa81P/LAQovFc1YpPsJJNKqmCwT6P0oAkCczqxJJvxcc4DBDgs5pmsSpI6ZJIsqTRHJs2VSfNSZfPlYA3yjKtBn3P1uJ9CApS%2bhzwmYF8DAG%2bWLHVACz8jAdYjBGbskFBhzcSAZFUSs6meupoApQo9HwfcT8FBWh6iOwtka82itBZU1q%2bBvGjZ2kU4jotEojnzwFwEOGyW3AmC1TBUi4iMYkmGVJqbCtUheB/N%2bMPcS1F6afMQWfUSonDTROBZCSABKrODWFqtLN2I5ezAmv1wVS0Ge5CydYvn5edbnpCJEwTYD66exVhAUaEkl2nJIY00W4p0EVADgnQST7WA0ktbhsm6rYjcQxMhCgvQWICKIxhF4jUw0xig0CCl6VVluIjqjWjDK0jxMGbspJS9aOmzbyH2Ax7MZjHyvBSuYhGEelUpaRKkk1BUKNFeFTPlkwn00pZBsn4DLG9RES4S6yBxlwrrUmHdKqyLZNDN1HGXCu0kMJcK6ySxHqYLcamgbrJyPVy3BjIFMTCgBr2MDyROow8uO3G3jEehx2yhGRqyPJlIJwIXK8EqmIlCT9w/mI9S%2bmmTC6nqlSRng8oFkHweCBZCigIQKoIURRBYBIJFkGI%2bCC1QyueDUEm8rihQgAsgsBA01IBFtcnailTUz/iAc038NCoSiZqamgoKCioqKgoKCng83kNhNEYg9vMnnDi2kZKIJK6QLTKK4XYcC8YJoHPFGR%2bFBNXaxfKiMi4HTUkhRWKtWESKUnQpYlIk1ojFdBQasUglStGmiClRij5FRImZulqcohGx0ZRcJ5/KTIJ7aMiHJQgIhcKGhoaampqurq7a2lo%2bn/8YAt8NRJxo/GEBgEApiC0dj%2b7yrJWEfZSAe5nXR2K50kMRGaKC0mguEXJ4Yh5fzOOJeVwhl5/C54v5zFPC56fweCIeR8jhi3ncJC5PxOMlcwUSHsDh5hZzUQ0XaiKhAEMgdifWarVlZWWF0ZKXl0eSZDwTzxmFYo1cFpfL4ok4snlyPMT8/HiAAj108Tos7wUc8tD4wy6BBymoQ6UkeYWLuNGNCzxXYUflcwo5iIqT6kSUIbx0LE5Ar9c3NDQ4nc7i4uLKykqapuMEHtlCs4EfAFIXKJAeEm7D0B4S71Mz8WSGQNG/YLmrccj7MAEfhYdpRTWqULKLFkcJMBZ8trWzGMQJFHFglJWSrYD7idKxhTEnZrFZj3fihAUeHQ4Akg0ipJNgIk%2bQQroI1E3i/WoiSIFuumjd4wj0UkRELckH5TKgqOL/ZAEIBpJ1UjjMEHimMPoIv9kROQAvmSPEhHwxly/hygrkmJdU%2btVPskAthuj4ztYkQCxMgoV8UMBXCLgihs9chZvC40MCPigQKgWASDCvOokw8CXZoDKEl69dnP/URPZdA81ags3i8pm%2bWIBivFnOkyxGFmwgcseiPvCdQAT7aMsAUfsyInfRhI/CvFG/r8cEoJDFY38XQrkAbsDwAM1I%2biiFi164Ac0axWGPGupFnU89SqQWyjk8dsJALBbAnYmwzCFPyJZmywQQP5bpYjkOAFhZ1clZQ6jSp37EieNHiRGydks0E8/kXTxI4z4K6SDgh4F0Engv0zsjRik89MIfolmrcGVvlMBTMzEWoKAmlMWJ90tlQM6C2e3LEXKk2TJ5hRJagspLQSEmTEYFLBHPlsFWp/OTM2SPJWAZJhu2wvKeh89CMRrfAfaADB6gFG66YhOSvQpXep%2bZABag%2bIgg9ipLBQrKZgIIACSnS9ERrSZAEUEKjWjgII34KambKlgJ5wyjqUvwx2yhXsowQJaux8DvBNlnOcZCHnr%2bWsw%2bSiAPW4DP53O53NhfWhwO5wECUc8Da2E2j%2bEoSwXynFxZEg8Ss%2bUSLtGOl9Yjh5M5L9NJGjdpdKsMHtLUTpavxXLGiMduof8v4AEa9GKJs1Bpaeng4KDL5erq6vL7/WazOX5ASkQPsA5hp/JT5ay8cl4Wmlw6P7W4EXV0ES2l4DUA2Cfh5i7FS5qxolasshJtXIlkjxHK5/%2bNvwcBaTSRgRBoMpn0er3BYLBarRAExRNZIgISYTXspTUupHxYIa7HQJ8KCtFgiCbc5BInWFgLg0EaCjK3VYlf7ViL5ywnUPdjotCj6/BRZC/zfF4xfIbA03zggSiO%2bSkiTIPDasmwFovGDWbEAJ3arwb74q8xkAFK0U%2bLB9Vw6EkccD%2bl6KNFg2pliFF/wuqhMCMGhWfFnp9A7F7np1oWKEazpPoOAg7GFxdn8oAYFKBqyqHRDGlaKzbX4ggfpQjRCyuVL6RJHI0oNIcY7qPAMF1Ui6y0SYpqEXCGQ5QA48RyuZwFsLg87mMLQwDxkbCPgH0E4ifAXnxczv0TAMyvgqRhEu1l2mEfgfpVCTHUR0gC5GuqpH8DgMaSVFGfalbMNyuG9xK8MPkDs%2bgeAPTmSpIiKsyLJ0ZD/aq4mBcXRlSjOdJPAWB5jlQQUeFRMcRPyj1w%2bbqnZWLMT%2bn6zYaI1RCxGgds%2bkG7u4JeV0Bk9Zp1Q3ZDP9NuiFhVAY2mz2SM2IwRq3nAphm0ddRqNswjCnpM2mG7KWJj1CM2VVCrDhuMAzbjgM08YKNH7I2N2s25uLPDoB2xm6LtxgEbFdTRYb1xgNEyD9jVI/aqVv0mB17ZoldHxQwRq2nAjvvp0jULn2IBXb95cUOVyWq2Z6VZ0qw6kw5PM8KZZrVFrzcb7Jlptky72WTWV5sWdVSazWZLulVj1OlNeiLNCGYYVCatzqTTW422TLvFYtVXmMu6FplMZp1Zz8CoI%2b0GOMdC241ao05n0ussBpvNri3Rl7rK09LSLelWtVGrN%2bkpZjSjymbQmxhFS7o1IyMDzyKKXyh7ig/oIxZbuj1WF4vE6WnpVqPJqNbarTaD3hDNaExORouIzNIcJlHIZFmZWQa9wWay5GVml5U6rWYLraJiYkgenlnBiDkcDovZ4shxpFlsKgSzmiy5jlyr2WI0MGNKzanZNY7YRbFgXoFRb9BrtNn2dLPeaDKazCazQChkFgSySmduZHMSMAxY07LSY/WkpKSMjAyHw5GTk%2bNwOIxGY4IAVkRmlTErk0glmZmZRUVFGdGSnZ2dl5en0%2blix0E0D89ezKzMZrPF9qjZbMZxnKIoxnoWi9FkYn4Fi9xRn89cFJOE8%2bbNy8nJsVgsFRUVhYWFFoulvLxcLpczUys5swQAICMjg6IoGIZ1Ol3iyzFDwGQzR/oj595998iRI2%2b88cbPfvaz3bt379mzZ//%2b/SdOnDhx8oSG1ID5sLnA2t3efe7cuX379u3Zs%2bfNaNm7d%2b%2bBAwcOHTp0auJUlj0zNQM0FpprK2smJyf37dt38ODBmPChaNm/f//Jn590LnAK1EnWhWkLS8onz0y%2b9dZbe/fu3b1795tvvrl79%2b6Y1oWLF1qWtAACYOG6ygQBl8u1cuXKlpaWtra2hyxgsBhPHD8R%2b8py8%2bbNqampjz/%2b%2bI9//OPnn38e%2b8oyP3d%2bao7CkGva%2bepO5qPLt99%2b/vnnH3744R/%2b8IdPP/30m2%2b%2b%2bfZb5jNMc31zik1G52pXL181PT3997//PSZ848aNe/fuTU9P/%2bMf/5ienh7qH2LhHEOJaWRgJDb%2brVu3pqamPvnkk9iksdHWr/0BAACL1lclCMT%2b34195Jv96G0ctJltlkg4cvbM2fGj44cPHT6w78Chg4cOHjh45PCR428fP378uIbQQPmIdb69s63z3XffHT86Pn50/OD%2bg4cPHT508NCx8WPHxo%2b98847mbZMeSZkKrLWLK65eOHi0SNH3z729vG3jx88cPDY%2bLG3j709fnT8zOQZZxFjAfui9PLi8snJyWPjx8aPjh/YPzvp0aNHz58/39LQ/JAF5vIBbZ9JZ9PH7zSxm8vs/1tRtehJGy7CTIWWWTGm/QGZmCIAKPMQs9PGiHFmxGJdD9YBQGaXWyvTmFqsKzFdYkDmhsJiY5zE3ypPysRoDxmFai4gPSTqVaEe1TOKMZVnEXM9SQzroRQu5KlHif8FPt%2b5nQhUBywAAAAASUVORK5CYII=' /%3e%3c/svg%3e)
Display Checklist
-
On a Gen3 20|20 navigate to Setup > Equipment and use the Combine Measurements and Combine Head tabs to fill in the information recorded from a Gen2 20/20.
' width='1280' height='800' xlink:href='data:image/png%3bbase64%2ciVBORw0KGgoAAAANSUhEUgAAAEAAAAAoCAYAAABOzvzpAAAACXBIWXMAAA9hAAAPYQGoP6dpAAAQZUlEQVRogdVaCVRUV5p%2bbDrJxETHRjOZjASKYt9ERNkKZCl2sBQVcAHBmBhtl/QkprOYWY49dqYn3fYkZtKT0%2bdkOklPVuPCpoDIXlRRVRQgyCL7qkIV1F4F35x7qwoLKIx2dHq6zvnOfe%2b%2b/77/3u/9/3/v/W8xDMPgLx02Nja09PT0RHR0NHx8fPDMM8/AwcFhkezKlSuxbt06rF69GitWrCB1DBjX58F4vQDG5Tkwf7sadowNbNasMtY5PQuG9XdGGVKyn4fNT1bChmHg6%2beH4E3BCAsPR3x8PMLDw2kduU9KSkJgYCA2BgcjICAAoaGhCA4OpvKRUZFwc3N7dATY2tLSz88PPB4PGzZswJo1a7B8%2bfJFsmvXrqW6PTw84OjoaCKADDyADcaXBcZ9HezJS1euMBKwwR2MvysYDyfjvYcTbFc9TQnw8fZBdNQWRHEikZaSitiYGHodHhqK9LQ0JCcmISkhEZzwCHodER5Oy5gt0Qjw8zd2/s9uQQ528yuIOZE6W6NZWQV5tsz%2bxysn7yC6HOwfAexga2%2bPZQ4OWLZsGQVxAQJ7e3tjabqnWGasZ5icWDD7Yu5hbzSYPdHGcq/p3owFMjb7YmC7LxY2%2b2JhmxM7dz13b4L5fr5cDJg9W4y6fhS2mPq3BWuDfRHo6wcPT08aDwi8vb1pTPDy8qLXvr6%2b8Pf3p3JubDYY5kA8fvvdF6htlqC0sR7lIv5fDMpEfFSIBbjCr8HaIxlYFeyNtMRk7MjchX05ORRpW9ORvXs39uXmYH9%2bPjYEBVEy3BOi4OzhDobZH4faJhHob2YWD/SbNcnOPqD84/qZ1Bs0WjifyMYKfzYi1wchJoKDuIhIcDlR4ARvRvjGTYiNiKRY7%2bUDLxYb3n6%2bcHFyAsPkxaFUUEcHNK1QQKlS/QCUUGs0gH4GBq0Oih%2bUf3xQKElf1JiUyeB0ZCdWcTdjw45UeG1PhHdGErwzkuG7LRG%2bqXHwToml8N%2bagABeIgK3JcE9KtRIQLmwnjJJXqrRaKBWq61CRZ9rMXF3DOfbRWgZ7IZBo4ZqCXnzu0j5OEDerdNqIVcqwNqfBubXr2B5y%2bdwuPIbOFx8zwj%2bJ3AYuWTE8EXYD5yHfd93sB8vgF3BrxYTQF6q1%2butw6DH%2bMg4rpZ9C%2bYPb%2bCnJR9jtO0GFBrtItnHPfh5BCgUYOWmgTl7GDYVH4D5wztgvj0N5o//CKbkfTDtX4Bp/m8wnf8DZvA8mP5vwdy%2bDKZwAQHEpHQ6HYaGhtDX14eBgYFF6Ontx2ivFB/UFKFWWomx/h709vXPkyFtFQrFkiRYWof5WqVWQalWPZQFzbOA3FQwHx4FI/gEzBfvgvn%2bX8Fc%2biWY738B5st/AvP5KTAVvwUzWQTm9iUwiqtgys4uJsBgMEAsFuPChQsoLi5GUVGRBQpRWFyCyqKvUXv1KhorClBaUoDCovlyFRUVUCqVSxOwgATiQtAbAMPMosET2R8kYHoKzq9kwD4zBs%2b9fRBrXsuB46t74fizfVjzei4cX8%2bB48lcWv/s67lYS8o387F6X6p1F%2bju7sbVq1dRUFCAwsLCOZD7IjLYgku4VFiEsst/REnBBRQUFs09LykpAZ/Pvy8BGvMAldPQajWY0RsgHuxBbc9N6LQ6WqdWTEGtNsouZQ1mAqbkcjidyMIqPzbCWJ7Y6OaFEC9fhHj6YCPbE6Feftjs4YNgNy/4O7EQ8IIr1juz4fbc84sJIIGOECAQCOhASFlfX4%2bGhgaIRCJUVVVRVFTWoEVQAZGQj3p%2bA31O5BsbG9HU1ITpaTI47ZIuoNUZMD3WBYmoAeN9gwgp/BirLv07hoeG0SwWYmq0ixgEVCoTAQtgtBTVPQKOZeLpIE9k8LZhX34eXjz0Ml46/Ap4GRnIyc/D4WNH6bWrhzt8/P3gE%2bAPF7brQgKMX434sEQioQMm7kBKoVCI0tJSOkCxWIJGoQDNVRcgqS9Ho0hsqhfTdu3t7YssYN4MQSxNo4P6Ti8m74xiWjaF31VfwXvXL6OrswvdHW3oaxPgzoQc0Gug02mh1urnQWOC1kzA8Sw8HeiBQB8/uiEjqz%2by6iOleQVovjavDl1cXKwTYJ7yzB0mcYHc37p1694iRDcFQdm3GO4Q0lvLqdI4Xc4fPOkoeQ%2bdJXQ66A2zMMiHMKtTQ63VgV9ZDfWEDJMyOZRTE5Dyy9EkakBrXRGG2uuglw1Cc7cPmol%2bCkKe4nbPPQswEeDl6gZXNpvu%2bAjYbDbc3d3p6o8sjc0lIcHZ2dl6DFhoroODg/TLdnZ20i87MTEBuXwKtwc70dhQi1s9vXMmby3Sk/q7d%2b9S1%2brv76cW1ts/gP52IYb6e9DV1Y3SsjLU8eshbBThhlQMUU0J6mur0Fp7GcLrlzEtvwutagpqhQx6jQJjw/1obhJhZmYGcgsCuJFbwImKpFtzgoiICFqSQZOvbmkRLBbr/gshal5TU2hra0NdXR31c9J58xQplkjRIBBAIhZjdHR0zucXTmVkSjS7R1dXF3p6bqFJ2oLBDhEU8ruQyeTUapQKBaYVSkxN3kZPSz3uyBRQj3eip7MNOsOscfbQaKHV6aGcVmJkaNhIgEyOF45n4an17shITceLBw8iMzOT5gYOHDiAtLQ0agVmNyAguQPWUgRYfjlCQG9vL1pbW3Hnzp05MybrBfLVb3V3U58fGxtbFPTm5niViq4tzGuDkZERdHb3QCcbpF/TMDNrsh41dDo9MKPF5GAb%2bgZHIRu6ick7Y9BYkEtcqHdoEDXiRtoXswWsMLmAC4sFV1dX6gJkkMQNzKZvuUt0tuYC1gjo6OigQc4ysJHBkOckLhDLGB8fp6RYcyFSko6a40lvTw86uroxdkuKgZ4ujI6N00GQ9jL5FPV9aX0pyq9XY6RbQknSG2aM1qRWAWo99lZ/A%2bbTNyBTK6GUT8HlZ3vArPsJTebY2dvDzs5uHmxtbRfBhqbS7kOAuSQWYDm3E5BrQgAhhzxbGPiWmgGMpMqpC/TfFKGLRPy%2bfhobhoeHUVfPh0RYj6GbDahrEKGptgTdHTfQ09tH22l1OkCtxdftjTh%2b7RuotRoaBFmEgL//mz8hMZNnnQDLjs/OzlIfJl/ZPHgCMmhi/sRKrH39JZfAKhUaJVJ0NBSjo1lAl9dkTieBsrn1Bno6mjHdJ4S0/Raufv8ZhPxajI7dxsDAICYnZcZdsG4GqvG7mJ2ZgWxSZiJgtTHFZkqS/igC1Bb%2bS8z2xo0bqK6uhkwmw%2bTkJDVZEhcIMWbzfpANkHmzRWaWFqkY7W2tlERiAaTuZkcn2lqbMNjGR1dbG1SjNzF4qw31NVVoEglQX3MdbS0StLc1Q9oswozBQPs0n4BHaAEa0zWZBYi5EysgMwAJauSaxAZzPHiQwVsSOzwyitHRMWo95sCq0xsgn7iNHmk5BK11kPUJAMUQNBMD6GtrQGtDObqaamg50i2FQa9//ASo1WrU1NSgubkZt2/fplMeifqEBOL/D0OAZUkHbHIdM6aUSvS1NuP3JMh9fRq/q/wKt5qbMaXWwjBrTETRkniBfobqJdPgYyNATTYcOh0dPLECMo/fvHmTLopaWlro3P4wyQ%2brS2MLy1Cq1JieuAtJTwtONZbRktwbF2lklamkMcS84tQ9TgI0JlMlQVAqldI9AWVcLqeBj6wDCDkPOvgHJYdE%2blmyEyJpP8MMvbemY247/LgtQK/XU78n0xQJiLSTWu28ld%2bPJcHY1iL9plZhWqWk5T0d93T9nxCgWRC5zdF%2bqdzf406BWeuXdQIewTSoWcJnH5W5P1oCZPMXQg9rAaUPlRb//4O5tPjkpHEp7OSI5QwDB8YGDrRcDHtbO3okRmBnR44F8ywORkjgIcusH4LlwcTDyP8pbR5Ajh6MHM/Cyo1e8I%2bJhHtaHNxTY%2bGRGA3P5Bh4Jm6BR0osPJOi4RccBH8/P6xfv950Qp3HxdnzX6CmRYwrYj7KmgQolwpRKhGgVNKwCGXiBnokRVAqbkBpkwBlTULahrS11oYeY5F3i/kmeaOOMlNbgvvpmC83X0d5kxDFglqsPbIdK4M84ZMQDaf9PLByeGBlJuOF7FSwuZFwyUjEuvzt8NwUBB9PL4t8QH48lvPC8eTWcDyZEoJlCRthz91Ar/86NXQenkoJwfJtEbDbFYkniHxaGJ5I2kTlCf4qadOiNgS2WVFGHVR%2b85wOc2mp76nkECzbbtTxZHoYnkwLxXKTnAN3A55I3mxVBzkgddzkix2JKcjN2o2Xc/bjcN4B8BKS4M12g4%2b7J3zYbvAmWSHLlJhtRjjsXssG81%2bvITSSA15qGrbxePDz8YWrCwturmy4ubqC7cqGhzMLzwZ6wSE1BMzv38DK/WlI5URjK4%2bHnRk7EBy0ESxn57k2tB2bjSe2BMDm53vAfPI6OJEc7N%2b7DxnbtmN3Vja283hIT02Fh5s73cMTHWuDfGC/NQzMp29i1Z5k7OAmITMrC9mZWdi4IQgsZ5d5OtxYrrDhhWJNWACCAwIRtCkYQeTPGJs30WsyYJIn9AsIoCfDJBlC/rTBJqfDNtlRcDuyG0EfvouMrEzsz82lGZWUlBRwuVz6zw9ufDzi4rlI5sbDN3ELVm2PQuDZt8A5mo/83Xtx6PBh5OfnY%2bvWrYiLizO1MbaN43LxTEoo3F7NxcbfvIXM7Gy8dPAglc/Ly0Nefj5yc3ORkJBAZVO48fBM2oJVO6Kx4T/eQdyJl7B35y4cf/UEDr1yiGZ3FurgxnFhnxEBVnwEUuMT6XtI3xPI%2bxISER4RQWVSkpKpPEFycjLCwsKIC3BRUVuNTn4jzcu1tLZCSDY4SiWFOeJOKaZpwPmo6DuknjmJXoEENyRNqK6tRXFJMUZGRzA1PWU84Zk7RFXTVWPgGwdQVlmBLr4I5deuoay8HKNjY5iYnIRMLqcg8mYd/3b%2bc%2bz41dsYEEpRcrkA/YMDuH79OoaGhzE1PW1Mn83NAhq6GXr%2bpzvhFBtCzT9jxw5qkcnbeYjfswuRERxwk5OQuJ2H7Kws7Ny1C7t27aK5QhoEGzvbcO6DD3Hq7XfwzZdf4fLFi1ApFFZPpD%2brKMbuc6dRU1GJzz/7DGfffx%2bn//lfMDI4RE%2bLrf2C3zwIYWcbGhuEeO/MGZw5/QuMj4waZx0rv3PF3yH3P8%2bg60Y7Dh8%2bjMsXLuLjcx9heGAQMyRlZuVHzgXWxYTgH44ex2snT%2bKtk28g%2baX9CDmeDw6Hg5j0FERnZeDE0aM49e4pHDt2zGQBeVycu/AlKoR8XKosR1HtdZQ21KJaKkJlUyOqTCB/RJDcbMPPPz2H0LdeRlWjAAU1FSiuraRtrkuEqJLekydtyTuuNfLhfnw3Prr4FeqkYhSa2pjlqhboaOpox7FPfo3IU0cgbJHiSkMNCqquobiuEpVEh4V8ZZNwTofjIR6c48JoUjQ5JYW6cGpaGtK38RAVFYWkxCSkb92K1NRUivT0dEoM/YcIIcH2xQTYvZhISxtStz%2bO1pN1wjzkcyls8uNha5InpVVZM0w6jG2IfMLS8kQv1WHq1wFTvw7cpw2tj8U6zkZEh3MQFnEvHc6J4NA5PyQkZK6O1nM4NBD%2bL9eKGbQQDzTSAAAAAElFTkSuQmCC' /%3e%3c/svg%3e)
Display Checklist ' width='1280' height='800' xlink:href='data:image/png%3bbase64%2ciVBORw0KGgoAAAANSUhEUgAAAEAAAAAoCAYAAABOzvzpAAAACXBIWXMAAA9hAAAPYQGoP6dpAAASkUlEQVRogc2aB3CWx5nHXyQRx7HokNgUoS6hLkRHEupdQkIVUSUgFCe4BufGmeTmxhPbl8R3c3G78yUXjy%2bmSyAhepEESKghECqAhHrvqHyq8Lvb/b5PDeEBH8ncN/Of3Xf3eXb3/e/z7D6776coisLfGlOmTPm7tL9kyRLWrFmDra0tr7zyCosWLcLe3n5ETkdHhwULFrBw4ULmzZvHtGnTRLmCYroQxcoQxXg%2bymtz0FWmMOXHs9Rli19FMVmglhGp2UKmzJ3JFEXB1s6OFStXsNbZGV9fX5mKDpc6OeHi6oqLiws2trZ/cxK0bRsbG7Ny5UosLCwkAebm5qxfvx49Pb0Ruddeew1TU1PMzMyYPXu2hgDx4g5mKLbGKOaL0BXCM/XVBCw1R7E3RbEwUD9bGDBl1jRJgI21NR5u7ri5uhIcFISnhwcebm7YWtsQ4O9PZHg4VkuWqDv/W1qAJjU2MiIoKAh3d3eWL1/O/Pnzn5DVlk2fPp1Zs2ahKFN1xwvp6KD8QA9FV%2bfpnepMUcs86wBfmooyVU%2btMxmmPiP0Ji%2bX7SsK5hYWhIeH4%2bPjg5OTEwYGBnLWp06dKq3gpZdekrOvr6/PjJkzmTFjBoqyzQtlqydK7Do1NrqixLiosclNXTcRWzwkpmz1RGebFzpx3ihbNG1sch9NN6tlRKrVeQKiTtOu3nYP9OI80N3uwdQ4TX7baH5q/BididjqwSwHC8wWG7HIwAAjIyNp5tbW1tjY2GBlZSVhaWmJnZ0dDtY2mJqYoCg7fFm4yoG1fl6s8HFnpa8nLsF%2bOAf5YuuyGiNHG0yc7J6AsZMdpo52LFjlwNTQNdg6r2KNvzeO7i44B/mx3NsN%2b3Vr1bJLn9SX5cvssXS0Rsd1NXs%2bN%2bXiuR9yPHkayWf1OXZSn%2bNJ%2bqSc1%2bdwgj4JyfocPKZPeoY%2bGVn6XM/S59oNfTKz9Um7No1XX1/NrBWOhAUEEh0Tw7Zt2yRCQkKIjY1l69atxMXF4bRsmXRLC991GFuYoyhx3hhYWRAVuoH4bdsJXx9KTEQkP43fgY%2bnF0YGi7EwNcPcxPQJWBqZSF09v%2bWsXLac7Zu3sDEqGj9vH3VboWGYm5g8Vd/c1AxbI0MUx2V8fOQnNOcrpCcr3DircO2UQtpJhcwzCrkXFVK%2bVbh4TGGoUYFOBdo16FQYblQw2u/EdCd73NeswdvXRy7Kfn5%2brFu3Ti7GXl5eEo6OjlhbWWGz3AkTU1MUJd6b33/1BefOnOF4QgJJyckkJCbK/Nlz5zh/4bxMT58%2bTcoYnEpJ4dKFi/zhP7/EbF8UxxOOk5iYyOkzZ2TdyaQkzpw9I/WTTyVz%2bsx4fYHklFNcv3wFzwOv88a/v8FA%2b0ka6o/Q0XqClsajtDUn0FiXQEvDEZoajtPSeIy6mmPUVmtQdYz6mgQqyg6x6OchTHeywtLYhMWGhtL/BcTOIHYF4Q4CYqsUrmCzxEq6iaJs96KopoJ7RcV8%2bcWXpF6%2bQlbmDU4kJHLm9GmJ2/m3eNrvdkUpbh%2b8xZ3bBRw9coRzZ89SVFjI8WPHOJWUzOGDhyi9d5/v%2bu376ve8/%2b1fuHElj2%2b%2bSeTokdN89tnXfPvXE/zXnw9TXd3O8NB3NoHR25uZ7mSJr7snAYGBRERESIgdQfi99sXFmiDXBVtbSY6ixPuQdD2Vkvv3uJZ9g1vFhdy5W0LendtczcokKz9PlrV2ddLc0U5zpxqN7W309qlIybqK7YE47leWk194h4zcbEoelHK7pIirNzK5fC2dsqpK2iboCzS0t/J4aJiYT37Dz//0CS1NDWTfzuN6dgYZuTfIvpVLRk4m9a2NNHe20tbVTutYPGyjvbuThtZGDN6IZvqyJURHRLI5bjvRsRvZvG0rIWGhLF%2b1ktXOa1m6fBnWdnbY2Nth6%2bCAiZkZirLTl7lxgRjticBoXySGe8JZvHuDTI33RWG0N0Lm58eHsGBHCPPHQDy/Gh/EjLgAFu0KxXBPBMb7Isfpm7wexaJdYcyPD35CX2DhjhBmxwUyJz4Qw93hI20IGO1Vpwt3rp9UVzuGBfEhiImca29BpLsP2yOj2RQSRkxgCJvXbyAuIppdMZsIdvPEcuFirA2MsFlsjPGrIiaI9%2bHktct0dD2kpqmBupamUTSP5utbmydFQ2sLzW2t1Lc0j8qOyYs2xPPT9AWa2lppbGsZ3/cYPFW3pZnG9laqGupZtDecadFeWB/Yhfnb27E6sJMlv9iBxdtxmL8TJ8ss34nH8u04LN9S1xtuClYvgun5OdKPBgcGeDz8aFIMDw0xPDikTidg6Cnlzwyh/z3aEP0%2bfvQIVX8fJttDUD59gx%2borqBXewLd6gT0ahLRa0xGrzpRXVafhG7HOXRbT6OnuozulT%2bqLeBSbqYkoFelorOzc1L09fUxMDCASqWS%2bf8PEGMRY%2brs6cYkLgTlX/ahpH%2bO8ud/QPmPAyhfvIuS/DHK179C%2bbc31fnmUygVR9Vpyu/UccCVm9kMqPrIv3WLBw8eUF1dTWVlJVVVVTIvygoKCmhra6O/v38cCeJZm35fjG1nYrsSQk6UaaB9FnXCah/29qgt4F9fZ8rD8%2boXrElEqU5AqU1EqTuBUnUcpUbzLMpbUlBO/15NQOrNbPp6esnIzJSMit/jx4959OiRzIuy7OxsSYAoGxwcZGhoSJa/6Jfv7VdD%2b%2bLPQkBXVxeGP4viZb%2bVGIb7MT/Mi4UbvFm4wYcFIh/mjWFUAIsj/Vkc6cfiCD%2bMogN5zWuNmoDLeTfg0WNS09K4f/8%2btbW1cuZFWl9fT2lpKdevX5d5bbmwkPb29hdKgiCVvkHoH2RwaEhd36d5WSHXPyAx8qwl4OFDFr%2b5kRn2ZvitXIvbqtW4LluBi9MK1i1fJVNrIxPsTC2wNTWXsDezwHSRwXgXuF96X76sFoKM8vJyWltbKSkpGSm/d%2b8eeXl5kvlnJWAyMx%2bL3t5eSfDP0xP4OOcirQ2NqEbq%2b%2blT9dDXWU9fV%2bsoCWMIMHxzI/pLLWQov2vPbmJiYwkLD2fnT3cREroec0tLbO3tsbGzxdrOVuZNzDSh8OXcG/AYurq75UAEenp6JFpaWuRsl5WVjQy2qamJmpoahoeH5XrwPDMtCBMupIV4FjPf3dVFYVERrx7%2bCJ%2bUrygvLJaru1puiMG%2bHoZaSxnqqqd/YGhkLGMJmLbUEitTc4xNTOSxV1yImJiYyBBYRIEiGtRCRINGMhTWEgCo%2bsa/jHawYqaFJYgOxUuLxfHhw4cjs/%2bsFiDkhds0NzdLYsdCWFlbewedrVW0tDTS3t6hqROyrbQ01tP8II%2bGikJ6VaPWJBfBzoeYvLMZxWAueoqCrp4eurq64yCuwyZiirxJGkOAmPmJK7H0S5C%2b39HRQXd3t7QIQcxE2e%2bCsBRBnrCkS5cukZaWRmpq6gjSUlO5nJpGfvppsq6lcfnKaF1qWjrpVy6SeyWRjEtJ1NTWMzQ0KNtUE9CpJmCRvOJ6TsSPEtDXr54lyezgoCREDFjMfn5%2bviShsLBQrgGCmOfZDrXWU1FRwdmzZ0lISODEiRPyBKlGAgmJJzl97C8kJR4lIXG07rg4mKUkUZp3iZr7%2bZIAMb5RAjQWsGiO%2bnrsue4f48UukCV3gfaODmnaonEx25mZmRQVFVFcXMStW7ckCeIFhEuIbVKQIDD68uO3qYkECFlhPdq2cnNz5WJ68%2bZNbuXnk3fzFiV5aRTk53AzP1/Kifqc3DwK8nOpv3eDpspiqmvrGPpOAp7HAuLELpDFUP%2bAnGkxQLHA5eTkyHx9fQM1dfVy4RNkXLt2TdZrdwixJU660k9iAYIAbdtiW83IyJAkX716lfPnznElNZ289BQy0q%2bQmprG%2bfPnybh%2bneysbG5cv0pJ1jlK79ygobGJwcGBF0RAvM%2bICww/GpaBjhiweLEHD8rpaGuGgU6qqmtoaGggKSlJLoJ3796V7iK2LhEpykVOBDA9XSN79ERStGuB2F1EKlxMpGJdEa5WUVlJXfUDqqsqpaVVVVbS%2bfAh7d3dDKi6GWwto7%2bjjsGh4fGR4Iu2gNraWoqKCqmsqqaptgJVQxGV1XXU19fJGRMytwsKaG5pkcQJtyl7UI6qu4Ohzlr6B4fp61M9lYSJEESK9UEccMTLSbcaGpRb81vZKSiJv%2bV6TgZtpTmUF2VTUVnNwGS7wPezAO9xa4A4%2bIgZaWio18xIOQ3lBVTX1FFWVio7Ff7f2twsw2MBYQUtrW0U3Myho/YuXT3ikPKkW3xXIDS6oKrTHpUKBob4piSHTWlHeFBVTm9LNa0NVXKL7H%2bhBORqdgHNXq0NTpqamqmpLKO99i61dQ10d3fJmRKdi3hdyIn9WxyUsnNyKb6TT829PK5nZlFRUT5uq3zuEFmQ0t8PfQOgGpTWMSACIonR%2bOOFEtCrGh8HyM5UXdy7mUZZeSV1dXXU19RSUHoPnUP/xOvpCagaW6htqKe8opLbeVl01t2lR9Uvd4qxM/68ZwPtTiKiwR7t4WiS0%2bILJkA1poM%2bGYsP9qtoa6iUUZrw9Z6ubnkTE3v5IF8XZzHU3Stdp6enl6bGOlSdTXKmtD76fQ9Hkx6RJxyPXxgBlzRngZ4JkaD0TeEWmphdDnBAvWgJsxTm2afxdQFp8v3q7Un197wQGYkEvycBaTez1ed%2bEfqKs/4YDIt0YHyZgFil5b3AWEwip4a4vnpa3f9BZ2CQx8PD9HZ3Y/rOlu8fByRnptHdp5IXjC2dHfLKWps2dbTRrEGTuNZub5OQ%2bQ613IjOw47R5w6trkZHPGuuwyf2MV5ntI%2bxdRNlBYSs6LOmsQGjdzahGMxBR/vx9pkJ2OmLfqQbsyLc0I9Yx482uPBKuKs6jVjHzBjPUUR7MmOTN9O3%2bjIzwo2Zke78aIMrL4c5S50fhq6VeaE7I3pUb9p2P2ZEezArXN2HkNGmQl/ISx1NH9M3ezN9mx/6os0wZ17W1L8Svm6kP/GsL8YQ4ynb1tnhi7J43nO8uAY60a68tG8Dykd7WL7OBZ8AP9x9vfEJCsDF0x1jS3NMrSwxsbKUn59/vMIG3eBVKB/uYfZGP/w8vfAJCcTVy4PwmGhCwjfg5e%2bHha01JksspN5UL0f0fhaO8sEuVrm5Ehgawho3V4LCQkf68vT3xdR6CRbm5sx1dmCquwOuLi4EhYfhHxKMd6A/Lh7ueAX4ERwehneAPyud12IixrfEAt1IF162NeEnM2cz98fz5D9A5s6bK1PxP4A5c%2bYwd566XIuZM2eiTIl2Zda%2bSGb/8YBsdHPMRiIjIti0MZYAP38c7OxZ6uCIo4Mjy%2b0cMFyzlB%2bFrGX2pwcw3RlJdGAIe/buJTRkPVERkcRERxMTFY3T0qU4Ojjg4OiIvvcyZr4Vy7xP38M/IIDtW7YSFhrGpthYNsduIiI8nK1btrDMyYllNnYYuK1A39OJ9T5%2b7Nixg8jwCDZGx8g/YQQHBhElxhcbi5%2bvr2Z8DiihqzH1X0dYQJDsIyAggKDAQEKDguUHUn8/P0KCg2W5v78/wcHB8qOpXAO%2bTUokK/0aR44c4cjRo/J2uODOHYpLirkvrsZK71Ny7y5NtXV8%2bO2f8PrNfrLSrsozffKpUxw8dJD8W/ncKbzDncJCiXv378v4vri4GJu3t3Iw%2bQTnk9UfTS9eusT5CxcoKi6W/RQWFcrbINFHc1097//lM4I%2beJeM1DTOXThPyd27Uk7IC2j7KCoppuxBmSx7de8GDL3WsC0mlvCICElawIZQfDZFsc5FWLY//htCiY3ZSFRUFNHR0Tg7O6vPAgXlpdy8kc2Bd9/l499%2bSHtL61M/Qh68eoEtX3xIdvo1%2bQH08z9%2byj9/9JEMjZ/2W/n%2bbu5UlHH4m7/yh9/9jqTEE1w4e45Hg5N/8fzy/Al2//kTrl%2b4zMULF3iWn7gSM/Bcxbv73%2bQX773H%2b%2b/9ksDdcax%2bcweuLq54rg/CY2MEb%2b3fz69/82v279/P2rVr1dvg5ycPczknk/9OTuDQmSR5S5yWn0P6rdwRXMnPJv9uMb/8%2bjPW/movFzOucuhsMkfPpXD47Cn5cSVtjLzIXy3Ik0GWxVub%2bOzEIZIunefQmWSOnD1FcvrlEbmRPm5mc/teCfu/%2bgT3f9zPhatpnEy7yLU7N8fJTdbHvL1hGHmvJSJ4PYFBQfK/QsEhIazfEIabmxsB/gGsDw2Vpi8g/jzl6uqq3gWEG%2bjs9GPq7kAJZYePLBPkPAFRt0Mtr/fTADV2B3y3jqYPraxIdXb5aeQn6Ii/22j60N3lj84uf3XZ09qWEHVeGLgux8PZlbUuztK/hYmL2Rd/ili9evVImSx3dcXhf9eO/wG8s8qXGzZSyQAAAABJRU5ErkJggg==' /%3e%3c/svg%3e)
Display Checklist
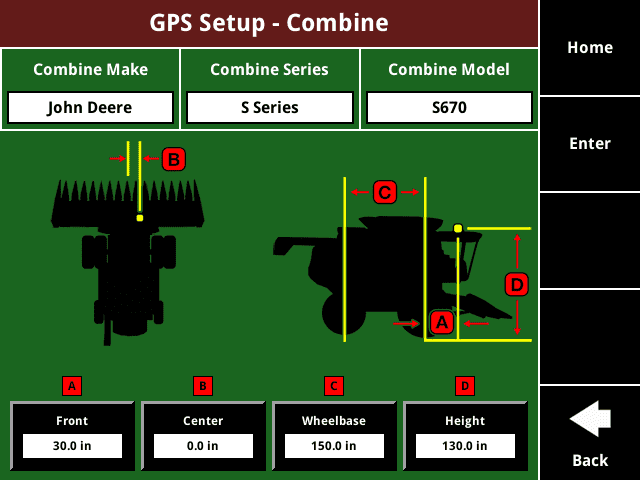
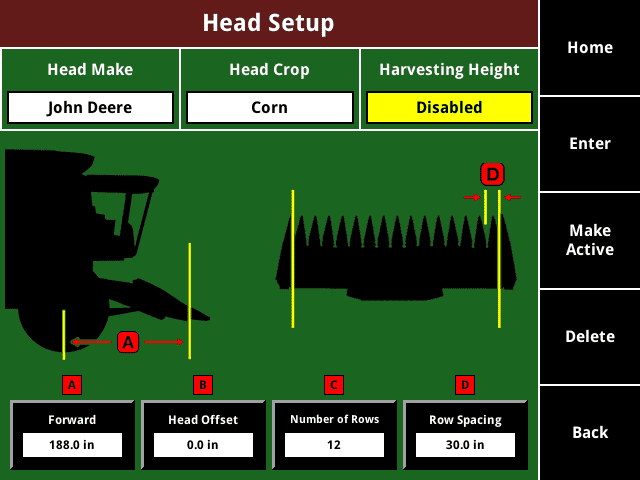
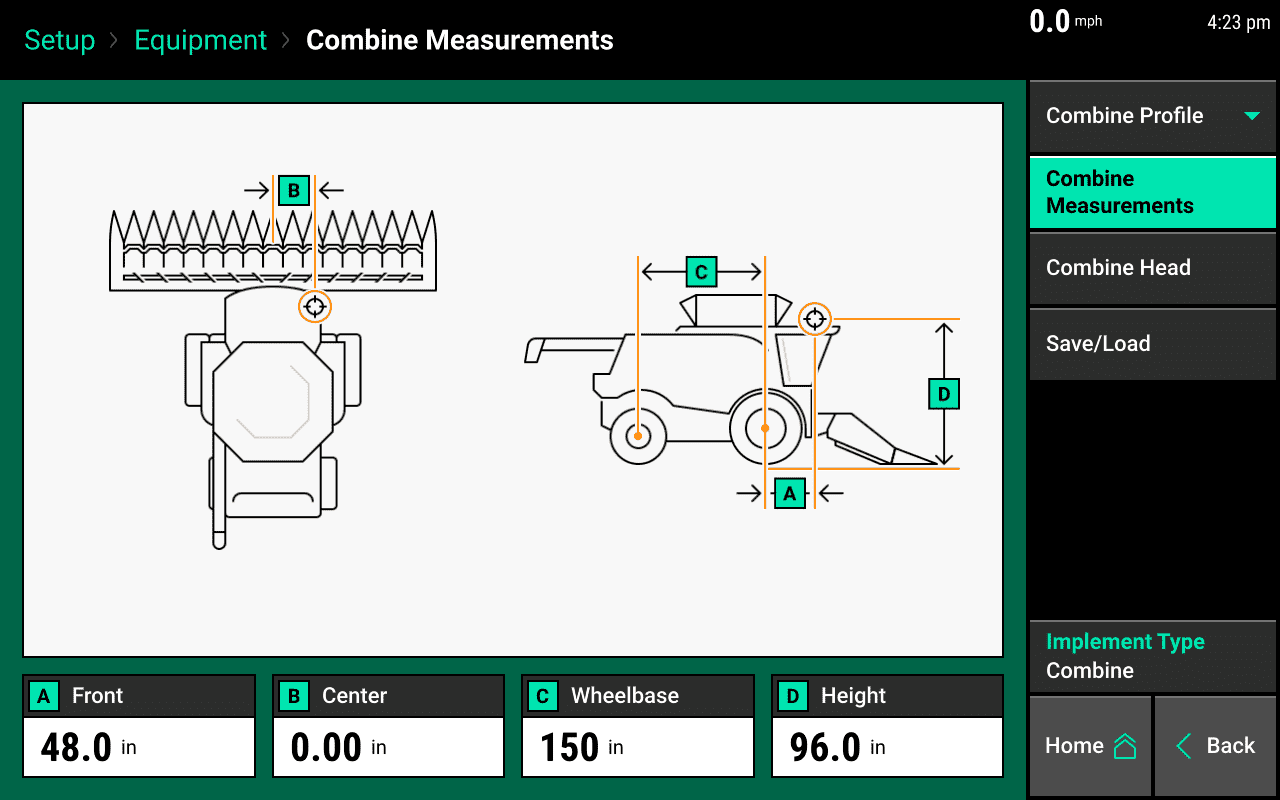
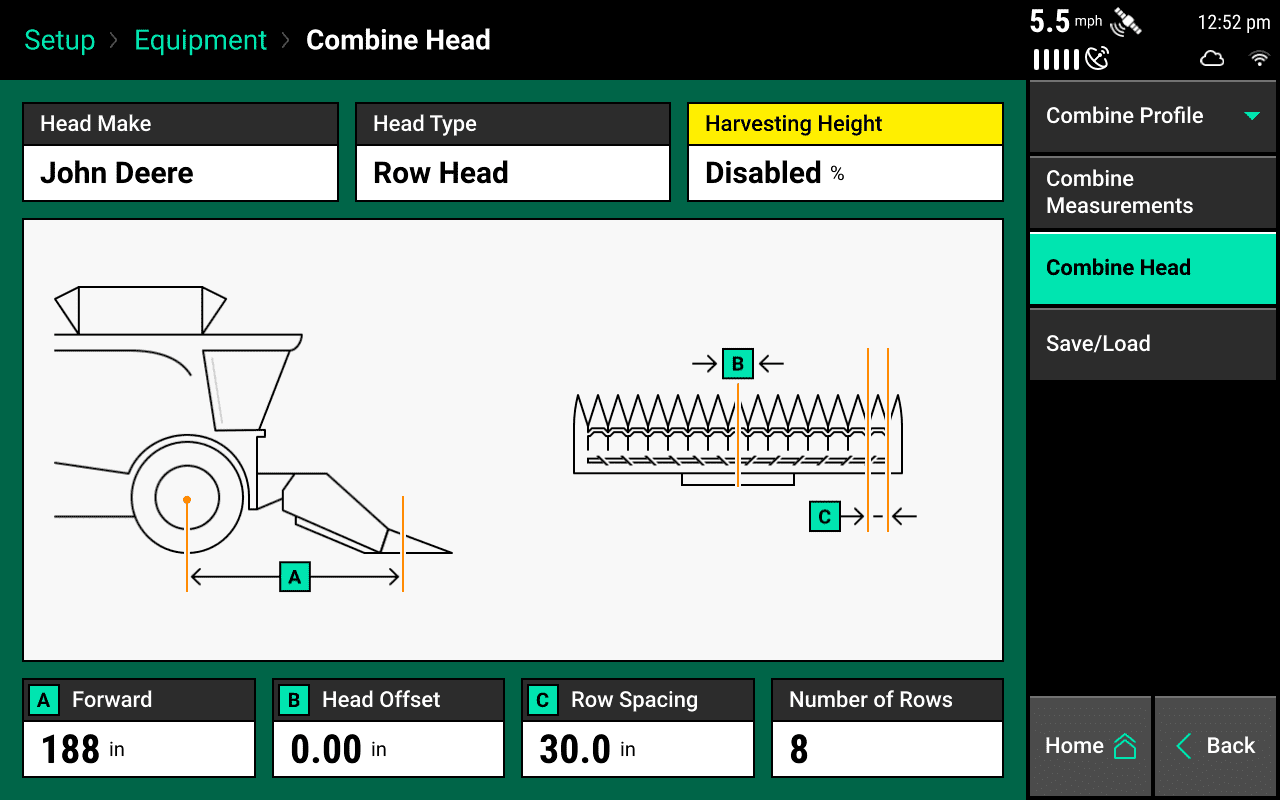
Transferring Seeding Setup from a Gen2 20/20 to a Gen3 20|20
To ensure the correct Population Control Setup and Swath Control Setup, follow these steps. It may be easier to take a picture of the monitor or write down the information.
- On a Gen2 20/20 navigate to Setup > Systems and select your seeding system (vDrive, vSet Select or mSet)
-
Click on Population Control and record the Rate Section Setups
' width='640' height='480' xlink:href='data:image/png%3bbase64%2ciVBORw0KGgoAAAANSUhEUgAAAEAAAAAwCAIAAAAuKetIAAAACXBIWXMAAAsTAAALEwEAmpwYAAAUBklEQVRogdVZCXRUVZp%2bqay1vffqbbUmVfVqX1KpVGqvLJV9gSSQkJCQpKqSyp6QpCq1JCSyBJDNsIisKqMNKhjcGmm1RcT2KN0giLT2tDPaCpyBM9raIthzZpwZ5rwqliAutM6Zsb/6zzv31bv3v/d7995/uQ9YU5gf0WvGjZljWfpIpjai144oyIBSFtZrQlpVRK%2bJZGrDOvVYlj6okg/LJGGdOvaIukYNurBOTdXRa4IqeUSvid%2bGdKqxLP2oWhFQkmG9OtZEHdKpgmo5Vdapw1pVNFNLVZBLo5nakFZFNTfoqLZaVdSgG8vSjxkzozr1ktLimpqarKwss9mcMwtmszk7O7uoqAgIZ2p9ONLJJ/w8fEAmGZBJNjU13tdQt1gpW1lROqJT94pFAb3Wz8Pvra7a0dU5olMvVsmDmdrFSpmfwJYV5odNxn5SvG5e9YTTPqSSL1bJR7P0HVx0RUnRdOOCIbWCEo0ybMqaKi0e0aqH1IolDmvUYron37WldVGvWBQyZk6VFXcJuIMKMmQ0dAl5HVzMzyc6MLjbaDBmZzPodBiGoVmAYZjFYpEkCYwZMzv5RJ9Y1I7CWz2tv965/bn16w6uXnlo0/ShjdPPb970zLo1Z156cZk7/%2bDKFYe3bDq4aurwls2vPPzgCw/cPzO1/MVtW48%2b/NCbTx449ugjL%2b/edXDV1NF/2PPrnTumSov2hkNbWhftXzr50o7tL%2b/edWjT9JGHHzw0fd8vpzcc3fPwpqaG6cYFxx595Oieh4889OCRh3bPTK04vGXzkQd3baif347CvWJRNw/vN5ssVisMwwRB4DjOnQUEQVQqFTCm0/gxTg%2bf8CNQxKDf3FC/fm7VlsaG5Xm5y1zO6fm1ayvKHljUHFArlufn9on4q4oLd3g9z65atbaifFeHb%2bP82q3NzTvbfZvq50/Pq904v/a%2b2pp7S0tGlLKpgrxNC%2brWlJfe37Tw3tLilYXujXXzp9z5G2rmbqqvixgyx0zG7W2tW5oa182pXD%2b3antb697AyP5oZFSj6sQ43XyiC4X6sjLNFgsEQTiOczgcFotFjwEEQQRBlEolEClzd2TruiyGbkuW36jzahU%2bvdKrlXcYNB1ZGq%2bOuvVo5J0mvS9T1WnK9OmV3TmGQEmBRy3zahUerdynVXg18na9KlZZ5dMp26ma%2bvZMtVcr9%2bqVPp2yw6DuMKi9WkW7QU3p1yn8Rp3fqGvTyDwaOdVEr2pVSvtdln6npT1T3W3J6jJndRq1iytLrVYrk8n0%2b/2Tk5NtbW1LliwJh8M1NTVMJpOaActUZUbQTIZs0lFrRtAsDdukYbss4pCErJJRqzRE3aqjeaalpWTErog4xaNWUSCHP5SVHqusHMsVBXKEAZNwxCQetZiXVqqW5JFhOxmyk2GHPOLUjBeIgjmiQI541CqPOGVhB6VwPN%2b0olwyao11ZJNFHFLq6hQHLeKgRRq2S0atZMguCGbPWd7ssjtZLFZeXl59fX1DQ0NXV1dHR4fT6WSz2RQBYciU4BWk%2bsX0TqlgOJvdo2R0kal%2bCdyngnqVYK%2bS5hOwu%2bRwnzpnRXnrzsEFD3TVbfXP2dhav7VTt8Rdv7Wzfmtn7Zb2uvv9VRtbxcOWtB4p4OUntosADw/sVbjX1LtW1TRt71NFc4FWPNEnTPDyGd0kP2ikCl0kp0%2bd1C4Ce5WpfjGrR87uUdC7pIxOMs0vAbyENVDmsjnZIBuCIEYMqTFAEHR9CUmitkSfUBqyzb%2b/feLg2jkbWxfvnfA%2bODzy2LLeR6NzN7Yxu2Vwj0o4nE0MZcrDDuM9JZXTLY0PdFdOt5qXVRSuXdCyc9C6vMq5ssZ4T2nGkBkaUElHbdzBTO5ig2DYqIw4yzc0l65bqIrmikZM4qAFG9Bhg7qMsAXw8G0r5gQfXzbwiyXh/VPjT97rWFk9vO%2beJTNrVjwznbdqHuDBXOE5uQ4XBEM8Hi%2b%2bd3k3gKKoWq0GxBFLYnsG1Kcmww5iyIAO6ESBnPSgJT1o4Q9nIwM6ercM7FaKRkyJflGqXwy0oKZlZf49o96Hhlt2DdRv7WzY1k397%2bUDPr5wMBsb1pfft6h5V//gvonxp9b0/WKs85FQw/bunkejkZnVowemvA8FjMtKuCOGFL8E6lPhizMVUZd41KqM5kF9KlEghww7FBEXd3EW0C5wjFZass0pqSkgCLJnAQRBBoMhkUiAjFFzapuI7hUnLRKmtqaneTLSvKLkVmFyqyilTZTSmpHmSed0yIXDplRfBtMrZXilYIcc6VSjXRpOpwr2K9ntMoZPyvSRaR5x%2bqAJ7FGAPhLxK5leiagvC%2btSM7wSto/k%2bJVgh5zToWB6JJwupShoSvOkM7wZqa3pSS2C5BZRcpuA7slIbqV6T2oRprZl0Dx8R7CirbnV6XS63e6CWXC73Xl5edXV1UDFpObV14AT7ySeOks7eYb2u9O0147TTpyhnXyHur71e9o77wHrd7EIf9bU5lWHXnj%2bwLMzM889deCZJ5946sATT%2b0/8MyTM88enHnuqYOHnn7ywH5rpLbIibwJAMdSE15Pof0mOeF4csLpFNrxFNqJ5ISTKQnHUhLeogHr%2bWxBX%2bbjTwNvxTo6eZZ26mzib44n/vYU7dRZqt8Tb9PO/iHpmZeBwt6ikpLy9PR0uVwumwW5XC6RSMxmM1C/Sv3qr4EdOxNmZoA33gBWrQKWLQUOzgAvvgBMTwO7dwEHngB272UIurOe/tUzlz/7y4Xz5//86acHDx5cunTptge2bZze%2bKcPP7x08eKlixcvfvCxe6p1gQW8BgDXaAmHAGA1AGwDgOcB4BcAsAsAHgeAqwnANQB4DmHKgpkHZoBnnwb27gWOvgIcPAgsvYfq/fDzwI7twL59wCMPJ%2bzdD8wLF5pyHEwmA0VRBEE4N4AgCAiCMpkMaN2gvvBPwInjCWdOAn94B3j1CHDiTeDsaeD994BXXgJOvAF88B7w3IsMrt/4q5df%2bPqrf//sX/989Ysrb588/cIvf/XBH//5lZeOfHrpk8uffXH58y%2b%2buPBJ8UrvQut1AhcA4HcAcAoAzgLAOwDwBgDsBIDLMQLPc5jkcOZvjwN/%2biNw5iTw%2b7epjk68Cbx2BHj3DHD8deDMW8Dbv0s4cQqoGi60Wl0QBMIwHHde8dGjKMrhcCgrZAtqlu9KWP9Eytp9yWv2Jm94Ipkq7Eu%2bN1Zesy95%2bkCiZxmItevrwotCG5csXhdavC40umlJdOuywMbxyP33DG%2bIDK0PD2%2bIDK4M6AaLMoux5ShtUpiyUpC8TpC89oasEyQvEyRPCpNXchNbtBC3Wzd0X%2bKGx1PW7KX6XfdY8trHktc/TvVIlfclT%2b9PCW8HcruLXM7ctLQ0s9mcm5srkUjUarVYLE5PT79OQDtSRJ9vghsdUIMdarCDsSvUaAcbbKx6K9RgYy%2bw8VodhoAbb1PDjXKkWYE0K5EmBaeJKnCaFOgiZVyQZoWy1ybss0D9dnjADt0u7D4L3G%2bD%2b21gv40/6DAE3VCjhb3ABjbEZIEtPoDrY2i0ww2OtPrs/JFql8NFo9F8Pt/Q0NDq1aunp6fXr19fVVXFZDIpM6qezLNUW%2b2FVlvxLbEWWVzlzsJqd26Fy1HmyK3IMxfZHWV5xbVlrooCV3m%2bozTXWuy8TUqcjgIXv1qlbMvJy3NYCyy2AutsKawsdJW4cktyncXO3LI8k9vqnut2zy1wlTud5U5XudNaZJk9BkexXZuv0/Q4LBYLm80mSVKlUikUCmUMfD4fhmFqBsiona8UgnQWBEIQGwRZbBiEmXSGXqsLjYamlq9oaV40p3JONBxpaW4ZGhzq6%2b6dWzW3tLgE5SAgiw2xwesCgnAyK9WECOYqMToHZN94xAIhNoRx0J6unpHFwxPjS4rchYHhEW%2bb19PqmVwy2dSwsKykLMdoSktJhWNjiAvMgtLANEW72RIL5uKL/iYwDLu%2bhGRRe7pOgnEwnCAwDKM8HIaCIAhzYC6Pp1DIJVIJn8%2bXy%2bXxlSeVSoUiCvH49hYInAAxho0Q1aoFCA/DMeo/guDyeCD1biAMwyQSiVwuFwqFEomEJEmhUCiTyTIyMoRCIY/HwzDsNn0YwcYhRYclJyeHyWR%2bqxWSy%2bWAbMyerhMTKC4QCFgsVlNT09jYWF1dXXt7%2b7x58xAEiY8j3iauAo0B%2bwZwDGejDCsurFELER6Xz0VRNCsra3x8vLm5ua2tze/3kyTJ4XC4XOpRXA/nhkn5pjYMw1GchYGKDkuB2y0SiUiSlM4CSZIZGRkmkwmQjTlEWnESLSkpKQkAAIIgjEajXq83GAwajYZGoyUmJiYlJX1rH3cSoFvx9HlaThqYQEug0WgMBkOpVGZnZxsMhqysLBAEExKo/9lsNo7j36%2bPoAiwFR2WhQsXulyub3jigoKC656YjNozdJJuf9eSiYloNBoOh0dHRycmJkKhUDAYjEQi4%2bPjgUAg/tp%2bkADLzkVLxZXusqXLl4XD4Wg0GggExsfHx2KIRqORSGRycjIeDBOxRfud%2bm7MgNFoTEtLgyAoHg7FrxAEMZlMqVQKkBGbxCA7dfLUX//tr1euXHn//fdff/31xx57bGJi4vz5819%2b%2beWVK1cuXLggEok4HM73vbYYAdAloLvwVRMrrl27dvXq1aNHj27btm3Pnj1btmzZvHnzuXPnLl%2b%2b/PXXXw8MDCQnJ8fX/Q8SsNqsHJgjEAgSk5ImJyZXr1yVlJQkEAiuR6MUgUzy1VdevXjp4vnz50%2bfPj0zM7Nz584dO3acPXv2/PnzFy5cePfdd4VC4V0RcPIZucTE6PhfvvjLuXPnjh07dvjw4bGxsVAotHv37rNnz3788ceffPJJZ2dnSkoKl8u9GwIWi4VywxBktVo///zzr65ezcvNZbPZKIreskIVpeWNjY11dXWNjY0tLS0ej8fr9TY0NNTV1S1YsKC2tpYgiLtZQkw7QVSSNoN5YXPT/PnzFy5c2NLS0hSDz%2beLK2xsbNTr9TAMf/82mE2AA1PZcGAk8J//8fW1//rv8bExFot1g8CYI10rZqQxGEwq36HT6Wk3QKfT40kQk8n8vqHPIsCw4um1GpyFpNHTbmqLp%2bE3FdJjZyQ/uInxWQTiST2Px3v/H/944fx5oVA4yw/ECGAIRnC5xHfj7gmIaig/gHMp4/td%2bMHRY3cQQDGUIIgPP/jw0qVLfB4/btNvEUBhBLsLpXdJgM/hotgPmd27JmC1WTkcDkEQPB7v%2bJvHz7x9RiAQxF8BtYl//gSMs8xoPCcGQfCWGf3ZEiC%2bzZG5Y3JbSikbc2RoJBiI4CiOI9iPFxQjmCjDgqfXaAQQF0PQn6QNwbgcnI1QBNxud3p6ukwmI0kybglJkpTJZGKxOCcnh/LEXL0Q5iIcIcoR3C5CFBXhqAiHBQgiwhARxhFiqAhHRBgsQO6sjGAIw8XlVitwAoeFd1QQoIgIQ9NxRBjTTBUwVBRTKMTu7B3hY0wRqPBbTDkmFosVj50CI4HBgcF4SHY9mJNErIq5WbrKHG2l6TapMqnKszLylRK3WltpkhZqJG61vEQvLlDJinTaSpOmMvsb9fVlOdg8mXCRzlBu1tyuTVORra0ykYXajHylssygLDOI81XyEn1crbLMoC43fmMA%2bkpzRrFK0Wm9GU6LRKJPP/n0o48%2b4vP58eD0uiOT6kgeh8sneHycEgHBx2A0O9M42DMw3D/UWNdQUVI%2b0N1fVz2/0%2bf3LvKUFZZWlJRLRGIuSsSbUELwBCCXaSHSa7RiRMjDuTcf8TCukCvwezva23xDfYNF%2bYVd7Z0L6xsX1jUM9S%2beN7e2qrTSmm3BYFRA8G%2b2EmJ8CIMV7TfMaCx0PffRx%2b%2b9%2b148OL9lRkVaMQJzUBxDMTQuHIQjShe5cnPr6uvMFotaoy4sKrI77PnuAnehO9uUbcw2cnlcBEVuNkFxFGMj9Fg4zeMQCHbrEYIiOEFkm0xlFeWl5WVKldKVm%2bt0Oe0Oe2VVpcPpyDRkyhVymANjs8aAoRgLp/ZAnACCIJUVlZ//%2bbNL/3KxtKQ0Hod/nx9AUZTJZOI47nQ61Wq1Vqt1Op0kSer1ehRF4%2b/gb7JCIAiyWCyz2WwwGBQKhcVi0el08dMeFosVTzy%2bM5TgcBgMRjAYvBZDX18fnU7HMOz7CMTP47VabWdnp8fjCQaDoVDI5/P5/X4%2bn//jzCiPx2ttbW1qaurt7R0fH/d4PP39/U6nEwTBO539naEEm806eeLEa8deYzDo8eH9sCfGcTyef%2bE4Hvfe3xnS3bUfiCuM70L0W5O72wnkmM0sFgvHcTqd7nQ6rRYrg8HAMAyCoHhKebeOLJ6q/t974ry8PD6fL46Bx%2bPxeTyxWBzPpI1G49%2bTJ3a73UVFRYUxn3ybJ/55EsBvX0IYhrHZ7NTUVDabHfdrf/MS%2bv8iYIl9pUQQJH7G4XA4TDk58aNF6hPTz5%2bA1WplsVhyhfz0qdPXrl278uWVr65%2bVT23OjU19e8jnLbEzCiGYSUlJTt37Fi0aFF9fb1CoQBB8O9jBiwWCwiCOI4zmcyb51S3PvL9/AlYbVY6nW53OAKBQE1NTVVVVU9Pj9FoZLFY1AzIxxwZOgkGo9TpJkXixwqOE2yMaSXSazUCTuyg86dow3ACJdgYpOyw2Gw2BoNht9sjkcjY2NhADC6X6/rxuiRq5amFEBuCEQ7MgX%2b8IDCHAaVYEF61AmcjEAf6Sdo41C8NYZDtOaYcE5PJjMcBLBYLhmE2mx3PB6hPTDmhEnGVVlKqkZT9ZClRixfoyWajtOR/QZu0TCMsU9p7S4uLi6VSafzjgEqlUiqVqhhkMpnNZvsfOt8VKNBMtigAAAAASUVORK5CYII=' /%3e%3c/svg%3e)
Display Checklist -
Click on Swath Section Setup and record the following information.
- Control Style
- Number of Sections
-
Calibration State
- Start Seeding Offset
- Stop Seeding Offset
-
Coverage Pattern
- Row Offset
- Coverage
' width='640' height='480' xlink:href='data:image/png%3bbase64%2ciVBORw0KGgoAAAANSUhEUgAAAEAAAAAwCAIAAAAuKetIAAAACXBIWXMAAAsTAAALEwEAmpwYAAARtklEQVRogc1ZB1AcV5oeMcOE7smJyTkyAzNMIgcRRJBAEgPCxAndE0CkAQZmEJIAiSQYJIFAliUH2WtbAQnlsNLaZ9%2btfbbX8vp2vb6tss9h78633l1X3dqurYu66hmJxQJ8Qrpz7V9fdXW/fv977%2bv/f//732vU2MacXr02bEwKGfSrImxMCiaqO%2bTiXr12Cd1aZZdaEdRpQgZ9h1zSo1X1JiX26rXBRHVAJQ/qtUGdplev7UlUhwz6gEoeUMn7khJ7EtVdGkVfsi4YfdW3Ro/3YEzq02n6iwoqKioMBoPFYjEvE4vFkpKSkp%2bfjwomJTpZdJjLhjislYC5bCeDGjQZj3qgzkR1q1LWqpDtVEh3ZaTONNYHzUY3m3HE5RjIzmiWCHcqZZ06zVj55oHszHatqk0l70lJdjFpo1tKp6rsPhE/mJI8VJgPc9htakW3Qb9Wp/fAZbuZVK8x2ZiSAhAIVCqVskyoVCqRSJTJZKiQMQnmsv1Cnk/AXQm/iO9m0UZKi2%2bfOH5t5tCbC2cXJ8Z%2bdvnyrWNP/tXzz904Ot9j0F%2bYnLg2e/iNM6duHJ072RN45Zmnbx6dv3Jo%2bubRudsnjg/m587D7ldPPvvaj56/NnPotReePzO459rs4dsnjg8VbHSz6H4hf9WufUKel8NqsZisNhuVSmWz2SwWK2GZ0Ol0tVqNCum0EJPm47C8CcyV8HFYMJPWrdPO1NZMV247vKMqsrXiGOQ6aK%2bc2Fw6UlTQLpceKC%2bbqamera2Z2loxXlo8Wb55amvFoWr7VEX5SGF%2bj147kGqbb2yYrX1itKhwunLbXEPdqXDfC50d7TIJzKJ71%2bjay2F5GJRmQ5LFaqVQKCwWi0ajEYlEQlTIZDKdTlepVKjeTXnuFJ3XavBYkteAAUrROROVDgQKp07ZpJU7dSqXXu1K0njNyS692qFVNMYKkzROvcqhU0ahcCdrIaMOMuocWnmTVu5O0rj06gaVpC03w29LcRu0XqsBNid5zMlei8FnRRC7iY7HABsTW0sLrTYbCIIQBA0MDDQ2Nvb39weDwYqKChAEEQtY95WKAhZJt03abZOsBmlPqrjLZh4s0fRnS4Np8mCGuNvKD5hE3VZxt43bbpT02MTdNnUoS9JjM%2b8uUfdnS3tSFX2ZqlCWsMuiCKYLuyyCLrM0mCYImIVdZllvmiqYYdq9SRxtXNGbIetJE3Sa%2bB0psSu3w8jrSEEKuy0ZfWU2q41EImVnZ9vt9urqao/H43a7MzIySCQSQoDfkxLn5JH9KjwsIXrlJJ8CRK5Kok8BeGREr4LgkcY18bgdBtAv3%2bDgFk89se2wq2Bih30Wrn%2by1T4Lq3oza%2bb9xt2FqAYmr9UINitQjWxtOKdgYof/ub6mp9q3HGysnIUcxzs2TzeWTNVhIRHolXE7DBiXANWUYN5bXBqpL5jYUTJVVxqprzjkqJn3F0/Wxjn5KDdP5jFbzZbYxAWigosKhUK550LCoIXiV3ufDTYea/U80%2bN/rs/3bG/xZG3LyXDni3v8z/XVHm2Jc/BFAQu1RYOHJPJguvN4R8lUXe5oZe3RluLJWl1/Xv54NaMlEQuJRO1m6k4N1i3idaQYBgrKIvUNT7aWRuorZ6CSqTrrYGnK7kLQK6f41cKAGQ9L8LCE15GyY85XOQNtmqwtjdRvPeTqfnnIvLcYD0mwHrHKn2az2mg0GofDic1dzn1hMBgajQYl6rViITG30yAImPidiPn4nSZmq57TYdDtylOHsnidKfEuobDTRGlRYyExwSNteKq16an2bTOu5pMh54lO99NdWw41oRxcvEciaDeRW1Q4WIKFxSgnh7FTW39sZ/epof5z4yWROlQ9HeMWYmExuVkl6DQhpvApUE0J1qHSWLVd58a3H4Fq5n1YSIT3SNEeodJnMyQl4/A4MplMWiZkMhkAAIlEghJ3W7ENAoJDgm0UxjcIcI2i6FWId4gx9Xx0HQ/bKMQ1CAUdJopHhW8SAw4JDVKTXHKKW0mDVFRIRXTKqJAKiLYg2Gki%2b1WERhHglIJOKcklJ7sUNFhNhzVEl5zgkIBOKaFJTIGVgg4TrlEEOqRElwxwIuV0j4YKq0CXDHBIAYcUdEjjmwQqr61mR01mZmZeXl7uMsnLy8vOzi4vL0fl9217%2bfSpMxcXFq9cuPLjaxeuXrx0/fKFa5dOnT9z6frlyzev3PjJj4cm93O9SWUNFd5mn8sHuXyQ2790dbt9sMsHQS0el9ulbrBm92w%2bv3D%2b7KVzCxfPL1w6d%2bnGlYXL589cXFi4iNyfvbhw9fq11tFudpNm5sTchauXTi%2bePb149uzFhdOLZ15cOHV68ezVW9cvXr907tLiydM/ynQXZeVli0VihUIhXyYKhUIikVgsFtT2fU3/8OuPxsfHh4eGT548GYlE9uzeffPmzb6%2bvqdPPD0/P3/tKsIqAdY526CJ0fHhqIyOjjodztLS0nA4PDIyMjw8vH9k//DuIV1TesVw/R/%2b8cuPPv7oyOzsqZdPjY6MfvirX83Pzb304ovTkekPP/zwT3/8NvL8DLNe9cZbb/zut18%2b%2b8yzkUhkcXHx1KmX29vauwJdx586vn/f/nfefvuTTz/J923WG5NIRBKDwaDT6bT7QqfTyWSyXC5HVe13/vazL25eu3H1wuULZxcPTk5fXrz0i/f%2b7q9fff32jVuXz1/8xbvv37p9KwHWwe2%2bQ%2bPT4/vHDoyMT40d6GoPeNyekcF9k6MTEyNjk2MTB/aO6psyKkccf/ry6y//5cu/efX1996%2b8/ILL73/7s/f%2bunfvv3Tt65euPKbTz%2b/%2b293Z196klmvvnPnzp/%2b9dtXb71y8%2bqND97/5TtvvPXKzdu3rt28evHK9cvXPvv40y/%2b6Z%2bL/BXJZiONSqNSqbHFKzZ6BoNBo9GQKGTuKGgb6Q7PDfXPDQcPDXRFwrvmh3sODfTN7AkdGQwfGRyY32cP1HM8enNNVn59SW59cV4UBY7NRa7yjQ0lsceNDSU5Owpl9abE5ozAWF8gEuqb2RM8vHvX/HBXJNw3s6f38O7w3FDnZF/v9EBplz3Bkdg04O2Z3tU7syc0u7fn4K7g4d2h2b2h2cH%2buaHwkaGegwO%2bkY6Uxiyz1QIAgMViycrKkkgkGo1GLBYLhcJ7BHSBHHylALCLCHYRWCUmVkuA6A1QJQbsIgRVInKNTNWaznHpaXVKer0KQYMaQb2K0aBeAq1eqWxO40PJQJUIrBYDVUib%2bEohAWlcSLAL8ZVCoAppk92UqGpNJ1ZLwCpx7BW41N0yYO18k39jWloaGo12Op3t7e0jIyORSOTAgQNlZWUgCCJhVDWQBfhkgE9GbFYAPjngk4N%2bBdGvBHxyol9BQF7JCV4ZHpZQWzS0nVraTi19ZyLJr8R7paBPjvdICF4p3iMl%2bhSxx3hIFGuH4JVTWtTMNj2jTbcEZrse9CviYREOlkS7UBL9SnKzCvDJQD/SdUyX5Fcy2/TkVrWuLctqsZJIJJlMplarlUqlKipcLpdKpSIWSAgka/tyiiZqjAMFeWP2ksk622CpeU9x1r6tKbuLCid2lEzW5o1WJvVvxLnFeEhCgKUYp0DWk5Y7sv1%2bhbqNY/bEUI5lT0nhRM3m6cbs/dszhstzRraLuywYl5AAS/GQBA9JAFiGauRk7d9aedht2l2UPrzFvKc4Y7hc05ezcawqdbDUOlhSNlWfN1qZvCufAEnRboHCa7NakJU45vRLwmQy77kQJ2DQh/NcJwKbJp/YNFnbeKytYLw6Z7SyZKquahbeetBZO9/sPhGwDZahnQLAIwM8sniXUNmbueVgk30GWqpg2VtSMF6dN2YvmqgpizTYZ%2bHGY626cB7GhWgRYCkBloIe%2bQYHL21oc9OxttJI/fYZ96bJ2uLJ2uRd%2bdsOu3bMefPG7DuOeO2zcNrwFrJXiYYESl%2bqOcUEEsFVo5BCoUCJe61xDv4GBw/tFGCcgjjkho9xCeKc/OgjH8lJmrixDxkDAEuxbtF3KjiQCminAB1tAeMSbHDwNjh4WLcIuK91T9cjwzgFG5q4aKQLHiaqEh9tbQOiKIxz8pFylwCAZRhIqPSl5ubkCgQCmUwmXSYymUwkEplMJpQoaMW6RESvPPZ1EcD3b%2b4DRK4PjmNFhahiTBdGSkCPfLnKWrpA1D4AYh8ZYfkA7hNYdSXOzc29txKLe63xLtGSlWPAw4ivrwuxzGy9WoS1de8TsBkNRjweT6FQYulQ7EqhUEAQlEqlqxMg%2bZTrHQTolRO9ikfjAK6mu2SBWDbK4/HQGMzAroGRffsxGAyPx7uXjT5AIDZHS6bquO2G%2bBUevJZLoF0CRTA9f7xqg4OHeMJDDx1YW3eJgNViRZZhCsVms3311VfffvNNdlYWiYQkF0gUWmkBPCQRdpopfnUsaD4McJCY1qzld6TgIPF6Pz9uDd3lBGK74UBn4D///T/u/td/h0MhIpG4JgFCNMg8/OiXaGPdokfwH8IaussJxDb1HA7n1x/%2b/W8%2b/5zP5/95HViVwFoB5Pud4YFGHlMX%2bC4BBpPBZrM//ujjL774gsvh0qOyJgGMk79eC%2bAgcbxLCMDr5gDAMqxbFB9dJdeexFQ2m8XhJLz5xpvvv/dzHo/LYjGZTIZGo14xiRH/EdsGyxgtWpz7YR0a6xZx243aUA7GJVyXHQAYiRnCgNkwUBhb6VcS0CWmoFAEHI6KxVKoVA6NxsViKTgcFY0mCgSyVSyAdYsLJ3awduoe0qeRnlxCccCaMVz%2bwCAexnkwLoEymJGxr3ytKNQV2A5DVq8nw%2btJX4YMD2zzekvXnsTrjugS3Dq9bgmrTmLQI0M5RaYe6ys/SenuZoXD/FCI19wMtrSAoRAvFOKHwwnz8yvWgb8cgB4ZqkmUMWCZjmhQKHJ8PB2LZcJwl8PRFh/PwGDoKBTV5RKuTuARvuXjphKQZFUC6bss83NaMpnKTmCIxfzf/%2b7Lzz79RCDgstkMJpPe0iJenQDVr16vTR45lcAjJ4IKil/1AIclAnNHtABIZTKR/cBnn3z6wS8/oFAoTCaTSqU3N68gEJtV1Ue8vA5jNCz%2bv6cScU6%2bNpy7ZboR1chZvv4sI5AIglQGg15aWvrV7/%2bA7PQLi2KbglUIxKYUuzVpXZ/zcVIJPCQh%2b1WsVv0DusstQCTSQRDo6uq6G5Xm5mYCgUCnM1cnEBvQI4zj0VMJWLKyx%2bUEQCI1IYFFJhN/9s7br7/2GggS2GzWmhaIWfaHTCUIq/W4RODwISQKUSjsuDjAbMpMTrah0SCJxMJiqR7PGlEI7eD%2bcKmER4Z1CTFO/op8TIZyiKx9lnMLxk2bWBUVvIoKXkkJs6SEWVHBKy/nbtnC3rdv9VRClLGvnImsxD9QKiHuspj3FqO/ywGAZWhIqPLbursqGxtTnc4slysLgnJcrmynM8vpzHI40mG4bLVJDEvKIvWsVv0Pk0qgnfzEcG72yLY1UglbcpIFiyWTySwcjoRG43E4MhZLIhLpBAJVLFas7kJx63ehR04lgOgecKULLRGwWZEdGZ1BNxoN/eFwRka6xWIWiZCjReQX0//VJH4cAN%2b7H7BZbUQiUaFU3Hn3zt27d7/%2b49fffvNt%2bZZyHA63yp74nhf9wKkEtEoq8cCGhslkFhYWPnn0aF1dnd1uVyqVZDJ5dQsAsIziV613EI%2bTSpB8yu85lbBarOTolhIEwbi4ODQajcFg/vyTb1ULPDHfvI5J/HipxAYHz7y3eNOBJ1BN30kllrsQgUBIS08PBAIVFRVlZWU%2bn89oNBKJRMQCkl7kZA45WovGUCT5gSScNgPZqyAgx7HShwEektCbtYIOE/6hVZZ3R/WrE1qT8JB4eTkIy%2bIhocpnS7XZAABIS0vr7e0NhUI7o5KZmXnveF3Qa45zCXAe5L/iEtCQIB4WLS/5X4GBhGhIsC6VJcTDIgyE/L1cDhws2QDxZT6rKXq4G9vFE4lEKpVKIpFoNNq9X0zmnkKBM1kCm8RQyl8UJJCJ505KaykqKCiQSqWxnwNqtVqlUqmjIpfLU1NT/wesxqDXFQfH7wAAAABJRU5ErkJggg==' /%3e%3c/svg%3e)
Display Checklist -
On a Gen3 20|20 navigate to Setup > Systems > Seeding and enter the recorded information into the Seeding Offset and Coverage Pattern Pages.
' width='1280' height='800' xlink:href='data:image/png%3bbase64%2ciVBORw0KGgoAAAANSUhEUgAAAEAAAAAoCAYAAABOzvzpAAAACXBIWXMAAA9hAAAPYQGoP6dpAAARVElEQVRogdVZCXSUVZZ%2bSSoLENaQoGzZat8rqVSl1lRVakmlUklV1gqVlSIkLIILq0CDTSuI9hFFkSgE2SVACCB004ja7Thzxq0FdWRwbI7baRUU6R5n5syo35z3/lRSCQER5Xi6zvnOve9779776v3vf%2b%2b%2b9xNCCP7RERcXx6REIoHD4YBcLsfYsWORmJh4Vdtx48ZhypQpSEtLw%2bjRoylHQPhTQaRZIDmTQW5PQ0JcHOLSxoKIpoNMnwQiywbJnczV8xKQnJzMAhUUFDDpdDmRr9UiJSXllxmA%2bHgmlUolgsEg8vPzkZGRwfo5tO2kSZPYANHBSk9P7xsA%2bsfUAhBFDohwGhKo09QRIFoxNzh5QpDcKSDiTMTxeODFxcFht6Pc74fPW4piux2N4TDGjRn7i8%2bGH4/EhMFEfBwYl8CN6lWgdUNt%2but4IEm/EBITEM/jISkxEUlJSQz0FeDxeEwOBx6PB0KanSBNxQNodIA02EHCNk6niNZF%2bQYH4puciG/m0G/TQGWMPqMIJBzLOwb4Qe37bBjvGIbnYg6yoX7rY9o32jFJp0CeQgmJVAKxWAyZTAaFQsGmu1QqZRyd/iqVChqNBkKhEITM8mCyTolclQzJDg1IhR68gBGptTYQvw6kTAdSks/0kTVFSK21czzlaJ1fhzEhB1KqLIP5sgKMq3ciMWgCKdcP8OV6pIXdiA8YBtr7dUgIGDF%2bhotrG41ZrgcvaMTYUPFVfUmqNCO9sYTFifPr2eBlGFUoK/GibkY9wg0NqKyuQl0ohLr6EGY0hJleZLNBLJFAqVIhl88HIa0u5KhkUIkkGGmQgZTkIaFEi5HlRhCXGsSpBrEpQNwajPQbkVphAnH3cbTOpcbYoBUpZYWsTT/vVGFitQOJpbrBvFuDtCo7Erxazj/lXWrEl2iRXuMA8eQNikn7MqrcdFVfknx6TKp1sjhxLg1IrRnpWhks6nw4i2xwWW2wGUyw6g3w2BysTFGoyYckhw%2bFUIycadNByEwXcjQKKCUyTDJpMNFnwsQSAyaUFCLda8REdyHSHFpkeI1IKzEgzVPI6Q4tq6P6BE8hsxnKj/foB/HpQ9qnU3%2bU79NpexozPSYmbUfjMn0IP96tZ3q6xwBSbcIknwV5FV5IfcWQlbkg97ug8LsgK3P2Q1nhgTroRV5VGYR2EwgJFUM01wzN5mK0378Gv33lONb07MTqfVvx4Iu9WHt8H5Z1b8W6l45g5cHtWNndxXTKrTm%2bDw%2b82ItV3duw8tB2rHupt5%2b//8XDuHd3J9Yc28PaMP7Es/jN8wexfNeTWPv7bqw9dYDxa/9wAGtPdjP%2bN6cOsnaUf%2bDFw/j1iX0c/0IP1pyI9qUXq3p3YsW%2bp/HAS71Yc7IbE%2bhrsnE%2bki6fROInvUj86DASPz3C4eNejvukF7yPe8H7sAe8L44j4fjDICTshLjWAO09RWhYfCdW7d%2bGRU9txJLOR7B81xYs3vooVjyyAQ898xTWdT7OQPWVj2zA/Z2bsGF7J9Y/9cTVfFcn1m15HOuf3oyHtg/wD3Ztwbotm/DgtiexfutmxlNJy4zv2sLaUX7D9qdY3VCe9aUvJo1//9bNSKuygTyxEOTURpAn7gZ5chHIU0tA/qUT5LOjIB/1gHx8mMNHh0AuPgdyom8ABLUFULfp0HHfKjzyp2O4r3s71uzqxIZTPbi/dw%2b2d3XhxOEjOHqoh%2bH44V7s2taFnmf347lDh3GMgfJHsGvbdvQ8243neg7jWM9hHD04pH1PL%2bOpzZEDhxhPJbWnHLWj9tQPtaP2tD3H78fObV043sPxtC80fs/Bg7i9phjkyTtBvnke5P19IB/3cPLDgyCXfwdy6TjIl32gf/4/T4GcfpTbBZJ9JowoNiC53IiUgAkjgmYkB0wYGTBjZNCMERUmjApaOAQ4ObKCqx9dacXogBWpfisrp5Qb%2b%2buo3cgAZ8t8BcwYRdHvy8zajurzk1pp7fdNbVODFgZmEzAzfXTQgjFVRRhTGYNqG0jIilENHty2PIKMpS0M6ctakbGkBRmLmjBpcQtuW8Jh0uJm3HZvBGlNfroLuJHUXowxq91IbfJgQsSHsa1eTJxVhpGNLiSHHUxSJM6wI6WhGElhB1IanBjR6ASpsSK%2b2YqUhXZmP6alBKOa3AzjZ/qQ2uxhbRNnOBg3ssmFxLADyQ3FDLSOgtRaEF9jQUq4mNmMavawOLx6e18sFxLqbWyxGxatTtymkcDEl6JAKIVOKIVBooBeJGO6JlsAVVYu1Fl8JmlZOHkqCGlyYdxdxRA%2b54dsXgj25XOQt7AR3tULmRTMroJiXj0Dv62SSc2CBsjm1kG9IIy0WhdGRIy4fb0T0vY6OO6dC%2bvSdijnz4B5SRvzJ5sbQu6sIFR3hCGfG4Kko5bVR/1Qn6NqipAWLEJOsx%2bahY1Q3xFmNjmRALOh7ac2l4H46L7flxP0geUBTXakG1SorwuheVYEjS3NCNZUo6m1BU0zW5GnK4BEIYdMpYRUqYBcrUKOgOYBbR6QGXaQUBFIjRGkqpBDpR6k2gASsgyBFaTeClJn5kCzt5ANpMbOlWtNA3VUp6B21CYW1I5mctE6mmEyzjrA0XIs159BxoBlmnaQmU6k6xRQS%2bVQKJUs46PZH5U0G6RZYSwon5OTQ/MAN6YUaaF0WaFwF0HutCCf7pceG2ROM3KM%2bcgehDxkG/IGyoY8ZBk50HJse6Yb8pBcZwOZ40PcbC9Iex%2boPtuLuCFlqg/HDSoPQgknZ7mRXiCHOJePXAGfpbkUIpGIDUQsaGpMByE7O5vLBKeJ%2bKj2l6M6EER1RQDlXh/qKqtQEwhCkJ2DrKnTkD1t%2bs1hylQk%2bQ0gHaUgEQ/oovuzo62EGwCdHCUOJ5wuF4xGIywWC3Q6Xf9MiCJ6RsjNzeVmwKqH17OtZOfuXdixcyd27NzRJ3di1%2b7dN4ld2L1nD3Y8swPT2ytBZrkQRzv6cyN2AArkCFVWo7G5Ca2trZg/fz48Hg%2bbBfQPDz8AEQ9ePf8u3njtNZw89Qfcil/eitkgLXbEt3lv8QxQQMoXQiAUspMfBZ3u0T99zTXg5Tdexb%2b9%2bRbefess8O13wPcYwHdRfB%2bj3wC%2b/Z6z/5//hXpZBKTVgfjZpVc/Qfr%2b/sRZwGbWLDcmFsjZAPCFAggEAvD5fPaU6Vpw7TUg4oF19R2of3wtqjeuhn/9UpQ/uAz%2bB5fBt24JkxUP3YvgwysQeHgFkzcC1va3K1Cx4V6M7agAibhAWorZfj0IzQ6Op5jp%2bvFPP%2bLulxl6BVsDSn0%2blJWVIRAIoKamhl3bxa4DV60BY/Vy8G2FmGrMA7/YiMmFKuTaCyErtWO6RcsuGsYpBRivEmG8SviDGDcE8UEjpljykV/igNRhYhDbDJAXm6Etc0Hp4nYfvrkA0wtUyNSpkalT/SjQRIrmAfToW11bw%2b4G6QDU1dWxdYAOQOw6QO8Pc9kAtLqQK5diZn0YbS2taGtuxZxIG2oqAmgK1WNWUwuKDCaIsnMhE4jYFBsWggEpF4qhEEugEEkYl1yqR7ZCglCgEuG6EBrq6nHXHQtQE6xkaA43oLWhEVajCbmZWRDzBRDl8m8INB7d%2buggj9fJIcjMQmZWJrKystgUz8zMZJK%2bBvS1iIIujNOns/sAN9Y9%2bRjbBfbs24u9%2b/ax1Xvfs8/iwMGD6Dl8GL1HjuDosaM4evQoJ6%2bDI0ePovvAAezZuxfd3d04eOgQ%2bHNqsH7LJhw6cID5pf5p/f7ubhzqOcRiHOrpQW9vL44eO8Z8/FAM2hfaLxpj//79yJhdgQl6OfIVSsiVCvaE6VOPTne1Ws2uwqIYuBKLePDymTfwwfvv4%2b133sGFCxfw1ltv4cyZM/j2229vatU/d%2b4cTp8%2bjbNnzuLKlSvQr5zDYpx/7xw%2b%2bMtfWP2bb76J8%2bfP/6Td5bvvv8Prr7%2bOTz/9FPzFTRibL0Gp081dh1VWorGxkcHlcrEnHrsb0EHJie4CJ/75T/j73/6Gi19%2biYtfXsIXly7iy6%2b%2bwleXL%2bPy11/jqxvCZQba/uKlS/js88%2bZj88vfgH14lac/NdX8N/f/BfzT9t9feVKf3tqf2NxLuPyla/x%2bcWLzE8Uf/3sM0xfGGIDYDdZYHPYYbVa2R%2bn77/BYBiSDMUsgnERN14982f89T8u4NyZt/HpBxfw3ptn8MG77930k/nw39/HK6dfxPtn38X//f0bGFZ04LV3zuLSh5/gwrnzOHf2Hbzzxp9v2v/5t9/Fy8%2b/gD%2beOo0XfncSX3z0CURLmpGqEUIuELE8IPadj02HJRIOMdugG%2bHHfo3lezuxoGsjFu3azHDXM5uwdO8WLN3biWX7OpmMgpajGOC39LdftOsJ3L1jE5P37HwCt82rQstja7FqdycWb9%2bExV2P4e6nH8GK3Vuwck8nVvwI0PbLd27GPdsexT1bN2JR12NY%2bszjGNNRjgkFMuTJFJDGJDux014qlUEhp1fjNDmKvgIRNxLNCqToJBhRKEOKXoIUvRQjCqVMT9SKkJDHBy9fAF6%2bkMmEvCg4PlErRLJO0o8BeynzG1dHT3v0dKgHqTNwCBm58s2grhAkZBgA9TfTiQydAs0zwmif04F58%2baxT2TRgVAo5ODzlVi7MhWLFkxEdo4aAgHLA1yQaJTQy9XQKlQoUKg5KNXQypUo0hvgK3bBabbCbjAzWepwwWsvhs/pRrHJwq6edcoBO86HitNlSnarFDevDIntPvA6fma0%2b5DY4WPJEM0E85UqaAsKoNVq%2b576QAYoFstQZMlGoT4XEglNhbO5RTBbLYdCKoMsZrrQUaO5tM1mw8yZMxnoihqJRFh2RfW2tjZ0dHQgHA5DNiTTksk5HzKJFClBM0jHLToHDDkMSfgC9sGDvvtDj8EUAqEMQiHtW3QNmOnGVLUUIqkEAtlgCGVS5IpFyBLwkS2kECBLyEeOSMj0TEEucsVC8CViCIaxZ5CIkRw7ALfwNEhfAVOBHkaziX25jl6GDAb3OtA8gc%2b%2bDFEHrS7EtVwDrS7Et7oHgXJxg/Tr2Le4uHuA2M7eigGIuDFJr0RNRRB33X036uvrBy2EQzGQCs%2b6BZ0arpO3EHF9h6GJWhlLi4UiEdv66CsclbE6lfREmJWVBcKulOj0vFnM%2bQm2P1ecOaUg7SUYrxZBkJmN7Jwc9n5T0K1u%2brRp3NkgJ4eVKU%2bf/uTJk0HoZ%2b60CismXgdp5RZM8JsxISr7dMqnec3XtZ0YsLL214vB/Pb5i%2bqDYvitSCuzDN%2b3gBUZ5VZ2pc4vsaDCWwqPtwQlXi9KvV6U%2b3zsaszjdsPv86GkpITB5/PBbDaDJFVZ2MlNJZGxD6Sx4Dgp8uRK6PPyoVWpodPkMz1foYJGrUSBWweV9Grbfh9SGTuxXS9GgUqDfKWaxaGSlgvUeUzPl6ug1iiRZ1BDJR4mhlSGPL4YqUVq5JbZ0FxXj6qaatRUV6O0KghPuBZFFgvcvlJ4qwKYUV%2bP2ro6dkw2swGotrDMiW1ZQyBXKCASi1HsdOKOBQvY9/XZ7bMxZ95cNIQaUOA3Iv%2bfAlDq1JBJZJApru2DZWfXqKcdisyKoLmlGaF67tt%2b2%2bzZaGppRl1lHVQBHTT3OaCUKSGV923XUSgUUImkGGXXsAG4Z/4CLF66FCuWLoOvvRWGOyOwWqworiiDo74ady1YgF%2bt/hUWLFwIk8nEzYDoFdFw%2b2b0SBnd36%2b6XdUqf9CWLkrXi0F5uirTY2rUd%2bzWRQeX3fPLhokhl0EpEGOUTQN%2bmR1VZeXwlZWxGyF/eTkqKoMslyn1lqIiEIDf72eoqKhgByZCWlygg/BDSKwyI7FfcmB8gJPXt70B/5Vm8CqjMfrisHJfnGvZVluQXEk/pBRhmk0Hh9kCk8XM3ns6xenTp2d/eiKMcoy3Wtkdwf8DLpvCjOynxWkAAAAASUVORK5CYII=' /%3e%3c/svg%3e)
Display Checklist -
On a Gen3 20|20 navigate to Setup > Systems > Control Sections and enter the recorded information into the Rate Control and Swath Control Pages.
' width='1280' height='800' xlink:href='data:image/png%3bbase64%2ciVBORw0KGgoAAAANSUhEUgAAAEAAAAAoCAYAAABOzvzpAAAACXBIWXMAAA9hAAAPYQGoP6dpAAAQWElEQVRogd2aCXSURbbHK4RNZYki0UElJOnO1t1JSEJC9rW7k3RCFhJCFrKHsG%2bKCQTBBWSR4QjzXJ6AAuI4IMgusicBggQBiSgOoLK4gOJ7LoM4KvzeqeruLIAKzvjOe/Q5/3Pr%2b9etuvXdr5ZbNxFCCP6/w8HBQUlvb2/i4uLQ6/V0796dDh06XKPr5OTEfffdR48ePejatavkBEJzP8KnD8KtF%2bJPPXB0cMChR3eEZ29E73sQOleEey9V79DekU6dOhEaGkpI/xAlY2Ji6Nu3L9HR0QSHhBAbG0twcDBhYWE4OztbjdsG%2bYc4oF07JX19fcnIzCQgMFDZleO02m6xf8%2b996I3GJSzejr3tDlAvri/FmFwQ3g8gKPstMttiCAvq3MCPBDu9yG8XJQDOjq2p39wCEnmRMJDQzEbTfj7%2bhEbHaO4mKhoVTabTLi6uFgH%2bX9gplwfHRzbEu0cUJyj1avXQNZd3ea30LEDokN7RMc/EO0dad%2b5E7d170qnLnfQ6Y7b6dTldjp2uYOOd9zeDFnXuVsXOnfrqp6FKEpAFMa3YEgcoiAWkR%2bLGGJ7ttcpPkZx7QoTaFeUoKTSkVxRCyelnRcFVyEv2tpXGz7Wxl%2bt32KzDZ9v05d8sRGRFsIdc0dz7/ktOH%2b8FudPNuJ8aj3OH67B%2bexGnE%2bvt0pZ98Fr3HNmA3etmYMQ5WZ6hfii8dPTKT4AkdGf9hnhdMmJRQwIsSI5SBm4fVAMXQbHtXC2%2bm65CXTOjlI6LXwwd%2bYb6ZAZgUjrb%2bVTQxDpofQoMOOYEdamH8fMcO7MN1l1U%2b02%2b9M%2bM5zuuQnXjKXjwEh6FiYhUoMRmWEISxDimXGIA4sQKx5DrHwcsX4WYu1MxOrpiBWPI157HNH4AuLzdYgvNyI2z0WIUhN99N7o3LV0CtAiIr0RUTZnhHshwrwQwVpV7hwfwG0JgVZecrIuzJMu5mA6xPm38KqdJ3cmh%2bIY44uIaKUf4Y1TUn9lo41%2blI67LGGISJ8WmxHWsXROuHYs7WP9uDslHBHmgYjWIRL8EIseRlzYhDj0IuLIEsT7yxHHX0UcWoxoWoo4/BLi1GuIb7cgftiJqP0LQgyJJTIlkaL8AnLnPsq0A1uprl1Ldd1aJu/ZwMM7VjNm3TJq9m6kqnatgixLTtbV7NlAVZ1V/2r%2b4do11/Cyz6raNUyqX8%2bkurWKl1I%2bS/3Ju9vanFS37rpjkZzUV3Z2rcGpKJH2I9K5c%2bmjOC2qofviKUo6LazBafEjOMlnKV%2bYjNMzD%2bO0aApdq4sQoiCGuMxUSouKKZ05jbl7NjN9y2pmbFnNzO1refyNlUxe%2bRKzdq5jxtbXFT9r53rFyTqpM2PL66pO6rTht7bln7Dx099cxZPb1qg6yUtpf565Y901Nqe/uZqZO64dixznrB3reOKN1%2bg%2bLI0e/p4Eumjw6d0HX1cNBhc39C5u%2bPZxx9Aaru74uWnR9LpfOiCapPQBFGRksfy5F/juzGd8fOhdjjU08uXxjzh1%2bChNdQ1cOHlKcUd3v8VXJ09xpK6BU4ff5cKJj2mq28sHb73NhROnaKpv4d/etouPDjZZdST/zlHOHTvJga07Odv0Pp%2b9d1zxUsrnxq07Vb3Uk7y0f/qdo8pm81jqG5SdkwcO0/DGVr46eVrxD4zIomugFwWDcxk%2behTDRo5g6PBhxMTF4aXzQe/ni87XDgMGfz/ctRq5BxhxTo/mgQExaHOTCawcjH/5IPpWSOTgX56NoTiTgKE5%2bJVlKfQdmoO%2bOMNarhj0i7xv6UD8yrOvqy/7lZC8Ktv0/W31kpe6Vj3reJp5OZbybKWvdMqycSwy0qOfjkCDnwrGAgICVJAWGBSkgh4fH5820Ol1uLq5IURFIqLCiBhqRpTGIUpibdIGWbbz5QmIciOizCZvqJzQlrf3oeRvlFW71vg1OyZ69tPjo/FAo9Xi4eGBRqNR0svLq40TZFmn0%2bHq6mo9Bu%2bfmE/Xkem4VRfRc/wguo/O5E8TcrlrbBZOowdy55gsxXeotOBQnki7it%2bB8pvjb8aOY0USosyEc4iB/oFBBAQFEhQUREhIiJKBgYEqTJZ3BIPBoKR81mg0CIeKRHJemIm2ppT0Zx9n1F%2bfZfDCWYTPnkDuwlkULJ5DxbL5DHxuOo6VFkSFGeus%2bQ0MvR5/g21vEg5Dk9QMcA42kJc1iOKSEoYMGUJmZiaFhYUUFRUpJ8ivL19efn3pCHd3d%2bsMkLGA6qzUZPVmuVl5tr3yrBlRYkQUJyCK4q1lqV9mRjpPlWUfZXaYrFyRsQWSLzXiYPtS6rm5je25JAFRHI8olkuulY3yRKXjcLUNCTkmCTmmMiM9g/X4%2b%2bgx2L62/YXly8qXbg3Ju6k9oMzM4BXPMGzjMkbtWMHwN19RGLntVUbvfE1xD%2b3fxMQDm5l2dBeJL87D%2b5FEarblMmFDDlNqh/Dgxhwm7cinelseNbsKVHnGoTJmHCzjsf3F3D8uiZnTX2HR7NdZPn8LL87dwEt/3sCSeZv461%2b2qfLq5%2btZu7CBXUvfoXzK08Q8lMbq58ew5JmRrH5xPEv/YyQrF45lxQtjWbV4PCsXjmPbisls%2b9skNi1/mHuGJtI9SIe3u0bt7nLtS3h6el6zAbbdA8pMTH5nO1Mb3mDi9lVMP1JL1Y7XVUAiA465H73NkivnWcIXrOIipdtfJ/SpJJafLaRmTSJPH8xiVl0as%2bvTmVWbzoJDg1hypojNjOENRrPu5%2bF4VCez87kmds3ZzeYnd7JvwSE2zdjOzrl7qZv3Foeef49vNvzI928CtTB3zgbyp2VxYU0N6%2bcU0bRsHLufrWTv8yMUjiwbx9m1k%2bHQ03BgHlf2zsF1eBLdgnQkxyeQYDSqq3hkZKS6lttngh1tl0CpkUW73uDYNxc4/MUnHDp3xirPn7XhDG9/dor9Zz/k%2bH9/wbTVLxM5tYQTF/Zy8rsDfPSPg5y%2bdJj3vtjNu%2bfrePd8PUc%2breWdT3fR9HkdB09vx3vCYNZt2MXFM9/zX6e%2b5duz3/PVh1/zyXvn%2bOz980qeOfopHx05y3cffsNji14kaWolF08d4etP3uUfn7/Pxc%2bPcf7kAc4db%2bT8iQOcO9HI2WP7%2bOzvjXzctJsHRmbSLcib3IHZDCkqpKSkhFGjRmE2m9UssG9%2b1zjAocxM3cFGzp0%2bw5ubNnHi2Af82m/pjk3kLHiCw/sO8/LSV6nf1cC61zdx5adfaHAZgmuGUdvUyMsvL2Hz9jdZtXYVH5y81s4Vm5y/eSWFz83iUONhFi9bzpYdu9iweSs//4KJn66A64R8ugV6odd6orUdffbjz/7S198DSk3UHzrA5Uv/5PgHf%2bfLz89Ze/35Mly%2b0ozLP1nNv7RtA2mzq/n63Hkadu/m4P79NNTX8/M//wlXpO5lG6z6P//wA0FV5TQcOcTxI0d5a/de9tbW8%2bmpM7bRX4afryhc%2bdHaZsH6leTMm8rF8xfYXVtLY0MDb%2b/bx5Uff7SOR41NtrusvPbT95dwHZdL1wBP5QCNhxatVquOOfmV5V7wK3uAmf5ThpPy1CRS/1yDZU415icfwjxzog3WsunJh0iZXY2%2bqoQewzNIfWoS6fOnkv70I2TMn9as0xqyrXHGBLpVphIyZRiZ86c161uemoRxxoNt9I1PPohldhVeE4twHpHJgLmTbTaskP1dY0O2mzGBjhXJ3B2sJzEugWSLhZSUFNLT08nOzlZ5wtb7wLXHYEEEoiASkRuKyAtrQX64FfZyXrg1Oiw3IYbI5EUUYogNhdGIwpirEI0oirHqy%2bNN2pC6qp2t7nptSuKtx1yz7g3YKDNyT4gvpth4sgZlk5GRoRyQk5Oj9gHpgNb7gAyE3KUD2g1NwjCtUkV9vo8Op3fVEAzThuH9SAUeNWX0qSpUZdfqIjSTS%2bg4LEWd4Y5Dk2j3G7DryBijXcVv69vbqPhCRnhDb7yNHNNdgT5oXVxx6eNCnz591BR3cXFRUi4DuSzskBtj7969Ee0rLSoCvHdiPuYFU8hbPJuyZU%2bTuOARQmdPUDJv8RwGPj%2bduHnVOA6ztER6Nwp7xFaZpKI2FbnZYH9uy99k37ZI8J7%2bvgTofdH7GtQXVpce23T39/fHz8%2bvGTKL7eHhYVsCMpqSebfcSESOnOpRiMERiFw59WRuMBZRKHODcTgUG3EouTk0R5P5ckpHI/JlLk/m%2bWReMNqGGKssjLXq3ixKjcoBSfFG8gsKVBgsw2EJo9Govnjr00A6xU2dAiVGXAL0xJuMxJqMmFOSiUqIw2RJxpiciH9wEBpvLzx0PnjovNHeLHy86JgaikO0AV1uCu7ZJjwHJ3NfWgz3DYhWZfcsk4JblpGeyWGIUG9E2E0g1AuRHY5zqB8xYeHExMUSFRWlXlyuf3ktbhsMtd4ES4y49zWQlZZBdlY2g7KzsSQnMzAjk9LiEiLCwvD29EIvz045pW4Ceh8dOm8fOqWGIuL8CB2RT7/KXEKG52EoyUSTZ8GnKJ3QEQXqbh9UORhNvsWaL4w2IKL1NwADIlKPyI6gZ4gBH41WxQGt13zrcNjb24qWY7DUxH/%2b7WX27dlL/e7d7Nu3jz179rC3oYG6%2bnoaGhrY37ift/bvZ/9NQOo3Njaq9tpROYjsMOuUl0tLLa9I61KT0v4spUx1y0vXDcOWfs%2bLpmeIL311BnxaBTutp72Pjw6D3gu9XgZHtiXgUGZm33tH2LxxE0uXLWPVqlUsW7qMixcv8u/6%2bT5cgmOxifJXFqhN1KEyGYdhyVbZumyT9g3yhlBpPQHkHiZnQFFePpXDhzFy5Eh1BbY7wmDQo9H48sSULjw05m5c3fzRatVdwMS2xgY%2bOX2GI01NbN26lYMHD3LhwgV%2buPSDcsT3F7%2b/ach2ly5d4ttvv8XwYBEiJ4K7x2a12bT%2bZdiv5nIWyBkQbFApsaB%2b/VQixPrVWyJALy8d0ZGu9A9xx9tbhsKutozQ6Gx0VSX4VJfiO2UouklleDw0BM34fDQT8q3y92BCPu7j8%2blYnmQ7ZeQJEPvHoDhB5QO8NVrcNRq19q%2b%2bBktoPXR4eMhZYd8DKmRSQyYW5J%2bY4hBFsjOZA4xHlMoEyL8I2Yecor/njL9htGSEwvuFEBYRTr9%2b/ZqTIW1hXQ7NKTFRbs3syGxNi/x3whasSCf8UZD920Lh7LQMxk%2bYQG5ubpuN8Go0h8LiD8jR/a/C7oByE3cH6fBy1%2bDh6amOPnkdtsvWZSnljbBPnz63kAMqzDj19VR3AZnvl%2btbQh51vR94wHo3cHNTz5KXX79Xr163hgNUsrUkHq0pgrQkC%2bakRBKTkkhOSmKAxaJSY/KfNVItFhITExUsFgsRERG3lgM8zJEUDs5jYHYW2VlZJA/MwJw/iOjISBXaJw1MJy83l0E5OeqaHHHLOGCozQGmSB4cPZaJVVXUVFVjqSwhdFwZUZFRxKelEJebxfgxY5g6bSpjxo4lPDz81poBnuYoMlMHYElJURmh1AEDSMvMUP/ElZyUTFp6OqmpqQppaWnqwnSLOEDGMkZ6R/UjLiKK8MgIte7lFJdfX9795Y3Qzik%2bKkrlCP4HFiUloTJpo/QAAAAASUVORK5CYII=' /%3e%3c/svg%3e)
Display Checklist
Transferring vDrive Insecticide Setup from a Gen2 20/20 to a Gen3 20|20
To ensure the correct vDrive Insecticide Setup, follow these steps. It may be easier to take a picture of the monitor or write down the information.
- On a Gen2 20/20 navigate to Setup > Systems > vDrive Insecticide Setup
-
Record the following information:
- Meter Type
- Any and all rows Row Rate Adjustment
- Delivery Offset
- Active Rows
- Cal Mass
' width='640' height='480' xlink:href='data:image/png%3bbase64%2ciVBORw0KGgoAAAANSUhEUgAAAEAAAAAwCAIAAAAuKetIAAAACXBIWXMAAAsTAAALEwEAmpwYAAAcMUlEQVRogY2ZB1QbV/b/hyLUJUANod4bEgIEiC6KMWBTTFdBSDOjCkh0G0yxwQb3Bu4txSmbZBPbKY57SbxJnMRxjx3bccMmTvLbX87uL73wPyPZmGT/u5t7PmfOnfvu9715mvJmroDR3OzuOEWPVr0gPu4PzNeo5quV3XEKv5DXIZd0quRdKnm3WtkVp%2biOU8xXKzvkkq5gMBDpjlN0qeTtcnGnUtYV8LvVyg6FpCsOcbrVSr%2bQF0hWtsvFXSr5fI0qmLng/zf6Aq16vkreOyu/rKwsPj5ep9MlzTCdTpeQkJCXlwd0qZU2WjTMpEMxtJmADKqLE%2bvhc/wK6TaPayA3u1OrWZRvcHNZPoXUK%2bI3iQWL8nNblXKfTNIsEQYjPpl4MDdnSdEsv1LWlaTtTNAsLZ69ICXJxWN7hbwtLkeHVuPhc4Zm5beplA5WTIdW3SwWgHTKH0ZHYNJBaqRTq9EmJOCw2MjISPIMi4yMJBAIQqEQWKBVw0y6mxPrYjN/ByvGxWY%2b17vgjXVr961c8dqykaO7dryyZGjv8tGjO3ccf3r3wrTUI9u3vb5m9dubNp56bs%2bp5/Yc27Xz%2bYU9r44uPbnn2QPjY0%2b1%2b08%2b8/ThbVs/3Ld338rlbSrFke3bDm/fevyp3Qc3bzowPvbKkqGjO3c839frjGX8cXQ208WJdcbQvLrE5JSUyMhIOp1Oo9EYMyw6OlomkwHdKpmDRvEwGe4Y%2bkycMTQrETdSNGv53JJxs3FleemSgryBDP0GY%2b1wfu7a2mq/kL%2b6omw4N2dtZcUWW%2bOYybhmXvnKitKh3OwNdbXr62pWlBStq64aM9aPm40r5pa4WDHr6mo2mk3raqqWFuRtbmzYDkP7R5eOFs2yU8jOGNofDsDNZLioUS5NXJJORyaTaTRaVFQUgUDABoxEIkVHR0ulUmCwaHaDQmLXKG1qRWOcPIhVJWvSJfnT9Q1CvlXIt/A5DQKeVSRolIjMPI47XuOKUzUoJCYx3ywVGkW8egG7XsitF3KbNBq3Rl0v5BpFPJNEYBRxjUicYxLz2vWpkEJWy2eZRHyzVFAvYFtkIk9mqknM70hLdyVorCrZ9AEgqBVWubhzTkmqXo/D4SAI6uvra2ho6O3t7erqKisrw%2bPxyBmwj3owRi66jo0z8vAmfnCLMXJTWgvnV1UYGVQLh9XAZVnYTAROrDmW0TWnJLe7HGviEcxCgkVItIgQGkQ4i2BuT12qfxbKyA7GCWYhsQFpxZn55T3GRF8eziIgWIR4Mz%2bQIMQb%2bZFWSXWvRe5Ow5l4ZIuYZBEFIVvEGCMXWuY1ZGbj8fisrKyqqqqamhqHwwGCYHp6OpFIRCbAgFQYtzBtuJTXmUJtUbHbk5itWrxHjLLEVtFIA8m6VrmkVSbuVCtbZeJWuaRNJKimR6IssRiXQNCZSvdpopoUlGZVdJMC4%2bIDNbQot1zam8luT4r0ymi%2buOhmJaVZRfOrw%2bqY4TY2CuZwO3T8rtTYNi21JQ7rFKJd/JBaBsrGwTgFGAd/GqxDEAqz%2be7E5MAlRCaTcQFDB4xMJj%2b6hNjO%2bOhmZf1Gd9vzg749/Z0vDPW%2bNMLwa/A2vonPHLdanu7ueGGg74XBvl1tvmd7ure5HHVcOtEuJHlk5WttFevsnqfmD/x1Rf1GN9YpjDCxdH2FtRtdfa8sW/b6WMuzfY3b/P49/dCudrJNTICEoTZWzkhl8zO9i15b3frcAKVJiXHwCQ0CHCTEOYU4xxPwDhEK5kqbUlNSUqKiomJiYoL3bsxjo1AocrkcYNqVIbbY0AYmFhJgEPhokBdqZ6HNLCM1qplC65YpWpixbirVHU3x0ug%2beoyRGhVhZoXa2ThYiIZ4RKeE0ayJALkokIv8lo0cvEOEgfiqHgPZLUODPBwsjIB4YbUx4Q2sMBsLA/HxDhEWFuAdonAbO9zORk5OAyvczkZ2H4OycYDGGK5Tq9FoMGgMiUQizjASiYTD4fh8PpAzXKHqy9EOFmj68%2bIH8pFtf178YIG2L6/OlG2tzzbVpjfUZXkss62mHEt9VkN9Vq0pK35hrmYgT91n0PTnqftyVX05mv68uP7clJ7ZyYuK4vpz4/vzFQuzNX15mv4AA/na3ryE/oL4gXz1ADJEUl9hXD8i1wzkaXpyn2Q%2bBumhL3vOEqPJaEzPyDAYDDkzzGAwZGVllZaWAor%2bHIpXGemR450igktCckujvAqSW0r2SLE%2bGdYvJ3bERbVqkheXRs2PJ7apSO1x5PY4WvMfoTero5rk8a0GzcI8vFNEdkuJLjHZI0NwS6O9cqJbgoH5ZLeU4BbHeDVyf3p0i5Ie0FKbVbRmFb1FTW%2bJY7SoachuHKNZTfRKCxZWzi4o5HA4YrFYNMPEYjGfz9fpdACnUwdYGKpeQ85IpX5orra/gNumSxyYrVyQE7cgR9qZhgY5eCtP05qNdwrQNg7axomwcSJAbgTIC7dzUHZOhJ0bAXLRID/UzuY6EoQdelWvIXGgMHvpvLheg2x%2bpqrXwG5NzFhSZtvmj%2bsxJA4W8n06GqQMh7lokBcB8rCwAGXnAA2MMBsrxBoTEQiiQT5gi0lpK9Qn63F4HIVCiY6Ojnps0dHRJBJJJBIB/PmpgCUmbai0/flB1%2b5uaGdHfF9%2b/MJ8z%2b75/j19ZWsbcQ4hwS7SduQSPBI0yIv2KqhNcSSXFAsLqE2qKI%2bc6JIQXRI8LERBXIErST4/0zBabd3mc%2b3qrhlzVm6AwO2tGUvK5q0H7dtb6ze64V0dqs4cBqxCO/kEhwiwxiQOFNq2txatMkE728EdbbnLqiNAHh4WhoCstI6ijNR0EpkUGRkZXLyCR0%2bhUKKiopCnEKdbB1gZIVYGYKUBjQzAxgTszBBbDNYlRDt4gC0GsDPRdq62I5fklQFmWsHy2vbnF9WNO0vXWsvX2TpfWNzxwuLqDXC4jYOCuCJ3Mr8zGbAzQ%2b1MpLdGOtDIwDh4YfbYEFsM0EAF7EzARsdDQrYrPsLBw4B8pi9ePzQnf3lt6Rpr2Tpb9ZgjY7iM3qwmOMQh9ti0jqJMfQYGi9HpdJmZmXw%2bXy6X83g8DofzaALy1owMf/Gs3kpDd1l2x1xDV1lm%2b5wAJVkdczLaSnLnVyhAvbo1m%2bAR4x0i/eI55etsOSOVOSOVs5bXla61zl5ZX7LKrOrJCbHFCjw6tT87uSk/o60ko7U4p7M0q31OTldpsKuM1uL01qKs9jkqKJ0Jx2FcghBrbNJAYfWYo26T27TZC%2b1sr9wAuZ7qnrumAQPxgxPISs8KCQ212Ww%2bn2/p0qWrV69esWJFSUkJHo9HHqNVw43H3zry8osvnTp28qP3Pjx26Oilcxcvnbv40fsffvDue5fOXzr/wdmhtSMSdwrRK4lyy2vHneCOdmhnh3Gzt3Gbr3IMMm321m/ypC4qCbWxYp2ayj7LtQuf3r5x68bV6387dfrcR58cefvwx%2b9/9OmFKzev3bh%2b9bOv7n%2b5ctMaslmEcQlITknusuqC5bXVY46Kdfa8ZTVz1zSUrrVmLiln%2bRMAW0xaR3GGPh1PwAuFQplMJpFIpAFjMpmRkZHIGTCucu7attPX6j946OCLf3nR6XRCMNTe0d4/0G8Hwdb2tq6OzoE1w1KvntQkw0J8lJ2NcwijPQo0xMNAfOT2hXhokIeFBGiYz3SoqxZZP79x88Hkgxs3bw4uGhzfOG4HwT3P7dm1e9eJkyfuTz745u//u2bnBrJJhHYJyC5Z/rKauo3u%2bk3uyg1QxXp7w9bm%2bo3uolUmcWca0MhI7yjOSE0nkkjBi37aqFTqo0to7kD9hY/PX/vss%2bvXr1%2b8ePGjjz764IMPzn589uzZs2fOnDnz4Zkb164PbRgRuXSkZika4mEdyIFGQDyMg4%2bG%2bRiHIAAfAwtQEJfpVJf3mS6cPX/16tVPr3z6ySefnP347CeffHLhwoVzn5y7cP7C5UuXJ%2b7cGxlfQTILMW5k3Qy1s0IamSG22CDAYx8N8QAwVt8x%2bz88hcRiMaDyZSqteg2cqQYz4uEsrSNb68iOh7Pi4ewER47WkZ3gzBGbE5Na86KdCpJNTLZLIkFpJCgNOEECvl1CsAnlnjRNc7ayUR8PZ2mgzGAP8Y6sQIdZWjjYc5bMksxzJBBAUaRdOt1hkKgnjgxt5Wa1z52VN4vFYgmFQsEMEwqFXC43MTER0MzPpYByhjOO7lD9ARqsjLRJokEZA1bxvUmxDk2sQxMDqWh2BR1UMmE1HVTGQHEUm5wJq9lObTDO8SRQIQUVkkfaJGSbmALJg9BhFTJJq4AGK%2bkOFRNWx8KaWFgdA8WxnfH/CsepZcCqNF9hfV19xn9YiTldSWF2duB64M0EBXFJbomyNye6SYmsyk4hzinCOYWUZpW8N1vek0X2yMTdaQyfJnmomNKsCrWzZD1Zs1cbsU4h3iUieaTCLr12oIDSpCS6JZRmFQrkyBZkFq82Yx0CSrNK3J2Ohnlkj5TSrIyAef8KGuaHQCyhU6eN12KwGDKZTJphZDIZj8cLBAKA350SYefhHSIcLJwGD4si7NyYFs3i11ZvOfbMstfHxg7tePqdl8YO7Wx%2bpmf9we2bjz696NVVrXsG1h/cvvvUi2%2beO1Kxzq5fPGfVgc3rDm7bdeqFBS8t7Xtl%2bV/e39f/yorlb27cceK5uasb0odLVx/YvObAlhfe27vl%2bLOdLwytemvzlqPPiDvTw22cfz0GFMSVulJTkpG3UQaDQZ9hDAbj0dsotysZYxMQYQkBEs8EBwqjnIq8pdWFo/Wzlxlr1zvrNrjnrGwoHK3PG60pWmMpWW/LWlZdst5WPgbXb21W9OVyOlNrNnsrxuE56%2b1Fa62Zo1VlY1D%2bKmPZGGRYUavsyeF26Gq2OCvGbXPWW2atrqvcCHa%2btNj97PzIZlmEk4tx8WeCdQnCnGyxKyVZlxz8pKTOsOAXJvIU4i9MAdyRIc1UoIkSgBog4HspgJMAOIkIMBaA8YADDzjxoS5mhJkRUYHFVBEjKnCoediwcgyumkSoiQorx4RXYFEVuIh5eEwVEVWBRc/Do%2bbh0JUEPMwl2KRhZezwCg6qgouu5IeUs6imOFKtlFAjjqyTk%2btkQSLr5EFwdSKlJ/O/TKChzbtaPjaeuG2Tdvu4dts67aZ12k2btDs2arePabduSNiyIWHLmoTxsYStqxI2rE/cvF39TGM5SF9RH7N/T8zeHfT9u%2bmv72bs303bt4u2byftjaeDEdrrTzH27aK98RRt/27mvl20V7cp/dXcETH9bQ7jNS79dTZ9P5uxn0PdG0vbx6Lsj6XuZVH2xVL2M2kBh7aXxdjLIf%2bFntdWnK5LJ5KJ/3YCLbXzfwJ%2b/CH0%2b2vA1TPABx8CZ94E3ngNePUucOcEcPxN4I1LwMVXgJePAIf3AXuvh16fAqaWiHuB3b7QqSng11/Qv02hpqZCp6bCAlvSj7%2bE//Yb9udf8b/8GjI1Rf7%2bR9xPPwNTU8Bvv9BdVvR2FDAFhPwcgplCh0%2bFhk2Fhga2pB%2bJYb%2bF4X/CEX7EA1MA9mcM6ldUyBQA/B%2bga9FnJGX8pwm4ze0HgYPvRLz7VPhTB8IPHAs/9nz487vCd78VfuCv4a%2b%2bHP7y3vC9L4a/%2bFL4y2%2bHv/1axN7zwMVuRQuwyxc%2bNQVM/aq5cH7W4UOGkyfyjx5J%2bfBM6Ruvp73/Xu6J48VvH4g/f07/wXuaC%2beRCfz8Q6zbit%2bJBaZCw34KT3s/LeekwXDSkHMqJ/VMaukbpSkfphQeLix7vVx%2bVSG/qmBOxgJTIcA/gVR/ZqYukxxF/rc3MVTT8jzw3N/CTr8K/PUUcPIkcOJl4KW3gDePAkfeBg4cBg4FI/uAvSeA4/tC9x4FjvnEMLC1CTkDP/0CfP8T8N2PwLc/IHz34xO%2b/QFpChDy6xTw4080yBixNRyYAoDvH/MtAHwXcL57zLcA8EOA74HQ30KAb4BEb2qKJgWNRf/bxyi8wNefNrwkb8VSw8rh3OXDhuVLDStHclcNGZYtzV25JHfFYsMo4htWDhmWLc4dXZK5wmaGlYP1yrGlyrHFivFhxfgSxcYA48Py8WHFxqWKjUvkG4eR3UBQNT4sWz%2bY2WbULkxVbI5XbtAqxuMVGwOMI8g3apSBXcQZi1eMaxTj8arxBPEa1byOWku9OT0j/d8uZBnLy4FmJrZNgG7lofyccD8nzMcO9bFQfk5YCyu0JRbl56L8HJSfg27lYVr54X62sFvPalHTQC4d4jMgfrSdQwG5UTY2xc6lgFxyY2yUjU0DuRQ7hwry6BCfDvGpEFfWksLyJNBANR3S0CFNtE1FsauibUqKHXHIjfJou5IKxlHsqmAOA4ong3KDv2yWoYDNYYtEIuEME4lEPB4vKSkJSFo8O9QSiwdFaBuP4dUwvBpWSwK3NTnapZB1ZcUtyI10yuneuGiXAmsX4OzCiEYeq0mL90hQEB/tEIaB3NjWRGqLmteppzarI70K1cI8YVc6wSWltWjIHjmSBgvDYB7TqSbAIhTMQcO8cIjNakuIblZwO3TUQE1J05/Hbkske2W0FhXRLUZBHAzMA6CYFE%2b%2bPjEVi8dNf4vNfJlDirvJQ8WhVhbBIQ61srKWVDh2ddq2ty54aWnjVl/xSpPv2T7bNn/LM73mzU14WISFBBEgj92SSPJKMSAfqcSA/DmrG1y7uzueXwzuaDNu8sxZbWl5ZiG8o8P/bF/52sbQRhayrkM8liueDEswEKLCw6L6TW77jrbmZ3rhHR22bf65a6zQjnbfs30dzw0aRipDrLFEWBwCsvTeWek6PYlMChZ3g/WsoJHJZKVSCeiGiwAbE%2bPkRzh4OJeQ4JFgXUKiR4Jx8lEQB%2bsU4N0ivFuMd4vQDiQnDOawfYnEJikK5kY4eGgnH%2bMUED0SvFuEc4kwTkE4zMG5RESPFOsS4lxCJMfBC3NwWO54klOCcjxSBUfBIyohxilAQRy8W0z0SHAuETagwjj4gIOlhbIhi72js2PpyAgEQe3t7d3d3SaTCYKgzs5Oj8cDpPQXkar5DLOCZpJRTdIAMopRSjfLY6wqqllONSJxilFKM8noZnl0nZjrToyCZdQ6Kc0sC6ooRiklkEY1PYoE/eAu3SSPNopZkJrSIKUG%2bkFyEIn0cRoSpBiRcadVDJOcUM9PhvPKiksTkxLr6%2bvz8/Orq6srKipyc3MLCwsLCgoMBgNQvthy%2bm%2bnL1%2b5fP7i%2bQsXLzzm4sdnz55859THZz%2b%2beOnidPzi5YvnPz6X3T53Vm/V1XOXz1%2bazn/EpcuXZuZfuHjh/IXzV65cee%2bD9%2bmV0obFzhufXj934dyfUV27eu2Vt17LAgv1ulQAAPLy8oaGhnp6enw%2b39q1aysrKwEAQD5oKocbr1y5MvnF5N17d%2b9N3Ls3ce/%2bg/s3bt5obWvz%2bf3vvf/%2bFw%2b/mG6aeDBx9/M7uV3lJYN1D%2b9O3r2PBKe5/%2bD%2b5SuXb92%2bNXF/Yjp4997dycnJTz%2b7Sq%2bUQstb/v7wf%2b7cu/NnVF99%2beXh00czwcL0lDQiicjlctVqtVKplMvlRUVFSqWSTCYj1emKRZaLZy/cvz1x%2b/qtOzdu37lx%2b%2b7NOzev3nj3%2bDvHDx377PK1uzfvBONI0%2bd3bl/5PKe9dHZv9eS1ids3H8VnCqf7CXL7%2bq37tyYun79MrRDZl3i/vvPlreuf/xnVw7uTbx89lGEr0OtSCURC8LETNCwWG/yXCTkDRYO1Fd1m8yKHcQCaxjQANw65G4c9pkH4d/FBuK7XltSSH9eUZVoIGQefNE0n/CFiHIDMg47qXqvYrkv25lkGHPUDf0plWeQs6qzKc8/NyzLEMGN4PB73sfECxmKxtFotMG%2b1neNNFPv1Il9qEDGCXtQScPx6iT9NPKOJ35Kc1VeqnZ8naEmZlkyrEPxPmG4V%2bFKyF5RqOnIFvt%2br/Ppg5xJkIIQZY%2bm5Pl1lj8VS92glNhgMubm5hpwcw8yVOGFoFtDIQDt4KJiLgrlhIDvExgSs9BB7LGClAw00oIEaZmeiAgkRMC8UZDFaNFivMBziBCUomBcGsgAbI8TGQApyDVQEKy0MZKHgxyqYTXcqcTDykP2dqpERYotBinZWKjLWDBUaWcgYOk9eWpIeT8BTqVQikYhGo4lEIoFAiIqKIpPJyCWUMlwS1sgmOER4B/IZKehIzV9WU7rGWrTSZNnSVL7OVrbWpuoxoOxcvEOEh0VoiMdpSSJ7ZVhIgHz4BWr8moX5xStNRSvNxavM4Pa2klWWopUmYUdqBBhUCdEwn%2b3SRjqQimpQFWZjJ/XPLlllnr3SOG892LjVV7C8rniVmdOaFCiMigiwKBRip3kLM5LTyZHI%2bhUfH9/T05OWlpaYlBQsLSI3cfJwMcrOIbmkRKcECwt47cm5o9X1m9yZSypqxp2mzV7jJq9usCgC5JFckmAOpyWR3CTDO0QEp5jokqAhnrInp2ydrXStNX24DNzRVjOO1HQVC7LREB8p/TolWIeQ5YqPdEiRIv5jlXph3rwNUPFqS/6yGus237wNYOUGSNSVhgmoSE5JGMzRe2dlpqTjCHiJRHL247NTU1P//Mc/v/2/b0vnlqLRaOR1OmloNlBLCjXTABMVoT4KqMYDlRigmoBsEbBALQkIJISYaIAxKrZZi3eLAGP0I4mJBtRFIqpqPFBDRCRVOKAaiwRNj7s1UdjueBzIf6Iy04A6MlCNA2rwQE1grGocQn1UUIWMZY5M9c7KSE4jkUlUKrWgoGDL5s0mk6mqqkoikZBIJOQMGPoravvt4LJm24jXNuK1jzZ51rQ7V7Z613Y6V/pdq9rg5T77aNN0q3WxS%2bXNlHr14JDXNup9HPeCo00BmqHRZhChyf64FRxtNi2GmRal1pMDj7Y0jngeqUYQiT2gCkqQ3RFkrMYRD7zMN6enLh2elZ6cRiSRaDQaHo8PDQ0NCwsLDw9/8idf1VDjjSuf/f2Lrx/em/zq/sP7t%2b4dPXD47PsfvfHq/gsfnf/w9Jlb1z5/eG/yy4kvHk5MfvXg4cPPH%2bR3Vszpr//mztcP73/x5cQTvrr/8MHtiWDyNA/vTf598uvPr92kz5M4R33fPfzHF/ce/FfVF/cm//HlNyffPZllL0xPTcNgMWlpaW1tbWVlZSUlJS6XS6vVEggE5AxUDTde/fTqw4cPJyYmJicnb968uWbNmm3bt/Ut7Nu3b9/y5ct37tx5%2b/btycnJiYmJB5MPJm7dy%2buqmDNY/9W9hxMP7s80ZMX99NM7d%2b48ePCkYWJi4uEXD69d/4xRKXUs933z5f8iq%2b%2bfUP3PV18f/dvxLHB2Rmo6FofT6/Xd3d0LFixoClhGRsaj8nrJYP2rb%2b47dvrEoVNHDp86euTUscOnjr597ODhU0cPnzxy8MThgycOI36AI%2b8eO3TksN4/O7NrzoljJw698yg%2bzdF3jx95B%2blhmkOnjhw/fWLfwdepVeLKhQ3vnj598OTh/646eeTUe%2b9seXFHmq0gNSkFh8cHX6EJBEJkZCSRSIyKinr0F1PhQA23Vi1r0EksSdNIf7f7xJc26IRGbYLXIHGkiE2JMyX/AalFJzQnxDuzpLZksfnPqmQWHceoLm6pKi6YzRfwg38OyGQyqVQqC5hIJEpNTf1/WavuAl2zDZgAAAAASUVORK5CYII=' /%3e%3c/svg%3e)
Display Checklist
-
On a Gen3 20|20 navigate to Setup > Systems > Granular Nickname given to vDrive Insecticide and enter the recorded information in.
- Delivery Offset changed to Application Position in Gen3 20|20
- To enter the Row Rate Adjustment, navigate to the add hardware portion of the setup and enter the Adjustment Percent.
' width='1280' height='800' xlink:href='data:image/png%3bbase64%2ciVBORw0KGgoAAAANSUhEUgAAAEAAAAAoCAYAAABOzvzpAAAACXBIWXMAAA9hAAAPYQGoP6dpAAAP30lEQVRogdVaCXCcxZVuySPJxrIlW7Z8YSONRtIcGo00mkuaQzOjuWc0uqW5dJ%2b2hC1f%2bOJMvAcQwMYQQgEVskkBwQYq2ImNsWUOgzHHZilINimysOzWVi2Hk00gAcJuvq3X//yakSyIDzZsVPXVe/316%2b7/f9P9uvv9Yowx/LUjIyODS4VCAafTiYqKCuTl5SErK%2bs82/z8fKxZswYFBQVYtGgRcQxMdiWYsghMuhpsVQHmZWQgoyAPrHwd2LoVYKpisJLVvD5DIuEdmy0W1NTUQKfTwWq18rI/EECNruYv74DMTC4rKyvR0tLCn6uwsBA5OTnn2a5cuRJSqRRlZWXcRnAAvXhVKZhaCla2FvOo09wFYDq54BxtGVjJGjD5VdwBksxMWC0WeN0eDpvFAqfdgVAwCLvN9rXPiItD1ryZRGYGODdP8Op5oLrZbWYjW/KXR9Y8ZEokyM7KQnZ2NgfNVElyxs4FiUQCxnpdYD0NKXQ7wRIOsLhd0AlincgnnMjocSGTQO0TZNfAdeK4HXGxerB4Uk8H8aLNNBxJ3jkHL4w5ow31G02z73ZghUENrboSCqUCcrkcKpUKarWaxwalUsk5ig8ajQbV1dV8GTA25MVqQyVKNCrkOKvBmoyQNNcht9MO1mgACxnAfDVcv6KjHrmdDoEnjupCeiyOODG/zXoenx91IavFDBY2pviwEQVxDzKba1P2jQbMa67DkphbsBXHDAvPkhdpOO9ZslstWN7t4%2bNkNBq58wprNQh5fOiKRBCPx9Ha2orOzk50dXUhFotxWV9fzx1BjpFKpWCs381fXiNXYEFtBZhPi3k%2bHa4Im8Hc1WCuajC7GsxTjSvCdchtsnCdc1TnrkJeiw3zQ7UpnrerwrJ2J7IChjT7KjCPFgVtDmT69YJd0j7Tp8PyjgYwb41gx8cUnmXhHM%2bSHTRiRacLzKVBBtV1WrDcVAmbqQ5ujwcejwcOh4O/sM/n42W32w2TycRnAwXMkpISMDbgQXGVGuoyFQrNGiz1m1DgNWCJR48CrxFL3XossWtR4DNxLt%2btF3S7ltcVeE3Id%2buw1GMQeIfAL/OZkDcHT31O23uMQt8eIy%2bT/fSYDmFM4vmzkD6Lz3PVYJnXhAK3AazLimVGNZSyMsjKSiGTyfgUJ5BeWlrKUV5ezh1Ay6O4uBiMJRqgDZnh6LZj%2bzcn8IPT9%2bKux27G/of%2bHt89eRe%2bc/g23P7IXjw4dTcOHLwZBx69meu3P7yX15HNgR/eggOHkvwjIn8A%2b37wd7jnR4IN54/chvuP78ft3/8b3Hd0P%2b47to/zJKl8%2b/f/Fvc/tZ/bEU/t7j1yB7d/4Ok7p/kHp%2b7C3Y/fgv0PJ5/xyG1YOhLAEn0FqlVqyBUKPsXpJellad2LII5AupQvgQEPlnv0WO2ugb4nAN%2bOBBomI3BNRuHdHkfD5gjqJ9oFnfMRrhNHdZ5tMc47N3VxvX68jfNu4jdF4NocFXiyn%2byCa2sUzo1dcG2JwrUlAtt4G5dU5jzVT3ZxnvpwbY5w3j2LJ536J576ze5zYalOhXhHF9Zv2ICxsTGMjo7CbrdPr/l0R1C5hC%2bBYS9YzAHWWQ/WSoFJD9aoExDUCuWwHiykE2S6Lto2G8FaTGBNBh5EBTvSDSk7ks0mAS21X663XIheO1Pva8AyfQVq1BoYjEZotVrU1tbyQ5G4C6QjtQT63Mjvd0K2JwjtRALOXethmOyFZdsg7DtG4dg5Cv91G1F9dRwlQy0cVE9lxVgHdJt6UNjtQ07AAEVfMzRXx6HdmIByrAOyoRaoN0S4rXy0HZKwCZkhAzIbjSmI5bARGWFBXorOepxYbkjGgNLS6bVPkmZAuhNITzlgyAvWbUdmvwPz%2b7zIHQxg4YAfiwYDyB9pRG5SX9DvQ3avm4Ns8oZCyOn14Ip%2bHyRRYU/O6XHzPojL6fNwUHlBv5dLvs/T3h2xpRC18QDG2s2XAQufAYXGSpi0Omh1whHdaDRySbOAor449UlSWSaTgbFBL3IbzVjo1mOBR4fshmos9BmQ06BFlrMKuT6jAL8Ji5LI9VPZiMV%2bExYETciM2bE4UIscVw3mu2sw31WDBW4dl9SWdMIVHj0v54fMyAvWIS9UhyX%2bWuR01ION%2bMB/DMKw78Ih2g95UGhQI9beib7%2bfnR3d/NzQE9PD3p7e7kTxIAoHpBKeAzoc6FIWY6uphZ0NLeio6kFnc2tiLZ3cCkvkUG2rgilVxXPRFExytYWYW25DBKvDsbqGvREYhzt4WZ0R6JoCTWiJdiISFs7Ep0RHqBstXUoWnMlby8rKkb5qrXIN2vA1gcu2wHLDRWoUlZAnfy1xRcWd4R0pO0Cbrjam7B50yQ2TU7yCDo4PMQlIRaPIxKNIhKLCjINiVgc7o5m5HU4MDA4gF27d%2bOanTuwbft23teG8Q0YGh7G%2bMQ4Jq6%2bGhNXT2B4ZBjRWAzxRAKx7gT6YgnIO/1gwx5kDKXNgouB6AB9Bf/BSkpTZwBx30/HzBgw4MHUP57F27/6FV56%2bSw%2b/v3v8elnn%2bEPn3zC8cfPP58Tn/7xM9Dfs6%2b/CtN16/HGm2/g1ddew9lXXsahxw7h7XfewUcff4xzv/k13nv/fZz79Tmuf/Dhh/jdR7/Db377X3j/3IfA//wJW793F1ikFpLR4GXOADV8DS643G7Umc38mm4wGKCkX1yddhagWSGeBDMGvXj5zdfxzNHjePonx3Cxfz/95c/h2LsZZ0%2b/iMcfPchx457r8Is3f4Y//PYjnHvvfbz7L29zfPif7%2bHf3/lXvPXPv8B/vPtv%2bNkbbwKffo7rH30ArNMIydjlOYC2wa7WdiR6engcGJ%2bYgMfrRVl5OVTqCigrVAK4Q9SQ8hgw6ME3Dn4Xh396BodeeQ4Hzz6Lgy8/i0fPPoNHXzqFg2ef4ZxYFvHImSn86LUXsPex70G6KYpHnnkKD08dw8OnjuGRU0/hsdMn8fgLp/D4i6fwxJlnOMQyxwuncOiFKRx/5UWEb94J1m1D5kjgshywUq%2bGprgUihIZKkrLUCETUK1QoUqZBoUKWpUaZcUUAwa9yPHpMd%2bpRaZNzcEsKmTZNZjfoIXEXsm5bEcVFiQjvIgFDTXI8epAcYT1OsB6G8B6nQJ6HHx7vSD0u2a%2bzMU6YDTAt9Tc3b248vQDWHX8bqw68W2sOnkPVk19ByufugurjuybxsrDd3CbZfu2CrdB2gU6Qk1oDTeho7kF/YluNPoCSHRF0BON8QheX2eGdO06lBeXoKxIitJiKcqvkuIqmRTUBxv1I4MeaIQCmg8ZI/4LxiW/vNhuLCCcB769GeyXD4E9ewDs%2bbvBTtwBduw2sFfvBzv3Y7APDoN9cATsvSfBPjoOdmKf4AB3ezO2TE5iy9atPHrfeNNNWL9h/XQEp7XUPzDA79kUwaPJHSERj8PX1oyMAc%2blPfycU9l7eQ5464dgP74VbOpOsJP7wY5%2bC%2bzMvWDnfiK8PHfA4ZQDMga9OPHKGbz04hkcP/E0/un113HmpTN8N/jkU2EnINDOMNcu8MrP38A8cfu6XCdcquNoCURtyNydgOS5eyA5vg%2bSE/uRdfJOZE0dEMqHb4HkyK0CnrwFkqfuwLx9mwQH0Es8eO99uO2WW/HEwUN4%2bugx4L//dEG7wFvvvvP1O4DkoAcrTJWoViVPeioVFOVyjgqVClVVVTwVJiKVEhvwYO9D9%2bOJ01N4aOooHjp5FAefe5pH6kPPn8Ch0ydx6PnzcfC5E3jypefwrYP/gExywPDX7QA3Vhgr4W9wIZ4Q0mF0HO5OJHgmiA5E6fkA9fRJcMibityEvoZUBP%2bySC7WUZtLXb9fpQOSdwG72QK70wlbfT1/ca/Xy6/F/FhMF6HkgWj6IMSoMUViDkG/mAh%2b2VH8K3QAHYXpOlyaPAbPToMJx2ABM6/Dw1/FQ/w/cIBBSIkp0y486dNeqaSpT6lxBSoqxKzw8Nfw0P%2bHDuiNxTG6fgzj4%2bP8Ciw6Qq2ugExWiW9em4ttG5ehWFqF0lJxCfw1Y9YSqKnUQKfX80SImBQVIZerUG8thslYAoWCgmDxBTpg9jL5sqCXzs2l/7k2l%2bkAhawUJck0%2bOxrMKG0TIWyMpoVs2JARrLDdJlCMtClcXPpc7X/or7m7P9S7wJpu4BZb0SdxQy9Xj%2bdDJkJYTmkUmLDQmN%2bIRkk2SBcbkiK6HMm61wpbsCVKpPeJ3JUnyxP283qa07OnXqhi3FE%2bkHIWMkzWpu3bEE0Gp0RCGdj%2bstQ5ogfZXsGINvVD%2bnOXlTftAGKa4ehuHYIlTeMoXzPICquH8G67QmobxjlKNs9gHXXdKNoRw%2b3obLyumFId/bhqh090H5jnNtR2yu3xXm9/Noh3q/quhGU7h7g7ahMfRNWbolwJ1xKViiD5KAHy3QqnhGi%2bz9tfZQNFmW6TpKyQkVFRcIMyN/WhTV7ejF/UyvWXduPpdujWL4jjtW7e7BiZ4LXLdzcjhW7urF6dy%2bvozaFyToqr9rdg4JrYijcGedtZDeOYOWubm5HddxmVw9vX3BNlNcRT5K4RVs6wMZ8Qm5wzD8TxK2fxc2uH/VhSVU5z1cWS6V8fRNoq1u3di1/WeKpTDz9%2bqtXrwajz9n5jWYspgxt2MIllfNCArcoUIvcgIlnchcFa6exOCjUkZ4XqMNif%2b10O8r2chvel4XbkU48l8nxBE7ol7LESxstWBq2JKWVo6DJhuUhC5Y1WrCsyXYeCpptKAzbkNlhhcxnRZM/AK/fB5/fj4Dfj3AwyFNjXo8HjcEg/1BKCAaDsFgsYNltVlTKlTybqlGooFGmQJyhWguTtga6yiroq6qnJcFIvLoKWp0G2hoNNPKZbUWpKi1PjTGrf41Cyb/mUF8EvaYahmphPJ2mih9sFBYTVCY9NHIlKhWqmVCqoJXJkVtfhZKQHb1dUbR1tKOjvR2BthZ4452ot1rhCQbgb2tGLBpFZ1cX/1Ru4Q5otwo5smSyMAUVKjUajIyOYGBwkF8wKA9AeYG%2b/j7ObZgYRzgQRm3EBnPEDmWZkufe0vuh83e5XC6czuaoow%2bZLa2tPIOc6O7m/Y6OjWJwaAhDQ0Ow2uuxrsOH0qATKkpvz35OtRqaciUWOqq5A7ZObMT2HTuwZ8dOBEf7UTs5CJvVhoamEJzRdmzeuBHX33A9Nm7aBLPZLMwAMU08174p5tRFmf6FhXOUZCxTQFmuhFJ1fntqQ0Hpi8YQ%2byaI44lRmvdPBxhdNRTaKqgUc4xBP1SpHAvt1ZCFHGgLhREMhRAKhdAYDqOptYV/IA34A2hqbkZjYyNHU1MTbPz/mfrcICd8EbLaLMhKl60k02EFzSKOL%2bzji%2btSY1hm6OI43KbVImCu9u1W5LRa%2bSe3tXYDnBYrzFYLX/c0xenXp7s/3QhFjvM2G88R/C/9hGavwh7JPgAAAABJRU5ErkJggg==' /%3e%3c/svg%3e)
Display Checklist
Transferring Liquid Setup and Calibrations from a Gen2 20/20 to a Gen3 20|20
To ensure the correct Liquid Setup and Calibrations, follow these steps. If you have a Sidedress Bar with vApply or vApplyHD you will also need to record those settings to by switching implement type to Sidedress and navigating to the same screens for information. It may be easier to take a picture of the monitor or write down the information.
- On a Gen2 20/20 navigate to Setup > Systems > vApplyHD
-
Record the following information for each Product Setup:
- Active Rows
- Application Position
- Tank Volume
' width='640' height='480' xlink:href='data:image/png%3bbase64%2ciVBORw0KGgoAAAANSUhEUgAAAEAAAAAwCAIAAAAuKetIAAAACXBIWXMAAAsTAAALEwEAmpwYAAAap0lEQVRogcV5aVRU15p2KULNVRQgU1HzSBVFzVXMFIOoIIgggkCNp2ammplBRFBRQJBBcMB5BBREQaIxGlTUOBtNbqZONIOJuUPfzvf1/Xr1d3sdyiT2bdPmT69%2b1rPOeveut56z99rDu/d7IJtTkjxRkbUCXg0/6lcKeHYmzcGiu7lsB4vu4rDcXLYnKtLNZYMGj%2bPmsl0cVg0/ykanONmM6miuM5LpNbw%2b1dFcF4dVzeN6eBw7g%2bqJigRFoiJd4B%2bZHh7HwWa4Ipl2BtVGp7gimW4u%2bz81YKEN1Vx23bK0nJwcPp8vkUjEr0EikQiFwtTUVIibx9EsDdCHBQOhS73UhwVrgnAda1a3rshoSU/ZvCrTLeTbOKwKJq0qkmnjssvolMpIpoPH0YUE7Sguas1IM%2bJD6%2bNjGhLjdcGBNi7bxmWbiPgtq1dZqaRyBrWrsKCCRbdFRVayGQ5%2b1ObszHI6pTk1uS5Wtr0gv7u4qC1rRWNygjoAqw8L%2baUZQFiwLsjfKIgWCIUIONzf3x/7Gvz9/VEoFJVKhdQIePqwYDMh3BQR5qWZEK5bGnC2a/vd8%2bfO9e64euTwdN/OkxuaZ4cGZ3cNnuvpnh8bne7ve2d4yBnNPd7UON2388boqem%2bnVcOHTjaUDvV3Tk7vKs5JelYY/2J5qbjjfUPZi%2bMtW0617NjeqDvvYMHZgb6TrVsuLRvz%2bimjbcnzhyprR5vb9tTXqYPCXq9GSZCuDF0qVUikspk/v7%2bwcHBS5cuDXkNAQEBLBYLUsONBIJwptClxpCg19kYK%2b9Zt3b76pzO3JzNyzNaUxXd%2bXmnN208s6l1R0F%2bx6qs9oxlFRRSW0Z6b1Fhv7JkU1rKzvWFPUXrTjU2DAE6N487pNVsXbl8a9bKpriY0cbGYUB3vLZ2pLxsQ1LC6IbmrVkr3VGc7rX5PUXrtmVn7dKqtf5oU1jwr20IXWoIxFr4PIlUisVily5disPhUCgUfAEYDCYgIIDJZEI8GQqdkGuU8g2S6NfI10VHqjl0NZeh5jI0USwgmqNkU92rljsyUkqZFC2PreGxDOJoLY%2btiqSpOQxdNFvNZSiZFMcyBSDk6kVRrhVpWh5LE8VSRdIrkuMM4uiq1ARAwAEEHM%2bq5ToeGxBw1VyGikW1xkrsyxSAgGuSCowSvlESbZLyjVK%2bXsApX5kulcmQSCQAAA0NDUqlsq6uzu125%2bTkIJFIcASkrSuJdgnZKaM45WSn7Fe65BR3DEhPDMMZl9ayllmXSKwSR1SJIhziCLuY5o7F24REp5TskuPtIrJTTnLLY2szpY3LiU4p1SUn2kRkl4zmjqW6Y4g2MdkpI9klVK9mpSStJZ9eE091x4B/rxKGV/Aprhi8TUSwi0kOaXiVgOSQElySuOpMmVSGRqMTExPz8/MLCgoMBoNOp4uLi0Oj0WAH8C6hjwaPMTNhejLSSEObGAgDDWNioE0MuJ6CNtFhBjJUTeTZk/yMJJSRvrbfmNujXd2jLR60ZnQUAXuduT3anB0aTm0yRBlENolIDukiTRhMT0YYqThrJBQgQQESzsJGmehQPRmqJ/sCRJiG7BVEGmhFA5acHerVPZrSofK0rQXAXkdujy63R8etVUCUgTSjRCqWeBcuYgHQBWCx2FdTKMIlDq3ga/fYSnaVGfa5Kg7VG0fcaVvWVRxqqDzUUHW4IX8nsESJF7nT0VYmDCBndpbaj24o6DNkdpas2F6c26tb1lG0Ytt6skO2WIenW2RUpxxhoBpH3EX95spDDYZ97vxewLzfo91jN%2b5zVR1pFDVnQFVEkSsNZWEgDTTZhszm09vXD1gS23KLd5UV9BnTthYoNucR7ZLFOjzLEiOTynA4XGhoqHfthv6MwMBANpsNIXokMD05zCbA20R4mzDcJsDbRUHl3NAqAb8xje6JDbXx4VqKwJmCKWNBlMGKLfmOYxuyupXG/e6CAVPT6W3APsfaPgPSSPMBCFQzOHl89USiQwJq2kUkpzTMJsBZI8NtQoJDTHXH4Mo5iAVBlJXhqyMijdSVnSVrenX6Eaf5YI1yuEK718atV0BUob5GEsMk4/OioTAoBoNBvwYMBoNAIMhkMoTklPqVEmAqol8pAVpK8CuN8C2NgKlIUCVhSQneT0nwUxLQKirfqUAZaHAVCamh4vQsf4CJ1tIxOnqgno3SUJEaClJN8VMRqCYJ1SH3LY2AqohQJdFPSfDacDXZW/S%2bCxR0KNAGOkJFRmmoUCUBtSCL1TG8RGmoCBXZVxXBNMoK1xXGx8crFIrk16BQKBITE7OzsyFp1blHTxybmJ48c37i9LmJqQvnJmemxs6ePnN%2bcuzs6WNjx6dnZ8o22Ck6UV33hrPnz504fXJ0cvzUxNjkzNTkzNTE9OTU7LmzM1PjU2cOnTgi1CaluFcfO3l87Oz46MTY6MTY2NnTo5PjJ0%2bfOnVmdHRi7MTpU%2bcvTIOCgKims/Hs%2balTE6Ojk%2bMT02dHz46PT52emj238PaJ8%2b9MHzp5OE67LFGRSCKS6HQ67TXQ6XQymSyRSCCrW0q//qfnc3NzXZ1dHR0du3fv3tG9Y0f3jv6%2b/k2tmxobG//88o/dIzsjlLwDpw//2//92/Hjx90ud3NTc1dn18jIyEB/f3dXV29v7/Ovnn3x2ecyQ1p2c/Gzz7/89ttvnz979vKHH65du9axtaOxsfGzTz/97ttvv/rqy5/%2b8tfOvT0UnWj77u6xE6NDQ8NHjxzt7e2dnJzcvm371i1ba6prNrdv3rtnb/uW9mT9Sp4wGoVEBQYGBgQE4H5GQEAABoOh0WiQNS3KP3/746N7D9%2b9cOnwyKGhvl3HDh4dOz46e%2b7C5dlLk%2bMT//7T/%2bs7MIgvjTo%2bdervf/v/927fPX1y/NyZqfOT58aOj3Z3dE2fPT91%2buwfX7z87qtvYgxpq5tLfnz2/V9%2b/POfvv/xX/70z08fPrk0c3Hm7Pkfv/vhLy//9PK77//%2br/%2b%2bc/8AUR2978T%2bD%2bZuXbpw8c7ND2bOTt%2b9eefcmamz45OTYxOTY2cuTs%2beGTuTbs7hiwU4fxDe4OVtfWBgIA6HA3chuSujqsNTO9jSMLSpbnBj7UBL/a7Wmv7musGNDUOb6oda6wY3ZtrXsszytY3q6p3N1f3NTbvbG4Y3Ne1urx1ocfc2eouenY3l29w8XZzckVG1rdq1s8HZU%2b/YUVfd39wwtKlheJOr51VN3UALKGiSr2vSbti92fvSxuFNNQMbGofbmna3N%2b5u8xrOnQ0SXbJYKkEgEBKJJCEhgUwms9lsEolEIBBedSDMwYesQS5ai4Hko0F6jbWYVwZoo3yLQnguhY8qBJKH%2brXeywIsJA80FhSQRKOQYBNB8hCL1mJfibyu/Kr4mmAu8h8Ff%2baifDQkD04xiGLkMT4%2bPhqNprKysq2trbOzs6OjIzMzE4lEgtsovyYVb%2bYTLMJwUzTBIvDaBIsQNKxCgkVAsIrIJlFSdTa5QkKyikllIpBWEalMDNLqtUXkMnG4hS%2bqTBFVp4ebo8llErJ14Vevs1VM9vqXiQllvwoSLaJwEw9viiaC7xJGWATgGy3CCDOfZBWFWaKlFWkyqQyFBg%2beLBaLwWAwFxAWFubv7w%2bOAN0Ti9CSIyqEbHcivkJIscnCKwQh1iiaIybEygu18rBGRgDAlLiWBVgjYRoyQkfxEqmjwnVgEamjvnoCFLY1huWKRwFgDUxLRgE0hI6CAmhIsEhC6ChwLRljoAcALOmCIBqgRdUomK64pRZusDUKXy4MK4sOLYsmVkoCTWy4nsK1xEkl4GHOO%2bl/QVBQ0KspRK6WQUqCUrcWbJzoSu9Yl9WttByoWT9oMY149PucquFKlImO0JD5TgXcTOXUJjOr4xmeOGZ1PNEhYdck0N2xETYRzR1LcclhRgrZJKK65BBVCK8%2bNao%2bJbSST3PHhlZGMzzxoqZlDE98ZG0SzEBGaileQYyJuapbVTpUXnawbvUOzfpBi/lAtfVgjXp3Fc0dC9GEMEwykVCERCHfuAvR6XQIySP10xLRRjpST5U2r1i%2bbX12lzq5PU/RnhdSzvM3sRAGCkpLFbpSYUZydF2q9UBt%2bYG6NT2AfEOWerhSuatCPVSp22N3Hm0JruARjUKGOxaiDElozSnqN6uGKkwjbvOIJ6U9v%2bxAnf1Is2nEE2BlIzRgJEZbGH5aAtOTsHJ7yaou1apOVXaXOnFT7qpOZdzGbIyRvgSIYJrlyUnJERERVCqV8hqoVCqRSBSJRBCCRwLRhvnqiRBlELs%2bqXCXeWV3ydoBw/ohy2IgYpE2fDGAh%2bvIAmcKzEKBaEDPJQDBB4jw0ldPhBrIi3V4UEEXRrFIKC4ZRBe2SBvmpyfATBQ/IymgguNnIKGtzMAKLkQb5qOPgC0Iwq00iGopqzZhTR9QuMucvDUvd6c2t0%2bbuxNI7ShYAhAgulCGWf6WSMywxdI1Eq4lPsqawNDLqDoxDZAwDTKmIYZliOGa4zmmOGJpNK8qiaIXcYxxHHMc1xwfaYxlLzDKksA2xkSa4jimOJpOzACk7Ko4mlbCNsbStOLwIi5DL6VqRCQlH78%2biqwSsAygM1EZHeUVNMTSAQlJI6ABEoZRRgMkFK2IohNRtKJIQyxVJ47UxvAFfDgMhsViMa8Bi8UikUgKhQLJblz/5N7jm/Pzly%2b9%2b/jh4/nr83du37l98/aTRx8%2befzh1StXvvzsy/b%2bbQQVb/fxfR8/ejp39f1rc9ce3n/45PGTRw8fzc5ceHDv/v279548/vD%2bnftSfWpWfeHDDx58/%2bJFT3cPoNU11jds79jeWN9QVVHZ093zh48%2b/varb9r6thJU0UPH9j77/KsnHz796MOn89fn37/y/s0bN59%2b%2bOTRg4cfP/nok48%2buXPnToohSygVBQYE/HIa/eVMGhQUBG6j2RuKv3n29fiZ8W3bt1dWVTpdzonJiYbGxqbmptq6WqPJ%2bPWz5937%2b8JLuMdnRqcmp4wmo9liOXnqpM1ht9ltBqPR4XS6PK7NWzY/eHA/1pyR3Vz86cefXJ%2b/MXl2cmJy4tz5cydOnnjvynuz78xevnL54aOHL3942bmvBzybTBz548sfn3/9/NHjxza7ze1x19TWWMusR44eefH9i%2bdfP3/6h4/SzNk8YTQMCkWhUGg0GolEIhAIJBKJRqPhcDi4iHOaij95%2bPHHTz66f/vetStzt67ffProya1rN%2bfnbszP3bh2de6H5y86BjsjlLyRkwe/ePrZzWvzd2/defDB/cMjh65eunLr2vz83A2w8uYHD%2b88kOlTc5pK7t%2b463G4m%2boaNSVqR6Vdp9I21jZUmMvLzWXqEtXp42M7DwziS7h7T%2bx/8dW3n378yacffXJn/oN7t%2b/evn5z7vL7H95//MUnn//Tp188evAoGViZoEhMUaSsW7du/fr1K1asyM3NLSgoWL58eVpaGriI2fZ4aVl6vHNlvDMz0b0qwZUVZ1%2bZ6MpKdK/yFhOcWSydnFMRH2VNTHRkJTgzE5yZ8c7M1NrcJE826OlalejKSnKvklSkMwAp15YoKUsTmJNF5hR6iYilkoosCoEpOVIjJxfyBaYkecUyNhADCpYlxtsyY2wrYu0rElxZ8c7MBFAnO86xMsa2PM6%2bUlyRxlbLkhXJ6Wlper0%2bPz8/OztbpVIVFxfn5uZmZWXFxsZCqO6YJSo8TEeGaUlQLQkGErS9hGpJfloCWkOTOjPQZrqvmgDVEv00RKiW6Ksm%2bGmIvxCqIflo8CxzDNMZ56MOR%2bqpcICCNNCQejDAeW2UkY4AKFAdERR0ZaDMdD8NKOjV/FVqoQamJS3WhHPMcWKR2M/PDw6HeycPDAaDw%2bEoFAoGg4Gn0WhPSpiBF6qPWqqLDAE4IQB3qS5yKRAZqGUF6djBAAdv4hMNwqTqbGKZOMLIJ5qFRLOQYBYQzEKCCXx6a0hmUaiRJ6pIEbnTFwRBnWCAEwxwfhEM1P6jIN7IjzAJ3kiCSRhijJKUp8llchwOFxYW5l3Hv1wpXy1iQrUEognjNCRLWzPZ9UmchmRJ60phS0bSljXx7aujm1JhJgpMR%2bY5k%2bFWmo8uYpEmFKIOXux9asN8dOEQdQhEGbRIE7JIjyebRWS3DKIN5dSDgpGgoMIrmPhKMO01QaqvnuhnIL2RUAN5kR5PM0sFfAEM/tvbKMUj81GHs6sTiwetxQMW%2b%2bEmYI8jpiUrvxewHqgtGSzDWVhIDUXkSoUaSPz6tJwudelg%2bdpeQ/rWwqwu5epuTcmgdV2fKWNroR9AoJkldFfMYnV4ZHVS8YC1sM9Ucahet8cRt3FVfi9Qtr%2bmeMDqFRSCkZgOB8gIPeWNROqpvgCBaXpbICN5ZHA91VdHWNdvahrfphquLN1VXthvyuwsVQ1VhlcJ4QYKFmCAgdNE5dYqsrtUeb3Aml5d0YA5fWuhuHl5QZ9RvbtqWUch1ECmmiU0V4wfQMKaWcAee9nBOtuRJuVQeV4vkNFRVDpUwatPBX8FGOAl20KHAWS4nvJGIvTUJQCBYZIrkhUEAoFGo1FfA41GI5FIYrEYgneJIIU4SBGOaBNza5IJNjHFIedWJwsbljHccTANAVLkD1VGCFypvkAEZC0ako%2bE5MEg%2bXBIHhySj4AUoEBjDXTRWiRkPY5iBtNSkELs4uKlVKc8ui5V1JTB8iTQnbFRtQp2dSLOyIAUYhcEU35nB8DDHBKJ%2b/ku9vphDkzuCp2pyhaTcbtNs8Va2mZSbbaot1g1W8uU7WZlm1m/rdLa5Uwqy2RbYzM8%2bdZOl6GjytLpMHRUmTvtlm6npctp2m4zbbdbu50lLQaOLlZkT9W2Wc1dDlW7RbXZsr7VoNps0W4t12yxKttMmi1lFT2e5LJMTmWCN9H0tg7IJAuJLW9y15vP8gKLxXI4HEj%2bRtVnj/5wc25%2b7tLVB7fv3blxe%2b7dqxMnT9%2b4cv3erbvvzlz86uMvdo4M4Eu5xydPPrnz%2bO78nffeufz0wYfX35ubnjg/M3n%2bzo0Pbr4/f%2b3y%2b589%2bURuSFuzQXnj0tzF6XduX7t19eKVpw%2be3LhyfWZy%2bsLZmbvzH1y/cu3B/N1tA110kxRbzvrvO%2bBrIBI1fGWp0uV2tbW3AQDgcDg8Hk9xcTEAAC6Xy2KxQPLb1I/uPRzZP9Lb2zs%2bPu5wOJxOZ1tbW2NT4%2bDgYEtLy9Tk1M7Du8KLOcdnRs%2bMnxkYHNi7d%2b/u3buNRmNjU2Nbe1tra%2bvQ0FBra%2budO3diTMvyN2mOHjzS3t4%2bPDz8Xz0HBge6t3c1drYwrTGYsreMgK%2beSNVLVi5fIRaLC4sK09LS1q5dm5ubm5KSkpGRkZ6erlAoIMvr1s5euDD77jsXL196592LB48cunj54uWr73mLF9%2b7dOvWLc/WepJGsGV4%2b40b18/Pzly99v6J0ZPjE%2bPvvX/l3SuXQbfLl67MXT1/YVoMKDJq8mamZy6%2b9%2b7spXeuXrv6D56z775z6/Zt1%2bY6hlmGKXvLCCwBCEyzXCISQyCQlNTUjRs31tbWVlZWdnd35%2bXlQSAQ8CxEtEsQ68n%2bagZWRccoaYE6NlZFxyppXmKUNIyKhimhRduTMVo6ppSGVdHRShpOw8RpmJjX3LBKGqKERDGIqVUyZPGvgv/VE2QJNdqRjLTQoAAJpie/kXA9xQeIoJtkUokUg8EQiUQej8fhcNhs9ooVKzgcDhaLBbPTNHcMQkPB6BkogIbR0zF6htfG6hlYwysbp2VKnen%2bZjZKR0MD9AXSFkj/hRiAAddRWJYYljMevPgCjN/y/EUwwMzG6OhYgPFG%2bgNMhI7CMcdJxGI0Gu3ddryAw%2bHer0zgCPBrU0ONUREWAalMFGzkYLT0IEMkwSrEAUysjh5s5OCtfIJJkFSbTawQhZuj8Rb%2bGxlhEYSYo0RVKaKa9BATKPhbnuEWPtEk/D2CwWautDItMSExLCyMRCIRfwZpAXg8XiAQQCLcYogqLMAaWbzLuqpbtbpHE9OaVTJUVjhg0uyuYlYnQDRhCC2V50iGm6m%2bOqIfQHojoQB5sS6CbBKRndLFWjxUT/4tT189Ca6h/B7BRTo8zSQtXLfOG4kVCkVKSooiOVnxeiQme2RLNITg8ihBQ3p%2bL5DdrUpsy41vzSnsNxX1m/kNaVA9Ga2je%2b/gcABcW28kUk/zA0g0s5TmlPvpiEgD7bc84QYqWkv7PYK%2bAJFpkotFYhQKFRQUhEajoVAoGo1GoVA4HA6LxYJTiFwth6hDkzbn2Y82lx%2buL95VZj/WXHmkUb2nCtjnNO33hNkEcC14B39r4PQFiFSzhOqU%2b%2boICAP1tzxhYJqDxv8dgksWAplUIvXH%2bQcEBPD5/Nra2tjYWJFY7E0tgouY6JRAikJQOipGRydXSELMPCwApue9ywupoSxR4uGlpP%2b9DsjBzBwKRWfQ7965%2b/e///2v//zXn/7lp%2bxV2VAoFDxOJ3my%2b0YGdx3bM3BkuO/wruET%2bwaP7t5zcv/Qsb0DR4b7Dw8dGDuirjWyfk/c%2bZ/pgHQhMxcUFJSenr5rcLC4uDg/P5/BYGAwGHAEcjcqv/7i2fcvXnz/3Yuvnz0f3jU8d/X9/fv2f/bJpz%2b8%2bP7r58//9a//p2tvL80oeXvk/x/rAGbhOzESiVy8eLGPj8%2bSJUt%2b/ciXt1H13Zff/PjDy5cvfnjxzXdnxk5/8enns%2bcvfPzhR396%2bcfvvvn233762469fdT/vQ7IpDI4HB4TG2u323NycjIzM00mk0AgQKFQ4AjEuzNb%2b7ds2de1eU/nlr2dPUcHtu7r7j7c3zGyo31PZ9vubd0H%2bwvcqsjyOKyV9ft2oZi370Lgtpb6u3Yhs1wukyEQiJiYGI/HU1NTU7aA%2bPj4V%2bn1UHs0mIwvxEHW%2bYMswL56eg2QWJ%2biYI490ddEBDONOvwb6aOLgGhDIoz8CIcIognxASJ%2by3MRgPdVEzj2BF8T6a2CJIPQm9z1HqFRKJS/vz8ajcbhcK8%2bMWVsWCepSo9xrpA7lv8WY2zL8zdo5K4Vkqp0qW3ZGymzZYiqUldWr1vZXCiqTJXZMn7LU2JbJq/KyG95q%2bAyYVVqlqcwPS2dQqF4Pw6wWCwmk8laAI1Gk8vl/wFOAiqyv5EmrwAAAABJRU5ErkJggg==' /%3e%3c/svg%3e)
Display Checklist
- From the vApplyHD setup page, click on the Calibrations button and click Pump Calibration
-
Record the following information on the Pump Calibration page for each Product Setup:
- Min PWM
- Min Rate
- Max PWM
- Max Rate
' width='640' height='480' xlink:href='data:image/png%3bbase64%2ciVBORw0KGgoAAAANSUhEUgAAAEAAAAAwCAIAAAAuKetIAAAACXBIWXMAAAsTAAALEwEAmpwYAAAOwElEQVRoge1ZaXAbR3aGKYk4ZgaDmcFBkMQ1A2BwEiBx8BLFU6J4CKZI8TBXJAHMAOAh3gR46LAki6Z4gbd4WFJk2avDtry2rFuy7D28lU1qvVXJj/xJ7Y9UUpVKavNj196Nj5RSg6G4kCxHkle7Jaf21VdTjZ7Xr9%2bH7un3upszVrgtYjEO261DNssGhu3WfqO%2bV08MmMh%2bo77foAtbjGGzIWIxDpjIiMXIFoZsln6DrhtXRSzGwTTzgJkcMJHh2KtBm4WxoMMjsYZhs2HARA4Y9eFY24jF2Ksn4m0OppnjHWBgtw6aDSPbiz0ej81mczqdjjhxOp3p6elFRUWcsNXklaC0XEolSVjQcmkzIjyUnze2q%2bLojpLR8tKDebmdpLbbZOjQavptlg6tZp%2bOCGfYfBLs6I7iU50dnaQ2mCrvtZr6bJZOPTFgT/PLxAe35c42NnQQmj6racxTOVmze39u9j4d0W0k23DV2K7yA3m5XUZdp57ot1kDKUmUTLzhAwO51C8WBe1p9vR0AZ8vEongOBGJRCAI4jjOGbJbabm0VZEcSpWzaFOlNsPgWlvoF%2b%2b%2b%2b7Pz564tzP3s/Ll3Xjl6eXrqyuzMzeWlv730zrXF%2bbunT43u3HF%2b//DN5aVzI0PvTRz/8NTJO6%2btXV9cuL22MlWz%2b0xfz0xD3aVXj/3qxo3ri/M/efPsreXl64sLV2aiP3/7rY9fP3PjxNKV2ejN5aXba6uj5aV%2bMdKqTNlwI6RIDiZJ2p0ZLrdbJBJJpVKJRCKLExRFSZLkDJmNlBgJJUmCMjGLUJKExkSDduvkrorFxpdGS4rm6%2bsOZmdGq6tOhoJ3lpeXm5smKyte3V4csVkO5%2bW2K1JGtxev%2bn3jFWWH83LPdO67ODLco8MP5WbN7KmJVledbm%2bb8lTO1FQvvNQwVrp9oqLstQAV3V016amcra2Z8uwaLSmK2CwUJop3I5gkCWBwm83qdLlgGJZIJAiCgCDIj4lQKERRVK/XcyI7Cvzp5qDLFnCm/REum99u8pr1zUbCZyVbTDq/3dRE4p35OcO7K5uNhNes91lJKt3ksxroDIsvzdBsILwW0mvWdeS623JcvjSD32ZsMem8Jl0TqWkx61tMOuanhfRayCYSbzHrvLHKmCkDZTcHvuEDbTftKytxud0AAFAUdeDAgaamppGRkXA47PF4AABgRsD1Spmyz4mHszQDmfHAw1lEOBuPZOPhbIJ5ZhGRHHWfW9ntIGI1zNtwFtuQ1WH1Nf1uTT/TnG3CKA8yrxiFmLV15chDlVkPOzCQpeh35gyWu11uCILy8vJqampqa2sDgYDf78/JyYEgiCGQMpDxQktyIqXc4lc8HpSSwWPUlDEo/kQk%2bpUcnxwPOFwOJ/vhCmLCjQkMw%2btTSB1xJ/pVQJAQBPDnCkCA2EIr9a2ZbpcbQZCkpCT22026LxiGGQwGjiri2uJTCgI4n9Y8OQS0BgjgAvoRvbJPtrBR87T2%2bUwX%2bGZKoQu5bWlpXB5XKBRCcSIUCgUCgVqt/i4EBLQm0a9K8KZs8Sk2eVMSYnihJXmzT8GUW1I4e6UvNMs3%2b1ITWpI5TbKEFkaBR6m/E4HM%2brr63NzcgoKC/DgpKCjIy8vbtWvXUxMQ0HiiXynvsmUfrdSGc%2bwHip0vl6Yf3L712Ivk4NbMIxWOQ6X1S6HtE/XG4W3uIxWVM80Zh3Y4DpXCrfqn4iC4T6CwoFCpVGq1WiJOtFqtWq12Op0sAQWf1rDWebSaS6l4lJpLqXn0A/3xKDWPUgsC%2bCZvqj6Su2ch0PXmgR%2bsdARPDxy8NN5xdrhgrLpmgY5cPBa9sfryu5O1i8Ght0bHriyMvP1q5xv7k7psW3wK1kicTQ1jk2b%2bPl5cj8ysu0/AkZ4BgACGYSiKIvcFRVGhUEgQBEcZdnH9KiikFYZ0iZQKDBJYuwkKaUVtJPtlb1gEg8SGDhRk9JmffiXLKqaGC0N6MKhl9aGQTtiqT/QruZQKCunEHSYgQCBtBiBAbBAAg1owqGXXLjikBwNall6iX7lBwOV0wiImd2CDF%2bs9hmEIgjCrkCLswDpM41eXTtx9veON4ZoFuufcocPvTU3dWBm/tiTttPIDGkEQl3Zaj19djOmMVC/QkbeO9V84Er25WjBWvdmvELbqGYcoDTtuYIDgNMua17pmbr0WvvhKxUxT3YnQwR9N9pw7NH/71NH3o2iHCQgSiZSq442RyWsn%2bs8fKR6v9Z7sOXZ5dvCtY/svHXe8XJpIqbhBtS7kdrvcfIHA6XRu3bpVrVYbDAaVSqVQKNYJyHttnBrYHN6WNlRkCW%2bTBg2QV6PtySR6Mi3h/IR6jNOAcWqRhHrMFM63DxWbw3liWi9vt7n2l7oPlslDZk41xKlFtvgU8cPFaUClAdI%2bXOLcX6rpckoCBtCH63qzVV1O88C2hEYJpxbh7IFTO%2bxpg0XO/aWKDruEJsm%2b3IyR7bahYozWcXaDnEZU15qZ5c7ctGmT1%2bvt6uoaHR2dnp6emJgoLy8HAIBZRvMHPb0TQ%2b1TA20TfaGx7vbx/vbx/q5oZN9UuGNqYN/EQNP%2bQE90qGd6KHi8OzjW3Tbe1z0z1Ds3wv7sig72zY30T49oKMcWmhl3QQBPbFFURRoH5g60jve2TfS1jfd1TPR3ToW7ooPtE/2d0UjzgeC%2biYGBuQNt433BMcbOvqlw79xwZzRCj3Z2TPbvmwqPLB2pHKzH/Q42EuM4TpKkTqfTx0Qul4tEImYE2mb7v/zNH/7w29/f%2b%2b%2bvr79/dfr41NmTZ%2b7euPPlZ198/fmX//lv//HJxz%2b9fe3Wjy6%2be/zIq0cPHP7VL37595/83ex4dHpscmF6fm1hZX569oML723rq%2bT45MyqHyQSGuUXLr997%2bt7X332xb/%2b%2bl9mJ6JvnHr9zNrpX//TP3/1%2bRf/8/uv/vHTf7h0/u0bH1xfnl0aOzy6NLPwX//%2bm7XFlcXo/OSx8bXFlaWZhR%2b%2bdnb8xBThd7hiyRw76TdELBavT6G6o747N2/f%2bvjOhz%2b%2bu3JydWp2%2bs0LPzx55tTND2/d/clHl699cGJt%2bdTrp%2beW5ueW5idnpt6/enkiOhloC84szM4uzkXnZ6bnZ1ZXVmyhbQlUKkDjgiC%2beW/K4bljn/z8k9sf3Xn/6uWZhdkTa8unz/7NhXcufvjjux/99OOTZ06tnlpbWF6cW5pn3165cdUX8L/8yuH5EwvTc9Hp%2bejq6mrH4R7c73BkOEAQfOQqpNVqOepeF/iSWtSsg/cSEr9RRpsxHyn2G%2bEmbQyEMFYvoUxSyiSjzaiXFDVpZQGLLGCR0mYZbZYFLBK/UeDV8AP311xKA%2b3FWQtIs05KmyV%2bo9hvRL2kcC8BN2mhH%2bCYl5RSZillktLME27SYj5DUtDK9iKlzUm0BWhW64Lugm35qampOI5r4gTHcaVSmZGRwVFGXJv8Cl5Qww2oE2nVFlqVGAM3oN5AIqViQCsTKSU39mq9ZgO0ivdgGOIFGIMM6JgyrWIa3je73h2lSqSUjFm2ntFUbtjkUuoEOlXf%2bqwj8V8Mgvu5kN1m5/F4MAwL4wSGYQAANBrN808gk81GZTKZNE5kMtmflI3%2bJQm4nOtbSnGcsDtMZhX6KwHNX0dA8/98Crm/5x%2bx%2bzsuo0xYuR/UngQPB7KnbM59cPP0DLaUkoApOZgmD1qfCAErRBEbHHi0WkjrnrRt0JocTBPTRj71aAIF%2bQUKhYIgCDxOCIJQqVQOh%2bMRBHiUGgwRpkKbgTQYLEaD%2bXGwGEmShCoUvFacT8W2/EFVaqPZYrGQZoPBbDRaTCaryWh5BAxmI2k2mkymlHQ116/ix7nx4JYSjM/kHkjmHkkAatMpM3BYwGzhUASN5YGMARRBEVFsR4diGFPDFBh7kIhfKue3xQhQmsSgOrnBJEUlIliEIigEQnwen8/jCfgCPo/P4/J4XKYs4PMRUcwbCIE06ENb/u%2b%2bCjEEWnVqlxYTYQjKnKcCAMCejYEgyD4FAgEAAOwrxhwqFpQmxxNIaTAly5LYbmw2W3FxcXV1dWNjY1lZ2c6dO%2bvq6kpKSoqKiqRSqVgikaISWCt%2b5gR0QgFUW1fL9pqdnV1ZWVlRUdHZ2dnQ0FBZWUnTdF1dXWVlpVKlQmFEsPNhAnJpklgshkWw3W5/8cUXe3t76%2bvrPR5Pc0yqqqo8Hg%2bzGooxCSKGiWdNQOXUokIkMyurrq6uurra6XSy/1xjY2NNTc3u3bv9fn9dXV1ZWZlSpURhBHgUAQzDpFIpCIJ6vb67u7u%2bvr6qqmrPnj09PT1Op5PH4zFuScR/LgIYjAphmM/nCwQCZuYAgCB2Nr9xyMrn8wEAQDFUjGDfnEIsAbFEjGFYampqTk5OYWFhSUnJjh07du7cmZGRIRKJ/lwEhK06tVOLQqhEIpXGIBFLmIJUJrtfs1GQiCWY6BsEXjLJJUkYiokxsRgTYygGQ0IIgEAAhAAQBEBYCDO%2bYzFvRP8XAWZLCUHslnJDMAyDYfhbVyEwpE12qEWICJGhiPRxkKEIhgjK1gkwp0MhtbROL5ZJRFKE1UGlKCrDUBmGxZ4sNpqjGArpsW8jkJe7VS6Xq1QqZZyoVKqUlBS73f7tqYRXzW9WPQX8D4ZS/1M29z4%2bEhcUFBQWFhbk5xc80ZYy8PR4hs3pB6cQCIrFYgiCuFwuBEEgCCII8q1T6HlL5lxOlwgRoShqs9mGh4ezs7MzHA72aJG5YvpepNMgCGp12k9/%2bem9e/d%2b99vfff7Z57sqd3G53O9FOp3JLqNisbikpGRleZkNRDqdTigUfj9GwOV0CWNxAACAhISETZs2bd68%2bY%2bXfM8/AbfLzefzs7Kze3t7PR5PeXl5KBSy2%2b0gCDIjoI64En3K2I2d5rkCQONbKIU%2b5M50uwUCQVZWViQSGRoa6ohJbm7u%2bvF6asSR4EtlzxWfK3Bp9QtUCh5yZcSumNgADIKgSCSCIAhBkPUrJsdASao3TU1nqKj05wpqKiPZb81q315cXKzRaNjLAZIk9Xo9GROCIDIzM/8XzPLJp2rwlu4AAAAASUVORK5CYII=' /%3e%3c/svg%3e)
Display Checklist -
On a Gen3 20|20 navigate to Setup > Systems > Liquid Nickname given to your liquid setup and enter the recorded information in the vApply Rate Control Module Setup.
' width='1280' height='800' xlink:href='data:image/png%3bbase64%2ciVBORw0KGgoAAAANSUhEUgAAAEAAAAAoCAYAAABOzvzpAAAACXBIWXMAAA9hAAAPYQGoP6dpAAAQqElEQVRogdWaCZRU1ZmAb/XeVTT7EpfQe9f%2bau2uraur932BbrpZGpqmaWwkoLhr0BNQnGQEFMUcEzVBRxwXdpBNaaJBhQaE0UmcObNlmYjE0eNEXEHzzdz7qgEFCS4xSZ3znf/e%2b///fe/9777/f0sJIQR/6xgMBiWtVivl5eU4HA6GDRtGcnLyWbbDhw8nOzub0aNHk5GRIccEIu9ShC0LkXMx4qJRJBoMGEYNQ5i/jRg/DmHP1nU5F5OQlERCSjLClXd6PPsiRMG3MQxJJ9GQQE5uLqWlpRQWFRKLxdQOVVVVUVpWhlPT8Pv9FBUVKV0oFEJzub5aABISlNRcGhNbW/H6fIwZO5aU1FTdxiDRgzR23DhlJ4M1ZuyYeAByL0F4ChDOXIR5PEnCgCHDiCi0IPIvRfjMepCsWSQkJ5NgSNAPXstVBy4iThWQhAwjBiGwmM20tbbSNWMGjfUNRMJhKsoraGluJhgI4vV4qK2uobysjFikGI9T%2bwuuoKTEswcN53GQuoTz6BP0SF8wSQZEcgJiSDpimAkhAy/lUBNi%2bBBdfh7Dhuic0TeoMdn%2bHB95kuIIUzpC1PtJbgmR1lpMQnOQtInFZLTFGNZRRnJLmNSJETLaS0mSNhOLSZ0QwdRaosbSW6OktxaTNiGCsa2Eoe2lpLaESWoOKkRDIYbGIiUTmgIK2ZfIbSXUeEn4QR%2bGf3sc8eoaxP77Ea88jDj4IOLwTxHP3Yt46SeII6sRBx5AHIq3pTz4AOL5%2bxAv/ki3kT7SRvpJm0E/yeHVp/1%2buUbfltzmc/cixIQQlvlTaPn%2bDdTeehU1SxYSumEOsZvnqTHXVTMI3tBL8U19VH7vCkXhdT1ULb6S%2btuupmrxFdQsuQr/tbMou2U%2bNbdepcYv7mlCNBVimBhCbuMs5HhTEWJKDPGb9YhfPIJYsQBx95WIpXMQT9yK%2bMlNiHuvRvzoOsTTdyHuuxbx8CLEPQsRD9%2bMeOQWxLLvIH54NeKH1%2bj6bcsQq65CPHijbnf3QsRDZ/gc24J4eyfinacR//KoXAH6WZJn09RWopBnT56tlAlhDI0BkppDJMbHBqVErgq5SuQKknaDuiFtJSQ26SvgFI2fQR58jQfx932IF%2b5DPH0nhp0rEBtu19n6A0T/3YgdyxE7lyu92LFMl7tW6Dxzly4HbXbdqY9tX6aPPbFEbyvf5bpuz92I/pWI51YhnrwVIXqqETMrEV3liBlliGkxRGcpYlqJjhzvqkBMjyPb0n56KWKqtInpfmoOqYszaCfplvYViM44sj1NykrErBpEZ3ybU%2bPbk/s0q0r3lXKwL5FzdUs52I7byH0YnEftTwVids1pn0E5uJ%2byPyWGEL01jIu4yXU7yPW78JZHcZWECdVV4quIUVDkIdvnJCvk5NsBOzmFGpmaDW9FCeH6KtylxZgDXrI8DvLcTr4VcpPWEiHHZSfH6yTb6yTH5SCzVCOzQiOzTCOrRGN8o4vMUic5UQ1vWZRIfRW1k9sIVJeR7baT43Yo/1ynjfSGIGNKvOQ57WR7HGS7T5PjcZCpWSmqLCVcV0mwphxPLII14CPLZVPznGkv/fM0O6NKfXqwxOxqMj12XLkFuCw2ujqmcFlXN1f2Xc68nl5KA2FslnysZVbyS/LRHBas47OpjZUxf/Yc5s2aTWkghC07F3dOAdmaDWN9EKfZgsNqxW6z4sizYm5wkNurkTNfI6/LSV6nk9w5GpbJLmbP7KZtwkQWzJvHtMmTscV9HTYbWr6ZjJoiLg26cRdYcdrsaGfgsjuw5hfQ2tzCwvlX0Dd7Dt%2b9/gYmNDZhyctXeqfVfhqbHU%2bBlUuC7ngAZlWRcmUHxqWXk75kDinfm03SLbNIunkWSYu6SV3ci/HWPoyLeklfeS3pjy/F%2bOgSUlbfTOKDN5G4ehFpaxaTvmYxxieWknr3QgzNQUweM8N9DoZ7HUoOc9kY5rQx3O1QjHDYGSr7mh2TZlak2vNId%2bbrPh678hviNpPQUERKTMPozifFlatI1nJOkeLOU2OJjiwSndmkuvNI8%2bRj9JlJ95mVHCTdW4DRbyG5PoCYKi8BeU3cuxDRfw9i%2b3LEjhWInTKZrIwnoXhfZtd/fRRx/GnEe7sRf9yrI9tv70D8YRfig37EgR8j6oKk9brIPFjN%2bAPVZB6pZewjEcY%2bUqza4/dXM35/FSPvKuLSn1eSOVBD1st1XPR4CWNXF5P5ci3jX6oh60gNpis9iOoiRLWbix1m/LFi3NEQwaoywtUVBCpK8URDZDtt5Gh2hVyFsn8Wmo0sm5nEmIboa0C0FyNUYlgxH7HlDp2bZiDay3W6GxCPL0Fs%2bgHisSV62ZCl6ZZuxI%2bv08uNDJQM0v3XI568DXHwfkRlgKSrbQwhQtrzDkwfBEk/5CX9JS%2bmdwKk7bJhOhkidZ0D00dhZZP%2bHx6Mr/pIe94T15kZQojkpXZEWQBR5SIzL5f2ia30dHczfVon7a1tdM/oorVlAgW5eacw5%2bWfm/x8CrJzSIk4EHPqPxOArXcgNvydXk9v7UUs7EBcMxWxbili4/f1uvzyw/qquHOB7iORpefQg4j1S3Xd/vviAbAzlCjGf/KS8VEY4yE/xsN%2bhrwdJP1pBxl/LCZtnUbGh8UYB1yY/tOP6dVCjC/4yPggTNo6K0OJkHK7A1Gmr4Blq1ayY9t2Nm3ezGOPPcbatWtZu24dGzZupL%2b/n6efeYZndu9mx44dbN%2b%2b/VNs276dHTt3snnjJi6eWIaYVY2hIyovgQrEKnkJrEJsk7VS1sl7EM/%2bEPGzexE77tQvgaeWIV59FHHiWcTJ5xCf7NV5vx9x/BnE%2b3v0fvwSSO6xMWJfkBH7Qow8FCbjp24yVnsYcSDEiL1BRvw8gOkOJ8P7A4zYH2Lk4TAZ/%2bBhyP1u1R5xMMzIg0FSF9gRlUXqrvHnA/v4x0cfZefOnaxatYrly5dz4403snv3bt566y3%2b61e/4ujRo/ypX8GMJlUODZNL4vcB17QjbpuNWDILsVjSjfheHDkmke2V8xEPXo/48TWnuf9axAPX6e2fXI%2b483JEfQhjj0b2/koy91aSfbCab60OK7IP15A1UEXW3gpGL/Mzfk85Wc9VkD1QxUVrIox7IET2oWoyX6gk51AVGQvciKpCDNUe%2bvc%2bx0sHDrLvxRfZ07%2bHPbv72f7UNv75lVf479/%2blmOvv84bv/89H334IR%2bfPMnHJ07q8uRJTp44wR8/%2bYT33jlO3rQGPQAdMgBzavWbBlkSpp%2bPMv1GZXL08%2bkoRnSXI%2brCJF5twySX8CYL6Uf9pB32KYxvFJK61YKJMKnrnBg/DJO230n6b3yk/9JH2otejMcDJP80T9kkqRwg7xrdaJMbKLu8i5K%2bTiXL5nVRMb%2bbkss6icyeosZjfdOJ9E5R/bPonUKoexJpdQHEnLp4DuitQVxWh%2bi7EOoRc8%2bD1M9vVAGQOWAYJZhecJNxNIDpcCGmlwoZ%2blYQ4xY7w04Uk77exdCPomT8eyFDP4gw5JVCTPv8DH03jHGNhWFESVkqc0AAUe1idEG2qgK2gI8Cr4Y94Cffo2Hxu9HCRVxizmNcbhbfyss%2bN/nZjMvJJDFsR8yoQKgcIFeADMLXxeX1iMYIiT1WTAN%2bjC/6MR0pJO0hp8J0pAjjAT3ZpSy3YdzjwzjgV8FJW6OR%2bqBTBcs4UIjpsJ%2bkBVZEVQBRqZFjLmDWjC66u2Yyub2DlqZmJTunTFXVwOf2qGxvNVuwFpjPiSW/gGRfPqLGi5hWGg/A14UMgFwFbRFE2IootiOKbYiITZeD7VP9M/TntLHr8zQHEBVu7rjnLjZv2syTa9eybt06ld0HM/5T27apKnCuCvCpKrBlMxfXhlVADdPK/kwBaI3oB1DiQEQdujyTc419no2cp0kGwMVLv3iFgX37WbRokaoAb775Jr/%2b9a957bXXeP3YMSUv5FcwqRpR5sDQ%2bU0E4BT2OJ8d%2bzwbOyJ2RgDKXTx/YD/HXjvKU1u38uzPfsbrR4/y2u9%2bp%2bSx14/xP79/gxMfneCTkx%2bfyv5nVYF33yVvYiWi/BsPgOOLEY0HQl4CMgCVbhwd9ZRcNo3y78ykfF4X4dmTCfV0KCmRmT7Y3U5gZhvB7kn6WO9nqkBPB2kxF6LK82fMAV93AGQOKHcxxpyDNxpWmT/P7cBbEiFUVYYvFsFdHMLsd2P2ubEVeSnwuvSqkPfpqiD7if4CRK0PMfVvLAA55nymTGqna/p0ZnR2UldTQ8/MbjraJjGhuYWZ02cwa2a3rp/WeUZV%2bGwVkAHw/g0FoGmwCqxUVWDd%2bvVs3LiRLVu3Krlp0yb1fCDZsmULGzdtUrpt27f9FVSBkq8YgFNVwK2qwIGBAVUBVqxYoe77jx8/fkGZ/6%2bgCji%2bWgDKXewd2Mcbrx9TtX5Pfz9vvfkm//v22yq769n%2b43gFGOQvWgWspw/ky3KOKhCdM5VY/Fkg3NOhsnrRzDYCMyfF5Wmk/i9WBQwRG4YSx3mRB3hem5gTQ9gWvxN0MaYgm8LSKKHqcpyhIoW10IsjVIgzXIQWCeCKBNDCAexBP5l2i/5skP9NVoG5MgBhRNiMiNp0Bm9wBvvF8jbZero/aHOm7SAh81lVoLenhwlNzepFaufUqUyfNo2mhgb1TDChuVm9KZo%2bdRoBf%2bFZzwZ//iowt56UCREu8Tq4tEhjnMfKaM3MGJeZsW4rY90WLvE7ubRQ4yKfnYu8djUm9ePccdu4/Rhp67aR1hBEVLpYds9KNqxfz5Nrn2Tz5s1s2LBBZXuZ/WX/tNykKoN8Pvjmq8DcOkwtETwOJ5rDoc7U7O5ZTO3ooKWhUdXnIp8fj6Zht1gpDobUmZs8qZ3WlhZV12V/SnsHHZPaCXv86rW4vGYP/eJlnnjiCVY/9BA7d%2b1SB/VlfgXtNWckwd6v71HYIL/EzK3D2BjCmVuAPd9MRTRGc20dDVXVVJaUUldRhctqw1FgwZydi9/porG6lvpKXd9SV69sFdU1%2bC0OMir9iHJNvQU68uIAz%2b56hhf2PMurR17mo3fe5eTx9/jk/Q/55L0z%2bEz/4/c%2bgA9P8P7bfyCvsQxRYosH4LJatdNfG/Pq1acnGQRTU5iUuiKSanwk1/hJqS1UclAnpVzecmxQn1St2ypq/eoji9rRyVFsV3RScfvVlN22UFGyeAHBRXMVge/2/UmC3%2b2j6MY5JLeXIKZEEXLehK5KRrWUMPqL0lzCqOYoI5uKGdlc/Kk5Rk2MMWJSmWKkpL1cJ94eHB/eKu1Kz9KfibSV841uLcXUHFEBTa4tVMFKrSvCWBfAWFukPp%2blNwZ1eT4aQ4xsLWXUpDL9rXBKWxSnxYrLake7QOQSln91cWkuAh4vhW6Pfs1bbaf08jPb%2bXBb7djzCtDM1j9pK%2beTc0sfr91J0OMj4PZS6HThLPLjjIbx2B14bBeG22LDYbOr/yiIlElRbHa7%2bh%2bP/UJwOtQ3u7xYCG80wpVXXEHf3LnESkuxyO95TucFzSPtzBaL2rac80J8pK3b4%2bayvj56ZvdQ19hAZnWU3LZa7C4Nu5zrQrbtcGDVnPEAtEXVH4aks81mu3AcdrVDTocDTWb0L%2bgv7QvkU9qX2LY8AKfTqU6ExefGHPR/sW1LP0d8BYjuKmQQvizJbcUktxZ/Sd%2bvsE1FlBS57YmRLz6HTIT//2Hk/wD/g%2bHNZKnl0wAAAABJRU5ErkJggg==' /%3e%3c/svg%3e)
Display Checklist
Exporting Gen2 20/20 Field Map Data
When upgrading from a Gen2 20/20 to a Gen3 20|20 it is important to ensure that you have saved all of the Field Map Data. To save all Field Map Data follow these steps:
- Navigate to Setup > Data > Export > Field Map Data and insert a USB drive.
- To transfer one field to your USB Drive, select the field to highlight it and then select 'Transfer'
-
To transfer all fields, select 'Transfer All'.
' width='640' height='480' xlink:href='data:image/png%3bbase64%2ciVBORw0KGgoAAAANSUhEUgAAAEAAAAAwCAIAAAAuKetIAAAACXBIWXMAAAsTAAALEwEAmpwYAAAQIUlEQVRogdVZaXAb131fkiBA3Mcu7muJxUEcJO7FQYAET/AmeOmgiGt3AfASiYOkSIqiRPGUKFOUSVlH7MRJk07ruHUPZzrtF9cfUk/caZoPzTSdacZtOq1nmtYfGvtLL3d2QUmUG3nGsT5I//nNm4c//u%2b9/e//eu8tsNvStGQzrzjql%2b22L0HJpC8YagtGpGjSF41IwaBbbrAWjEheX7tUb1mymResdYvWugWzcaneXDDoikZkwWJaqrcsWEyXqDaPwIvWuqV6S7FOv0B1vnzFZUf9JWvdakfbwMCA3W73eDzuU%2bTxeJxOZ2trK7BYb0mJRYRcgsvEX4Kdvp5XzozuD8e2e7tuxPpvjQ5nFNK9gb67WGo16JuEVVvd0QWnfae3q1Bv2R8ZvhEbuIS6J7WqkqM%2bq1Ys%2bzx306lFZ0NOo7zWGinZbZMaJSYBv2xRuQSDBFlHg8PpZDGZAoGAf4oEAgGHw9HpdMCyo56QSybVipxK/ixkFNLfWb/y/m99593Dgz86uPXtUuEP92%2bu%2bL1vb13/3atrf/zKrQ/e/v57b775J0ev/tmDe5cDvp/98Ic/euf33nvzmx98/633vvXG/QxxnIy/dW39T1%2b7%2b6N3fv8Hdw4//IN33j28nRLxJzXKZ66rVmRl4mmPy4uiAoFAIpGIxWLpKRKJRCaTCVi2mXFImJOJs1Lo1yIjAScV0ocEthvtOBiO3U8nt9tb7yXjl1HPZdQzp4N3uzrvxsdv9vceDMcOx0Yu1mrvnB27FRs4HB35bqn4g1v7Kx7XZa/7tfjEzb6ehwS%2b39/3ei575%2bxYRgI%2ba1ESMnEG5E/Z6z1eL5/PF4vFQqGQw%2bEwKeLxeCKRyGg0AkvtEcJhy3kcObc96254FuJGXcpqSpoNCZMubTMl6hC8wYzVm3GnLWU1Jur0SYsxZTYkLYaM05ao06cspCTWYMm3hNNWI2G3JkxIymIk57EYE0YkaTZkXA0Z15MlqL49R4HkeOwZu2W2q92Lomw2G8fxtbW1eDy%2burq6uLg4MDDAZrNJC/jWepSzTvVFt2rWpcv7ngV9MYgUA0gxqCdbCgW/ruDX5X1I4RGHAsmhOqRkIaCZdWvnveqLbqQYRAoBQ6mxtuCH8yhSDBgKwdNLIIVA7Ryqnj15EiTv18y5G9cHUL%2bPy%2bGGw%2bGRkZGxsbFMJoNhWDAY5HK5pALd%2b%2bOph/NDr2KR3eHKlKIqpXwuoKVVwITYthoZPEy17o627I7W4FpgHHRe6Yjfn0GvdY8eEbPfWfVt9ADjIB3TABMS//XesWNi4CAR3T/HJGorkwogLoXzXq8P5fPIwGVRxKCIz%2befuJDzerdjq9uzN2DbiEJFJ5hvAAsNUMkBFu1g4WtBmG9QX/LXX4/aNjptGx3iolMwXw%2bvNDq3emwbne6dPtd2r3Wjgz9vg4oOYb4BWWuyb0Zd2yRfUnKCBTtv3lq/3okGfEKBQCaTlWNX9ohAEKyrqwM2iliqG423O1NRb6Y3MDPWNjPaRvQEcoPhmZHWmdG2r4Op0Va8P5jq8mZi4RPOSEsmFk73%2bNI9aCYWzg01z462zYy1T8aasW4U6w2kutFk1JsbDM%2bOtecGw5uljMfrpdPpPB6Pe4p4PB6LxYJhGHhjMnd7ePgBht05c2a7o3032nk/lSpjwWLGBLysGMxAot8AWTGICXjLDvt%2bf9%2b0SoGLBBmxiACFOZlkq7VlM9KcgcATMT53xeW4PTx02evZam3d7%2btddjkIUJTisLajnclkMhAIRCKR5lMUiUTC4XB/fz/wjURyv6Xt3ujZw%2b6%2bg2j3Wr190x88Ghx6dSC2bKybhSRzMsWcVP4bYF6mmIXE6w2O29HuokpzUSydk8ovSmR5hepmS9teOFKeeV6mmAHFV%2brtd/oGNn2B3VDz0UBsyx%2bck8qn%2bcL9rp6uri6VSqXX65FTpNfrYRj2eDzAeLpNZ6u2urhmF8fpg9CQ3BOUOlGQ7IcV/oj66yDQonEGxBYXF21SBiKaMtPXrLJ5%2bDYP/ymxoNji4jj8YL1XYHFyHD4w2Kp1BsTYZH8wGGSz2SAICk%2bRSCTi8XgIggBdxyn01rBzr6/x4EzNfF3FVG3VDFJG5bTu66BqBgEmtfIVn3Ovr2auDpiCK6d1FVO11bMG23aXc6%2b/vAQpltMoVwOO3T7ZCmre7LDv9spXfJVTOiCr9O8NhUIhOp0uOkXlrQSfzzcYDED77lj0xtnRO3jsICnImWowLQuvfS5gE7rqlNpyqan/lbhosq4G07JxHRODeRl9x%2b5Yx94Yh0CYOEyJqcxL4XPHueBGX9Pm4JmjjO9qNxODKxOK5s1YKBQKBoNWq1WpVMIwrFQq3W53Q0ODQqEwm80AutEDnOVXJmRAXMokap8vWBlddVJZcQGqwbVMQldm1uAwcAECxsEaHH4illIC42BFQl4RlwIXoKqkgp1BgKQ8sjPs9XqHhobm5uaOjo7W19e3t7ePj49v3ry5uLhot9uBvoO4bsFvuhQ2LAWfuwIMHBbP2OASys3qy49bg8PcnMGw1GhdiXBzhhocZhE6Bq6VXmyASyg4bdEUPKq8SzhlZhE6IClv2hpqbGyEIAiGYavVajQa6%2brqTCaTTqfTaDRkIZt4cLH9xpnLb%2b81bg0%2b99dflVLZ19rP35sGpy10TMPK6OiYRjHvSD6cy39vXTJbT8e07AxSlVLa19qw14vNO8Nd%2b%2bex1wvh7UEGrq1IKpq2YuFwuBzEAoGgHMECgaAcCaQCwc2BqpSKk9XXECcGfb6oweEyTitGx7W0tPr0inRMS1mjloFrWYSOnUXKLtS0FQsGgywmSyQS/fosFN6OQTNW4VTd6TWeIzhZPX/SxMqcBEAZvJxBOGV%2boiQB83JGbtbAzNTyJ43sjI5UJnPiQtFoVKFQ6HS62lNUdiGXywXEH8yuvLWNXuupIOPmqWW%2bJtiUC7nWOxMPL4IzlAsR5JPxcobR48y5u5PsDFJDwOwMUplSutej2W8uNm0P9d9OEm8UQ1uDDBymXGgokUj8/0rc3Nx8Uombd4bJFzBpZODaGvyRxQkK5Q4OM0gm%2bddX9h%2bCDFlw2sJ6lILKEE1bBJOmLxhKdrEBmrEKJuvkcw5oxvrIAjG/38%2bg0/kCfnk7VG75fD6bza6trQUatwap8ELKhuZk9dysgZvVsykOJ4Nwsnpezkj9NDLxr2wHBunuqi8w6ZiWjmlP%2b1UNAVfEZUBcVt5aVyXkj2OgqamJz%2bcrlIoqGm3t8tr25haNRlMoFCe70dQ38tH988mH87vvHrXsjfbfTvYdxAu/fbXnlYn5714ZehW7cH82%2b61F53pn4XtXDYtBWlr1BYd%2bFlgZHY3MQm1n7ubKWYhKOCrbakviwRz%2bRtF0KURLqzlZ0oUcV9rjDy4GrvdF98%2bfvzflvdb1yIXIQsbjkQcCFEU/%2beSTzz79NBwKcblcEATJLNR585y64NaV/JaVZseVdttqRD5nt6w0G5YazcvN6oKntuSzrkS0Ra9ttQWasTLIkvQVXr9k1qZf9HOypLuzCB0d08rnHOblJl3JJ5oyP64D0IzVuhKBS6i64K6/3FJbQllEbdkCoVCYz%2bdzOJxCvvDf//lfn//P/64sL3M4nBMF/Nf7gAlJ2dDkYSqtomMaWlpVnVbTUmS/GlPTKGZVSvWVnv60C9U8xdFUpVVkGsWfBBUD11aS5zh1dVpdmVJWY%2brHLhSi3rdYLJbJZH/3tz/7p1/8QqlUQhAkFApP6kBlUsnOICxCx8qQIK1/uk91ypznkp3IqZ6OaeYXBUh8QQEIgiQSyc///ucff/yxXCYv7%2bpOFKASKPJcHu45gv10EEskEplM9sFffPCTv/6JQqEQi8UQBJFB/AIroHsqjfLJNFo%2bE5dj%2biSNvvAWGDpdyCIUnjpSvvAKxKLRqFKpRBBEp9OBIAhBkE6nQxBEq9W63e6XwIWCwSCLxRKKhCAIFvKF2ZnZ8saOx%2bPp9foXWQHkdBYCQVClUv3yX3/50UcfyeVyEARfmiwUKisAkYf6f/zoH376Nz/l8/kQBL1ECoS5XK5IJOru6v7k3/7943/%2bl472jvKR4KVRgE9djBaLxc8pmpqaYjKZEAS9LAqEylsJLpfzlx9%2b%2bP6fv89iMcufC14OBRobG9kstlgsZjKZwWAQ9aIsFguCID6f/3Jkofb2dqlUqqVIJpPJZTKtVqvRaJRKpcPheJkqcSQSaW1tbaFq8stUiYOkC5E%2bw%2bVyGQwGl8vlcDhCofDEhQLX%2b4GEvHzcfqHAInRAQhbeHAyHw3weXwSCdrt9ZWUlEAi43G61Wi0UCslPTJHdEQYBC6fN/CnTCwXhdB2d0LbdONPU1MRisQwGw4//6seff/75r/7jV599%2bll/Xz%2bDwSC30%2bhOryxvVy941AtuzaKH6jyGW1VyK0sueAE1X25SlJzqkkdD8SmcyDzuK4pO8%2bUmeBFVFl2qEjlWveCh5nws/HjIU2M11M9yq17wnIwteaBCfe%2b18yF/I5fHhcRQe3v7/Xv3xsfHR0ZGDAYDj8cjLaAsuSqTKgYO01IqYEICTEhJxGXAhKSCuiOgYRoOoVfMOaswNT2tqYxLgTLKwnFpVVIJXJDQUqqqtFox5%2bRk9bS0hrx3wOEqah5yNkq%2bMi4j724T8oqEnOJLKb60glqLnO2CGJiQ0KnhNRgMpOXeXGvQE%2bDyyTrAZrMrKyurqqpoNNqTj3zwJZSBaxm4Vl1wd948F9oabNoZat4ZHjkiPFe7BFN1DEIryJnUeXc1rgGnLU07Q8HN/tBWrHlnePhVvHVvVFv0Dt3B0GvdFUmFpugRTJEXPpysviql9G30dN0aRzd6gpv9bXtj6EZ3cLO/69a491p3y95oaGuQmmqw4%2bZZ//W%2byO5I78FEZHdYMGmqIWo5GaSSUAVmOkNokMGsCQQChUJhYGCgp6cnl8s5HA4Oh0NaAF7yMtIaJg5D05aOG%2bfO35seOSJ6bl0Yf226/cYZXs7AwLWCrFGdd1XjanDK7FjrGDxMjx5lxo6zY8fZc3cnDYvBxIO5wPU%2bIC7TFjwC8voIJpdPKsJbg2PH2dTD/NhxNnaI%2bTf6Yofp/oOEb6P3wr2Z0aNM7yvxc69Nnj3Ohbdig4ep6TeXUw/npbP1DNLsSCWu9E93hNBGJovp9/uXlpaWl5dnKCKrG5tNxoBqyV2ZVjEycDWuBlJyICkj25QMSEor0nI6oa0mNJysXp53VBFqOq6tTCtOBCgZICmjYSogIaFhKhqulucdnEl9Na6hE1o6AVdhqoqUohrXVKQVQFJalVZWkAPl5Z%2bPJ6lIyihJOZCQVCRldGp4DQEDuBydavO7fCw2ebkrEok4HI5AIOByueXzAHm5615oV6UaYMKlxZ1awgkTJy3JIZxa3KnBHIYM6si3qHA7jJNMmHA9EnOVB5Y7qrTdkW/R51AN5iBnewLHiWR52pOFSM5jPJ4EfjQKxl2ytLV7fqS7PQrXwiaTyWAwmEwmo9FooghBEJ/P93%2bT3%2b0dOR6VOQAAAABJRU5ErkJggg==' /%3e%3c/svg%3e)
Display Checklist - To export field map data from previous seasons, select 'Old Field Map Data' on the previous page and transfer the data that is needed to be saved.
-
Before selling your Gen2 20/20 navigate to Setup > Data > Delete and select either Field Map Data or to delete the entire system arrow down and select All Data.
' width='640' height='480' xlink:href='data:image/png%3bbase64%2ciVBORw0KGgoAAAANSUhEUgAAAEAAAAAwCAIAAAAuKetIAAAACXBIWXMAAAsTAAALEwEAmpwYAAAVO0lEQVRogbVZeWwb6XUf3hTv%2bxzekkiREkWKhw7rvg/rsGjdPGY4MyR1UQd1ULdt2bIlW7IsS7Zk7zp7p2iyPZIALYK2aBqgAZo0bYEGbYEGOYp2gTbdP5rkn15bfDOyLMubDbLufvhh8M2b997w8Xvf946BbtdVLxQWLHmKssWFnwNLnqJ5l2PKZp4ryF8ocs65HPOFBXMu%2b6wjb6GwYPFz6cxS8BQtuhzLTQ1dXV3FxcV%2bv993bvj9fq/XW19fD80XORGlDNeqMI3yNwWuVSEKacZT9AhDl8qCSYPuZlvzjNs163Zdq6%2bdyLUQes3nUItR0KriCknC4/Z4vbycHIlEIj43JBKJQCCwWq1Q1lOEa1Upgy4Ja39TpIx6RCbe7bv64c3Nb54cf/uD9//w6PB73/j61/fuffuD97/7td9fLi/F1YrPpzxp0CU0yjF/SSAYlEgkKpVKqVSqzw2ZTGa326EFl51Qyke16pRGdR6EWo6rZBeIFHCVHFfJUxrVqFZNKGRZb/ExGrvd2nw4PHirpfEwOnK7uXE/1HsSR6ZslqRKcSqllBFqRVKrehWYUpZQKy%2b%2bSKtOKqRJd6HP7xeLxUqlUiqVCgSCHHKIRCKZTJafnw9ttLZECvJQtxMpKogVOihEXfYJv2%2b6NBh9Tjn/KB0IpAOBqMuOFDqQooKwI3fQAg/nmQcshvFiN1HgGM4zD9lMgxY46sw/FXQ5ZsrLRn1etCAfczkwlyPutJ/C5Zi5VJ70uqMu%2b0vvKiqIOnLnOtpLy8p4PB6GYaurq5FIZHl5eX5%2bvquri8/ngxVAb49yh4ycAZg3ZOIPm6krd8hYNtXcsdDHHNDzhy1ndMGwhTNkqJ/trJ/tzBkGFEAcsQgjNmHYxgtbLmf7S6eaWUOwYMQqjNhIWQuQGjZenR%2baLi8f0atHYM2wTj2i14RhbdioQ4xwJj6cO17OGzKJw7misI2COJzLHTJid8ZqK6v5fH5VVVUoFOrr6yMIIh6PV1RUCIVCYIAac3FT1vLNTtNcUDHpgmd92mmPYDSXEdVB/ar85Up12q1MF8KzJaq0W5V2yyadtEE1ParjJizm%2bVJV2i0dL5BPuGTjBdykGepTSlOO/OVKeNYnGbMr04WyCadiwinNuNXNwN8IjWK%2buHDR6551OabybQlYk1apKgqkEGHkEWbuOeQQFjoOm1MlAdKFxGIxjxwccojF4lMXghPFsgnn4FFq5oON9Htrc1%2b%2bsfyVLU3anRM38yOWKwfY2NtLmS9fz3z5OvFsLv3u6sjxOHfEyI9bxaP27n2kZx8dfWtx/cOdwaNUTsLKHtb7V5v7j5KrX71z5%2bsPJ99djT2Zmn53LfZWJrfbmoB1qEq61dX%2bzuL879698/5KdizfOq5W1/lhVsLKJ6y8c%2bATNhZuzB8vDQaDUqlUo9FQe1fzfMjlcofDAWlRJw3R0SPaHMzCBTBz4iYGomdG9MwBLRsz6ae8AiKXEzexUCMnbuISFsaAlhnRMxCYh1s5mEmYyFNPuNlxIytupPWrWTEDn7BxMbNrqVacsnPiJj5mpSfN2kZVSixLyeTjKvWkRjuh1kxqdUm5fEokry5QQCjMQmDmObAQAxTTmBJet9vN5XBFIpHw3BCJRDwez2w2QzWbPa7VWs96Q9FqXdFafdFanXut3r3e4F6tL1oCFNdKNfUI0Nfqi9YB3b0K5oWrtYCyWudarQG3a3XB5ZbAtVbq1rFcdapzta5wo6F8pjYyWBUZqg4PVo0MVIYHq8KDleGhamSguh2rdq3XFz9/BYXitQbnak3jtdDgwOClS5dqa2trzo3a2tqqqqrOzk7IuV4jGy1QTRYpJwovYvIVyq%2bmqyaKpOOO4una4pUG6ZhDNVmkOsemmihUTrnFGbc4UwSus0UAGfJ2rlg241a/zE8plIw7PFO1dbV1RqMxNzfXdm7k5uaazWa/3w/Bcz56DOZgZnbcdAYOCS5m4mDUxMzFzDm4hYOZOdjpLfeiiJmOwqZEiWkmQEf0Lys0M2J6KKyCRlTMiJY2oqKFNbSwGgqrwe2QHBpRQmEVI6Zjn5PixM00VG8jAj5vCV/Al8vlMplM%2bnzIZDKRSGSz2SDTQoCFGnmENQe3UOBiZlbcwEJhWlRDj%2bnYqIEW1UARDRRWMRE9A4VpETUUUdGimjORHNzCw60szGhN%2ba2ZUlbccKaQR1hZqME6V9Z5Pxo9mazdCjXc6W/aGWzeGew9wOrvXO0/TLbvhhu3%2b/MXK5noOUHcysQMeclScApJQO5ABS/q18vlcqlUCk6hCwZwMJMkZR98NHrlIN7zIB57MtW%2bG8afZfqPkqGHeNmNjqsP8ct7kcjJROu9YbBZcfOvNYCBwIXLdcjT6dWv3uk9wEjxycjJJPJ0unG7f/r99ZkPNg7/6Fnjdj8U0fAJ2wUDgoFgDo/n9/srKyvNZrPD4TCZTAaD4dMNYMdN8jFn43Z/zwMUf3M2/sZMw50%2b5OnU2NtLe39w0r470rWPoG9MT723lng2L0zmUa71GQac/i%2bkT7JQAxTVlF5v7ztMRE4m0%2b%2bteVYbobCSFTfKxgp4hJX78pJSBpQFSxkMBoIg6XT61q1bu7u7Ozs77e3tfD4fHKMXDCC1mJkIzED0tJiOFtOxUAM9poOiGsrpgQtFtbQYAMX/6QbggH56qOPgUOfhVkEil4nC3rUmsKpvZqbeW6vY7GQgekEil4uZefjzIEDJvnChgFAotFqtdrs9Ly8vnxxarVYikVxcAS5mpsf0TNRAJ30dRAMUpsd04IrooaiGgejZcSMTNTCAhYDIQPSfsQK0mI4eAzwMRA/0IDCIFWElNCSF%2boXQVR5tRM4CYQe8hR7T08l/jYnCF/eAWEw5/dlQKBQXXYiLmUXJPP9Ga%2b58eemNDu9aU9n1Ds9aY%2bXNbs9aY/WtK43bA961ZnMmWLza4F1r8q03l6w3u1caqJ1wwYAc3MInrFU3u/0bre6V%2buLVBt96S/5CpSUTLLveUXmzp/R6R9u94bIbHda5UudSjf9aq3etybvWFLjWZl%2bspOynDPiMUyg3N/eFARzMLE7l12z1Nm73t%2b%2bGex4gnXvRjt1I7Em6cy86%2bGg0fDJB7d323fDAYXLgKHnlAGvZGRIkQNx92QBjDm4RJvJqtnpb7g5d3ovU3b46cJTq2I0ErrVFn6TDxxNd95GBRyn8zUzPA7R660rkZPLqQ6LnAXr1IV6x2SlI5OZgpwbUVNfAMGy1Wi3nhtVqNRqNJSUlF12IiRpYcSMdAatJHucm0mFOFxfkBYlcyisoBmq5f5ULUTykKxoo3%2bBgJnbcSIvpGAgMNljcKEjkUg526mmInoUazrvQQP/Aq5G4pqbmNBLD8z46AnNwMxszsTETB6dg5uJmQCRvqTn3lMfIJecUXghiZnocNidLzJkAHdVTdM45Ns455jOFHNzMeq7wPDOlkBbX2xIBT7GHm8MVi8VUOkRdxWIxn8%2b3WCyQM1stwx2qVKEy6XodqJKF0oSjaKK6aKFWStj/XxRKEnbPeG1pMCiRSnU6HYPJXF1ZvbV5k8lk6nS602y09voV13RVcabOPVv7OiierXPOVDVkrzRshJzTVcWzr6%2bw1jlT1bQYCgZATSwSi4PB4Mcff/zLX/yiqrJSKBTK5XJwCmkXvBCqYxJGBm6gwMQNbMLEwo0s3MgmTGe3TMLAJAwswsgijEwcTJjPRUgpI4TpDEmPIeOD4logQgANpzibk%2bKkrJFJEpnPn1KTU82EkQ0Uas1JX8Dvp6rhmemZ//7P//rkf/53KZsVCASnBpgXgmzURAUaCjmYhR7V0KNaRkxPi6iZiJ4WVpGbDGbE9PSojhbVgjOb2tP4qSAft7Exky0VsGXKwDEQ09OiOnpMRwP8QISSYsb0UERLPQKHQUzPRGB6VAtAMnPiJooTPMKM%2bcmygD9AFfUajeYf/u7v/%2bmnP9Xr9Z8SB85yIdloQfd9pPN%2brGMv0neYCF5rDx9P1Gz1Bq%2b1XdrsrL7VM/x4vGart2lnoHC5DpQ1pOzZKWTJBDmYqWG7r2G7r2art%2b52qHart%2b3eSMOdvq79WO1WqHsfqbsdqrl1pfJmd8VmV/POYPPdwcjJZOP2QPWtK5ZMafPOYNmNjp59RDiaZ0sEKAPkCrlKpfrhP/7wo48%2b0mq0MnJcNAD8iLhRm/ak3locfTt79WECeTpdeh0YkHg213ZvpHsfnNPJLy0Qz%2bbG3s5615roiP5lAwKUAbEn6cFHqTvfeLj427cSz%2bZ6D7DJd1eQp9NVN7sv3ewaejw6/Hhs%2bNHY5b1I8ksLax/uJN8COqMn6eD19qWv3I6cpCffWeGnbLZEoDQQlEolKpVSo1F/58%2b/8zd/9dc6nVapVCgUcofDfnEF%2bIRVmMyDwurO%2b7HJd1Za7w1f3ouMHI8hT6dTby2EHuKJZ/Ph44mCbBUN0VGpy6txgB03kiEFlo872XGjdNRx82v74O%2b/HQod4MSzudG3s8OPxyo3u33rzZPvrqz/zk7syVTXPiJM5oFKgDxDuXEzFQdcTi8E5XA4EjZbLJFopFItmy3mcCQMhgCGrRcMMENRNROFoRGFZ7WhYy/SvjsSeoj3HSY69sLxpzMtdwd79tHeg3jhch00oiRzGD2VkJ4ZYJsrg0Cqp6OToQqKaviEte8w0XpvuHG7P/QQj5xMjjwe7ycp9sUqZ7a6Yy8SOsDa7o3wCRsU1YCoR24JCNHkp0pnZ67gWCBBVCSI8nOoIPBgItF2MRdqvTfsXql3ZqtL1pu96015C5fgaV/11pWS9WZtutiZraKSFsOM37fRAnjWmkRkUk0ZYBsNGKZ91vmymq1e73pT0Up94FpbYKPNs9bkWWtyZKsN0yX6dLFzqSZvvsK/0RK81mbOBIwzflJVs2%2bjxQvYqhp3Bi5tduUuVBfOFP/pn5RkMsqlJX02qxsd5Y%2bN8bNZXTarX1pSP3p0Lp3mYCZxyo6/mWm7F%2b68Hxs4SsaepAeOUlcO4k07g/ibmdABVnc7FDmZjD6ZrN66Ej6eHDme6N5H5WNODmY6Z0BJ/uKl5p3BngdxygMHjlIjxxP9h8nQAV57O9S%2bF0afTnfsRRru9MXfmOnZR7v30eHHY9ibs937aPh4vGKzM/QQjz%2bdKVxpKVks2t8rgCARiyVjsxU4PhuLTbJYciZTBkESFDW85ELsuKlkvTlyku7aj3XshYlncyPH4%2bGTiaadgfnf2gyfgLNo/J2l%2bjtXW%2b8NE8/mYk/SvQcYVZSddyGQe48oi1cbkKdT/UfA/erv9KXeWrz6EA89xMPHE8SzuZ4HaPtuGHk63Xk/hjydHn485gOvBn/K9Pvr3rUmaEQBReDyFf%2bjowKRSKJSy00m/c/%2b7V9/8uMfwbBWpZIrFLKxMdPFTaycKMydLzfNgmU1zwZt82XwdIlh2pc7X26c8SnGXZZMqXk2oJ/yWufKjLN%2b/VTJp27iHNyiSRfnzVdYMkF4ukQ75SnIVrtX6o0zfv10iX2xUj/l1U15rHNlhhm/fsprmSvVTXnNs8ADbfNl8jEnn7BAMVP5iv/osIDHlygUoB74yY9%2b/IO//YFYLFYoFBKJbHTUdDGZY8WfVzMoTEfJXBIFoIMrKEeoOShxSAoDhV9N5mhkMgdqN0RHspGtAERHR7TgNg7mDBQGlROlJP5CG/VeVhxkeFAEDi6XHB0W8PkSuVzW1tb28c/%2b/aN//pemxiaqKAAGOBerZJhdlXQpE04SZC6VeAVUjnX%2b9sUECKoSLilhLxqvKpqvkeL5pMJXxF%2bSekVt8qWJKunkI/aGjcqjQ6dAIOPzebOzs5%2bQY3R0NCcnRyZTAANqb/a6MtXFC/Xu%2bbrXQfF8vXOuumG5t%2bFGyJmpLp5/bYULdXlT1UO7PY8eufh8iVqtFIkE3/vuX/zZt77F5%2beoVMrTFdDNeaGYjoUZmXEDM25gYUY2ZmSRICegvgHAjKBZRD2Kg0dnbKeCcSOE6owJj3HWByHaM/rnBhszQmFdYMnzYN8OQSKxWEWn83wll9zuIIPBFwqVbLaEIAxkMgfqLBtoCCdsLLJ0gqJaJlnUk8U7yNtop7U5TItpwT6JqEG3K6ZloYZTWcLGxk220YBtroyNGUF2%2bHK3%2bTeFIGGjIaZgNvDhVz3NzcquLl1Xl661VdHaqujq0nV2ai9fVm1unksleISVicLOpZrWe0ORk8mard7yG5dLr7eX3uiovNlVeztUdaunYrOzYbuvYKnm6kO85wHSuN3vyFYxUZDPfXZf6HOAh1sZmCE/FczM9kYipQhSiaKVGFaNolUIUokglbFYOY63vzCAT9joiD54rX348djqh9td%2b7GWu0OhA3zkeCL2dIqKBtd/b%2b/gm29U3uxOv7c688HGoz9%2bq%2bXuENVO%2byIMYIJcKOgu8rPZIpFIyeEIGQwuhyNis4UCgSwnR2IynetKvGihgUIeZseNPNwKRbVlNy73HRLRk/TEOyu1W72gMibbWwwElo0W8MlG2K/tzL2OAcFAQCKRyOQyj6d4eWmpoqLc7/cZjaC1CD4xvZROk%2btAuS%2bfsAoIG9VI69gFUXnqvbWy6x20mE6YzANsCdDEPEtIvzADSoOBoEAgyM3L/f5ffv%2bTTz75%2bX/8/Je/%2bGXn5U4Oh3OxtUjtURqVD5LNQzAZUUCDUugqH%2boTQENSqldHi2hoUQ0tqoUiGjrZnPviDAiQBY1CoWhsbDx%2b/Hh4eDgUCuXl5YlEotMVYKMg8vMJW/c%2b0nJ3iNqvLXeHym90OrM1HXuR7n2Qt4RPJrv3EdCxu3G57d5w0/ZA3e2rHXth30YL9XO/OANEZEnJ5/PpdDqDwWAymS8%2b8p0ZIEzmOZdqgtfaq29d8W20tNwdqrrV41lr7H6AdOyC1lrT9kDvAdZ6d8i33tK9jzTtDDTuDDRs93nXmkEj7QszIBgI5uTklJWXz8zMdHV1tbe3J5NJj8cjEAjACphJA/hUL5Jqska1DLKVC4580JrWQxE1CA4RDT0GenXPXQjU6RBghnm4hY9b2ZjRlvLbQDJnAJ8cwY/4/OADnzTkJ4OlwSCPxysrK1tYWMhms%2bPkuHTp0ml7HV7w0VGYQ5BNOMJMAky45%2bZnYBMmio2bsLxEJ5t5dAw2JUtMmQA9rqeIrwMObqZhemsyUEI2d6kqXiAQSCQSoVAolUpPPzH55hphxG3GS0yY93Vgxkr0qDs41hDMNOvR/x%2bFunhR2VhTQ0ODxWKhPg7Y7fb8/Hw7OWw2W2lp6f8B5LabsPNlulwAAAAASUVORK5CYII=' /%3e%3c/svg%3e)
Display Checklist ' width='640' height='480' xlink:href='data:image/png%3bbase64%2ciVBORw0KGgoAAAANSUhEUgAAAEAAAAAwCAIAAAAuKetIAAAACXBIWXMAAAsTAAALEwEAmpwYAAAM2klEQVRogdWZW3DbVnrHIepCEgRIAgRBggQBEOD9fgV1I0VdLNuKrdhWbF1JkQRvsiTqQkmWZMq32LFrx9tcbG%2buXrepk4fuzs42fdjZ2Ydm8tCZ7HanD91pO9OdtNtpM9Nt89BNXnpzB6ScVWxnM7GcjPLNbzDAR5wP/A%2b%2b852Dc4DLvYk1j3Mj4F33ex6DjYB31e1Y4JgVp23N61pxO1Y9zhW3fdlhXfM4Tz1WzPUGAe8pt2NzX//w8LDf749EIuEdFolEgsFgX18fsOp1ZbRonsAFvfarkifwDIZUA95bQnajnS%2bZDBcPDi753Ms%2b97m%2b5JzFXDDqHyOs0IDAc5i6GPAFgkFQLler1aodplarIQhiWRZYD3jzBF42GUok8VUpU8YMqrp%2b/JkfXHz2J6%2b%2b8v7bd39888bP//zdd7/z/Ptv3/3Zn/1osyOW12GPF7xkMhT12pORUJTn1Wo1juNarVa3w1AUtdvtwJrbXtBqZghdWY/vpKDT5HH0AWeDPK7J45qyHp8hdAUMXQ/6X8lOXz4weGNi7NL%2bgRvpycuDAy%2bMHHs1l1ngzCUc226lRQs6rETgDyNo0aJO%2b%2bCDCF0JQ0o%2bTzgSUalUWq0WQRAIguR1UyqVKIrabDbg7IH9Kac163NlvM5pj6NB2m2fi4QXY3z6vmfnT5VotBKNpt32jMeR8TqnHJYxMzlhZUbNplm/r%2bB0TFiZcY4eM5Npl227odux1NE%2bEw5mnTbB7RDcjpzLvo3bsdTVUQr60m77557ldaYdlpWnhmLt7SAICoJQq9VSqdTm5ubq6urw8LBCoRDfQPbyjGycko6S4DitmGAaR9k41b4w%2bNTa8ZZRo2LC/JkfmjBLx019y4f7lg/LJ0SP6Jw0wykOnuLAKfOh9ROxhcHWcRKaZOEUV29rFltNUM%2bsji92dEwadZOkfsKgmzTqp0hiijJkKLKam7DMdoDjtGrKopziGqimLLJxSrhyMtmdUCgU8Xh8ZGTk%2bPHjhUIhl8t1dnbCMCwK0AluWZntePYwvcJj825yOUwsBqAZS3PaAJzAbZvduopPW/GQyyG84sMrPnTe1TSmk6QNsqKZWY3hFR8y69TMudFZp6zEAMe1SNlh2%2bwml8Pqk3ZtxYPOubA5F1L16QbFfCvosVW/51TQt%2bx2LNi4Iqmv4HinEwEKFFhgZDuQF8ySPMmUQ9F6CqlUKrBu0rqpVKrtFCKLfnTONXazvPT22cqfbK28c2HzT5/TV3zyHKNImY%2b%2bJJz8o43qO%2ber75wv3F6pvFWbfGVWNkkpcqxqxv70C5kjL2Rn7pw684OrYzfL8iLbNmGM1AZP3CzVvn/lyrsvz79Vm35tYfGtrek7VcvTbJE0ZHHkueGhPz61%2bsNrV%2b6eXj9pY2d1ut4I2VpkFQUW3IGiwLXmKdtsjOd5BEH0en2j7%2brvm0ajcTgcAJF1NWUMkhQhF8wyEUaao5szxpaUsWWUaBNo40IQKlikObo1S0lztKxgbh4lWlLG5gwJ5lmpQMNFq27O15ajWnNU0wld67RJUeBkAuPeSKrKdmmOVgispMQQA3hZhZZRzSyum9cTczr9PGEoaTQLSk3CiQFZsjVDtuygNWMCpvV0Mejz%2bWRSmVKphHeYUqkEQZBhGKDn2SPuWjJwpt9b6/Vu9Xm3en1bfb4z/b5an3dD9LhPJxo/if6tPu8Z0e%2brieeeWlL01HrdtR7xcquX39wfPXegcenYjG/HrPV6zvZ3LCVTY/HUeGJqLD452j01Fp8a654aT2RGE0NCwn2mz3//EQ38W/2uWs/AuZGx0bGurq5kMtmzw5LJZDweP3z4MOA604POOPF5r3bO8yDzD3m%2b2I/PeZFZh38x6T/dj5x04PNe/PO3aSoe5fIjgJc9yOKjA6pnHYGFZG%2byl6Ioi8XC7TCLxcIwTCQSAciVsGSalApMW45%2bGKnANJKqcdLg0XfmGEmWpIsheikqyRgfDiimX5Z6JNIvCNiUNXKFaDgYUkAKjUaDoihy31AUVSqVHMcB9Fq0NUuBBVaeNz8E25wxNk0b2nJUc4ZsSumAFN6U1j/qTjOYZ1sFii1H2GqsNWf6goBfATDPtggmaykmViG1OHdoDF6Nf6/RaBAEEavQFwkAC2xzhoxfOrJ498zQ9ckjL2YPfSedenXuwPMTYh/NM9%2bYAD7Ky0EwEol0d3czDONwOGiaNplMXyKgwf5r4wt3t/quPHPkxWz29cXFu1vF763CJatM%2bOYEtPOx5ubmTCZTqVQuXbp0/fr1q1evDg0NKRQKsYz%2bHgFiWZzCgZSuedrYlCaAKRyY0gKT2rYc/c2mUBSGYZZl7Xa71Wq11Y0gCLVa/eg3IA4iRbGQcyvtga0BbNaFz3mNiyFs1s2uxGxrXbo5rzjo5MWx5hvqAypVI%2bk/MwzDHp1CMoFpmjY0pfVASnfoD9Ojt8qx80PHXhKyry%2bGtganX6vUvv8Hx14WpAIDpAlA7NDM1y0gHBKrEIpqEOTBKmSxWD4nQCYwcMl68PnJEzeL%2b66OTr%2b%2b0PPcscSlowevT43fOjl2q9x%2b4dDRF3Njt8rdF58%2b9lL%2bwLUJZcnW6A9fkwBLKRbv7qEoo8Vi5jjmMywWM8OYgsHQgwKgoiVy9sC%2ba2PBrX2J5456Nnv9tf7QmcH2C091XDjkXE/w54a6nh12rfckLh3lzw2JyZb/ugRIsiZPhf/pT4beeCN4%2bzZ/%2b3b0zTdF6if8nTuhO3cGAHI1LMmQ0jzTJtB1KEDMH23TtB5I4c0ZommaAKb1ojOta8rUsyutA6YN9aPufitxpJPkSKYUYqpRSda4I%2bBjIsszQIrkN0NvvGbRaGQ0rTSZYJKEKAo2mSCKUhoM4Pw8AbjWE2jegZc92pK7AV726Mpe8Vjy4GUPXnok4m14aUerkgcpOrxzCe9aEinYdwZ8PPCyR5F19J%2bN33jZLZUhOp0BaGpeX69dOH8RaGrBcYNSqSmXzUDy/FH3Ytxf7fUtJ3eDf7nXtRTvXz/af3bEtRj3L%2b86YDVpnYuPXzty66ZboUBUahUf4z/%2b%2bONPP/kk3t0NwzCKamZmaIBYCwJZQ0uBas6bdkNLngIEg6kUMFXDQI7YfcDWAgWkDZHNwM0bTghCYRhaWlz6n//673v/%2b38b6%2bsQBG0LYNb4tiytKHBgnt0NijzXJtBcOcpV29ty1O4DQgUOSNOdp6M3bzhBUI3jmF6v//u//bt//vWvjUYjhmFqNSoK%2bP1Tia9UNJ5sFVIUWCBNdZyOiAIUakyrwXH8V//wq48%2b%2boggCFSDIsi3RMBLL7qlUhRFcY1G//57f/nzD/5aqzWo1VoYxkol814X0L4Zuf0mRxBSiwVmWcjtxj0eHctCLAvTtHxpSb93BYB5VpIzuef5O98b3tiI1rY6a7WOHXRubcUuX96/pwW0CCZLMRaNJDHMZDBwBMGCoEahwAiCNRg4HKddrvBeF2AVZ6MhpRLSaBCtVlOtLlUqcxiGajSIWq20WrlvhYBoYzpNkuRv/u03H374IUEQjU/kL/8i21MCEAT5pw//8Zd/80uVSoVh2P2VuQcnc4/JE5/MSQWmKWfkitGGABRFDx44%2bPG//8dH//Kv%2bwb2NT4JRAGuU3FUsOMlt7bo2g140Y0U7N7ZuHe1B8nbnkhAdcEWmO2JRqIIgoAguLy8fK9uMzMzcrkcwzBRQPLiMXc14V/r86327gb/ap9rJdG/eaz/woirmvCv7j5gr2slsW9jhI/yjf0BGIZ%2b9sEH7/3FeyAob2wXiAIMK0Fg2tAqUC05025ozVFA1kAVA9RyGMgQTyggYS6Ew6EwDMNarVYul3d2dvJRHgRBDMNUKpX4SSlO5nK0osjtXBl%2bDBQFri1PczNRbqW9TahP5nYdsDVP2cqxeFc3QRB03fR6PaHX0zRNUZTRaAwEAt%2bCKjR6YrSxuJtMJvv6%2bnrry7y/W9zd%2bwLCoTAEQRiGwTAslUphGIYgCEGQ7RTa8wL4aCSqRtQoivr9/o2NjY6OjlA43FhaFLeY9ryAGB/lIQiyWC2/%2bKtf3Lt377f/%2bdtPP/n08KHDUqn0S5YW94iAaH0gwzBsYGDgle9%2bd2JiYmRkxGq1KpXKb8cbiEaiyvo4oFAoJBJJc3NzS0vL7zb59r4APsrL5fL2jo6lpaXh4eGhoaFSqRQIBCAIEt8AsxZty1L1xVrzblDk2TaB4soRrhpry5meSMBWwWQr8TFeHLna29vX1tbW19dn69bV1bW9vE6uhSVZUlpg2vL0bpDmGYlA0qUQXY1KcsYnErBJMLKlaKi%2bxYTWDYIgtVoNwzCCINtbTOGVATLjY/IhWgjuBkYIGbM%2b/mQ/Xx00Zp9MQEPO235yX39/v9lsbmwO2O12m81mrxvHcbFY7P8BoIycYoUmASMAAAAASUVORK5CYII=' /%3e%3c/svg%3e)
Display Checklist