vDrive Control
Customize population, swath control, and more.
Updated June 22, 2020
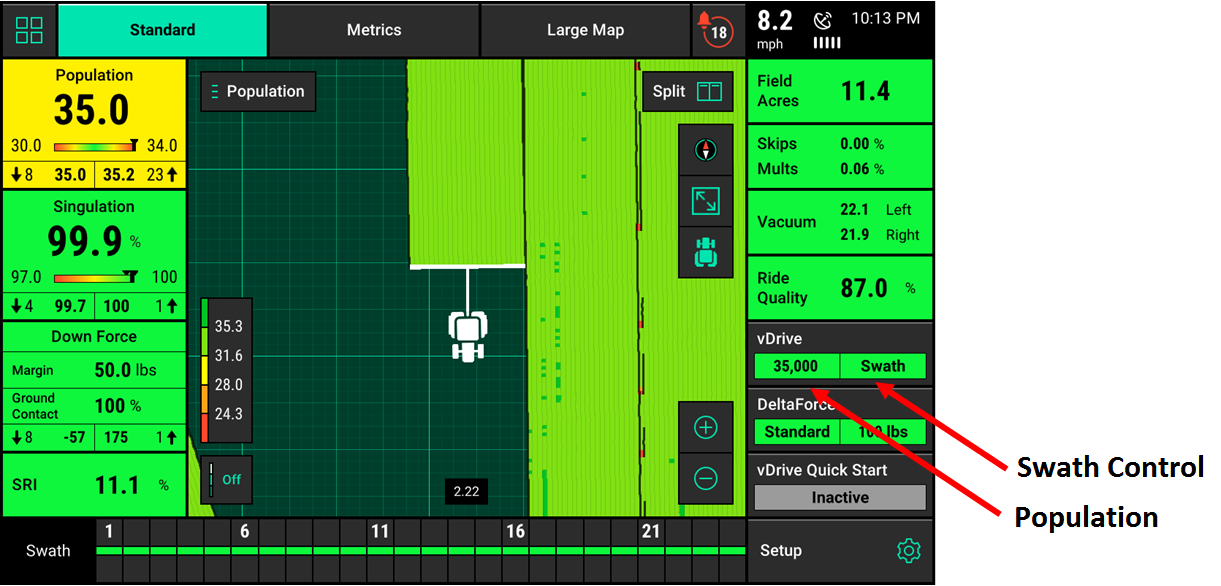
Control button
The vDrive control button is located on the right-hand side of the home screen. This button will display the status of the two functions of vDrive: population and swath control.
Control button population legend
| Message | Meaning |
|---|---|
| Disabled | The vDrive system is disabled. Enable it under the control screen to plant. |
| Variable | A seeding prescription is assigned and vDrive is in variable rate mode. |
| Multiple | vDrive is in manual mode and there are multiple rate sections configured. |
| Rate off | You are unable to plant because the master plant switch is in the down position. |
| [Number displayed] | The vDrive system is in manual mode with only a single rate section. The number displayed is the commanded manual population rate for that rate section. |
| Green | The system is functional and has a commanded rate. |
| Yellow | There is a prescription assigned to the active field, but the system is set to plant a manual rate. |
| Red | The system is unable to plant. |
Control button swath legend
| Message | Meaning |
|---|---|
| Disabled | The vDrive system is disabled. Enable it under the control screen to plant. |
| Green | Swath control is enabled and set to automatic mode. |
| Yellow | Swath control is enabled and set to manual mode. |
| Red | Swath control is disabled due to the swath switch being in the off position on the cab control module (CCM). The planter may also be swathed off due to coverage. |
Enable vDrive
Enable the control screen before planting to use the vDrive system.
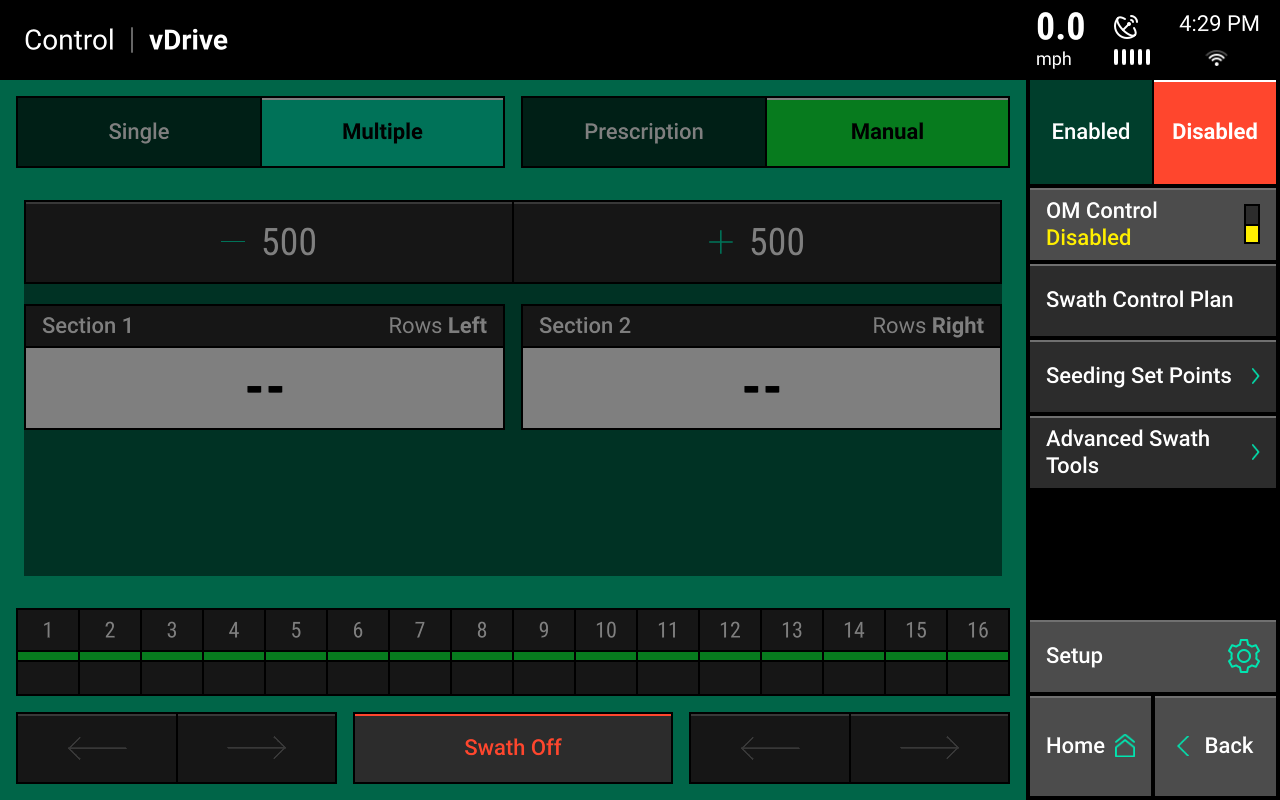
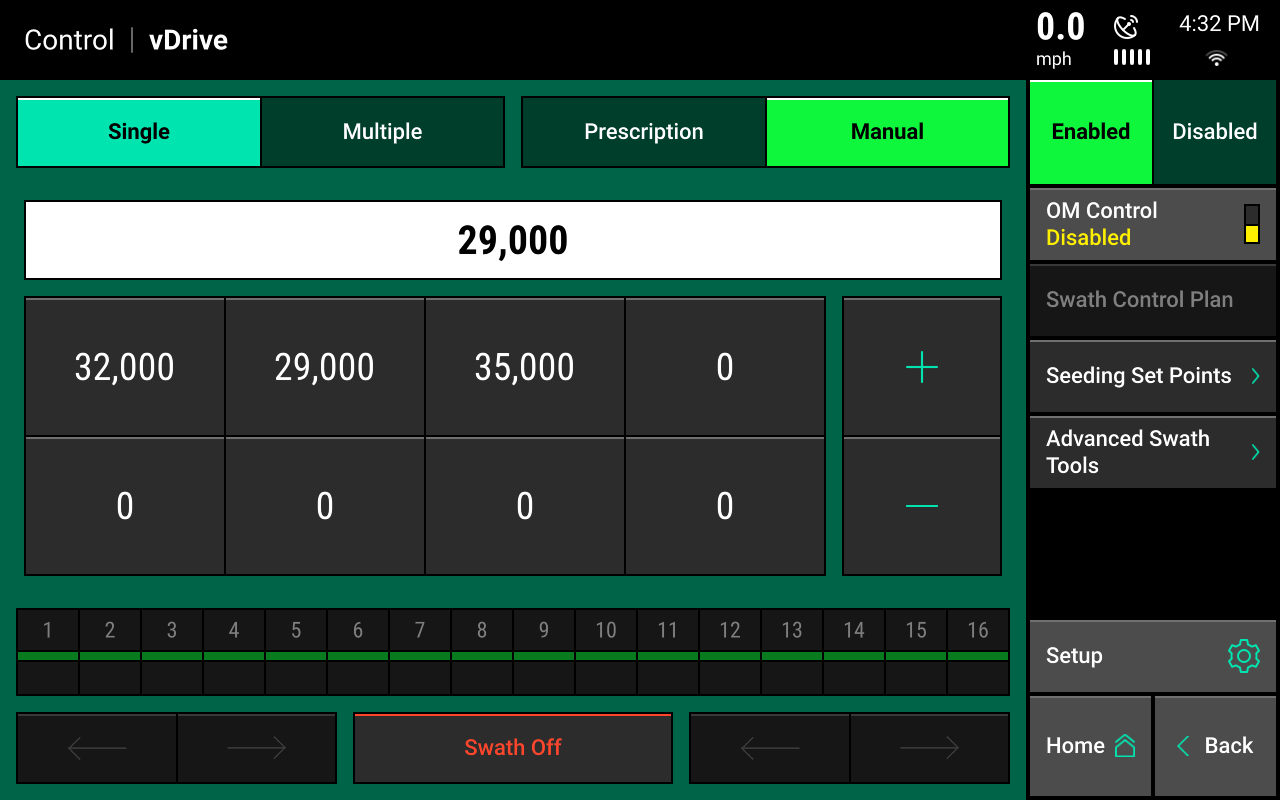
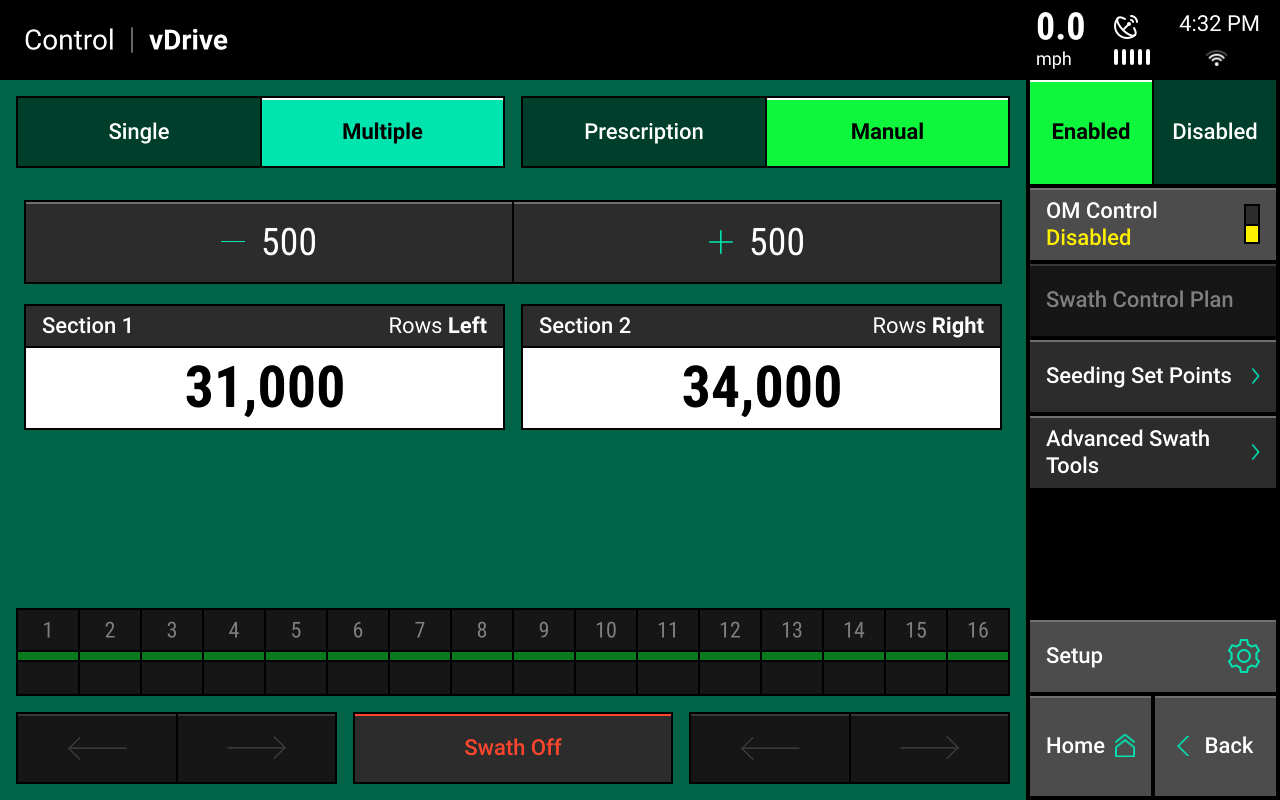
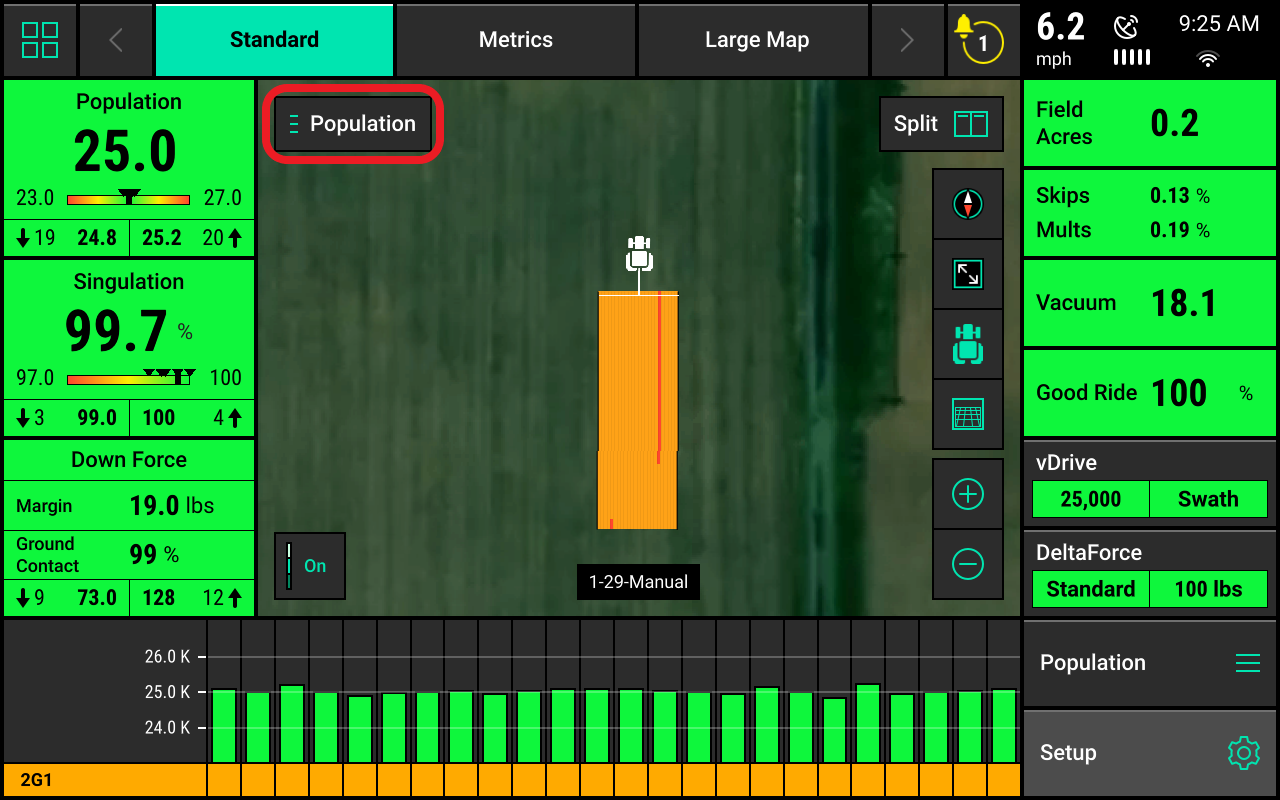
Population control
Access the control screen by pressing vDrive. Manually assign or adjust the seeding population rate by selecting manual. Choose between single or multiple. depending upon the rate you configured during vDrive setup.
Single
This assigns the same population rate to all rows:
- Select a preset population from the list of population set points displayed on-screen. You can configure this list by using the edit set points button on the right-hand side of the screen.
- Use the + or - buttons to increase the rate by 500 seeds or the amount that quick adjust population was set at in the crops setup.
- Manually enter a rate by tapping on the white box displaying the current population.
Multiple
This assigns a different population to each rate section configured during vDrive setup:
- Use the + and - buttons to adjust the populations up or down the same amount for each rate section.
- Tap on each population to manually enter a new population for each rate section.
The + and - buttons will adjust by the amount set for the quick adjust population in the crops menu.
Variable mode in active field
If a seeding prescription is assigned to the active field, variable mode will be the default setting. This means the system will control to the seeding prescription.
Move from variable to manual:
- Select manual at the top of the screen. This ignores the assigned seeding prescription and continues to plant at the assigned manual rate.
- Manual will turn yellow on both the vDrive control page and home screen if a manual rate is selected when there is also a seeding prescription assigned to the active field.
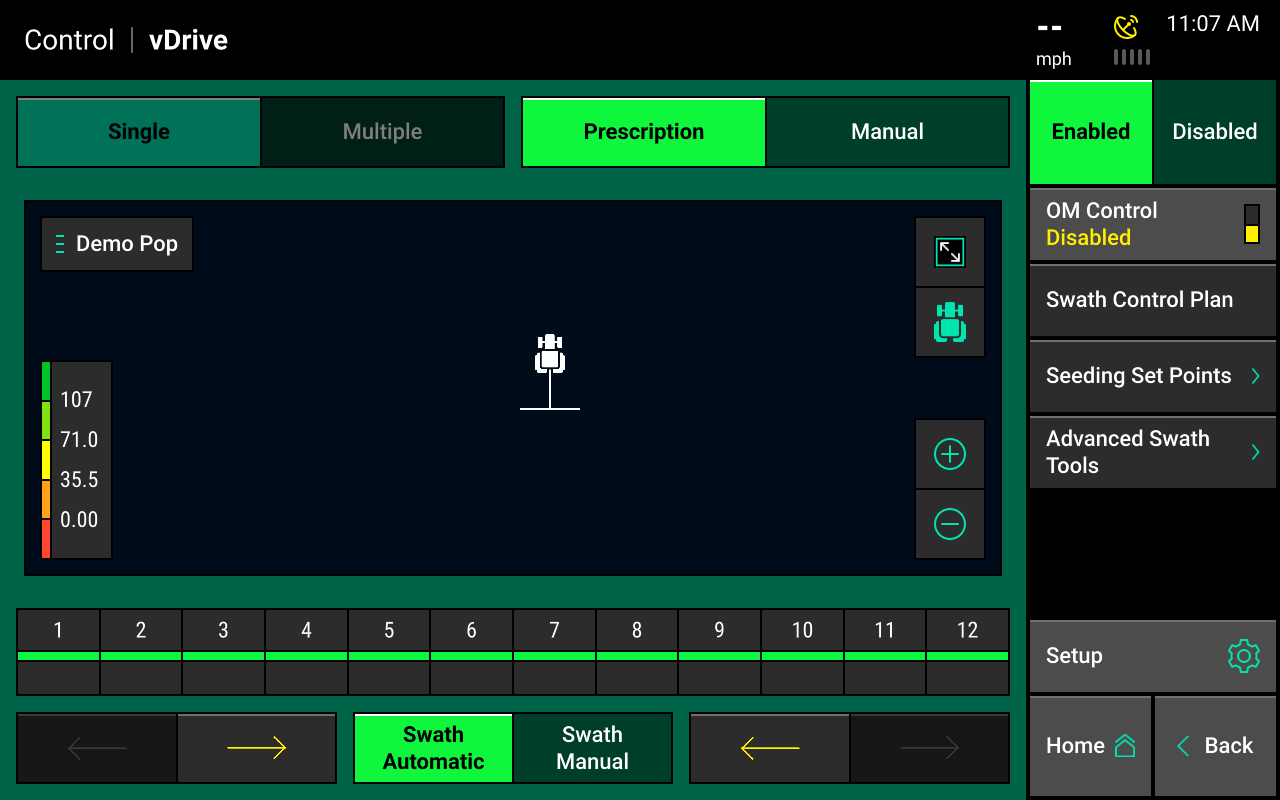
Swath control
The vDrive control screen includes controls for swath. If the swath control switch on the CCM is in the up position, use the vDrive control screen to configure automatic swath settings. Switch back and forth between manual and automatic swath control mode.
Swath control plan
When swath automatic is selected, press swath control plan to configure what the vDrive motors will switch to. Items in the swath control plan that are outlines and in bold are active components of the swath control plan. The planter will automatically swath on and off to these components while planting. The system will control to the options highlighted in green.
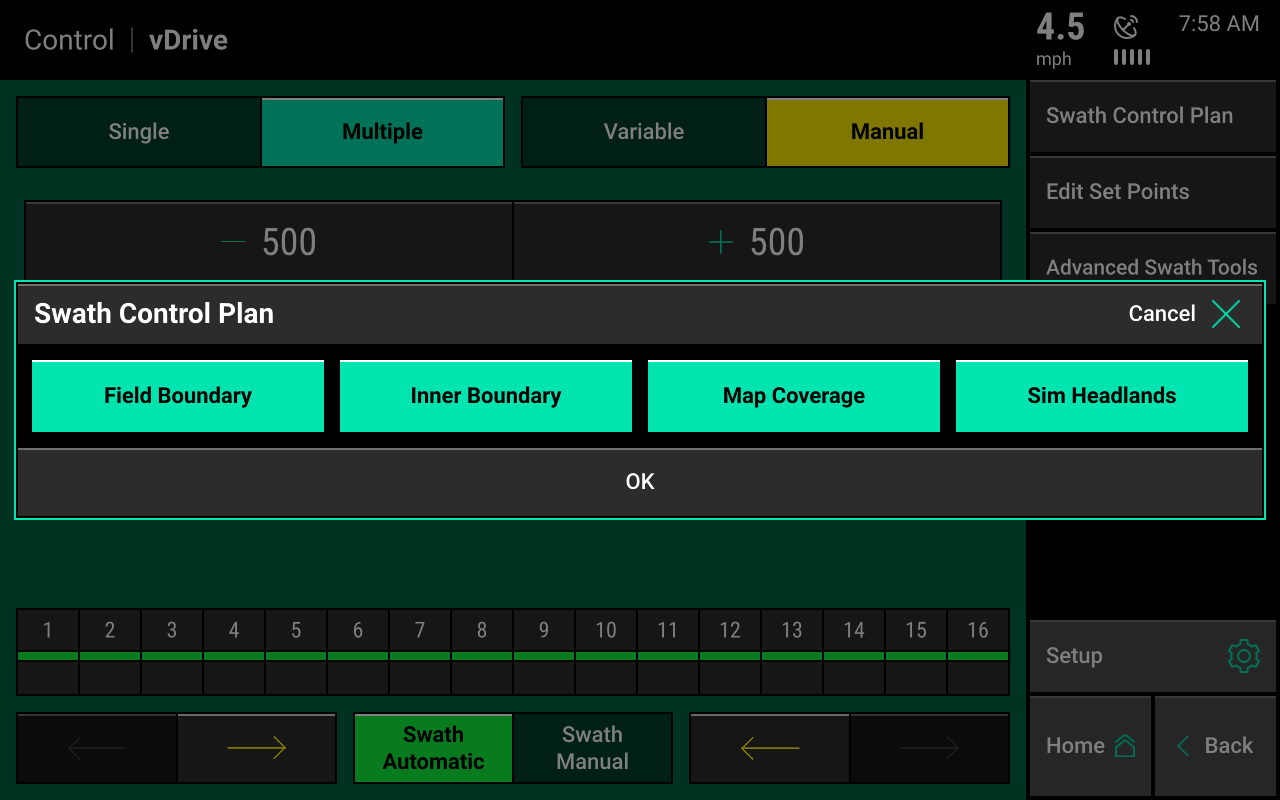
Field boundary
This swaths rows off if they go outside of the field boundary that has been assigned to the active field.
Inner boundary
This swaths rows off if they go inside of an inner boundary that has been assigned to the active field as part of a boundary file.
Map coverage
This swaths rows off that cross into an area of the field that has already been planted.
Simulated headlands
This swaths rows off to an offset from the field boundary that allow headlands to be planted last. Simulated headlands must be configured before the system will use them for swath control.
Switch between automatic and manual swath control
Switch between automatic and manual swath control at the bottom of the vDrive control page.
Swath on/off:
- Press the arrows to swath off from either side of the planter
- Press, hold, or swipe any of the boxes representing rows on the planter. Boxes that are yellow are swathed off.
Manually control from home screen
Swath control can also be manually controlled from the home screen. The manual control can be used instead of the dashboard mini chart at the bottom of the home screen.
- Add the swath control bar when editing the home screen.
- Select swath in the dashboard mini chart options.
- Press and hold a finger on top of a box.
- When it turns yellow, continue to drag the finger across all rows to swath off. A yellow box indicates the row is swathed off.
- Press reset to switch back to automatic mode.
See the 20|20 operator's guide for more information on editing the home screen.
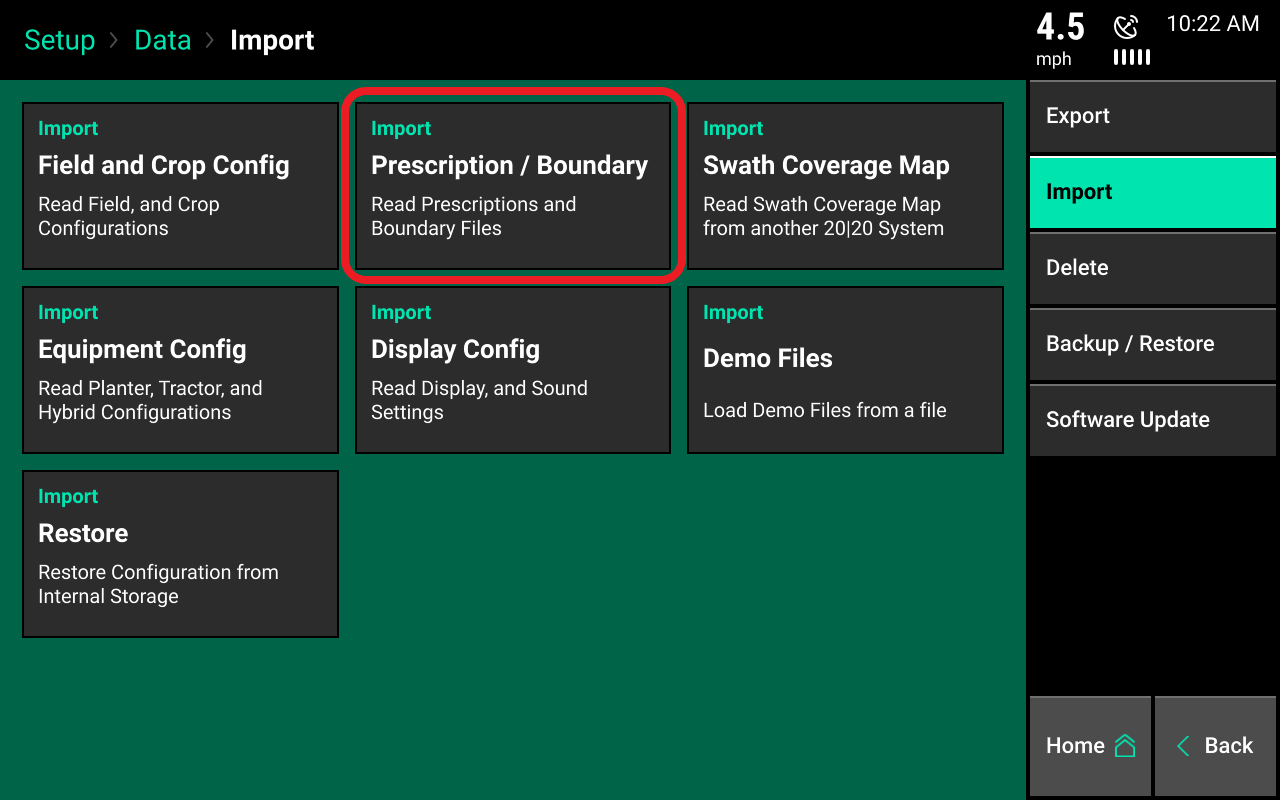
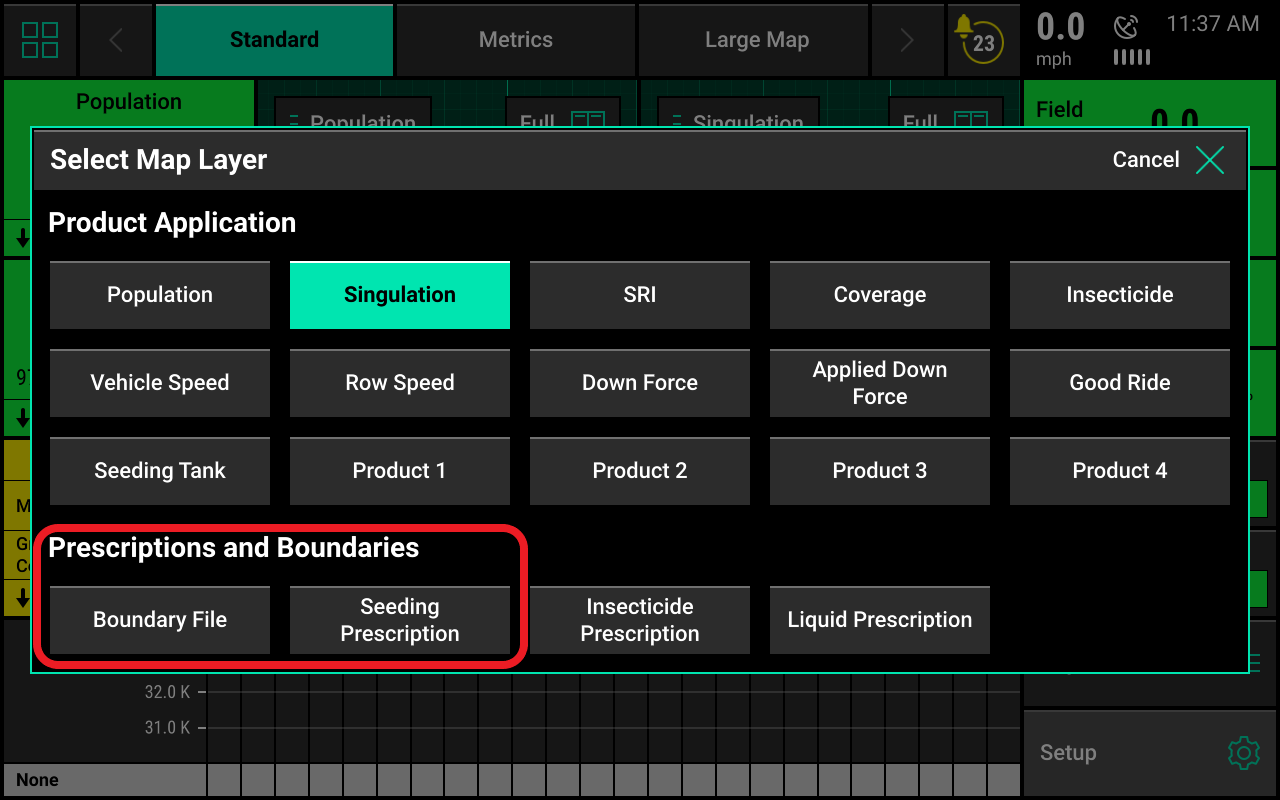
Prescriptions and boundaries
Import prescriptions and boundary files onto the display.
- Both file types must be in the form of a shape and include, at minimum, the .shp, .shx, and .dbf file extensions.
- Load all files on the root drive of the USB drive or in a folder titled sendto2020.
- Insert the USB drive into the side of the display.
- Select setup, then data, then import, and prescription/boundary.
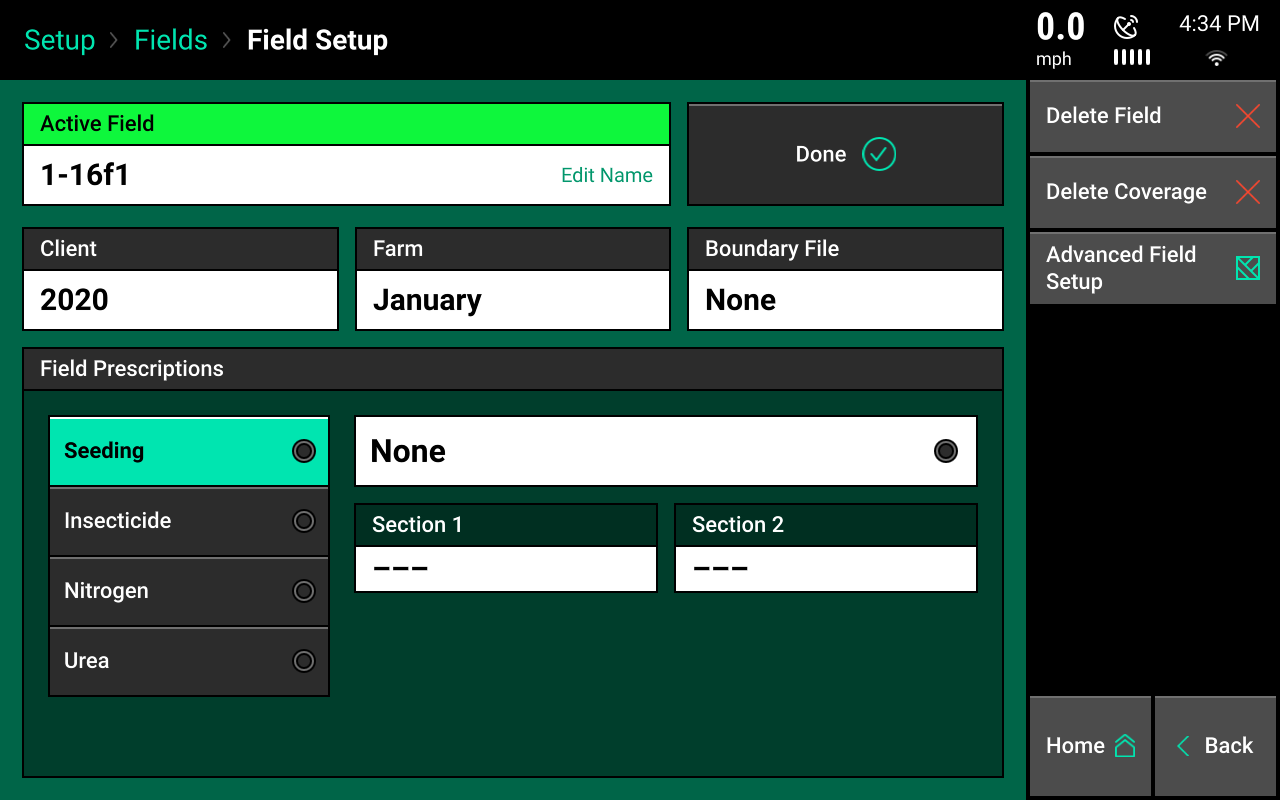
Assigning prescriptions and boundaries to a field name
Once prescriptions/boundaries have been imported into the display, they must then be assigned to the appropriate field names.
Assign a field:
- Select setup, then fields.
- Select either the active field or another field name (you may need to select a different client or farm name to locate the field needed.)
- The field setup page has options to assign both a boundary and prescription.
A field can have either a boundary or a seeding prescription; both a boundary and seeding prescription; or neither assigned to it. A boundary file is only used for swathing off rows on the planter if they go outside the boundary. A boundary file can have both exterior and interior zones. The option to assign a prescription will only be available if vDrive is configured as the drive type and rate section have been configured.
Boundary
Assign a boundary file to the selected field:
- Press the boundary file button. This will display all shape files that have been imported into the display.
- Ensure the appropriate boundary file is selected.
- After selecting the boundary file name, an attribute can be selected if necessary.
Boundary files that have been recorded by the display can also be assigned to the field using the same process.
Seeding prescription
Assign a seeding prescription to the selected field:
- Press the seeding prescription button. This will display all shape files that have been imported into the display.
- Choose the appropriate prescription for the field name.
- After selecting the prescription name, an attribute must be selected for each rate section that has been set up for the planter. An attribute is based on a defined product and contains a single defined rate for each management zone and is defined/named during the creation of the prescription.
- Select a different attribute for each rate section if needed. This allows each rate section to be controlled by a different attribute/seeding rate. The same attribute can be selected for each rate section.
- The name of the prescription assigned to the field will be displayed in the seeding prescription box while the attribute names assigned to rate sections will be displayed in the attribute box.
Prescription and boundary processing modes
Under the advanced field setup screen, there is an option to adjust the prescription polygon processing mode.
While this mode can be adjusted, the standard setting is the default and most commonly used.
Changing the mode to all exterior adjusts the way the monitor reads the polygons that create zones. They are then changed so the display reads all the zones as exterior polygons, ignoring interior polygons.
This polygon processing mode should only be changed if there are issues with the display reading the prescription or boundary file.
Viewing the boundary and prescription
Boundary and prescription files that have been assigned to a field can be viewed on the home screen for the active field:
- Select the current map type displayed at the top of the page to see a list of all available map types.
- Scroll to the bottom of the list.
- Locate the two map types called boundary file and seeding prescription.
- Select these map types to display the seeding prescription map or boundary map assigned to the active field on the home screen.
vDrive quick start
Spin the meters while stopped with the vDrive quick start button, allowing you to start moving while the meters are already spinning, helping to avoid any skips in the field:
- Press the button once to begin a countdown.
- When the countdown reaches zero, the meters will begin to spin.
- The meters will spin at a simulated speed of 3 mph and will continue to spin for seven seconds or until the speed of the planter is greater than 3 mph.
- The default time when the button is pressed is two seconds until the motors begin to spin.
- Adjust the time, if needed, in the quick start delay located in the vDrive advanced setup page.
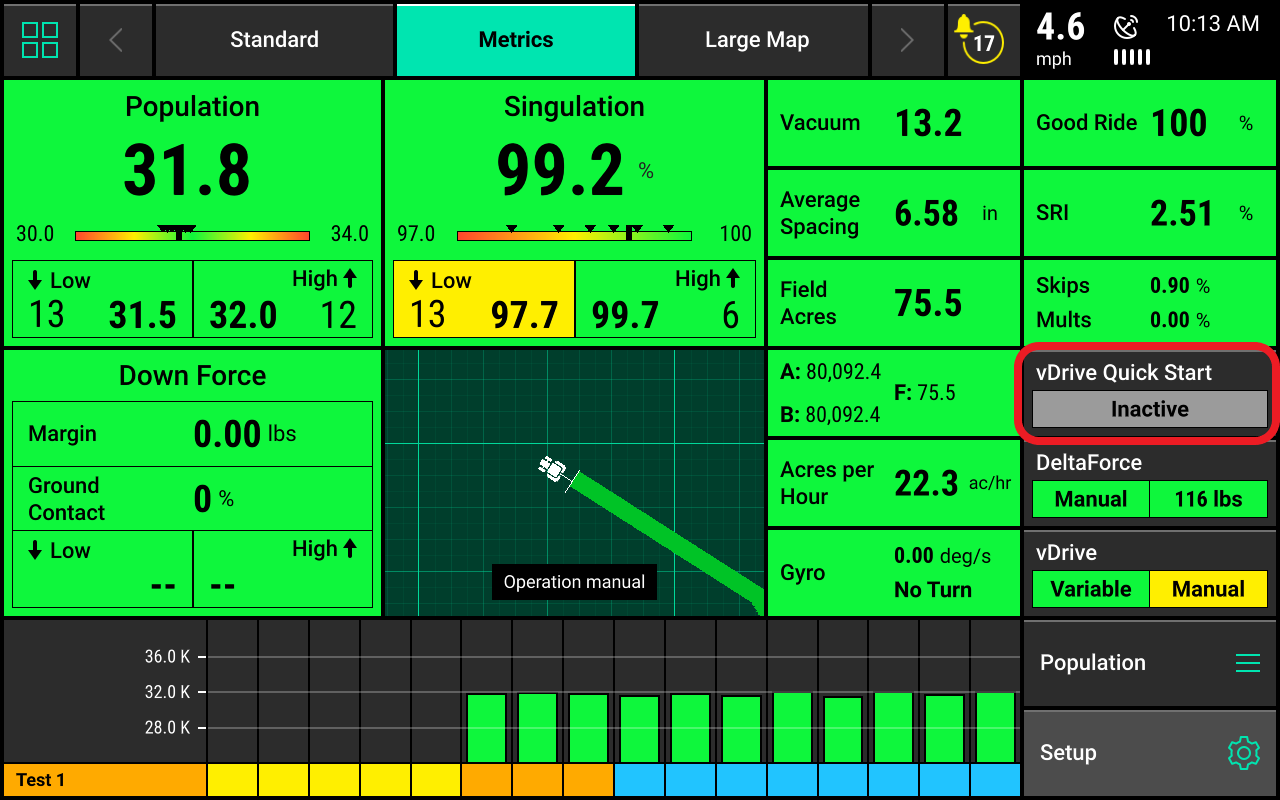
The quick start button will be white and say inactive when not in use. Press the button; it will turn yellow and begin to countdown to zero. When it changes to say active, flashing between green and yellow, the meters will begin to spin.
The vDrive quick start button must be added to the home screen before it can be used. Add the quick start button when editing the home page.
Advanced swath tools
Access advanced swath tools by pressing the advanced swath control button on the vDrive control screen. These tools should only be used with RTK-quality GPS to ensure accurate performance. Using poorer-quality GPS can result in drifting boundaries and inaccurate clutch control.

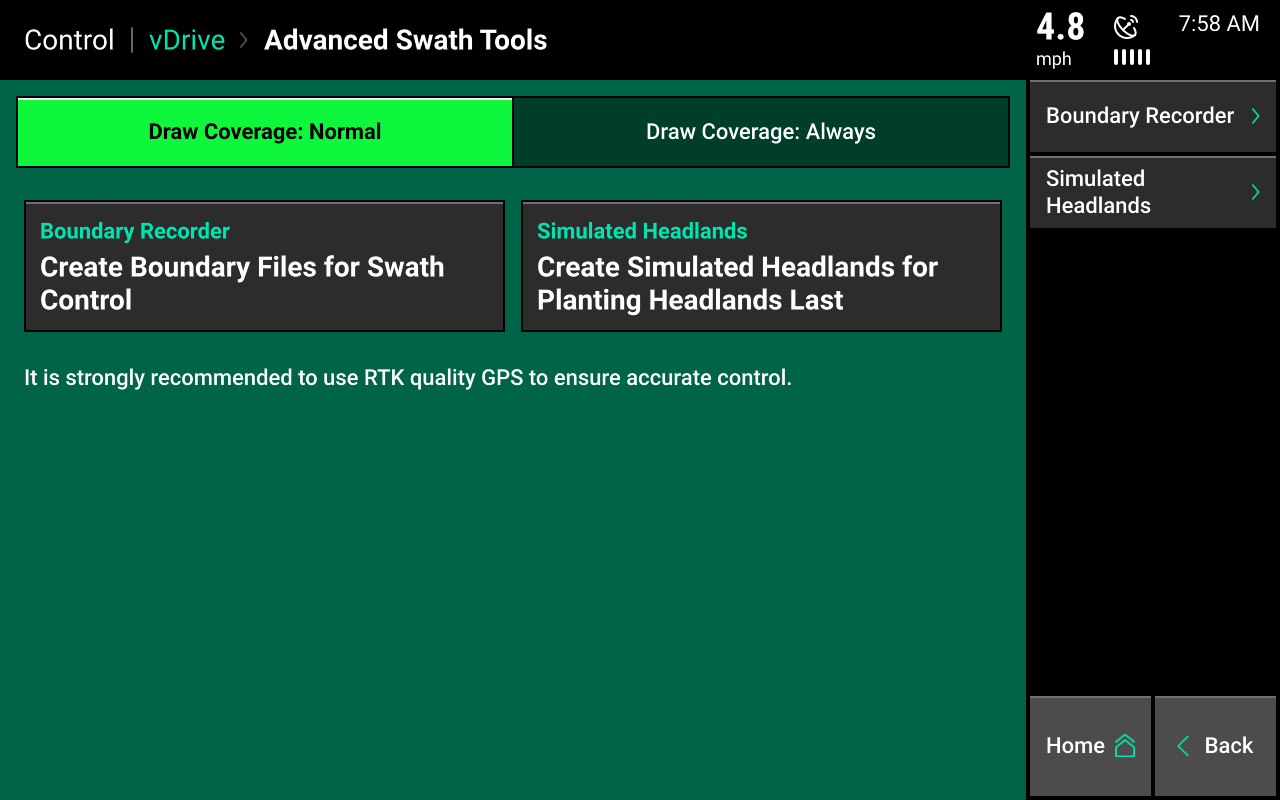
Boundary recorder
Pressing the boundary recorder button takes you to the record swath boundaries screen. The boundaries that are recorded are for swath control only.
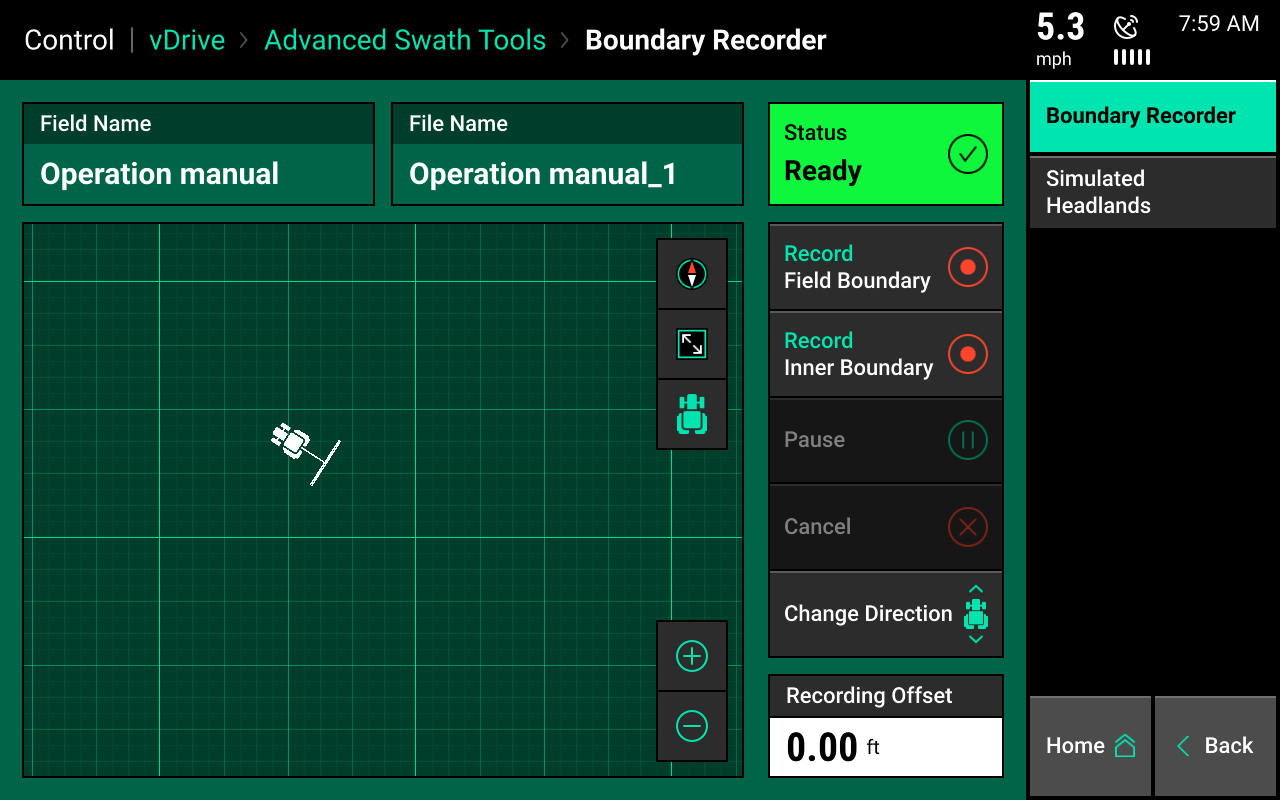
Record field boundary
Press this to start recording an outer field boundary. Once the recorder has started, this button will change to end field boundary. Pressing end field boundary will snap a line between the beginning and end locations of the recording.
Record inner boundary
Press this to start recording an inner field boundary. Once the recorder has started, this button will change to end inner boundary. Pressing end field boundary will snap a line between the beginning and end locations of the recording.
Pause/resume
Use the pause/resume button to drive around an area while not drawing a boundary. The system will snap a line between the pause and resume locations.
Cancel
Pressing cancel will discard all boundary drawing and editing that has been accomplished.
Change direction
Change direction will flip the planter 180 degrees.
Recording offset
Use the recording offset to offset the boundary draw line from the center of the tractor.
Simulated headlands
Press the simulated headlands button on the advanced swath tools page to navigate to the simulated headlands screen. This feature offsets the field boundary for planting them last.
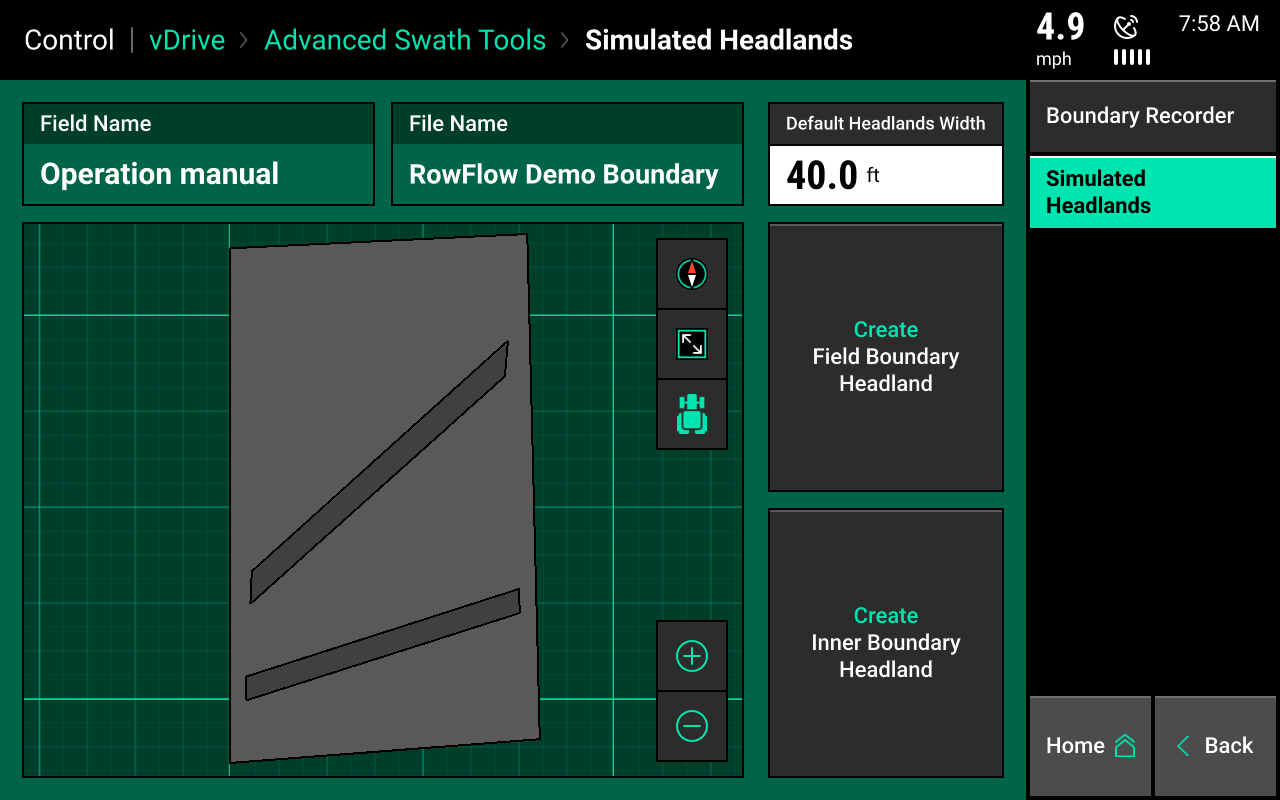
Default headlands width
The default headland width designates the width of the inner and field boundary simulated headland.
Create field boundary headland
Select create field boundary headland to simulate a boundary around the field boundary.
Create inner boundary headland
Select create inner boundary headland to simulate a boundary around the inner boundary sections of the field.