Prescriptions
Prescribe implement behavior using maps that you can adjust any time
Updated September 13, 2021
Your fields are not uniform, and neither is your treatment of them. By adding prescriptions to your 20|20 system, you can let it know which parts of your field need to be handled differently.
Keep reading to learn how to
- Upload prescriptions to your 20|20 device
- Assign them to specific fields
- Use them to control your implement
- Change them to suit your needs
- Save and export them for later re-use
- Delete them when they’re no longer needed
Import Prescriptions onto Your 20|20
If you have external prescriptions that you'd like to use on your 20|20 system, you can import them with a USB drive.
Before you begin, make sure that each prescription is saved on your USB drive in either .2020 format or as a set of three shapefile-based files (.shp, .dbf, and .shx).
All files must be saved at the top level of the USB drive or in a folder called SendTo2020. If they are hidden in other folders, the 20|20 will not be able to find them.
Once you're ready,
- Insert the USB drive into the port on the left side of your 20|20 monitor.
-
Navigate to the Data page.
- From the Home screen, press Setup (bottom right).
- Then press Data (bottom right).
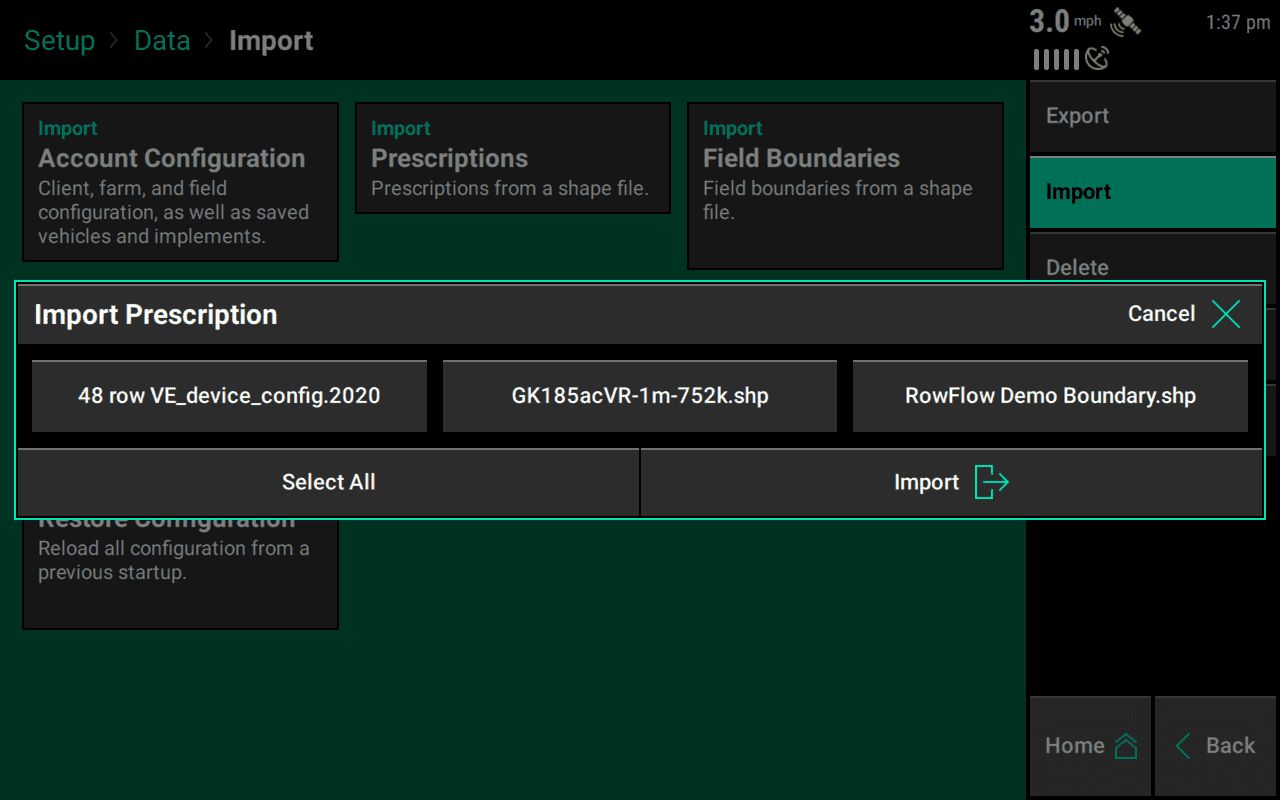
- Press Import (top right) and then Prescriptions (top center).
- Select which system the prescription applies to: Seeding, Liquid, Granular, or Depth.
-
A popup will appear, listing available files. Select which ones to import by tapping on them, then press Import.
Screen for selecting which files to import
' width='1280' height='800' xlink:href='data:image/png%3bbase64%2ciVBORw0KGgoAAAANSUhEUgAAAEAAAAAoCAYAAABOzvzpAAAACXBIWXMAAA7EAAAOxAGVKw4bAAAMNUlEQVRogd1a%2bVMbxxJegTkldK2k3dW12tVeuleSAYG4bG5x2RgwYDB2Kk7lJZXEyXPy6v3136vulWQZYxvbeUXFP3w1sz09PT29Mz09vSsIgoBvBeFIBFouB1mSMDIyglAwiEQi8Q7P6OgopqamMDExwXWBGyJTEMQQhEgAQmACPqJNjkOIBj26f5w7R6IicrkcC81kMhDF6J1PehChsGeAeCzGBiD9bNuGz%2bfr84yPjyMUCiEajcLvnxwwgBSFIEV4wmyAiTEIsRAERYQvFODOUTEGx7ZgWzZMw0AkHL7zSQ8iEonANE3kVBXJZJLf9Kf7Db21DsMngGlUDtKHh24WQHTip/JLMdTF18jgFySiUCggn89DURQEg0GmDw0NfRCCUNMhVDUIFa1b5t7WB9Gl%2bbr8vfJte%2b5d9Pp8DIPjvidjoP02cqoaxmUR0XCYJx4OhxGLxSDLMiRJeg9EF0URglDPI5CSEEkrCKdkhNMKIop0O8gJTKUkDDsZhJOeDEZKvoE/gbB8DUoC0UQco/kUxvQUokn5VjoMyoh0S6GYhT%2broGDZqNZqqFSr0DSNjZCQEogn3kVCkhCJkg%2br6QgrEqbKJgIVC0FTZQchRiKIRUWIkShEfvZo0QEkxBgrMGKkEFXT3N9fMRHOJCGGwohynyjzxsUYpHgCiXgcUjzOZSKegByNYTyXxKSqIGLrCFQtTBV0NowYjvTH9eDJG5TBZSwOXyGDyWQCqpyEbRgwchqSkoQ48UdFxK8hIYqIBEOeAWIpBdVqFU6piEKxiHK5zCiVSiiWSqjX63DrdW6rVitoNBqoVCrIptMIS3EMGUkYpoX6/SaqrgunUEDNraHmuqjVaihXKlDVLMRYDPF4vI8YTUCMYVxT4NdScKs11JoNNO83UecxyigWi305LKtU4iUciw/ISsThs9Pwm1kotoGYqSFu6pBsA7JjQnaM96AULIi5jGcAMaXApWVT8SZOEy4Vi3CcgjdouYRWaw6u66JSLrOxiK9ngGEzBTWXQ7FIxnLZaGQkUpyWI/Hn8zpPWFZkSLIESZYhJxXIsTjGcp4BbMPi8Vy3xsanft7EXdaJnukF9Pd1t4xLCQxpMoROC0N/XWDo91MM/XGGoddPMfT7DSD6m3P4zjcgCK6OqCLBsSxYlg01m4VpWqywqubYo9LRQm8ilUryGUrHHzkZOm9pbw8bKajpDAq2jbymo2BZKFgOTF2Hoekw9TysvMFtJceBW6nCNm1UikWosoIxVWYDmJoOy7JgEkyD647jcF3XddaFQLEIvSAybl7XEUvEMawpEDqzEK62IXTmIOzOQ3jRgfDvMwivn0L4fQCvTyD8eQ6hb4CkDNuy%2bK3S8qXJ0nFi0F7qghShoIIUsG2H31Be0xBKxDBcUBFIS5jKKAhmk9eg9EHtzKMmMZWREcjICKYk3DPT7APKThF5I8/L%2bkPem0CBGKFXpxUwTCtgdw7Cfy8h/HwI4ddjCG/OIPx1/j5o8sT3fKu3AmQUbIcNQHub3jhN2LFt3gbsC8gojsOGSSWTHGgoksTOSnDzEBoGhAaVedDJ0q/fhPfaDfbgSdoWisJ7%2brrX/ihoC1hpjNQMBBbqmGy7DH/bReAmzLsILDYwUbM8A4SkONLpNIe3mWwGqW49lUohk80im80inUl7PNkM72UKOuiICcdj3jlMk3L1L0NdRyCVgBSKeF47In4mohDICcoxZMIi0mKcoYSjkIJhyMEwl4OQQxGIAYoUmyaGGiaGXAPDdQNDBHqjVZ3rTHN7yHN5r2Eyvcfvm3W%2bGqNlHX5LxaT9%2bfDbKny0ivQMKs0GGvMtTC%2b2YZQK7OAlNcNIZNNIZFIeshlE6OWNrNRhrS5AazWRmXGRazWQb8%2bg8HAB%2bvx9ZGfr0OaayM01oben%2b3V7eQ72yjzs5XnYS3NfDWtlHtaDLwfp4yy2UBgAPy/NId9qQp9pwJyf5mdnoQV7dQFhR4fgmy1gq7ODX3/8CW9%2b/wPfX13hx%2b9f4fUvv%2bHnH37AL//6CS8uX%2bDNb7/hz9ev8Z83f%2bHq/Ay1Uhllp4BKofj3geQ5vbJww/NNbV1aV0a5i0qxBMe00dnq4NXLlzg/PcXZ4SGKrWkYnQco1aoIGyqEe%2b0y7s/PodPZwfOrK%2bzu7mBzaxPthQWsra/jydERtnd28PTpUzw%2bfIxHjw%2bxubmBUrnM5/1N%2bFjbl%2bJzZZLjpsCNAqrFxUW0FxfQmp2FU6/Bnm2i2HARMXPeCpgITmF8bIzv0HRfpmRBIBDoJw2oHBsb47bx8TFMTExyPECgi8d1%2bP1%2bvooO0gZ5B/v26j3%2b3vMgP7WRzJvkDfJTbHKd3tOHQHMKTk0hNOmHPxKGP5eCQEcQHWV1itqq1f6RR2c%2blUSj0ukegb0YgdqJRtFfL2ymI5QiN1KELiIcOVYq3E79iIfQk01vlWQRemNTnQKg3tgkg2SRTJJN8oiPeYifjmungGK3n6eTp38fzOOB%2blPUS3eY0RRli5omolKCY2xaLi9efoeDg308efIER8fHODk5xv7BAS4uLpi2tbWJ7U4H52dnuLy8xONHBzh/doGr55f9EJYSExSt0QRIgZWHq/jh1Svu//z5cxwfH%2bPZxSVOnx5jb28f%2b3u7ODo%2bweXlczw62MfVi5dYXlpkxUkGySIDsKHLZRyfnODk6SkuLy5wcfEMe3t73Pfs7BSPHj3C%2bbNnODo6wunpKW9rknl2do4nTw7ZOBTOR2UJY54BDIiyhHrNZWuvrq7iwYMH2NzYwMrKClZX17C1tcUgn0DlxuYm1tfXsL9/gJ1OB2tr69jYWOdVRDKi0QhHjBS/02CtuTlsbW5iaWkJGxsb7G8ePHyIpcUFLC%2bvYGlpEYuLS9jc3MTa2ioODh5xG024Ua%2bzLDIqyaZVsLy8zHqQfiTv4cOH3Jd1XFtjPTudDra3t7Gzu4vO9jY/E8igpKeoyF0D3LcwGZxCUlE4/Ozf1AZublTvPXvlYD3uhaPd8JUiRPIZdKXmaFFRvNsb3csTiXdkeSFtr0z06ZSooGfqSzJIFsnsyeuN1%2b8To5tl7EadSVavTmCZioLJcBATGdk7BbK6hkw3%2bqOo7zagyfYmTEIJHElmMlBVlXl6zx%2bSS5El4UNjDPYlmb3olMbtj6lmkcmpfDO9jd4sk3iNPAJaGsLoQhXlRveqSVfXWvUDqPWvtnTN7ezuYXdvF6tra%2bjsdLDd2e5nYgievA%2bgOxbtZ0JP7sf5qyhXypibb7MP2tzawub6OirLbdibKyjNz6JaqbyV9TGQY27WPSdIBigRgW54dPHpolx4W78OCjSODo/wkpzW3j4O9w9wuL//eUFPsYiiZTOo/mn%2bEvO2W3M4PznFd1dXOOzsoLjQQv5gHc7CLKqWgwqdRsVPgIKlWhWjyTiEe8suh7j2/DQLIdjtWVjz01za7RkuKay0qa0LtVlFslZEpl5GqlFhUDh9W%2bhzTagzdQbVb9/HRaoxMOb8fWjtaegzdWizDWhUfgL6tItcexr30pKXFI2oaRSqFRRqVYZdKUN3LNjVMuxKCValjEZrBla5hELN48sXHciZNCdBfdMWX2iEaev/jxkbvhmnD3LiDBo/HvJS5KMjEEbvfQIjXjpfqGl8JNCSNw0TtmnC0PMw8nlYpsVZHgoyKGFimSZ0TWceXdOgZbMIx0Rwap2uw3cJykcE%2bUvPZ8LVISYVTjH14mfLMrlOuUCKtshrDmZguKTsTCKBCCdEdE%2bBOiVF7gBkgKYJIez/MgNEFMk7XpIKlGSSszIK1enMTKV4sjdlacgYEWnQAPm7mTwbwPhSA%2bQ5MSBRZiV6A5ge4/T1dVBOP0pb4B9tgHqev8xMaClM6LfHOJVakr/o9Cf%2bjzRAw4Bw3/w63NXkP2QA32euAOHv8sJ3ugJMCKEvOQUad/DW/nYDePWReBj%2b8QlM%2bicxOfkWvSTPIK1HF74JA1DpahDzWTimBcM0%2bdsGxS30xYsuUvRxh2IZolOdkifZbPbbM0CVskxFL3NlFhzkKyX%2b3Jc3DRgF7%2bNPseTFPNlv0QBzM7OYm5/HYrsNp%2bki1arzCtBsC1q5yIlRSszMzszw1fgbM4DKP0jQx1Va4hblAwsOp9TonyZKsTHdsjhVp6rqt2QAHSE1CS2r9j/ncSIlq3IC5XrihSZP9P8BgmGJBTuJDKgAAAAASUVORK5CYII=' /%3e%3c/svg%3e)
Prescription Import - Optional – If you want to use a single prescription file for multiple systems, repeat steps 4 and 5 for each system.
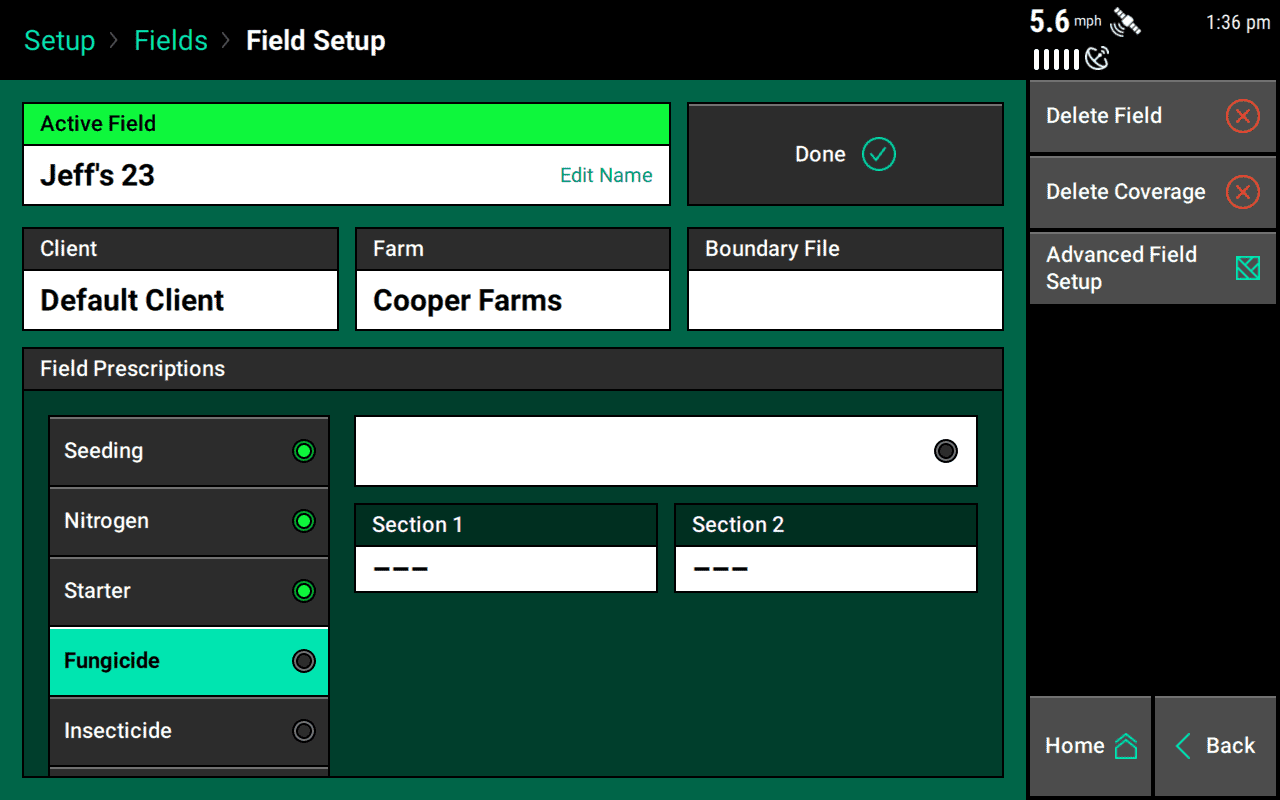
Assign Prescriptions to Specific Fields
Once you have prescriptions imported into your 20|20, you will need to assign each one to its intended field.
-
Navigate to the Fields page.
- From the Home screen, press Setup (bottom right).
- Then press Fields (top right).
- Select the appropriate Client, Farm, and Field for the prescription you want to work with.
- Select which system the prescription will be used for: Seeding, Liquid, Granular, or Depth.
-
Find and select the prescription to use for this field by tapping on the prescription file box to browse existing prescriptions.
' width='1280' height='800' xlink:href='data:image/png%3bbase64%2ciVBORw0KGgoAAAANSUhEUgAAAEAAAAAoCAYAAABOzvzpAAAACXBIWXMAAA7EAAAOxAGVKw4bAAAPmUlEQVRogdWaB3RVVbrHd0ISNCQRQk8gpN3eS9q9yU0lvdyEBAKkkICGJgk1CCpigdCkiyiIDUdH0RnFhqhI08GFCsqAvqWOvrG8eQ%2bd8YkzAvp76%2bx7Q0CQJ0V576z1W98%2b%2b%2bxvn7P/a/d9hBCC/%2b8EBARIq9XpSXO5MOh1hIWFETN4MGaz%2bYy04eHhREVFERkZSXh4GEIozgnRCHUMIiEKMSCSbgEBBPS%2bBpE4yBdviiegZw8CRABWu528vFw8Ho98WYYnk3S3G6vVSq9evXwvCrgyAgyJiyc7O1sKENqjBxq1ivKKCroFBp5KGxERgU6nQ6vV0rdvXyVOIBKjERYVwpqI0MbQTck0PBShHowwJ8r4gD4RBIoANBot3vJySgoLcTrslJWVU1xUSE1VFYOjo30f9FvXAL%2bNj4ujuLiYrKwskpKSiIryfc/5Ce52ZoSiZlA3xGmqSQIDEMFB589MSRMS5Et3wXS7eLoHy/ertRpqamooKCjA6XQSExMja0dISAjBwcEEBQVJG6zch4TIeyEa8xANuYjmPB9NuT4675VnCvU5iLocAupzCWzMI7Ahj4CGPF%2b4UQl3pblg6nNRvkPJ77woac5K5/seUZfFEE8SOeke0twuMjIyyMvLo6ioiPz8fFkzSkpKKC4pobS4GG9ZGe70dIQYV8DVj6fQ45UkQp9zEvpyMqHPJxH6jIPQZ52E7XcR9vavQ4/9bsIPpRG4PJ0%2b6akYUuxoUh1oUrrQpjrQpTml1SbbJWc89yOq3aiKs5g5pY322bNpnzWLqVOnSma1t1NTPUyKUFpayoTifGaXFeDJUARozif4DRtB%2bzQEblcT/JqWoLf1BL%2boIXiXju7fOen%2bz6TLx3dOQvwEf%2bukO3bEplT6W%2bxYdTqMej1GnQ%2bTTo9OpUYVn4BercFgs2KwWjBpdWekURAVqSQWZdJc10BTczPjxo2joaGB0XV1MlxZ6ZWFLysrY0xpERMrSvBkZCgCDGXBK%2bt56dhenv/HTh7//Hme/fo1nvjyBbZ8%2bSJ/%2bOs2nrqMPP3Zdp75bDtbP3%2bZrZ9tZ8fRXZSum0moQ4fNYEJvMmI0mdDqtGRmZdHQ2EhdXR3pmR5iS3NILM3BYDZhMBgwGI0YjUYZFpUuhuSlkZeRSXpGhmwCykiloISzsrPJycmRo4QnO5vs3DwcTidCjMnjvX/7kL8c%2bIB7V6zjyc1PcXj/n9m7bSe7t%2b3mcl8ff/0VX3z7HR/%2b/e98cPSojLvhkXvpZk3AYTRjMHUVymqzkeHxyI93OB2oMtPQZqTK5zKN3yoIbxoJBRl4i0spKCyksLBQtn8FpVMsLCiQfYHyrLIwnxHFRbhcLl8T2LH/DT46cpjXduzg3z/9hMOHDnHo3YO8f%2bQIP5w8wckTxy%2bZH04c58Tx7/nim6McPfYNX37zFZ98/TcpQNsDqwk2x%2bPUGs%2bo2gatTjYBbaIKg0aLSe3D%2bNMmoO1qAnOmz%2bTmeTczb948pk%2bfLvuCG%2bbMYc6cucyfP5%2bG%2bjrGF%2bYxt7yQTNkExhVgaG8ic%2bF0shfNwH17K56F03wsmErqLZNIvWXyz%2bB75rplMinzJpLsJ%2bWUz%2bm%2bvnD6rVNw33q9tAqe21oZ0DocUZ1OSFkaIRUugsvTJJ3hkHIX3b3uLipOx8VVXrccBRLz06mpqKRq2DCqq6up9FZSWVlJVVUVw6qrqRs9mtKyMmqKCmgsK8btdiPE2HzCs2z0z3TSJ9NB30wHPV1mrkkzcY3LTE%2b35WeJdFkI9VgR3hTp2y87iX5ZTiLTrfJ5r9PSdoXNZ9jIVBPBZamEeTOIL8xgUKGbmMJ0hhR7GFzgJq40i9hiDwPzUs9JlB9R6yE2N5U8TyYut1tW704yMzNlYZWw0pyUviUnK0fOFYRoGsqgxHhGlHmprarBW1BIXNQghvQfSOyAKIYMiPLZ/lHEDYyWzzqJ7x9NdEIcwfkOUix2RniH4S0swqRSM7jvAGIHRp/Ko5O4gV3%2bcdGDSOw9gDC3iYhkAzX5JVSXVzC8opK66uFUFZfiLS6juqSUxEExxPQbeEZekv6%2b7xNlycQXZDDp2vFMnzGDtrZWWltbaWtrY8aMGbS3t9PePouyklIKKisY2jxadpZyFBg/ezr33L2e1WvXsnrtGlasWsnKVatYvmIFK1etZMWqVaxes4bFSxazoGMhCzs6pF22ZAkTbphBVGMJHYsXs2btWlatXu1nFcuWL2fFSl9eSh4rV6%2biY/EiFnR0yDzu6FjIqiXLcLbUkjm5kbV3rmDR0iUsWbpUsnTZMplu0eLFLFzk8zkdJZ%2bORYu4Y8EdhNfnEzvUzbTJU2SbnzVrJs1NTTQ2NjJ8eA319fXUN9RTXlRMdmMt5jtn48rORASMLWDPe%2b/w5r597HvzDV5%2bdQeHjhxhz949HDz4DtteeZX3Dr3H3tdf518nfzirV9//4RFc8ybz%2beef8dY7b3P4/fc5cPAAbx04yF8%2b%2bZjde/dy4N13Zdw7Bw%2bec2S4bv1ibnxswyWNLrFtIxmUnczka1tomzqVadOmUVFRfmoWqIwKCqUlJZSUllI6rNJXAxQB9h14i7d37WXPS9vZvvV5tj/7Ivt37%2bXIW2%2bzY9sr7HpxGzu3befEse/PevE7R/6M%2b6aJ/Nenf%2bXNXXv5047XePrRR9n65Fa%2b%2bOhj9u95nZ3bXuHAG/t49bkX4PiPZ%2bUx/q5FzNt8z8WX/kdQTa8jQB1Nz9AwQsN6yGWvsjpVlr2dtjMs73v2IiI8wtcJjlhxC/OeepAbntjInC33MeeJjdzwxH20/34Dc%2bX9fczdsonpm%2b%2bi7cE1TH1ojbSzHrmbEStvofekSqZvXseNT26SaWc/voGbnrqf9sfulf6KrxJ/45P3M%2b3hrjxaH1zNnEfvRdfehOOm8cx9bANTHlhNm5L/L0Hms5brN62k5%2bRKxODeF7GaHJtPUJqe0CQdVyVpCU3Rc3WyjmC7ihCHmu5ODd2dahkOsiWegTJ5ucqpobfbKsOB5ngCLT4CzHGnwp3xSpyS7vQ8Aq3xcsSJSDXKND99x/%2bKVSEBMTobkTCwa1X6iwUYk4fZbmNSXRMzWiYypelarhvVwMS6MYwf3cjsSa1MGTOWifVNFLoycGoMpOjNpOhN0ibpjDi0BlINlosizWAhWWeSpF1kHklaI91rMhEJAy5iQ6Y5nwiHlkirhj5JRnrZtPS0aeibZKRPkoG%2byUb6OA0yHOnQyWc9/WkUIm1aelnUhBriCNX/tlytjyXMmECkRU3giEsQQHgMdHMbCHUZCXWbJFfLsPGU9WGiR7qJ0HTFmglzmxFuPSF5doz1Fb8ppgYvtuZq4mryEek6xMhMRPzFCpChZ4BFi9NswWgwYrVYsJhMmAxGzEYTZqPxLIwmI1ajgat1saRcV8vJf33PyeMnOPG9Muf/dTl54gTHvv2W49/9k51/eh2R5hegsw%2b4GAH6WrTUjxxNy/gWWlrG09LSgjstFa2yRvevznxLUANmjZFBWYn0GxnLVQlDSJ0wCn48e3j7Na4f/O/Zs3cvrVNa2bV/H8KlQ9ResgAaku0OUlJTcDgccu5st9tkoTuXnJ2YjEZ0FgNGm57uulhSW0bKsfi3vL779hj/OPo1e9968/LUgP5Wrdx1SVQlotFoUKkS0ev1cl/9p5jMJixGC06VhWtsasILUxg6oYGcCfXkTGgg10/%2b5CYKJjdJez4Krm8mb2IjOePrT/kqDJ005mf9C6eMpWLGBJIbhyHcl0GAflYdlWUVeCsrKcjPp7S0DFdaqtxD/2kTMOmMxKeoGZwbT2%2bLDpGUIMdjZQ4RkqQh2KEi2KlG6JTzhv4IzYBzo/Zb/UC62br8gxwqQpwahCnm5/0VX1V/hDbK1wQutRPsZ9FQVe6lqrqa2tpampqaSHelnVsArZFYl5qoojifAPZYORlKb6whta6S1FEVxBS4/QIoHzzw3CjPdIMQliFEptukf1pdJSkjy0ksySLEluAr5M/5yzwGXiYBrFoMag0qtVqemmg0alngczcBMxaDBafaQpg5kfjqoazf/ACrHtjA6gc2svbh%2b7nn0YfZ8PtH2Pj479j4eKft4t7HNrP5j1uY2jEflTePu6X/xlP%2byvOf8%2b30f%2bgPTzB76YIuAS6pCVi0OG12zMoQaLX6CmoyndUBdqI3G7GYjQRrY8hpbfb1TCd/hBMnL6gzO/j%2bYdnW5fXDhft/9Oknl6cT7GPRUlffyITrJzG2pYW8/DzUOi16s2%2bnthOdWdm3MxGdraL3qFjCNAkMqs6lY%2bM6Ft2/no5NCnez8L515%2bWOjXdx50MbaZ4/myEV2TJu0f33XJD/0oc20HL7jZehBngMDNSrcKsMuA0WXDoTKSod9jgVjgTNObGqVNgT4uhn0iAydAjzoDOx/ALM0QhHLMKl9d9fpL9bfwl9wLhChDOBXhOGkbjlTmIfvI24hxcQ/8hCEn7XQfymW88i4b75xG1eSPyTy4kYU4JI1RCUY6VbtuWCCMq2EJhlRniMF%2bzb6d9N8b8kAa4tRJhjEXdOQnzwCOL1uxFvrEfsXovYtRZx9FnE188hvvKj3B97iW671tHj0dsRt49F2OMRWSZZkIsi4yL9OukU4KKWw9f6BVg6EXH4YcQfOxBb7kC8sAyxdTHii6cR/7kV8Tc///EM4r%2b3cdULy4m8azbitssggOcyCRDX/wIKfnoTsMfTfXotEbvvIeLFlYQrbF8tidi6jIhnTkO5f3opYS%2bsIGzneoLHexHJKkTmFRQgXY8YkUGoKYF%2bPSPp06%2bv/PmhT58%2b0ipbYL1795bh0%2bnZs%2bdpw6BZg0NvlCcwFr3hFCYF5fRFfybKqYwlUSP3EUSWUo0NV0yAAOXdVWmoizLl0VhRcbHvJLikBG9pmTwXKCospLysTMYrx2XKIWmGb1u8ayI0snYUY8eNo76xgcYxjUycNAmvtwK1Ri0PLJVZoA8jOoNeiqVsoPxfEqB%2bxEiqqodRU11NSZWX/NHD5SlwfkkRRVVeRtWOpGZ4DSNGDCdd/h/QuRgya0i22klJSsJpt%2bOw2UlyOHHYbJiUGaGyD6DsD8g9AqPcK7Bo9PS2ahGZfgGuEAHpigCpUoBpk1uZNnMmc2e14x3fRErbWHlCnFtRSu7IGqZOaeWmm29myvWT/UdjigCZBno5dKisJmItBuKtRkmc3ybazSScA7XVRIRT5xfAeAVrgBFR7UJTlElVablv31/5F6C8nIqqSvnPUHFREeVer6z6ChUVFVIYeTgqRWge6ucc4abzcCrdlWIoAdLmEeP/RcadkS7bt1LFPRkebDYbaWlpp%2bJkvMcj/2z7H3CVhgX2E3FiAAAAAElFTkSuQmCC' /%3e%3c/svg%3e)
Prescription Field -
Confirm your prescription choice, and if necessary, adjust the target zones before making it active on the field (for more on this adjustment, see steps 3 - 4 in Edit Prescriptions).
' width='1280' height='800' xlink:href='data:image/png%3bbase64%2ciVBORw0KGgoAAAANSUhEUgAAAEAAAAAoCAYAAABOzvzpAAAACXBIWXMAAA7EAAAOxAGVKw4bAAAXQ0lEQVRogdWaB5iV1bmof1DQEwWM1Nm9zOz9t93bML3tMntmQGAoQ2cAAVGRNjAD2IJijOVolCOWm6hXPeq1nBhBBSkCaowmmuSYGHqzIQhDUSznPXf9e1NjTvQ%2b99znufM87/Otf9W9vvV931rr/0eSJIn/3%2bnSpYshFVVHUWQKCwvp0aMHVqsVv99/Vl2RbzKZuPTSS%2bnR42Ik0djlduNwOI3KRR4vVpuVC7p2pYu1P1JURnIOQLL2Qyo0IxX0NjqyO5w0Ng0iWVdLJBqnsqKMcCSCT9cpKS2jurqa0rIyAn4fXbt2/X%2biAM0XQNcUTGYzPXr2xOMpYtDgwXQ97/T4PXv2RFYUZFmmb9%2b%2bIk/C7XShyCqRUAif7sPpcNBddFzQBymhIblNSGEvUomGZDYaYbPaGTJkKJlkHX5fgIqyUhrqsxTHojQ2Dmb40CGkU2lqKsr/%2by0gL512O4Mam6ipqiYejWExmc8q/266nffdBd3PR%2bpyxnPXnJaNvHPL/hHdzs%2b1%2be%2bg2/l06d7NGKdQUxg8vJnqdAp/NMIAmxWpq/i93c5q0%2bWCbkiCbucjSRPq6DK%2bli5jq%2bkyribH2BqkMdVIQp5CPFfl5OjKnByXLxNtxtfR1egr31/%2buev4unP6%2bb%2bM%2bA0TapHG1SINSSBlg0hNYaTL4kijyo3fcqreScbm24wQ1jk5jVTtR0pHkOqCSDUBpNrg6bSRH6J7XZiLMgkuTEa4KB0z5I/SMS5Ox%2bleG6JLlY%2buVf6/w98r8yFVCvS8/K/Qz5D5dIWOlAwhTUpiSwSpaKqnvClDaUOK4kwt3ngYV9iHO%2bI/hSvipyjko395GGlMFZJoLFX5kSZmkFozSOOTSFMbkC5vQBotNJZEmpgmMHUENXMvZ/DiWQy7bh5V17SSbb%2bKxvYrCU8dgTRQQSqWz8CbR0YaKMg/n5RGWkYq05DK9f8zRFuxSONrcKkyLc0jGDU8x9iW0QQ0DbfDibewCI%2b7MEdhIbLDjSmoIrVUIkmtKbrF3HT327gg7OTCqJsLom66R1x0Dzm5IOjggpCTC8MufhRx0yPm4eKYhx5xD70SQhZhqQkQHBanpKWM8tGVlIysoGRkJWUt1ZSMKKN4WCXFw6oYOLzaoGREDWUja4leVkb/Kp2LSzz0KpfpKSiTz0h7DXqUCjy5dLmXnhU5flwuc2GVRpdJKe75xYOse3Utq156idVr1rDm1TVs3LTJSL%2b48kVWrlrFylUreeHFF1m/5lUW3XsH0vDSnAIsCRfemB1P3JEj5sCbyKW9CSdywmlIbzyHUuxGHehGLXZTFLYzalQJv1rxDM/d%2bXv%2b7c53ee72P/Lsz97n%2bdt3sOr%2bh/n18nms/%2bX1vPqLa3nloSU8f898nv35fB68fhrp5jjemiKCWR1fvYqeUfEJ6hX0tIyWUVDSMmrKi5Ly4C0uxON3ogbdaBE3BSmV8yZn%2bPPu7Wxev5Ynn36GzW%2b8yfp1a3nyqafZ99HHfNffi79/A2nYQKGAJAUDXcilLtTyIpSyIuSyQpSKQtSKIvSKIrTyIrSyIvRy8exBL/fgq/SilhVhjzgY1lLMk3e8x8%2bvhhVtR1nR9gUr2o6zfM6XPHHLQV544EZunzWO5QtbuXvRJDqmDGXuuEbmTL6MmsExPHUygUY/vkYfeoOOT9CoozdqBmqjjtagIWcV3AEPamkJ/XwqHtWDKa3TdXKa3773e95/53dsWv8av9n8Bs8%2b%2bRQvv7iKD3fvhW%2b%2b5ZsvvuSbL09w4vgXhgKe3rD6pAJS9Is6sQfN2EJWbEEb1pDFSNtDVhxhG46wSNsMxLMz4sAZdVAYc%2bGOOilpDLHh8WWsXbGFe%2bZ%2byYPtB3mo4yDL53/JO0%2b8yuHXFnHzxNHMzKZpHz2YK7JppieTTG3OkLwsgSfpJdDgQ89qZ6HWqyj1Clq9gprNpQtjCqZIAHtZHDmkYk6qiEDuX3I5tXe2U3PHQqpvX0DNne2k7l5M%2bS1zKF56NQNvmmXIxNKrKb35Gjztk07HgL4RJxafFbPfhiUgsGIVBHMKsYVsWIVignZsITuOsANH2ElhzE1hzEEsG%2bHNf53N128uYeMvf8OKhV9y7%2bwv%2bPXd2zmycTHHNrRxYN0N3LdoGvPHDGHOiCamNySZPryebHNZTgGNPvxNOYzVb9AMtLxUBVkFb8iL069RVBxB0T1YUjpGHEtFOb8qyPnVQbrVhA0plaicXx0y0l0r/UZ%2b99ow3UVeYzHS6KrTFuCI2LBG7diiNgN7TGDHEc9hi9mxR%2b04Yk5cCReuYhfuhMtQQLwxwqbHFnBi4wKOvTaLPz79Ao/f3Mm%2bl/%2bFYxvm8PnaDo5uWMDnG37C/TdMZc6YBtpGDmHWuEHUN5fgTcqGBfjzpq9lVWP1VbHy9Yqx8sZzVsVb48FbWURRuRtvpRtzRkecZQo9TvwuJ6rTTkSVuWpKKzMmjGPK6FHMmTGNGRPG4i90orkdBBx2bEH5pAUk6Rd34hQTjDtxxB3GhO2JHM6EA2exC7tQQlTUEeVOnImcAoriDuINUTY9Np8Tm5dwbMtLfPHbWzm47hY613dweF07nevbOfRqO8den8Nnzz7J8oUdzBqZ4crRg2gYXoacdwF/VifQoKNlVDRDASpqRiBcQDEUYyinQbiDagRJk1DAxCShuuFUZlopT0%2bkIjOJ9JAraBw5i/SQGWSbryTbfBXl6QmUZyZRnZmCUj8UqaUi7wJRJ7agFWvYhi2Swxq2GtIhVj3qMGKCNZSvE7Zhj9iNOOCO2UlkImx6dD4nNi2m85276Xx9MZ3rZnN43UI613ZweG0HnZvn0Pn8Exzr2MfBZR9w09TLaR1RS9PICrx1XsPn/fUa0awPNa2cQsnIyBkZJZuzBIFcr%2bAV%2bSkvBRkNaVKa1pvepuNfjjL/ngO03XuQtnsPM%2b%2bez2m79xDz7/ncoP2%2bo1xzx24W3HWAodevQhpRkjsImYsLKYo7ccccFCYETooSTjwDXRQV52XCiVvUibsojLty6VjOdaK1QTb/YgEn3pjLoZW3c%2bT5R%2blc91M6N3bQuWkuna/P5shzT9LZsYdDbVs5vnA3u5e8y9Irp5MZWnxKAb4GjWCjnpu82P7EJMWEM3IuEIqVb1DwNuSUoKa9mE4q4ObfMLHtJYZO%2byVj569i8UPHWXT/4TydLH7gCAuX72fmLX9i7m07uGzJc0gjjXNAkr4xp7G65qAVS9CCVSB2BBH5jV3AbkgRFE8GR0vQijNqxxW1EagJ8Nojs/h60884vGwrnQv20XnjVo7c/TuOPPYrjjzxazoX7eLwgu10tm/j4MK/8m37p7za8QQ1Q8PIdTJ6vQh0Klqjltv7Mwp6vWpM1FMvGxgTFwrI5vLUehlzvXCBNGOXvMOc244xc9knXP3Tg8y%2b/ch3Mu3GnVy19FMaF65EGiksoDWFLVGII2DFHDBj9VuwB63YAzbDLexBG86wHYdQRjC3FZ7EJbbDsFCAj42PXMfXy9/j8zm7ONy%2bhcNt2zk8bxed8/bR2baXwwu3cbhjG4fbt/P5wi181f4RqzoeoWZICLk2rwCx1TXkfF0EP6EAkWcEQqNMnAlyeBtELFAwZ33GXWDBozfxwOaHWb7hfxjctfp%2b7j6XNfdz15oHeWDjI0xesQhpeFnOAuwDPbiidsxhK9aIDXtU%2bL4NV8xhmLpwCeEaYlcwdgkjRtiMGOAIOfDVFrL%2b2sf5qv1jDi/cwtGO7RxZtJ1OMeGOrXy%2baKuhgGNzt3GkbZuhgK87PuaVJY9SNSiIUutFT4tgJ%2bfJu0A67wLC/0/GgQYVWewGWQW9QcFUr9OlNckDf5zMyk9m8OSWyTyz83Je%2b2YeG76aexbrT8zhuT3TeOXAFdy4YQJSs7gNtqYMBYjDjzlkwS4UELHiEAglxO3G5F0xO9aIFUvYgiUsZC5ICuvQ69ysbnuc/5j3ITvu3cGKnft46t/3ceja7Rybs42vZm/j6KLt7LpvN58t28mh%2bX/lq8Ufs3rxw9QIBdTI6Cnh07KBkhLmnYv8YrKGFWRVZLH6TRrqIA2lUeTJFNT7DAUsf%2bcKHnxzCsueb%2bHn61tZfXQxrxzu4JXOHKuPLGLlgYU88qeZPLNtFu2rWpGG53cBU8yFyWein28AJr8Ji9%2bEKWCiwG/CHBSnQgsFolw30U8z0V830083Y/abDQX46op4acEjMOcjVq3bxTR289PP9hoK2PPPO1m9dg/3b91L29d7Wf/SHr64ZgtfXPsRG5c%2bTv3Q6CkFaPnJG2d/YQX5qG%2bQyfm%2b3KgiDxJoaE0KBcICJiW5583prO3sYOX%2bBbx0YAErPzmXNlbtX8BzO%2bfyyidtLH5p8mkL6BOx01/uS2%2b5L32VfgzQBjBA609fdQD91ALMegH9lQL6ygX0U0TazADFhNlnwRVyoNa5WT//Cb5d/Al37d7F7OO7uX3/Ppi3gzWv7mEGe7jm%2bG7mfbWXjS/v4di8v/LVws/YtOxx6pujqGcoQMtP/OSeL0zeoFEzLKCoyotnYBHegR7kcg%2bmrE6XiSmeu/p/8uF1b7NtyetsW/w677ev488d60/xfvt6/tKxgT%2b0r2Hnok3cfeW9J3eBFH3CdkyaiYI8YmImn5kBukibsfgsmDWzUccsVl4XecICLNhDwgU8PHrVUnY8tZ%2bFx/aw4NAuFh/Zw4ub9vDku3u5%2bts9LN%2b1lw8e2cWx%2bds4cs0ePnnhLZ559ickmxJoKRlffus7ufJnngIN38%2bqeBoUPIEi5FgUT2kxiuJhQL3GeZMybJjxMr9rXc268b/i9daXOd6%2bj6MLd5/iWPseDrft4M9XvMmHV/6Bh6c/gTTqpAJCdgYoBcZq91dNFOgWCjRzHgsm1UKBamGAajakScuVi/uD2A0SySCjh5Uy4baF3PDFfto69zD76C5msoefdO5jzat76bx%2bBydm7uTI4t28v/EZ1rGER5%2bfS202gVYvE0irxurnyPt9Y/4uYJz%2bNLxZGU9Epihbg2tUI2pAoSCrGwrYPP0l/jx5LW%2bOf4F/n7qerxbs5su2Hac40bbTUP62GW/w2cx3eWza42coIGzHLFZfN2EyfNti%2bLfFb8mtvu/kpC2YdAtm3YbZZ8MWEMHSRlkqyKSWFNbEAEb881xuOv4p9%2b7ax8Zf7%2bbAsp18M2crnfN28Ml97/Gbnfew6vgc1p1YwmNPLSDTUIxerxDK6sa7AC19WgHGHSB/JhCHI29aNixACYeQYxEUzZOPASkebnuGP/3sL7x9y3sGm5e%2bxealvz2Dt3jjprfZsPRNfnfLeyyb%2b2DeBSan6Bt20F820Uc100%2bzMECzGsror5mNdH/VQh/ZTF/ZTD/FQn9V5IlDkTgI2SlLh5g2vgG9VsGdtDKjYxbHfroPZm7j0%2bt28Keff8jRBbvY/b9eZ13nDaw8Noe1X%2bYU0JgtNU55pYPCxBr8xssQMVlxMjQUkT8RKmnFOPoW%2bdzIHhnZK%2bNVCo1tUGpNM/6tV5h/aAezP/2AOfv/yrwD25h7YOtpPtvKvIPbuWrHu8z7%2bAMGr/5XpOb8Qah/1IXFb8MsrsJ%2bmzExcQ22BG2Yg478sz13VTbyxd3AiSvqMrbHskyI6eMbCNaqhDI%2bXFVW5k2awd67PuLWB4/y9Ir9sGgLx6/eyee3bOEPv32cNd8u5pGn5jJkUAVFaS/FTSGKs370/B3AeCdgXIFzShCWIadlvGEv3mQFhY21ORdIa3SZnGbiW6uZtPbfuOwX9zL6xafoOPoh7Yd2naZzD237tzLjj5uZveX3DF752OmDkLm4iMKIG2fYhSvsNF5yuCNOXBGXgVtwZl5U5LkpirlxRR2UJIM5C6iS8acU41pbVGVl2FVXMv%2bBTu687ygv3rOf92/bx/G5Ozgyey8fPvE2jz10A5cNLacoIxNq8FHaEDJei6liR8ifAo0dwNgRxN6v4QkreMtK8NSUo/iU3GWoNc3Uv7zJkm8PMv/QLhYe%2b5DF/3GQxd%2beywFmf7KF9s59NG/61WkLsISd2BUTVtWMTTNh95lwCHQzdt1kYNUHYFVP17FqJgr9FtSwnaoaH3MnNFGa8lFa76NiSICqpgjFSReTZszk5oc%2bZf7Dh3ljxT6%2bufYDOq/7gK8W7eW5G%2b6keUiCcFolmtWoqPcTy2gEUzKBesXAnxUKVQg0KvgHKSiJQtSAByXkRQ06sdSrxnU4tegaWu5YyojbbjQYfuv1f8OIW69n5K3XM/bOmylZMANppPFdIMWlmRD9kn76pPz0TQXomw7SNy1kgD4pgZ/eST%2bX1vroXZdPJ330SfrpV%2bfH3hSjemKW%2bKQkkQk1DJyYJDGhjoGtGWJjyim/YihV17RQe%2bVIUle1kLq6hcw1o0lOHYI6ogxLU4SCprAhrU1R%2bjeF6d8UYsCgMP0Hh%2bl3WYh%2bQ8IGfYaE6DM4QO/BQfoODtBjaBRpYh1OtxOfU7wQcaLl0V0u41l1OAxkh4PCgIbidmPxefJvhKakkcbW0mV0DV3G1OTkOXQdU8t5Y%2bs4b2wtXQVjcnlGemwt0uhqpJEVSKOqzmZkJdK4utybl2EludfQgua8HFGGNKoSqaX6b%2bhyFjUGRp/i%2beTvEnnj6oyjsHhNNqplNDNnzWJi6yRGjxtH65QptIwdx4TJrUyePBlfZSnO4VmU2gps8WDuC5dwgaJYkHAoRCAcIngG4jkUCaP7fciqiqprRtoXDOAL%2bI1ngT8UNOqdbGekI2Fi/iC9UwkG1BUTC4YJRiPGF%2bRwJGyMF4lGicZjZ4wbJhAKGmOc2V8wFCQYDBKJxwhHI0Z9QSQYwlESMSxAfBcMqjrhYJCQ30/Qd5pwIEgsKD786shlxfgCAexR/2kFOIM6Pi03Gc1AR9NycsjQoUy9/HLGTxjPpNZJjGppYVTLKMZNmMiIEcOZPGUKyWQdXtmL7tPz7TVUn47fq3BJbZQ%2bVRECslBgrl816McdC1FaUc648eNwFxai%2b3zGeKqm4pXl3G8QKCrKwBj28jhNTYNpbMxS5PGg%2bXz4VA1rPGAo4OKYQv%2bSIH0H%2brk0odOn2EfvhI9%2bAwNcElO5KOShZ0SmZ9BDr6CHfyrz5d8JTkpSqMqECmX8RTKBc4j7glTGB5IqryJTUW2kK6JxSsMxKmPF1AwsI%2b4L4Cv0ntXO75GJOIq4tDJMv7IQEafHyDPKPQo%2b8Tle1amIJtDdHgL5MtGP5iw06hh1C734ldxiJHwhSoJhfO5cXyG3F0dINz6NnVemU3x5C8VTRxKe1EyktRm5pYHI5OH0yQ5ESniQShSkUiX3SU58XxwlFDAlzY8aiumVTtAz87f0SMX4UV2Ef6oNG1xUF%2bWiZJSLk1EjLcp6pOL0%2bo62lyTjnDeigm7N5Ub6VFk6kRsvneDiZIxemeKzykR/Z/WVjtMrFTfyLzbGytUXfVw4uARpWgZpcHGeBNJl%2bbQhE3/LoHguDo2pQhKfr388rIofD6/mx83fgcgfXnMWlzRXc8mwKi5prsrLai5urqbXyfr5tpcMr6b30CouHVplpM/tt9ewynz/5473Xb/hNKJdr/z4lw6ppG9TGX2GVdN7WPUpeSZ9voPezTV0EZ/Huw8tN3w1KKuGn/5DvAoR3W8EuKgvQCwQIqFopDWVuKLi/579BIVZF3qMsb/XuGe0iwdCxHwBwqqOFouglibwK3%2b/jf8cRJ6uanQdVIzUvbkcVdPQTwad/wIRqESwy2QbmD5jOuPGjWPU2DFUB3xMjOhUB3RkUe979yUbY2tG8PzHiLr%2bQICJrZOZIoJvOokjXUHhkBRqwH8qcP/DsXUdRfzv0iChgGHlKIqSi85iq/seiA7EP1T58pHbp6mU%2bVRDft8%2bxHger/cHj22ML3YAvx9dVZGjIbyJyA9qr4l2et4CpIlJhBJ%2bCN0EQ8voNkyQez4vL39oPz907Fy7svz45XQfWkb3IWU/vA/xPvB/H97%2bE/ecKqfG%2bA6BAAAAAElFTkSuQmCC' /%3e%3c/svg%3e)
Prescription Edit - Once you have the prescription adjusted to suit your needs, assign it to the field by pressing Save.
- Finally, select which attribute will be used for each drive section.
- Optional – If you want to assign prescriptions to additional fields, repeat steps 2-7 for each one.
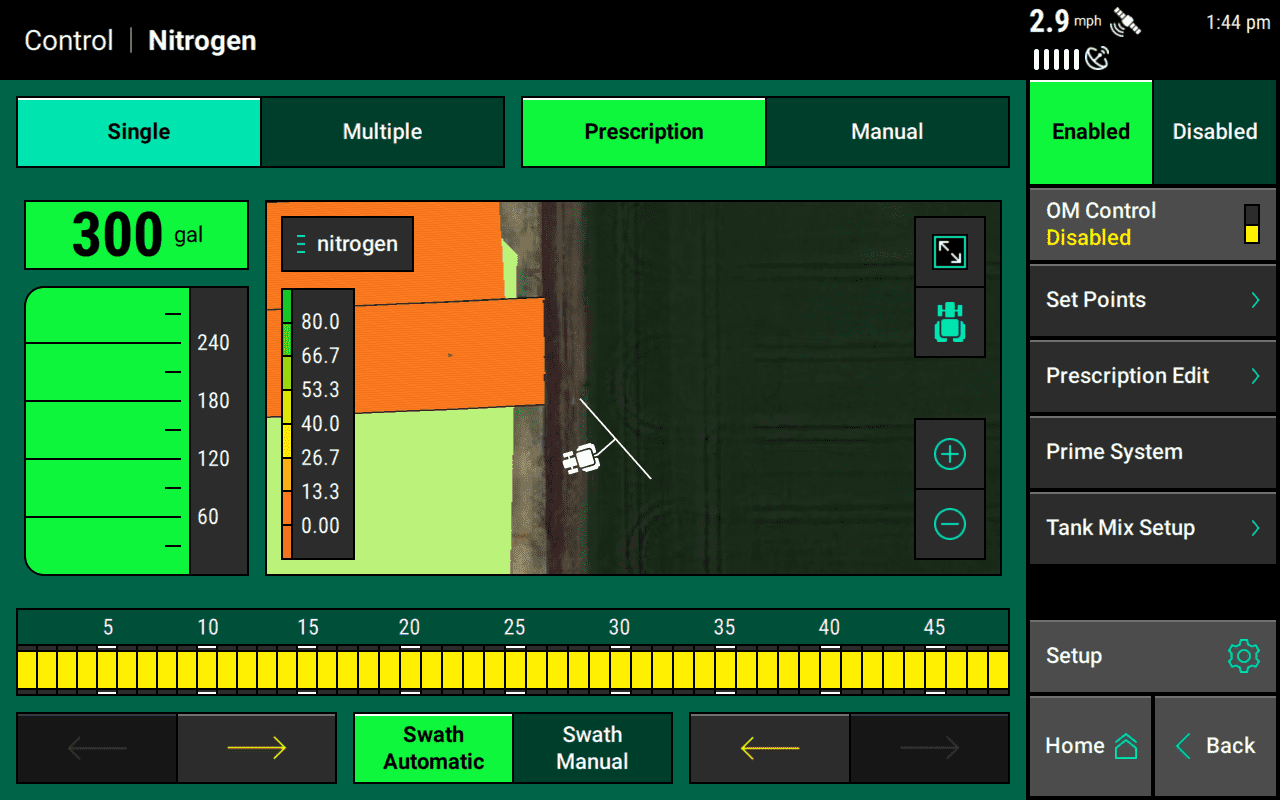
Use Prescriptions to Control Your Implement
After you have assigned a prescription to an active field, you can use it to control the implement.
- From the Home screen, press the control button for the system you want to control, such as vDrive, mSet, Nitrogen, Depth, and Granular.
-
Toggle the system from Manual to Prescription control at the top of the screen. When Prescription is selected, the system will be controlled by the assigned prescription.
Below is the screen. Notice the active Prescription toggle on the center right
' width='1280' height='800' xlink:href='data:image/png%3bbase64%2ciVBORw0KGgoAAAANSUhEUgAAAEAAAAAoCAYAAABOzvzpAAAACXBIWXMAAA7EAAAOxAGVKw4bAAAXb0lEQVRogdWad3Tc13XnHypRWYQyDRi06RUzmF4xgzLohSAIgiQaQYEdICmSACWRVKHiEifynjgn0rHsPbZiS4kdyZKdqCtWdpPNbrIl53idEydZyyVSJEVWs0SKkvzZ836/AQjKcta7f2X/%2bJ573/39fq/cd9t7M0IIwf/vKCgoUGhLq4lkMkF7u5fKykqMjY14PJ4b3q2urkav13NTTQ3V1VUI%2bXFrWxvNzS3Ky2aLlaYmIwVC4PZ4mdw9RTQSxulyEYlEcDjs/2YVYLJY8Xf4sdttVFZVYrWaGRkdpbCocOPdbdu2YbPZsFqt1NXVIeRC21rbcNgdBPw%2bPG43bS0tigIcDhcz%2b/aTTacYHh5lYW6OoN9P4b81BeRpW0srw4NDpBJJgh0B9Fr9r/F9SdEnPyhStfqJ2FKCKCtR6Tq/GVs%2bhtJihNyFwv8LyG8%2b3tcn9b2lhILyLcq8rE47u/dP0TcyQDAeosncTHFFCSXlpWqfcg5FRRQUqxBKe64bzbEJtMcnN6A5Pkm9ItuF7sRudCcm0RzbhVahExSMxxBjUcR4VKWbMb5Jvk73dlJzeADt8WE0x4bRnBhGs84f34RN7dKpFGI0cmN/Sp8xFZvHmogicnEq7w2ifS1N/T%2bk0P84i/EnPZivDlP7QBThtSASDkTMrkLynhaEWBmn9Ad/QOmPH6X0xT%2bi9EePUPq/vqlSKZP0xUfY8uIfseUn36L0%2b19HZLxqBymXgoK0G5F0UpByq/KkE5FUn4m4A7Erzva/SVJ7pZOaNzupeT1N7TsZFW93UvtW543822lKjroRQSci7VL6K5RjKP3ZFRRIXo6jULmoDkofjLCVBFXXElR9GKfyaoxK4pQ%2b1E5BwIXI5vtIOREZD8JvQojlMcSL30C8/Bjip48i/uU7iO98BvHAKuJ3TyO%2b%2bwVV9tNHEK88jvj7hxFZ78bghRkvPWeP0Hf2EKO3LSu0rNuvPpeTTjgREzEqvh%2blijhV78Qo/66bsscclD3uoOybNrZ8xULZt%2bxUvhym6oMEVVdjFB13IUIuCjJuRNSCfXaUiYuniR3dT9ctS2hGEoiEHdEpF2VHRP1s%2bVqU6r/zU/H7Nsq/aqP8PjNbv9dB0UMemgdy5M4dpv/sIYZWj5FZmaeow4wQJ8YQP8wr4J%2b%2bhXjpMcSL30T87dcQ/%2b3LKv9SXjn//DjiBw%2bruxuxqqYUtVGeaacy62NbT5Ct3QEK5a5HbepuhW2InVGq/meYbR9F2fpulK3vRKh%2bLaTipSDVr6i8lG%2b9GmPr1QjFh%2b0In01dZNRGcdJFVVcHVVk/1V0fGyNiQUR8bPlKhG0kqH45ytZXowrdRpKyh/wUBd1U9gep6gtRlQtRkQsifG0IcXM/4q4FxD0HEXcvIu48gLj7IOKemxG/saTKLy%2bqkPyd86oPjkQQo1EVw2HEkERIxegmn5V%2bPJOh8K4Uxb%2bVoug3VVp8b/qX8bkUxfL551IUzMl%2bN/m/7GckpGI4dGPc2RlB5BKUPBCgkgjlb0eoeC9Kxc8jVBKj%2bCtuhMeMiFvzypK8DeFtRoiDOcR8BjHXiTiYQRztQhzpQhzOUiD5%2bU7EbKf6juTnshTd3MfWIzm2Hc2x/WjfBnYc66P6SI7SpRtRdDBHwUwOMd1Lwd4cYm%2bvwn8i9uaxkEOZ2yYUbIK4OY%2bDvRQs9SHme9DtChJfyRA%2bkSF0LE3waIrgcpqOqSTtiRjt6RjtKRW%2bzjgWnyyS5nop%2b0aYqpeiVHzXT9kX7ZQ96KD8IRdlv2ej8m/DVP04RtXfRdj6j0HEPQkuTdl4bI%2bOL0008MC4li%2bN6/jyTh1fHNfx2P4Gvn%2bske8dMyr0rw43cfzoMNP7%2boh5HSSzPoyBJupsWrR2HbVWDfVOLRq3jnqXVoXknTo0edTnofVoMbTr0Tr11Ju0aM0SOurtesTuGObuFKuHVrl822c4cfAM505c4PbTl1g9eYbx0THGhkcYGxlldGiYUCBMIhZHiNleyl%2bIsY0U1S9FKD2qo/SYnpKDWkqWdFT%2btZ/K/%2bGn%2brUY24kjPp/kvv02JqJm3B0%2bhrrS9KYT9KaiRCJRTmdb4dZGfnG%2bCc4bubrWzMWVEU7OjtHv85HrCmDqaEJv1dAolWCtR%2b/Q0ujSY3Dq0Du1KnVpMbgk1WFw69C5tejdWhratTTa9NjbPbQE22mz22i0NSAmY5j7U5w61s3KSpZzZ1PcdmuaI0dyDI%2bMMzQ0yKCCIfoHBjh7soGurhBCzPRS8UKIbTJC/72Pst82Un5fC%2bX3tyh89Yt%2bqn/oZ9u7UXYQRtwb59/ttREOOtBGMoxMzTI8vcD8kRXSY/uYjZv4YK2Rd1ebeO%2bskfcutvL1P9zP8ZlxerxecpkAJp8RnVWDQSrAVo/OqaXBbUDv0Cm83pmncuEuCZVvaDdg9BlothloCXfQHAvQ2OHBKBWwO4Ypl2RxXxeLB5IcWUqwdDDBvukMvb0DDAz009%2bvoq%2bvj%2bk9KZLJKEIs5ii6kKTk83GKPxOj%2bDdjlPxWnJJ74yp/b4Li%2b5MU3Z%2bg5P4Y4lQn9y3Y%2bMqQkTv6W7irx8Cl7gZu62niVKeRByeb%2bFDZ%2bSaunjPy0cUWnvpPC%2bze30/W5WagK4jF36TuvE2Lxlq3oQCdVIBDq7R1Do1iDettvVOjWIrkjVYDjXYLTaF27B0%2b9CY9Yk%2bS%2bogXa4uVphYrzS02Ba2tVuX84nK5cDqdG3DYPbS2yiww30fhhTSl34hT%2bnCc0j/I04fjbHkoTsnjCbbeHMDg6MDg8yH6EvzOSTtfOKTj9oyBi71GvjZphPMNiunL3X/nrJGfnzPy9hkjb55r4tGvD7OwP0XO61IsQFWABoNdd4MFqIuVu69agNahRevSKr6vdWvRuLRovDp00gWsNhw2O1aTGb3NgJhOUhN2M9SbY3znGKOjI4wMDzE2NkY4FMJul0rIK8DhwBnw0WqWhdD%2bXsr/Q1hxga0KYjegggiGe1w4NSY8VhOVmRCXT1uxH2ilIzGIM97NrpiNV1YMvHLKyCunGnn1VOMGfeOMkXfWmnnzTBP7wyZS8Q6cgeYNBWisqgL0br1qAesKUExfh9atQuPRKqj3ajFYtFgTYWo/f4tCG8w6VQEhqYA%2bJicn6enpZWxslPHxnSTiMRwOB263G5fbhcvpxBXsoM0iC6HZXsqeClP9bpSqV6NU/ct1VL8SpfznERou%2bxmI50glYpSkA/zOWRsTS0Z6ugfp6s1xKGvj2moD18438f5aE9ckzqtUbRt5f9XIfMREZyKAL9imLtwqXaBe2XmDW5%2bPATp156X5SyuQCvCoGUDn1aH162hsq6N1Zx8Vz32Btp19NLTUI/amqAm6MBmbaGpuprW1leaWFpqbmzGZTFitFiwWFWazGavFgtFozCvg0SBVLwep/McglT%2b8jqp/CFL2ZoiGe/zs7p2gN9tJUbKD3121MX3IQCY7SCiR5EDawtVzDVxZbcrDyLvnjNfbMh6sGlmKmcjGg/jDJjSWvAIsahYwyCzgkFngugsoFiADoEfNADqnBp1bg86iodVloyXqo81lQ2fVKTFAE2unw%2b3F7nQoJq/4ukPl12OAtAKv14uvvR2Led0CXohSLUvIqwmqr23ClQQV70fR3eGm5aYmrKZWtmQj3Ldm5egJHfFkL/5wlIWUhatrRq6cb%2ba9881cuVXFVYnzEqolLEXbSIf9eENtiguoQVBVQINbTX9y0VIJMgDq19OgR4feq8YCncwM8rlDi17GD4cGrVsNgnVRLzuHRpjeO82uXZNMTOxifn6eXRMTjI%2bPs7S0RFdXFqvZgjMcyMeAdRe4kjf9n11H9WtRyq9E0N3lZaxzmJ5MioJkgH9/zszasoZs7xjZXB9LnVZ%2bcVLDL07p%2bMWKlg%2bXtVw7ruHqCS1XlnVcPW1Q3OBwzERnLIAz0orWXEejTY0B0uQbpAus7750AYdmwwoUV3Bp0EgryMcGvUePzqPPu4ceMZWkPtpOtCNId0%2b3kuq6e3qU/N/V1UU6nVZSYCQcxmG3KzVMm2ldAY/8ahcofz2E9k7PdQUkOvjCXR4ur9YTinWTSHWyr9/L9x%2bI872vZvibr3fz3/8wx399ZID/8vgwf/X8Lh796iB3HowyHPbQkwiQHgwru99g0aK3q9G%2bwWXYUICyu4561RJcGmWXFXneIhQFWTVKLSGp1qm6QG3YjcNkoc1sUvxcQvq/pNL31VhgU9xCZoKWlpZ8JfhnUeUcrZj9h5vwfoKKa1F0d3porWlWXSAV4rbnprn7DhPJVD89mW52Lmb5zru38p33LvDtKxf44/cv8cSHd/DEtUs8x5188a9XmFkaJd3hJeo14wi34u/00WDToZOxwK5RgmBDfveVmGDXYbDrMdi1SmwwbLIMvUWHXfq2v11ZjN4qXSBBXcSD3%2bXB7XEr/v7x3L/RdjiVbNDa2vrrWYD%2bLi%2bjncNKECyM%2brj03Rku32YilughGoqycyHNs2%2bv8uxbazz75qqCZ95Y5enXz/Gn753n9//iGOeWp0h73Vw4d5oHvno/vpQXb9ytFERSAdIF5GJ1EnKhdo1iGWpRlKeKK2iVtGdNRGiZGcWmpEFVAdIFJsd2Mn9ggbm5Wfbv38/SoUOK78/OzhIJBRWFSUXIYNjW1vbrxgAPfZFeMqk4hXE/l56b4bOnbMSSPUQCEcbmUzzzzhrPvHWep99au44313j%2b/Vt58M9PcPuJvXT72vnsnRf59G/fTb25DovfhC1kod5ap6bBvDtIaPJUpkMJjcwAeQUYLDpsPi%2bm7iS2di96WQfIIBjx0O5w0e7z0dHRoUDeZEvq93coC5cKUFzA6bzuAv%2bnLKC9w4W5vg2nzUJpOsiFp2a4vGgjkuxWXGDXYoan317lmbdVBUgq8dQba/zptdt44PnDLC9NkA36SHnttMoTn0x/Fk1%2b1zUbaVDZ7c3InwV064qQvFWvVIB2kxmbyYzOasjHAA9OswXzpny/DtmW1%2bHrafFGBTz6r9UBQZo/G2ayexy/10VxKsDFJ2b5jf0uvB1RUrGU4gKKBfwKBXz52SOcXpgg0%2b6lJ9KOJ2ZWor%2bMAXqrPBDJOl9Hg12nuoD0e7saINWSWLqDDIbSMjQYzDrsAT/W7qR6FrDk02DES8QfIBQOEQgEiEajBDo6CIXDihW0t7er1aDLhafduykLPJmvBF%2bLUvX6dVS/KivBMA33dNAV6KTd7aSkM8Dtj89webidaCrHSP8oo7OdPPnmKk%2b%2bucaTb6zy5BuSrvHE66s8%2b/6tfOlPDnNy76iigFTIgz3aqiigSQmCGjRysTITyPa66csYkFeACjVDaORx2aTDFg/TtqsfWyyMXsaA6RQ7Ak6lFD6%2bvMzU1B6Wl5fZPbkrHwcOsW/vNA6nA5fdgSMSpFUphWfkWUDepsap/kWcaq5j60dx5Sygv9uFS2PBZ7dRmurg8lMHuHdPAE/QRcDvZOZEhr/48Hb%2b/FoeH6j4j1dv5y%2b5yLeeO835%2bV30hf3kQl6c4RZ0plrazFoaTHXoLHU02DQ0KUdkDTpZ4MhTorVOKXYkDDL622XxVI/BpMFqNmGzW7GZTOhN2o0s4LU7cHncGzu9seMej2IB6xnhehCc66P4s0nK/yxC2XNRyp6PUP58nj4bYct/jrLjlI9ml5emoJuSXJiR%2b3Zzx5/MceaRGc4%2bOsPat%2be4%2bOwiF59Z5FKeKnj6AHe8sMgtvzfD5PwIHdkQvnQHxqSdHf5m6v2t3ORrZntHM9sDLdT4W9gRbFV4BYo8j6Aq26G0m9je0cKOjha2%2b%2bX3LYiZLCXWRipLtlBeWUFFxY0oLy9XsFlWVlaGEPI%2bbTaH2NeDmMljf/cmvke5bxML3YgDPcj7AzHXk4e8M8zzM10q9mXyfPd12UwWMS%2b/l3d9PdepxGKv2l6n6883Y/3bzVDms%2bm7wwMIY93/w09rM1mKdkUomoxSOBmlaDJG%2bXRKaV9HjOp9GYonYxRORCnapULKSiZjansyqjzfLndidyzfVuXyvbKpJIUTEeXdgokIFdNpKqfTCi9l8tmWqQTV%2bzo3%2bpco3hVj2/6sOnZeJmnVXtlnQpWNhxH70hSaDZSKAkq3bKG0tJSSkpJfidLiEoqLixFiMo1IRxDZGCITQfSk2LFnJyIbVSFl3SnMSwcQPUlEp5RFEd1JWhfnVJl8Jy/zHD%2bC6E0hOmWf6rvNi3OUjfUj0iFEVxyRCKDdvwfD3F6FV2SpECVjA7QdnLven%2byjO0n78jFlXkpbkUdpPbhA%2bfgAIh1GJCOIvjCWgRSj/YPKWaC7u0e5%2bxscHLwRAwMMSDo%2bSiIeR2yfj3FgpZbFk3UsrNSydEbLqUttSvuAhJTdouXkxV%2bWndosO1nLoTP1nLts4eCpeqW9LpfvHTlnYGGlJv99DacuNrNyezPzyzUsnpJj13D4nEF5d/O3S2fqOXu3eaNPZbyVWlYutHJk1cDcci3HT%2b/AtminobuTU0ePcW5tlVOnTjGxc6ey6KGhIRXDQwz3D5A8PEvk9uMkUkmE80yQD34s%2bOingg9/IhT%2b6g9VXmJd/v6LKr8ORSbfk%2b1/Enz0koDXBfyz4MN8ex1XfyS4lh/jg58IeFnAK/nx5Dj5PtfH3jwOrwp46ca5SCrHvvYjtW/eEJy838CORBdLs/tZvPkgR48eZee4vA0eYmRkhOHhYQUjg0N0z%2b6h88QiyWQSsf1gkvnzBhZuNSj04MUmVj7jUNrrssXbG1n%2blI2583oVazpFduJTNubX9Cyc0TK7rOHAaS2n77Qxf0LL7PF65pY1zJ6oZ/kOC0cutbCwqmNRjnFez%2blPWVi5x8L8OR2La3rmz2mVsWWfsv/r4xg4/TkHC7c13DCn5U/bOXRnKzNrBo5e0GE76kGXjtObTpNIJkgkEnR2dpLNZpWFSj6TzSrtbLqTnkxWKZaE2JtFRELXEQ0jErEb2qVdGSpyPZRkM5RkMhRnMpR2ZanKdSO65C9HfVRdHKPqwjjbL%2b%2bm%2btMTVF3eSeXFcarv2kmJjNCdMdXXpQ/HO1S6HlMG0oiBLsqz6jiyfzlOSaaT0myGyr5eRDKGCAcR0fy85BxjEbUdDCEGY5j6Ekoh1JvLkcvl6MvlGOrrJxaP093dzUBfPz29vQrk3UAsFkMUjUXR1d6Evq4GQ30throa9Pm2pFLW7rTjczoIeu2EfHZiARuBdjt%2bhx2T203Z5QTaD5JoSVP7l%2b3UPuel9gkPmp8l0JFh69faKWg3U5i24VsYI3ZoisThKSqybgqjFsSgD21XBwGrlXaXg2iHnbDPTqjdjs/lwO9y0NZoQFuzQ5mfMsf8fPX1tTRu3UZx2Ip5JMvc1DQTk7vYPTnJ0MQ4uf1TpFMpcoMDDEyMs3d6mt1Tu5naM6VYiSgai1FXX0ddfT06vR6dXodWp6Veo1FkGo0Gh6yeXC6CQQfxmJ1cr4VY3I7T4aLJ7aXw7gRVV6JU/CBA%2bbNu9WfvP3ZS/oKHKhKUPexXfumtHIyQXlkgtTxH8sQcmrEUImZDDAapzQZwWx14fS4G%2b80k4jZiMTsut1q1NRqN1NbWKvOS89PqdOgNBuq1WrTbb6IwYsM8nOWW48ucPnuW286tMnZ4gfDJRVKpFF2jQ3RNT3JqeYULFy%2byfOK4mgWkAmTH8g9Dn4T6%2bvqN05Pd7sRmU6nd4cTtsGN0eSi6I8HWn0WofMFLxbedVDzrpuJpNxWPOdn6VpSyB30Ij4WtAxHCS3vwzo0TunkK3UgKEbIgBgLUZAK4LTZF2fLEJseRWD%2b/NzY2UlNT88tzrK9Hu20HhWGbYgETg8PKz18y%2bA2PjDC6c1zx/4H%2bfkbGxjaC4ejoqKIYIassqYR/DaUTSRW7PoaJJMW704ibuyg8maZwLUPhrVkKz2dUSP5MJwUHU4jJpPJPETEaRIyFEaMh5Y8TinxfhsJ9WUp3Jjb63TyGpMXjcQp/xfyKR2PKadDYGSKbSBJPJpTAJ008lUzh8/mUk%2bG6TJGnUsrZ4H8DUkkV2FCqeCIAAAAASUVORK5CYII=' /%3e%3c/svg%3e)
Control Screen Prescription
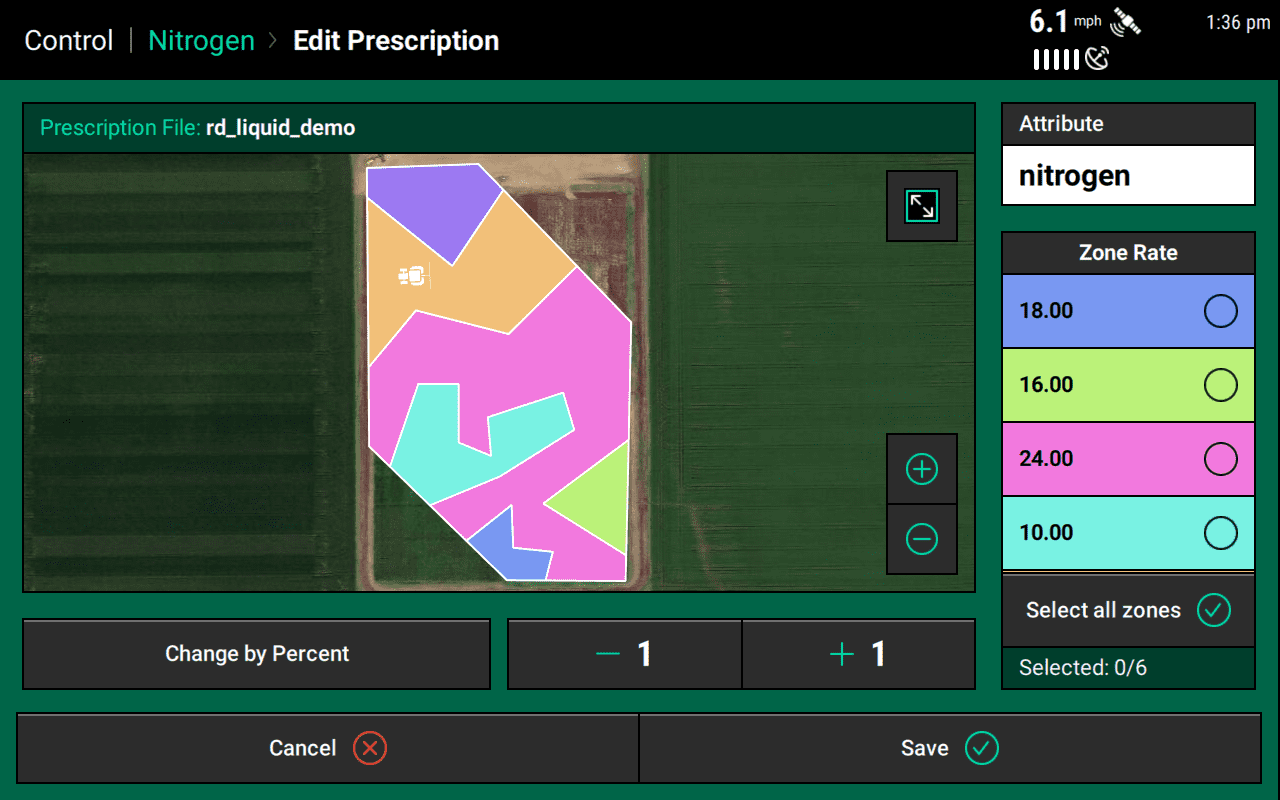
Edit Prescriptions
You get a first opportunity to modify a prescription when assigning it to a field. But you can also change your mind later and modify it from the system control screen.
To edit a prescription already assigned to the field,
- From the Home screen, press the control button for the system you want, such as vDrive, mSet, Nitrogen, Depth, and Granular.
-
Press Prescription Edit (right).
Control Screen Prescription -
Once within the Prescription Edit page, you can
- Change the Attribute (top right).
- Select any combination of zones on the right side of the page.
Prescription Edit -
After selecting the attribute and zones you want, you can either
- Press Change by Percent (bottom left) to enter the desired percentage
- Or bump the values up or down with the +1 and –1 buttons (bottom center).
- Press Save (bottom right) to confirm your changes or Cancel (bottom left) to discard them.
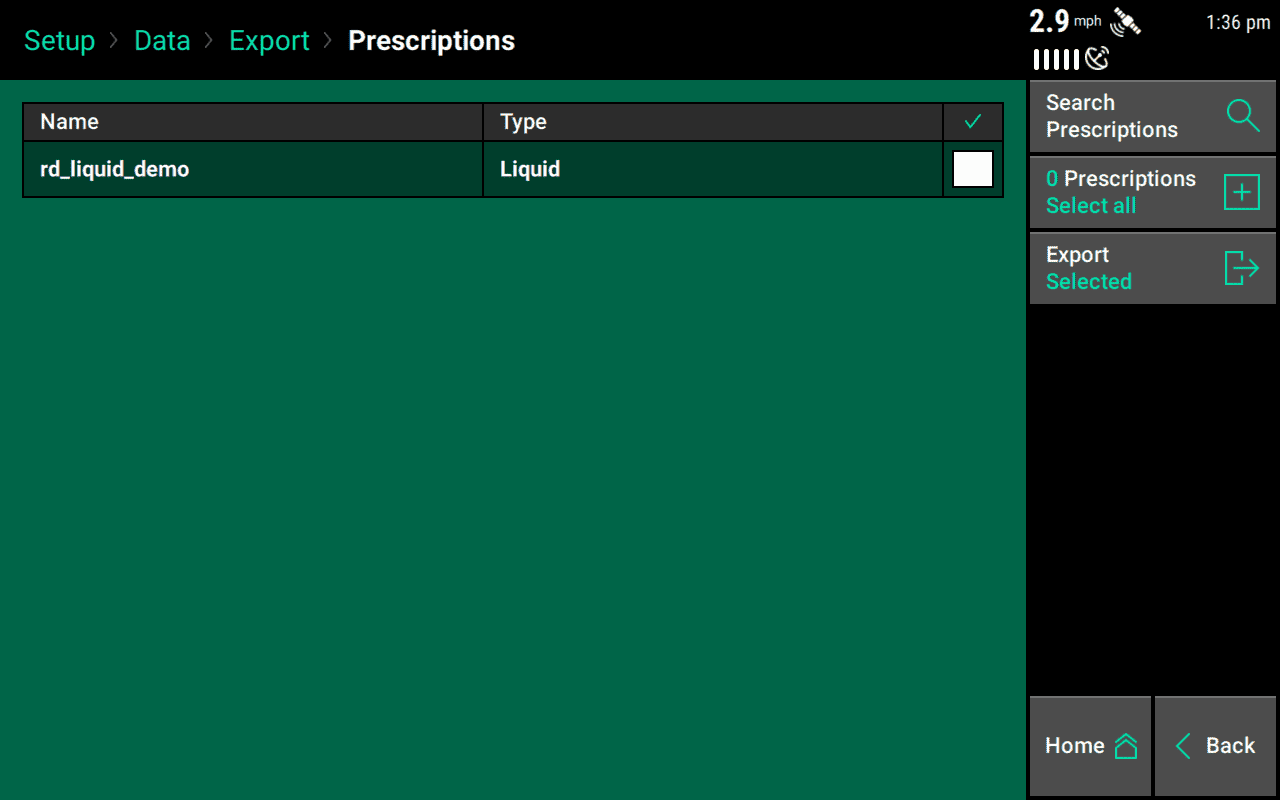
Export Prescription Files
If you've made changes to a prescription since importing it, you may want to save it for future use. You can do that by exporting it to a USB drive.
The 20|20 exports prescriptions in the .2020 file format.
When you're ready to export a file,
- Insert a USB drive into the port on the left side of your 20|20 monitor.
-
Navigate to the Data page.
- From the Home screen, press Setup (bottom right).
- Then press Data (bottom right).
- Press Export and then Export Prescriptions.
- Select the prescriptions to export, or tap on Select All.
-
Export the files by pressing Export Selected.
' width='1280' height='800' xlink:href='data:image/png%3bbase64%2ciVBORw0KGgoAAAANSUhEUgAAAEAAAAAoCAYAAABOzvzpAAAACXBIWXMAAA7EAAAOxAGVKw4bAAAGcUlEQVRoge2a61MTWRqHTwdQS0UFQV1ZGQiBpBMgIXLLpTtJ50I6d5CABMUJd0QuGtAtpsa1tsr9P/bzftn/8Nnqk4wDzm4VXma3BpKqp97Oyelfdf/q7ZNzzttCCME3oXzj%2bd8BRVFk7Lc70LQwPp%2bXGzdu0PvoEaOjo2f6tre38/DhQzo7O2lvv4kQ1skDPYihXsTAQ8SDTloUBaW7A%2bH4M8LZi7jfQYsl8Og%2bwtGD6Hsgo%2b1ehxQdHvViGDH8fj9e7yjTgSDxuEEgGGRiYgK73f4/McAx5MT/2I9bdUkDnEODFIpFWmy2T31v3bqFqqq4XC66u7utNlG/Ke8gwudAuHrlzSqdtxFqH%2bKxE/HD/boBf%2bpCuPsQE6o0xnb3thR1uVQimk7OzBCaniaZSrO0UCYRT5A1TUaHh39fAxpxwG6nUCgQiUSYnJykp6fnHOe3tZxtaLEh22zK2TS/2vrbdLf6XG0734Va/a60/i4ojWsYcjkplUoYhoHX65WpbmVHW1ubpLW1VcYrDVpbWxHiRQKxYiCeag10xDMD8dxArMTrWMen207HZwbKShxlJYHtRULGz7%2bLJR2xGEZUor9qfS%2bWoyhSM0qvNsFCaY4n5XnK5TKLi4tkMplPZLNZspkM6XyOXLFAOBRCiLUUjwJjJOeKRIpZQpkkjsej2MdGsPtPMfaF%2bEfo83nksaWr5dOMhKfqbV%2bj95l2v2%2bYPq%2bHQW0Kx4QP8STIQFrn7eEb3n/4K7VajZcvX1IsFuVjkc/nyeVykuhqhcT6czRpQDXJgG%2bYxfkFni4uUioWGfF4UF0uVJcqcasqHtX9ZbjduF0qzsEhZkuzvFhZITg9jWvIybDb8%2bV6n2l7VJV%2bu51u1UGfYwBRnGYwG%2bNgZ5ej4yOOj4%2bp1Y74%2bPEjJycnHB3VKJWK0gDzySwzLypoER0hVlMoARUxPogYdyAmBmkLeiTXwiNcDQ/TElBRppzYplwo52XahTLpRPE75HnisYMrQc8nrXPr/AcsDeG3058KUfv7ByIrZURhHHsyRFqLEjMMjHgcw7Aw5KAYjUbRdZ1YLIahR0hGYoyPj9czQImOMnO8Tby2xdLf3lL4aZ/Y4SqzP7%2bmcPIK%2b9MZRNCJiIwg9OHzERlGhN3YQh4SR1uUPxwz//6Qa0k/QnPXf9e/DlvMi/D/wJPX21iff/zrn4ikB2cmyszyIuubm2ytrbNerbK5tsHu7i4bGxsyC9OmiTFfIl6ZJyAfgdWUvJi2mJc2w8f15DjXEn6uGGOfaImOIjQPQhtuxHNgXWzYjQioXI37uZmaoC3mq7efV%2bO/oFgaAScP0kEWTg7wLhcQpUmcZoT0dpX5V1ts7O%2byebjHxrsa%2bwcH7OzssL62Rq5URN9aQTveJhyNIMT6DNKEaqLOj3HEj4mzVJP1Pl9FsqETr%2buvfovWKU0rvjAQiwHE8yhiNcFQIkRi9RljtXXGd1eY2FxmfLNCIpEgmUySSqUws1liy2WM1QpBLYwQG2nOsNng8%2bNv5XvpnNE0adnO0rKVkQb0xaZIxQyCwSDhcFg%2b9/GYIceBX7DGgHhII6VFGmOAlQF/cJQNE1GNMzSjc7i5w19qR7x7U6NaqWAmU3Lkl3MAi1wO49kC6cqCNOm3GfBH47QBKY35nQ0q749ZPNpj5uUqxnKZXDZbnwNks2SKBSLry0T2VgnJMeAiGZAIk6gu83h3hcD6EoG9qpz0WGuUbMMAKyYX5sjNldAuSgZINtNcU/vovt5Od/ttuixu3uJu%2b206OjrO0Hn7Dp0dHXJleHEM2M4geuXy9gvZuCAGbJmIvvu/rlIvtQHKZc8ApWkAzQwQzUeA5hggmoMgzX8B0fwbpDkPEM2JEM2ZoGhOhWmuBcRlWQzZLuNyePtSb4ik5ZbYdXc/9zo66brXLV9%2b6OrqktHaBrt79648Ps2dO3cu3q5wKZvDbJTDrU3QUi4va4NmOk0hn5ftpmnKarGmaRfPgOdPl5ibf0J5fp7sXInU8gK6ppHKmphzJSpPlygvWO8OXKS6wOYvhRGNN3sHvDk%2b5qe37yhtV5k6XJNV4XgxR3ypzOv9A35%2b/579vVeEZHH0AmWAc0ZnLl%2bo1wByOfKFAsW5WVkiy5gmhVJJpr6F9eKErlvvB/y/b%2bC7GJCWBdNefQIjrBPSwvL5tlJc13TGxsYIBAKf2mS7ruPz%2bfg3AJ2QTBw/Ih8AAAAASUVORK5CYII=' /%3e%3c/svg%3e)
Prescription Export
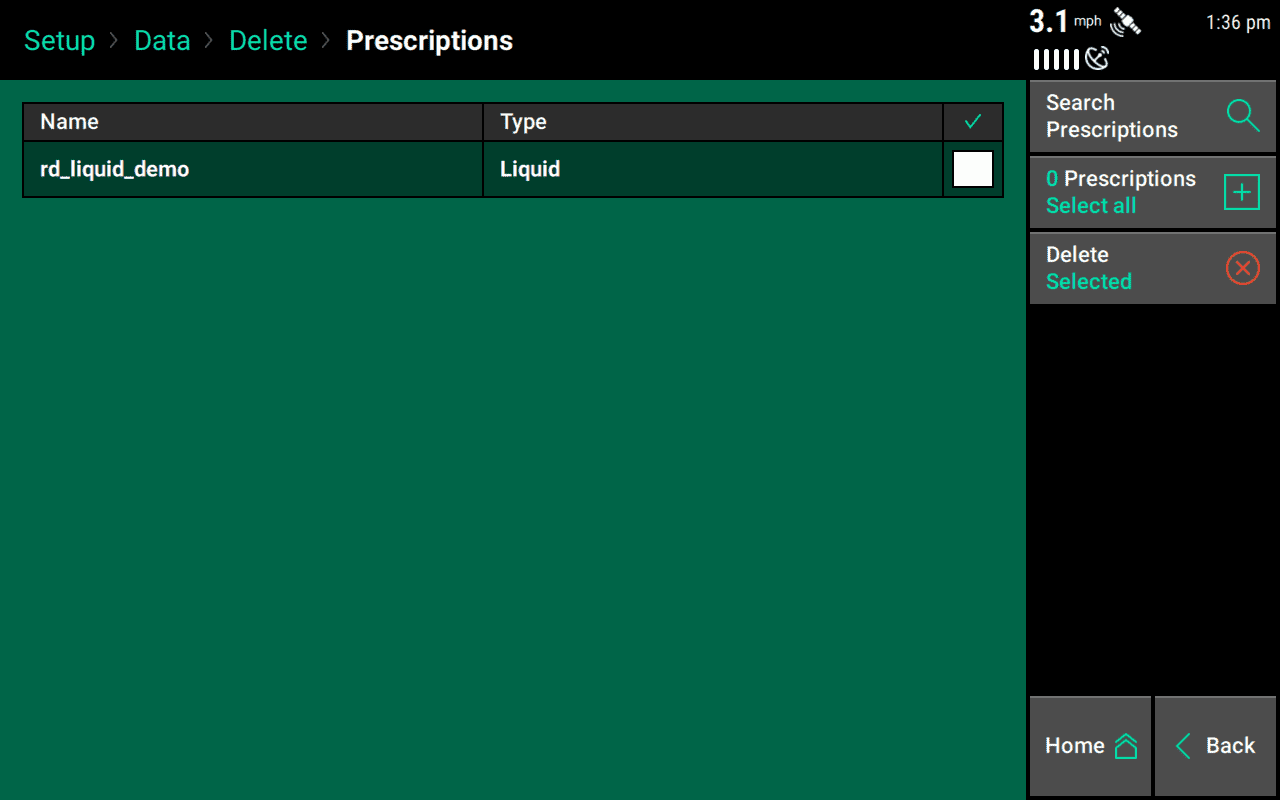
Delete Prescriptions
If you no longer need a prescription, you can delete it. Be careful, though. This is permanent and irreversible.
Deleting files is an irreversible operation. Follow the above steps with caution, as deleted files cannot be restored.
When you're ready to delete a prescription,
-
Navigate to the Data page.
- From the Home screen, press Setup (bottom right).
- Then press Data (bottom right).
- Press Delete and then Delete Prescriptions.
- Select the prescriptions that you want to delete, or press Select All (right).
-
Delete the files by pressing Delete Selected (right).
' width='1280' height='800' xlink:href='data:image/png%3bbase64%2ciVBORw0KGgoAAAANSUhEUgAAAEAAAAAoCAYAAABOzvzpAAAACXBIWXMAAA7EAAAOxAGVKw4bAAAGdUlEQVRoge2a61MTSxqHe7ioZQkKwtEV5XBJSEIC4ZIISWYm95DJ5AYkRsIRDXdFQOXiLmePa22V%2b3/s5/2y/%2bGzNZ0UC%2b5uFXq0toRQ9VRPXnp%2b1fPL252%2bjBBC8KOjKIosbXYH3jEPNpuNjo4OHj16xPj4%2bLm6VvzBgwd0d3fT0XELIaybh/sQI/2I4QeI%2b920KgpKbxfC9hDh6Efc66LVEvhDD8IzVI85%2blE6bloC%2bB7PEAoGmJ6exu0ZQ1VDRKMRQqrG9PQUg4OD9QY0Gvq9DBi2O3A67PQ9fCgfdGTETr5QoLWl5bRuZ2cnLpcLp9NJb2%2bvFRMIWx/Ca0dM2BDOfvmwSvdthGsAMe1A/HyvbsD9u4hpJ2J8GDE5gtJ1C0UIvONetGAQ08jg9z1mvjjPQj7HXGqOVCLOmMfzfTOgUQ4NDpLP54lGo/j9fvr6%2bi5wf3vr%2bUBrCzLWcubbUgTielu9/LzutbaLNfJ6e73ud0BqC8GI00GxWJQGeL1emepWdrS3t0va2tpkea1BW5vV9ucJxEoM8VRroCN%2biSGexRAr8TrW9eexM3FlJY6ykqDleUKW5z/HEUs6oqIiqpF/a30rliMoUjNCv%2banXFxgsVyiXC5TqVTIZDKnmKaJmcmQzmXJFvKooRBCrKV4FJgkuVAgXDAJZZLYpscZmhxjaOoMk1/I1BgDE255belquTRj6kw99jV6n2kPTngY8LqxazPY/BOIxSDDaZ3jN%2b/48PEvHBwc8OrVKwqFguwWuVyObDYriaxWSaw/Q5MG1JIMT3iolJ7wtFKhWCgw5nbjcjpxOV2SUZcLt2v0yxgdZdTpwmEfkWPC85UVgrOzOEcceEbdX673mbbb5WJwaIhel40B2zCiMIvdjLL/cofDo0OOjo44ODjk06dPnJyccHh4QLFYkAYYi/PMPa%2bihXWEWE2hBFwInx3hsyH8dtqDbskNdYzrqofWgAtlxkHLjBPlosw6UR47UKZs8j4xbeNa0H2qdWGd/4KlIaaGGEyFOPjbR8IrZUTex1AyRFqLEI3FiMXjxGIWMcLhMJFIBF3X5fgQ08Mkw1F8Pl89A5TIOHNH28QPtlj66zH5X/eIvlll/re35E9eM/R0DhF0IMJjCN1zMcIehDpKS8hN4nCL8scjSh/ecCM5hdBG6//Xv46WqBcx9TOLb7ex/v7%2bz38gkm4cmQhzyxXWNzfZWltnvVZjc22DnZ0dNjY2ZBamDYNYqUi8WiIgu8BqSjamPeqlPTbBzaSPG4kprsUmT2mNjCM0N0LzNMoLYDVWHUUEXFyPT3Er5ac9OlGPX1Tjf6BYGgEH99NBnpzs413OI4qPcRhh0ts1Sq%2b32NjbYfPNLhvvD9jb3%2bfly5esr62RLRbQt1bQjrZRI2GEWJ9DmlBL1HkRR7xInKeWrNf5KpINnXhdf/X3aJ3RtMrnMUQlgHgWQawmGEmESKz%2bwuS7NXw7K/i3lvFtVkkkEiSTSVKpFIZpEq2WiNeqBDUVITbSnGOzwefXv5dvpXNO06B126R1KyMNGIjOkIzE0FQVVVVl349b48EZrDEgooeJRWKNMcDKgB8cZcNA1OLYUxpHO3v88eCQPx%2b/p1Zdxkim5Mgv5wCmScY0qZgGtbwpTfrPDPjROGtAUqX8apP5410qh7uYuxvEqmWyplk3oTEPeJVJ8afcHPplM8CRUEm8qOLbfUFgfYnZ1y%2bIrlbJGpnGw5tksllKpkE1n708GSDZTHPDNUDvzQ56Ojrp6bhNz61O7nbcpqur6xy3u7q4090tV4aXx4DtDKJfLm%2b/kI1LYsCWgRi4V3%2bosyvZK2mActUzQGkaQDMDRLML0BwDRHMQpPkrIJo/gzTnAaI5EaI5ExTNqTDNtYC4Kouhlqu4HN6%2b0hsiabkldnN0kJ%2b6uun5qVe%2b/NDT0yNLaxvs7t278vosd%2b7cuVyboiMpjaKZxWgch1u7wcVsTp4PGOk0%2bVxOxg3DkKfFmqZdPgOePV1iobRIuVTCXCiSWn6CrmmkTANjoUj16RLlJ9a7A08uz66wstkwYE7j3e4%2b746O%2bPX4PcXtGjNv1uSpcLyQJb5U5u3ePr99%2bMDe7mtC8nD0EmWAY05nIZc/PQDJ5fMUFubl0XjGMMgXizL1LawXJ3Tdej/g//0A38SAtDww7df9xFSdkKbK/m2luK7pTE5OEggETmMyrutMTEzwL%2bHWj8tLQIw%2bAAAAAElFTkSuQmCC' /%3e%3c/svg%3e)
Prescription Delete