Software Update Process
Learn how to update your 20|20 Gen3 Monitor
Updated April 2, 2021
20|20 Software Update Process
Updating software on a 20|20 monitor is an important step in operating your 20|20 monitor. In this article you will learn about the different ways to update your 20|20 monitor successfully.
Updating software can take approximately 15 minutes however installation time will vary depending on the amount of existing data on the 20|20, the software version currently on the 20|20, WiFi connection speed and the number of Precision Planting hardware devices connected.
Updating Software Process
There are two different ways to update your 20|20 monitor. You can update with a USB or Over the Air (OTA). The instructions below outline how to use each process.
USB Updating
There are two ways to update your 20|20 monitor with a USB drive. You can find the latest software to download by clicking here. To update your 20|20 monitor with a USB drive follow these instructions:
Standard USB Update
-
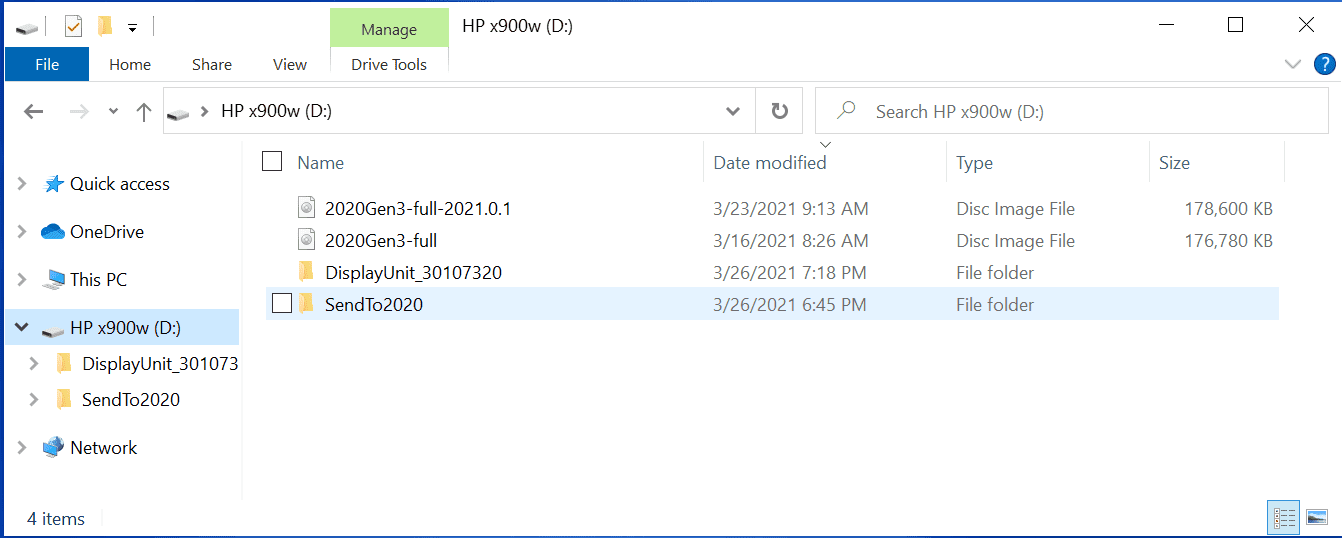
On your computer, download the latest 20|20 software and copy the software download to the root of your USB drive.
' width='1342' height='538' xlink:href='data:image/png%3bbase64%2ciVBORw0KGgoAAAANSUhEUgAAAEAAAAAaCAYAAAAHfFpPAAAACXBIWXMAABYlAAAWJQFJUiTwAAAHRklEQVRYhd1YzY4bxxHmE%2bQlcsoT5JRnyJP4DQLklkN8CAL4FCAI4GMQLIJEhuKDLMTO2pJlR5Z2udrlkhxySM7/9M/8/39B9cxwh1ySWsVAEKmBj13TXVNVXVXdXcORL1NsnAjLtQ/DtGFZOtZ2BNONYPuJgtX1tp92dAqLJTg3vsAT/RGeLD7D09VjfLF6hG/tr7E0BGa6i8nCxu3CxsLgWJoCrsjvIIsdeMcQnIbf4dCzzdNurMTKkjC9CCys4PBUPTuywCiNfKCpUYUcTWoAxRRlWQNNhdOtwbP4U3xu/x5/nXyMs%2bvf4h/O7/BDdgbBOCxzA02bYT6bwjINuI6t3vlftrLIt3QUSuRZoui6KlGmkaJHv/j4HL/85AV%2b9ut/4s/fWzQNj3FkWftyFEVgjCHPC/UchiGElKjrGiw3sfSvobNbzO0rrMQUsnCOGkTLb5q3oXkAz8OgdBI9sKGulRW4MiKcfW9h9NNfPcXPf/MVfvLRY/zpfAVUKVYbA3HcektKCdMwkHYOCQIJx3WVoagB7gkwT8J3OQQL1VhVVQdBTjsF4mmNPM5Deof92%2bTtj5WkoyrwfObjj1/qGJE38oIUtwL7VhSFEtBGpFGZEASByoCyLFVPPHexpd8GZVUedcAp5EWxlZvnuaJJPtHU93SaZapPkkT1Wff8TvrUOtu1jqTwkGc56rraKo3juI28ZamFE71cLqFpGsbjS0UvFgukadqlWesklRX/ZZNBoN7fbAwEYajG1ALzXNlgmSZ834fn%2bRCCwzAMWJaltic57eCWG2yF/VY3FKyaMgAoq0YN9KnVpxc5pE%2bdY%2b0hqf2QNB1mkqI6/YdS/W6Bd3PVke20b%2bP%2blhztK77vxbvIUtpxxuBzCdPxIWS4E/1DONX6%2bTCKsbFccBmCcYm16WBteduDeFdeo/gsl7X7eWd%2b12bbZRBBdE/G0IkjoMQrr8LC8qHNbrExTWw2a5XmSXKX4tT67UE3ggxjZHl5coHDd085qCwrBFGCJM0RJxnCKEEYp0cDQQcyl9HBsG35mkbJSdLspE0jIvysQURCmY9I7X%2bh9lt/9e0bHCcJ4iiC73tqL3qeB845XM%2bF6zpwbBs%2bY2pf7xt/yJCyLFR2JUmsHJylKbIsVbQQYpvOvZx2PkOaJGr/J92Z1Ud2x7lFgSAIlRziIZlDnhE9vFzH8GSMJKYDL9gebociSI0W5nse1us2U6j3fB%2bmaWC9WcPYrOE4DhgXRx0wHMvzDIxxCM63h1p/65Bzh6m%2brUWEUD3N09VMAdh3FG0XWgvxUkAZ59sD884BTYlPLwJcbRh0qtw0DUt9qU7fYw4QQQzX49B1HbPZXPWu60Jf6VsP7y70WMHTyqNoUnHFyEjG1MLJYBojuXQYDm2hiPKtA9pbwXHce2eCytY4AhcSnufCth0IIe9nALVKVUg4YTzRbYrVyQqJ0GE7nkp5uo7IYCp3bdtSUXEdZ5BJbTTut%2b5syXOVnlIIFS0yOopCtRXp0KUreshP82EgEYaBmlc1S3dj7Osjm2t16peKh%2bg9BxR4oUu8nG0wvRljsdDU3uq4doytmxp5BeTRArHUoa1sjG9ucTtfYLZcQV8bWCqY0JYr%2bDJC2QB51aBQwA7UeA1EaQbb43A8BscXkFGCIE7hMgHH50iLWvG1cgAmQ7g%2bV%2b9Yro%2bsbJSeVu5QT0fXd1CfOdusRpsBvYKsojuhRdFACSXhadkugAoH3QlhbF5BN%2bd4fm3h2cUUz9%2bs8PXrOV5pHqwUMGLATIB1COiygR7gMGSDVQDMvQyXOsN46WG8Yrg2Aox1hqsVx2vNwYJXiq/nvzYkrlYMl7qPy6WHhai3861s6juaxgbYhP112WXAV/MAz/UcT648/P07HWffTHH2zQyPfzDw2csNvrOBZwYw5e1LIs4RJjGCJIXNIzg8hCti2CwEi3KEebODqACivt9HNx6kFViYgUUtRFJCxAVEUoCTvj05MinBo1yBhenb9XQIcyAudj%2bURnpQ42ppY2J4uFyHGK8lLleixVpixipM3AJGQHnxkFL3Xcvhh/IP9/eP19s7YUQ/deYA0SXWKwOT6yvMtTkW2gy2bUObTTGb3sK2rJMFzbAa26Uf8un7NpnNA/jf7VO6d8KIiCIPUKUWojgF50zdl3Qacy7UN4IqHwdXy4/56Pl/ayP6KRIblXyNxXKD%2bewW2mKJyWSi7ve%2bNR%2b0A6r%2b6/h%2bO1QIfWAOKPHo2seryQzX4zG0%2bUz9I0R10f6i31cHHFrHTiUok0L9I0OVW5omih7elYeEvHeN7O96DM600T2%2bjof%2bPByC/nCgcrl%2b30Fr296oDTmghlBfgF35%2b4G3qR/i2w3HwuHIywqjl29MfH4%2bwdMXGv5942Ks8Q4CVwuCVHizJAQK1zohbLEKcdNhQli3uN28HT3vDgbyCL0e0kt2kF2Xc4aLGcPF1B/Au8PtYVzOGP5yPsUfntzgb/%2ba4tmFif8A1aNO4SnJcX0AAAAASUVORK5CYII=' /%3e%3c/svg%3e)
softwareupdate - At the 20|20 monitor, insert the USB into the side USB port on the 20|20 monitor.
-
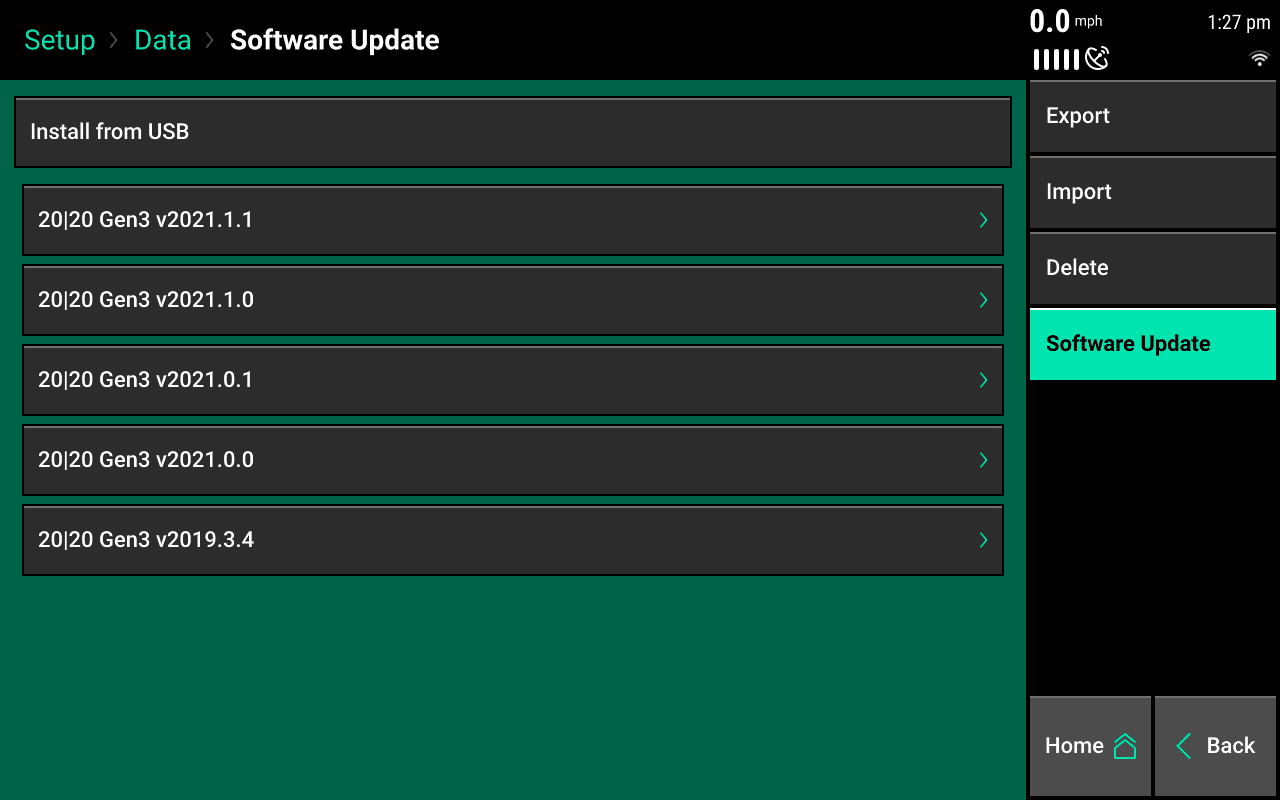
On the 20|20 monitor, navigate to Setup > Data > Software Update and click on 'Install from USB'
' width='1280' height='800' xlink:href='data:image/png%3bbase64%2ciVBORw0KGgoAAAANSUhEUgAAAEAAAAAoCAYAAABOzvzpAAAACXBIWXMAAA9hAAAPYQGoP6dpAAAH20lEQVRogeVaWWxjVxk%2bN3YynelkdzKJEzve4u3uthPbiXfHjn29JbFjZ6FSQ5JJR7Rh0zDTDh3UBx4pQgiYLoBUilg0CKQKAS9IfeOBRygvZXtAqOKJR54%2bdI7tJJPOqEmKEjc8fPr/89/1fPf/P/%2b%2b5xJCCE4E7oT7XQA4jmPW6/ViYWEBkiRhYGAA3d3dH9q3t7cXRqMRBoMBfX19NEZAHJMgXguIzQgyPgwd4cCNDjbjbjM4o4EdPO10IpPJoFgsIhAIQFVVZumFk8kkUqkUszMzM%2bjq6jp3AtxuN7s/agcHBx9LAJ202WyGzWbD0NBQiwCrEUSZBhFsIE4T9PSkQ30gLjOI6kQX3U4IpsxTWK5UkEoksJBMIRVPIJ1MQvB40aitYrlcQTGvIZNOQ8edIwEta7VYkM/nkUgk2EOYmJh44jE0QwYGBkBIj/7R9NZxIFf0IPojE6Dbn%2bo%2bXRnQ8145J1ztYdd0ul2oVWvIZrPw%2b/0wmUwsTjNBr9czUF%2bn07EM6aMl0LWRxPVaAtfrSVxfTeDpWpyB%2bS1Q/3otjt7VBPobKfTVk%2birt20SvS3LYmx7iu1/XuirxaFrxDGguDBtsWLSZILFYoHH44GiKJBl%2bUOgOmG320GuLUUg8AIESWSQVRWSLEMQRYiyBFlVmG1v7zTwkgiVFzGU8MEwJ6NaLGPzmU9hc3OTaZLL5YIgCOB5/hGIotgkoFubRX4xh62tLdy6dQs7u7vY2NxkJ6jX67j74osolUpwOp3sIJ6erIPgFQQoHh5DMRVDIRHx0BzKlTJyuRxmZ2eZQFMCjuIRAq4Ww1A9PGYUH2ZVH3yixBCQVWZpXBVECE43RJcHQqfB7YHqcGM4omAwKIB3OGF3ODA9Pc2ePiXgOGhpUBKsViuIbjOJ3lwQvfkQQx%2bFduj35oPo18LoL8yhvxBmfl%2bHYSAfgm4lAkNQhOIV4OV5NlGWscdSvw2aCTabDYTsLGIsNYvJkAJjWMHknIqJsIKJORWmeR8bG0My800RP8zRAKyJIKzxDgC7j1lYYzMgGwmMhGWsVpZZGe/t7bEyoD0BJeJ4GRyUAHl2AS5VwtrSChrVGko5DcvFMipaEfmFDBuv1%2brIJtNIxxKIBMPgnS5IHi9E90XDA9HLg5ck6JbmMByW4ONFBEMhVv90oo8rAYqDEiBbGbh8TeZWqzXks4uoV6uoLa8gk0qjUiwxYpKxOGt85oJB8G4PJF5gF79w0DRXFeiW5zEckpgGOKYdcDgc7Ol/pAaQ7SxGwzKMsgdjigdGH8/suOLBhI/HuOpl4wm/gAmfAFNAhHlWhnmmA9C%2bj4AEUo%2byeYR8AQRDQQSDQdaqt9P9KGiM9gEOh6NJgDHig9kvYpJObkaCqYXmBSQWn5qVMRVUWMw25%2b8Y2MN%2b2EI%2bcI0YDGEZ6401bO3dxHPPfwYLuUVMe9zgZQleSTyAh2aNLME6TQnYysDpk9FYrrJ%2bvqQVWE9PUz%2bfybLxer2BbHqBlQG1Ek09qgFtexHwtiz9XVdkdK3MY8zPIzhph8/igH%2bqCR%2bD/QgcbHvAOg33uOm4BlSbGrDyJA2II5NMNQnoFAgieJ8KfS6A/hdWYf/uK7A8%2bDIsD15u2u/ca/qvtfDte7B84w5sD16G8fazp9OASb/Atj9Sfx2gAaaQAn3WB/LmbZB//gLk92%2bA/OltkPd/DPL3hyDv/QDkD2%2bB/PEtkH/8HOTfvwb5z29B3v3m6TSAxiwhFfZO04D5APSLfpAHXwD3u9fBff8lcD96Bdz3XgL3m1fB/fAr4N64C%2b7Nu%2bDe/Ra4D94B969fgvzqayfVgDqr/bJWQHRuHl6X%2b2Lr/5gGeP0qetIKyNefB/ngHZC//BTkbw%2bboP6fj4zf/wnIe2%2bD/PUhyM%2b%2bejINqFdrrAcoF4qYD4Y6qw8QRHgVGT21KIjHBNLTDfL0UyDXWqD%2b8fH1q01cvXI6DaA%2bK5NOqP%2bjGuAXod9IglhvnOGN0vbJNaB9UVunaUBQhX4jBWIfa06qq/mO8GTYOrkG0Pd9uYXMYf13SB/glSX01GIg9vHDV3inIcB1Qg2gZGRT6Y7rA5gGrJ6VgO3TaUBH9gFtDbCNnY0A40dpgL8lfPT/wKzSuRpwJgK2DjWg/gQN2GisIZfJQlvMsfUAVn8M/BH/vMH/bzWgXllmta6x9wG1Aw1YKpZQXVpGOpFEMZdnMaoBnQL2X%2bBja0BIwpjowqjkYvV%2bQ3LhhuRu1r/sZuO2FlDbLpFOAH0XYPIJH0MDdhbBsEuRa/m5Q789bvsU29nOw14exHLjDATstib7SQZ9KHvaGQnYOfJkP8n4v82AnccQcKpWePeSEPCcBmIeOcXELxUBOZCbOVzzWjE6OATD6AhGRkZgGDEwS5fCh4eHYRhpxtsYYN8HXAICuN08yFYazmwUS4Ui8poGTdNQLBRYHxOPx5HP5VAulVicfkRBF3yj0ejlI%2bCZtXVUazW2yKOtLCG7WUc8GkVWyyO/soSNtXW26t1oNBCJRC4JATcPCfjiC5/F7Ttfwr07d1HY20L4c9uIRWNIV4pIrdfw%2bf193L9/H/v7%2b5ifn79cGeBajGGlVEahWGQfcpXKZVRWltk3Q1peQ2VpiaU%2bRaVSQSwWuywE5EA%2bnYE5NoNUJIb5aITVN01x%2bvTpElk4HD6IsXgsxj6f%2bS8UrjIVb7dv0AAAAABJRU5ErkJggg==' /%3e%3c/svg%3e)
softwareupdate -
A popup will appear and you should select the software update that you would like to install.
' width='1280' height='800' xlink:href='data:image/png%3bbase64%2ciVBORw0KGgoAAAANSUhEUgAAAEAAAAAoCAYAAABOzvzpAAAACXBIWXMAAA9hAAAPYQGoP6dpAAAIG0lEQVRoge2a2XPbyBGHh7IlHhJJEDdJkOCBG%2bCtmzpS5XVSu4ldqfJD1rUb5yGuxIr9nji7qU1iJ//2L9UNQqLltS1pXTaj5OGr7mlgBpieAz1NCiEEbguapqHX68EwDBQKBaytrb11D9krlQpKpRI2NjbIJiDkMoQmQdTKEFtF5Mi2WYCQKxBKFaJc4sqyovADXM9Do9GAaZosVU1Dp9NBt9tlSbZcLvfJHaCqKr%2bfoijvdAB1XJZlplgsLhwglSEMGUKvQSgVrJGtmE87b8rISVtcuVqtIvB9dO0Oup3uQnagqxriKOJrruOi1%2b0iJz69AyRJguM454NQLpffeS85qFAoQIg7l7yUE2Db2qUO3H3bm%2b%2bF2vhU3L3Dz6SRD8MQ/X4f9XqdpzrZaSYsQ7OTOp/P5yFygw42ogvWQ5thfQFfW9jycRd5kkuwPbu2gO//RORDG7nYRsFUIEsSd5xmAy0JWqa0J/wYtVoNYt1vQ9d06EaKsaig61Q2uEwyu75qaIYOU9NRtOsotQyEno/BcIjBYMBLgWYF9YU2yGXIViMHrDlNOP0%2bxuMxtre3MZ1OuTIRxTGOjo7ged5FQyuIqWoo2iaKlg7basHzfd4Lms3meWeXecMBdz2LG2iYdTTNOuq6wTQMM5WmCZMqKupqQtNcVlFsmSg0dWiygtpil6dBuzzyBC0NkpIkLfaAfhMbjsXkF2T6htNE3rWQd1sLeXHPSuBaKDgWcmEbpWa6HJan%2bY854I0ZICZ9bHWaqFgmypaJSqvOMtMrLdKNhV5Htd2AZDdXjAZE0kHJMhD5AS/j2WzGy4BG%2b/ISyKixA0Y9KKaBJAgRhxE8x0XgefBdD06vx%2bUkitDn776NdtOCpigwVI2//58XFTqNqGEg57dQtGj56mhaFq//982A8yUgxj0o9dRzURjyhkgyCkIOaHzPY8d0bJsDnxZtLKoKg74cNJU%2bN9RJ00QuSB1Ae0AW6WVr/b17gJj0sWkZKBsqtkwVZVNjyXqddA1bBuk6U2noqDYNVBurhYja3A%2br3kDTavIMoBjgXdOfPvWyLKcOKLcb3EiFGmuaqFAHGTMtk90yIVlpudZqrBh1iNjmPSCJY0xmU2zv7KDn9KHQaBvGW59Oim0kdsCwC0VTkbg%2bYi%2bA1%2b0h6Dvwe304dofLiR%2bg37bRabbQa9nQa/JqIMnQZYWXpHAbKJkqGlUZRm2BlEpzieyaWVOgblGovBdCHYcIj/YRHO%2bjvz9DfDpHeHKA7u4E/nwP0ekh7O0ROjtjvm4OAhiJDzMJPjM%2bjGEAYxyhuBdDOpmh8YtjmD%2bfLziCcX8O4/7hOeb9OepfHKL%2b5QkqRxOI9eMhZidz7Bwe4PBnp9g9mmMwm2C0s42d%2bSGm%2b7uY7O%2byPjvYQzKdYDCbrhzD2RTJ7jbig91zov0dDI8OMDo%2bZMYnc0QnBwhPD5m7v/kCQuwG%2bOrBr/DD93/DX1%2b%2bxOt/vsI/fvg7Xv75L/jT2Rm%2b/%2b47tr1%2b9Qr/fv0vnB4fIwoCDJMBBnFyc5J36DdpJyOOMYxSRnGC0PXw4MuvcPaHP%2bJ33/4WT75%2bjHh/B94v7yEZj7Dx61OI9aMBvDhCRDGA7/FxcjgcIo5jPgNkZwMqZzYKMByXcFPp3Axq67y9q8LPXHD%2bHs6b5SVJ7VOfgiCA7/vo%2bx76gQ93EGP9wTGE2PFRKG9BqaWxM30aKELKYmnSs3Jmo%2b9odm9my%2bxXIYvRNzc3GdKvUn/5mcvPXWb53uU6inxxD8UKxWoZQqc4YOZANnSMRyMeaRr9D0H30emRZsdkMmGdyE6RV4Hq0XeaIP0qdejZ9Mzsudl7EFTO3u1ynbfefTSCbBoQ0iY5wEVN13gN0fE3/gBJknBO8OHDh3jx4gUePXqErx8/xr179z5YNyOKIn6ZLDFBOtneVyeMQu7k2dkZnj17hufPn%2bP3T5/im2%2b/wZMnT/D06VMkdIT/QDtRHHFfa6YOUaNU39SBrGsYD4ZvbijvI07Yi7PpFCMalfEEo2vU52BlPIZpGAzpZPtw3QFmkymmkwk/e3dnh/XpZMr2K7/7YMCzXnCuczdAXqqgpqqQtKtRI6kqqCryG/Kq9elecnqxvMWQfqX6qsrPyqjItQud3kFXP0iVpKZiQ5EgtCoFQgHWoy7yXht538aGb5/LDa99USb9I5P/iG2LqQvR1iCqm2man6b3j7K4Rp0vUVZ43ONcgGRoqJoaJFM/l1JdT8uGlup1HbW6AaVZ/yjITZO5eX2SJuSGgTtJJ%2b38tdPp4/Q4HIch5/Y91%2bX8Ph2D6WhMZdr4%2bnQ2cBz%2b8eOzH4EvHYdV08CdyIaQty5S%2b9d1QLSUD4iX8gGUHAn9gH8AcR2HbYamrQxpPmDhAN7VrzsDJmk%2bYEtXsGkonAcgucn5gTQXkNpTnSQdj1cFPsbXdazREripAwQxJZyF7lzoWTnTV5WZswhsruuA6aKz/82wA9wbOmCyAqP3/xng/LTRv7wErvUVmN4WB7gQ1dL/4B4wIQek%2bromYbNQRGmzxH%2bEyKCfwunPEMu2zC5uhQNIjrtQ%2bm0E9IOO68J13TSo8zzYts1BHAV3ZM8SJe12%2b/Y5YJgkCKM0w%2bWGAfqDGHa7jT5liMKAT4TZ0bh9Gx1wsLuHw/kcx/M53NkY1t4EdttG1/fQTSLs7%2b7h5PQUe3t7aLVat80BNv9BghI2nG%2bkM00Y8B8l6L9LfhCc5yEpP2jb9m1yQA9Vu4Fu20ar3ebpTdDoU9rNsqxzG9vt1P4fiUX%2beWzkmdoAAAAASUVORK5CYII=' /%3e%3c/svg%3e)
softwareupdate -
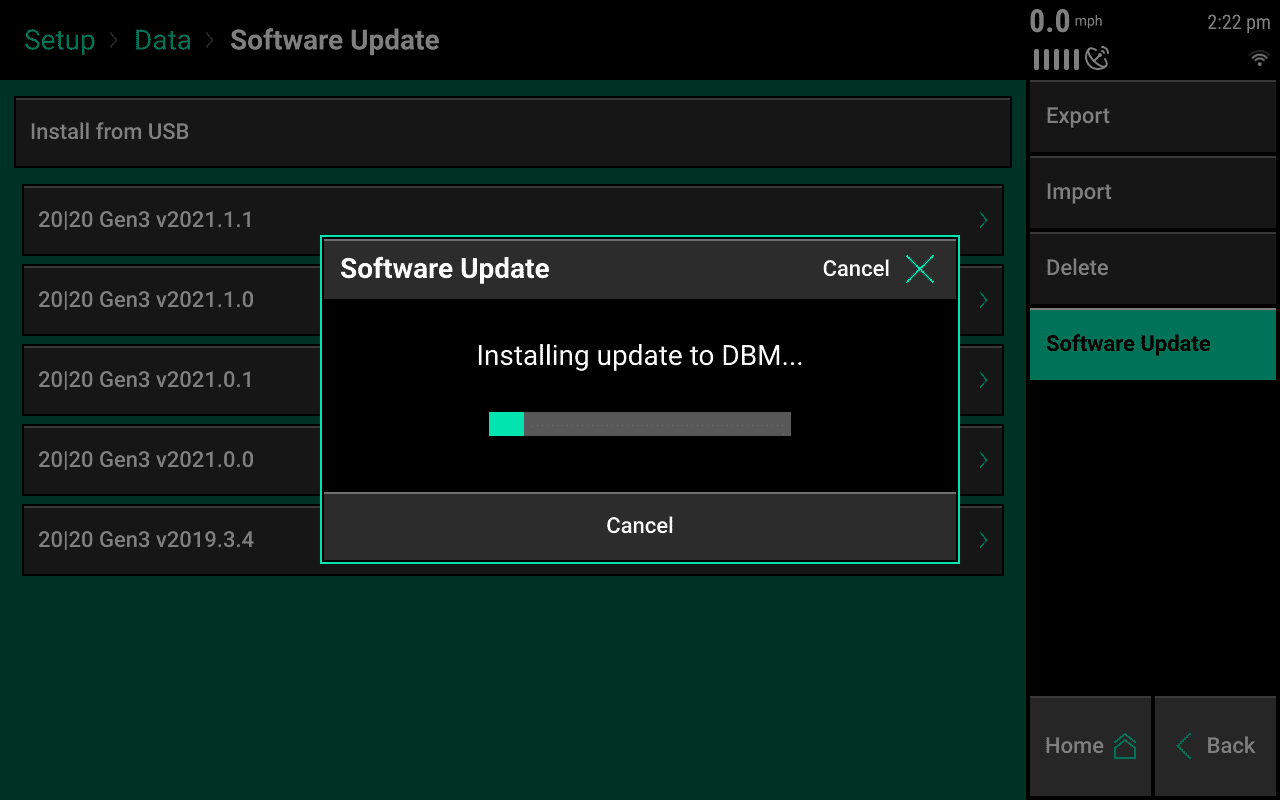
Once a software update is selected, the update will begin to install on the 20|20 Display Base Module (DBM).
' width='1280' height='800' xlink:href='data:image/png%3bbase64%2ciVBORw0KGgoAAAANSUhEUgAAAEAAAAAoCAYAAABOzvzpAAAACXBIWXMAAA9hAAAPYQGoP6dpAAAIz0lEQVRogeVaWXPcxhGeJSWee2APXAsssAewOPbgLo/lkisedqkk6iBty5YUOy5bVZHsslNJbMdypZQ8uPJi5cH5A/lH%2bVNfqhsAuaKpNVe2jtAPX3VPA5jBNLo/9AwghBC4KJBlGfV6HaqqYmFhATMzMz85h%2bzZbBZLS0uYm5sjm4AoZCBkCSKfgUgvIkW25QWIQhaimIPILPHFhWKRB3CbTZTLZWiaxrIky6hWq6jVaizJlkqlXrkDSqUS31%2bxWHyuA2jihUKBsbi4GDtAykCoBQglD1HMYoZsi/PR5LUCUlKaL87lcvA9DzW7ilq1FssqlJKMVhjyMddxUa/VkBKv3gGSJMFxnOOHkMlknnsuOWhhYQFCzJ7yUkqAbTOnJnDpp96cCOrjVeHSLI9JTz4IAjQaDei6zqFOdoqEcVB00uTn5%2bchUp0q5sITXA5sBusx%2bFhsm2/VME9yDGxPjsXg818R5gMbqZaNBa2IgiTxxCkaKCUoTYkTzkI%2bn4e47FlQZAWKGkGNL1AUaqvcJpkcf9Mgqwo0WcGirWOpoiJoeuh0u%2bh0OpwKFBU0FyLIcZAtTw6YcQw4jQZ6vR7W19exurrKFxPCVgtXrlxBs9k86egNhFaSsWhrWDQV2GYFTc9jLjAM43iy43jGAZeaJndQ1nQYmg5dURllVYukpkGjC4ulNxMU5oUSFisaFgwFcqGIfMzy9NBOP3kCpQZJSZJiDmgYmHNMxnyMRJ9zDMy7JubdSixPznkj4JpYcEykAgtLRpQO42F%2blgOeiQDRbyBdNZA1NWRMDdmKzjLRsxXS1VjXkbPKkGzjBFXz9YLuwSpDtKtYMlWEns9pvLa2xmlAT/t0CiTIswNW6ihqKtp%2bgFYQoum48JtNeG4TTr3O7XYYosHvfRuWYUIuFqGW5CgEpQKUfAFqDG4nSNqn7b8a8lDoiaoqUl4FiyalrwLDNDn/J0XAcQqIXh1FPfJcGARMiCRDP%2bCCxms22TFV2%2bbCp0LEUipBpTCit0PHhxy6KAUu5MCF2vagtJoMso9LOqZ1fKhtH9o5QdeorZM%2blZYHjfohW8eHommQNRUpP3IAcUBS6SW5PpEDRL%2bBZVNFRi0hrZWQ0WSWrOuky0irpCuMbFlBzlCRo7ZdRnN/G6O9XWy/tY/RW/voDTawtjXE6nATW3s7WB9tYbi7g/XtIR/rrK1Ohe76KvqbA/SHA%2b6TZGtrgO5wgMbeEFnbQE5TIFo2z8PUyzBMgyOAaoDnhT%2b96guFQuSAjKXzhHhyZRXZGDxR0vV40obGMl/RkTd15KoG/NEmnjz%2bDk9/eIq/P3mC7759zPKLzz/HN19/jX//%2bCP%2b%2bf33%2bNcPT/HBnfc5pbrtDtqt1kR0SIYtrHQ6uH/3Lj57%2bAiPHj7E7WsHqO1vIbi6C2e9B6lWQd7Q2AHEAe1WG721VaxtbKDuNFCgp62qXC8kKFFqqCokdkCcAi3igDBE0yUO8Dj0nXqD23QjjVqd04Akh3%2bxBLmsw17rRjfb6aDVamFlZYULkXa7jW63i8FgwDUF2em453mT4RP8CLEtDEPuj673gwDNVsjSXl%2bBbOhcC1AKLOsyjGweulSAnhtHfgwFPl6WCiils5M4wD%2bDA2zUqzWosgKVPFvWMUOLqJ9ZFyQrQ5Kzs7PPgGrzRCZ1OmFcP93XDNmpxlcKkI0yFOIAp4z5QYj80T6kW7uQbu9G8tZOpCe4uQPpYMTHMtu96TiAUoFslBacMrYRLaNf1x6ALEUcUFYxU9chDrch/vo7iEeHEH%2b8A/GnDyC%2bugfx5XsQX7wXyW/uQ/ztY4h/fArx4MZ0HEA2ydAiDjA0zr8ULaGfc4O0KKHyemNjg3H16lVOCVqxEYbDIUajETY3N49Dnc47ODjA4eFhvFyd4AAlH3GAqWOmoUPc2oL4wyHEOzsQ7%2b9DHF2B%2bPg6xJ09iMMRxOEViAc3Ib79EOLxRxC/vzYdB5BuVSqQi6XjFEhNiADacbGqVTi%2bx5solmVxLtNEyQEkaeJUsNDylY7TOp6Ws4R0On3mpsZxOshSxAGaitmaBnF9EE3uz3ch/nIvAunjbYqKL%2b9E%2br23z88BVAN4rosKFUJUB5Tkn3XAy0bkgDKT4GxgQZSy0f7A5UuTMRfj0uw5OYB1hfXxOmAiByTktdVG6qt7qA76CJsegjAK/0nwfZ8jhd7XkzkgH9cBMmbaVQhp%2bQUc2Z%2biDiBbWeWcSziAbuLMjpPQ/ewI4r//wfDBfdy%2beg0HN2/gxo3JuH79Oo6Ojjg9xt8iz%2bUAIsFODSKfPtnVOrcDelNwgOOiUa9z/Z3UAcckeNZNvqyN0eS1quSP64DZ0D5xwFTonZ8DyBmNWo0dkJAg7yi/Jg6gsY854IUd0J%2bOA07XAUW/wWtw2jrTpsD4So30aa7lsWSFx36GA17UAZlpOOBUHeCOBuh3V7DS6/G22nlAZTFttVENMNzawvb2Nvr9/rn7oPNoTBr7TA4Qv5QDvGc5oNNq896A22hwKTzOAfWNfrSXEIbnRhiEuHXzJj795BPGu%2b%2b8O9X1BBqTxn4pHNAa2w%2bgzZHA8/kDiOs4bKPFkJo4YHudF0LhShdh9xzg8zrHCDptBJ24PUUfNGZ9a/3X44C0UsSyWuR8J7nMnBCtAyJ7pEe1AKWDwttoyx0X6bbzWkBj0z1kfykHCMIqwYl150RP2ol%2bGt3a60VyH2vOCxZCq/Fk/5/BDnBfvBIUFwG/2Qjon%2bGAqUrh1YviABcit/RbjQCH9cuyhOWFRSwtL/GPEAloY4V%2bhhi3JXZxIRxAsldDsWHBpw86rgvXdeOFXRO2bfOmCxV3ZCedPvhalnXxHNBttxHE1aYb%2bGh0WrAtCw3XgRP46MS7ywTrIjpga7CJ7dEIO6MR3LUezM0%2bbMtGzWui1g4xHGxid2%2bP9yErlcpFc4DNP0jQ/iOFOP0n4AU%2b/yhB/y7Rtwa207dPz%2bPUuEAOqCNnl1GzbFQsi8ObQE%2bfltCmaR7b2G5H9v8BTdm5koqfkecAAAAASUVORK5CYII=' /%3e%3c/svg%3e)
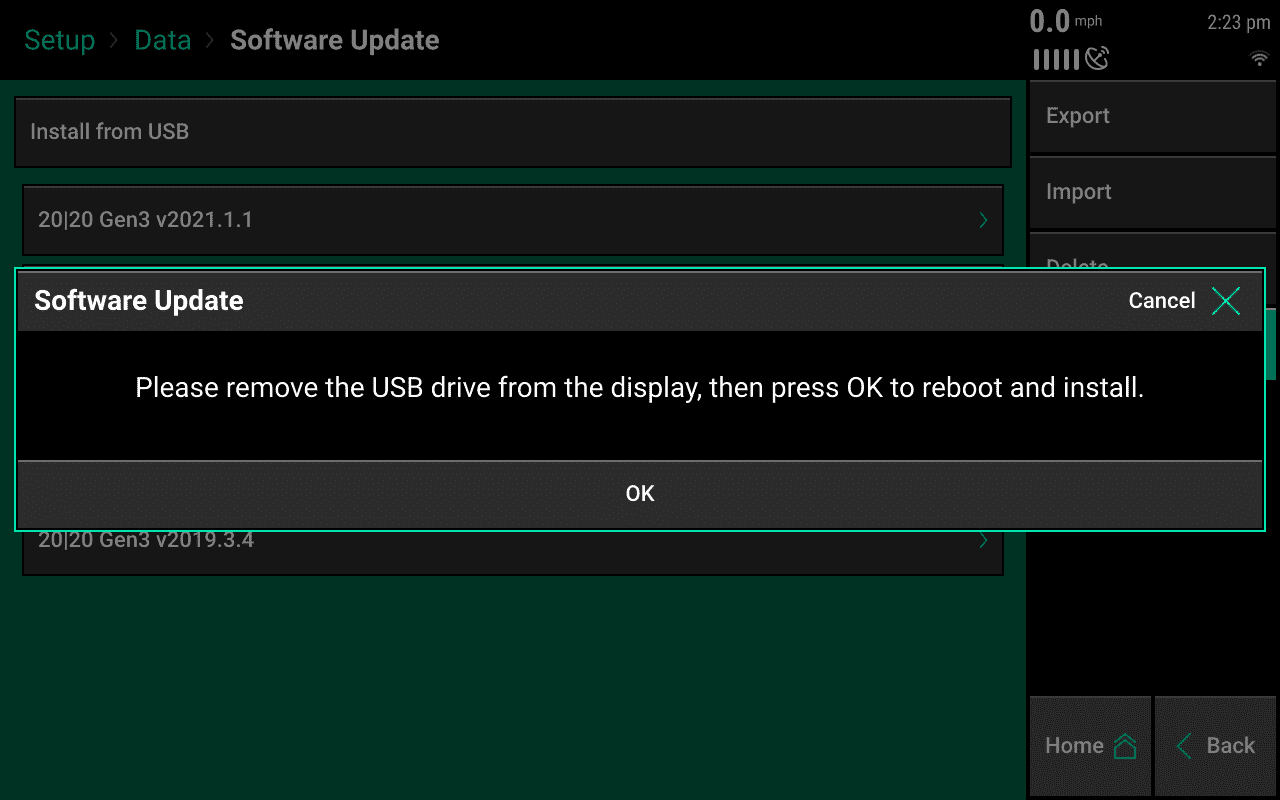
softwareupdate -
When the software is installed to the DBM a popup will occur and you can remove the USB drive from the 20|20 monitor and press 'OK'. The software will begin the process of updating and will automatically power cycle during the update.
' width='1280' height='800' xlink:href='data:image/png%3bbase64%2ciVBORw0KGgoAAAANSUhEUgAAAEAAAAAoCAYAAABOzvzpAAAACXBIWXMAAA9hAAAPYQGoP6dpAAAHz0lEQVRogeVaaXPbRhIdUhQvXSRBHCRAghfug5RInRR1WL7itcvxOtl17GQTZ1PrD4kd//8vb6ubhEzLilNlqxxG%2bvCqe3oOYN70HD2AEELgukCWZXQ6Haiqinw%2bj3Q6/UEZsq%2bvr6NYLCKbzZJNQFTWIOQSRHkNYrWAFNlW8hCVdQhpA2KtyJUrksQPsGwb9XodmqaxrMoyWq0W2u02S7KlUqkvTkC1WuX3kyTpDwkoFAqcX6lUWJ8SUFqDUCsQShlCWkeabIXctPNaBanSKlfe2NiA6zhomy20W%2b2ZbEGpygh8n/OsnoVOu42U%2bPIElEol9Hq980FYW1v7w7JEUD6fhxBLF1hKCbAtfaEDmQ/Z/CiojS%2bFzBI/k0bW8zx0u13UajV2dbKTJ8yDvJM6n8vlIFJRC1n/HZY9k8H6DJw3s%2bWCNnIk58D2JG8GLv%2bFkPNMpAITeU1CpVTijpM30JSgaUprwmUol8sQy04TiqxAUadQZxUUhdIqp0km%2bYsGWVWgyQoKZg3FhgrPdhDFMaIo4qlAXkF9oQVyHmQrEwHpno5et4vBYIDRaIStrS2uTPCDAIeHh7Bt%2b11DCwitKqNgaigYCkyjAdtxeC3Qdf28s/N4j4CMbXADda0GXauhpqiMuqpNpaZBo4pSdTFBbl6potDQkNcVyBUJ5UqFV3katIsjT6CpQbJUKs3WgK6ObM9g5GZI9GxPR84ykLMaM/muzELAMpDvGUh5TRT16XSYd/PLCHjPA8RmF6stHeuGhjVDw3qjxjLR1xukqzO9ho1mHSVTXzDUIcIWioYK33F5Gg%2bHQ54GNNoXp0CCMhMw6EDSVASuh8DzYfcsuLYDx7LR63Q4HfoBurN9v2kYkCUJalXm/f%2bvRRUKjaiqIuU2UDBo%2birQDYPn/8c8gNaOEhPQ76BKBDguk2B1ulMyHJc77Vo2Qs9Du2miY5po1HWee7RuqIsA3sFUpJ0GTwGlXIFE879cgSxVIVcvh5KsAWKzizxtIbqCgq6wGxXm9KI%2bTa80NAbZEn1hYKgQcQs5s4aaoUNpGFAbBqr1GqSaxrJaJ6lxusI2jRdLkZnEUMdbkIYBqqPwXMrbEYP0xE6oH2zBOBxBXxAYM9SOt9Hc20J4PEZwMkZ0OoEz3kVjK4IxCNDYDGFshmhvb6Iz7KN9MEKp24RI7/m4c%2bcOXj7/Hq9%2b/i9%2b%2bfElnn/7L3z39Fv8%2b59PWX/5/Q/45cef8PMP/8HecITY8zEIQvT9xcHAD9APQkS%2bP0PAC%2bLZ8QkeP3yEr%2b7ewz/u3kO0M4J3Oka0OUClY0Is7Qc4uXsbv/36K356%2bRK/vX6N39%2b%2bxf9evcJ3z5/jzdvfOf36zRuWh5MJgjBE3O8vNPqDAb/nrbMzvHjxAk%2b/%2bQZPvv4awf4O3PsniLaHWJ8MITIHIe8C66trHO1RBEUgnbYJOlDM22llpfP13wXJgSfpCx3teQFvGkg/OYYQ286Hkd9NAEWRD/YhxI4LsZw5z0guMujGhPZSChnnQXaSy8vLHFKSd9DFQnLRQHF4YqdyZKcRoNsXSlOkRjbSqQzZybMoTKV6VJbyMpkMp%2bl5S0tLXI9Gk2z0bGqDbFSOdLJRW6urq1hZWWGdJLX33uVMaiZzyxD3d2cEzOLpeZD7HBwc4N69e7h//z6Ojo44YJpMJjg9PcXJyQn29vY4WCI9jmPcunULDx484JMY1aE8CqrG4zFu377NdtKPj4/Py1D5hw8fcvuu6%2bLJkyfc7s7ODj/77OwM%2b/v73A6lgyDA9vY22x4/fsySnkvPp3yqR0EdveOjR484jwj8wAOyGQi1nHjAJQVmoMrEMsmESdKJ8aRMcslA9ouXD4lXJS9BepJHtmT0aOSSvOTGhp5LNpIX20rKJu%2bWvOf8uyR5l/aNCJA2iABnOh/%2b6jn5pUGDXmUCXGTyOWTSU8ZuBKivxfz0Ijg7iREPtzCI%2b%2bj3bwYGcYx4NERWVyCyhzH8fowwCBFGIcLwcgRz8irg%2bz4ftJ49ewbX866o7YAXyT%2bF78Mf9JGty1MCArr%2bsmy%2bT6PjI8lE9515fYrQ868EO8MRg6JNOr5%2bajuR5yN2PcR%2bgDgI/xx%2bgIgI0BWI9EGA%2bihGfDpBfHYE72gf4ekhBxTu4R68owMM7pzAOdyFO9mDdbCDet%2b/EmiRy9D7wae3MwhQG0aQdmOUIxsVq4WK3f44rDbKXg9p3gUGHZQbdbhBADcK0XFseFEINwzQsnqwfQ9O4MPsdtFzHbStHuSadkWozfAZbVDIa9RB9xpC3pj7JpH6OM5Pv4MuVnQFq7KEFUXCqlrFKklFwtoHepXlRk1ZLGgy0oEJUVr5hC1xqwe6FGHJmNM3L%2brdqVxEDK3PIGDrb47PImBzAUbvSjygd0M9YPMSAlI3kgALYqN4Uz2gx/qyXMJKvoDiSpHvERJQZElR57wtsYtrQQDJQRtSt8nfMXqWBcuyYFv0kceGaZr8lcixbbaTTh98m83m9SMgDkN4dNb3fFiei24UwGw20bV66HkuIooZZjFB8zoSsL%2bzi4PxGJPxGNZwAGN3E2bTRNux0Q597O3s4uj4GLu7u2g0GteNAJMDN/qJi1yc/hNwPJd/lKB/lxzXndptG47j8NS4RgR0sGHW%2bRtmo9lk9ybQ6NP9pmEY5za2m1P7/wEtw9guoMyVfAAAAABJRU5ErkJggg==' /%3e%3c/svg%3e)
softwareupdate - During the update process it is important to keep the 20|20 powered and not turn it off. Turning it off could result in data corruption.
-
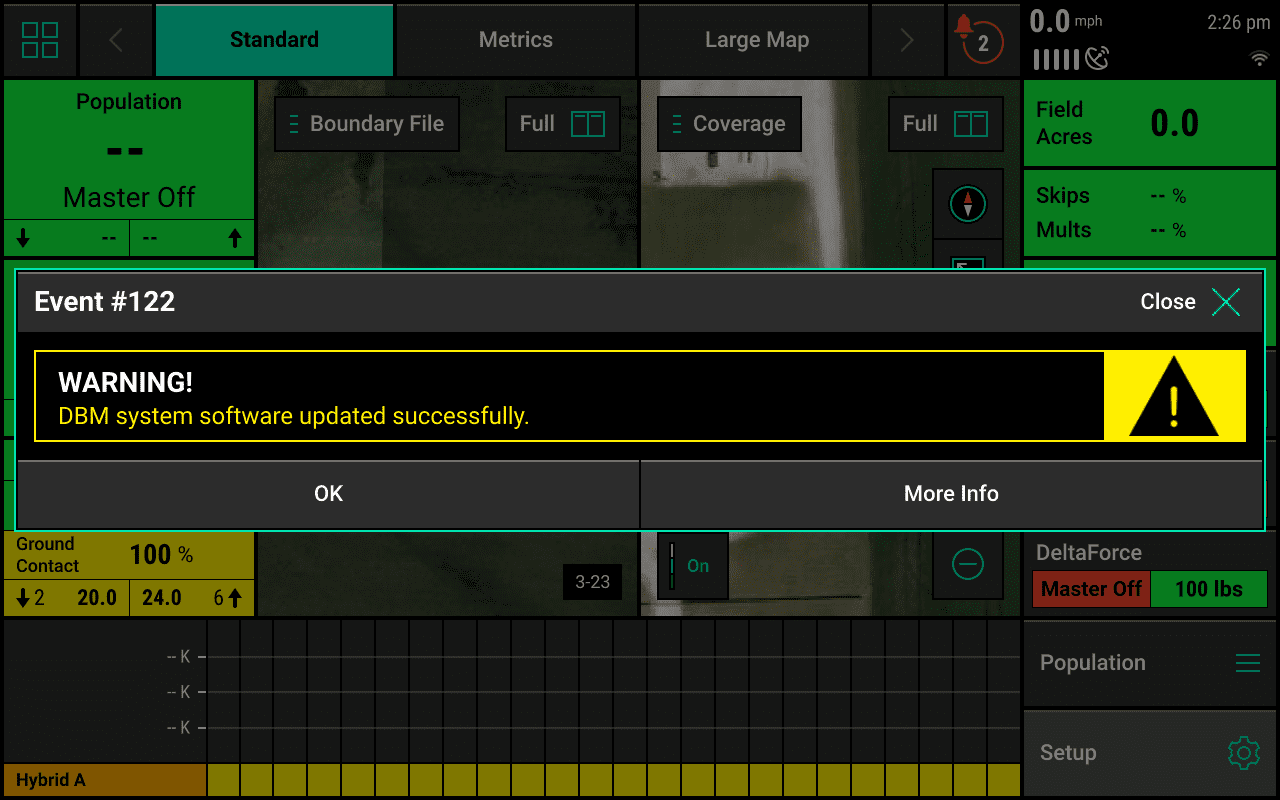
Once the 20|20 monitor turns back on you will see a popup that says 'DBM system software updated successfully'.
' width='1280' height='800' xlink:href='data:image/png%3bbase64%2ciVBORw0KGgoAAAANSUhEUgAAAEAAAAAoCAYAAABOzvzpAAAACXBIWXMAAA9hAAAPYQGoP6dpAAASnklEQVRogdWaSW9cx3bHi2w2J5PsvvPUt%2bd5bnEUJUq2ZImSZQ2kNVEcRM2zZMmDPLz3bD8EBvI1sskqQJDsEgTZBUE2WWWZb5BNsskuv6DqsmmSkuD34PeCvMUfp%2bpU1bl1/nWq%2bnadK5LJJJZtK2iahmEYmJaFpRskciHvrZ9lYuMjJqS8%2bTET2%2bd/khL9tlsXeO/YNGZSw5LjLQvTNJXNPqTtvl7KgzpZ1nVd6ftyb7us98fqhoGtaeRtE8s0kX7Ytk0ul8NxHEZHRxkcHEQIsQ9SPzk5yfj4OCMjIwjN0Em2KwqadN40cT0P1zCZqOYQn11HfL6GeL2OuHcesX4acesjxOYyYusM4tW1qM83WwxeOIqV1LEdW01STqTZbFKr1ahWq6TTaaWXE5WQTvbrsm8mk6FcLlOpVJRsNBr7xui6pqTnumimSd7Q%2bCDtUcpksLWkWrh8Po9hmhEBsTcJGBsfUz5KAkfHxhCaZLpVRWtV0HUDSzdxHQ9PM5ks5xCv1hCf30B8sYF4sIJYO4XYOhsRIQn4TLavIb69ydCFJWxNEuBgWTau6yon6vW6IkCujtQrh21HESAn04ckQJIlx0hHWq0WmWxWRUGfMEWA52GaFoamUUgF1AoFXC2JltQp5Ytk01kCz2dqYvINAnYjYXiU0ZFRxKQ%2bheYZaK7BlJUg6elovoHuaoxXU4ht6fApxOaHiO3TiO0zDMrV31xmcOsMsfVTxNY%2bZHD7LPGlDnoigW7ouyE8NTXFVGKKRCJBMplAES7bDZ1EYko5nkoFBEGgHHNdRxHneS7OTqTYMuR1TdmQUo7VDI0pLYFj6vimzmRiCsM1qXRqZCt5nNBlQp9EDAnE8AAivoORQVUfnhwlPj6MiG/aDL9OMfx5iuFnPvHbDvF7biRvOcTvugy/Chj%2bLEX8qxQTVxzyGZNJbQzH1wgzJmHGIJU1MZ0kSX2ChD6BZk5h2AlsL6n0CWOCSf09kvokuj6JYSexXI0zHy6xcf0yVy9f5PInF7h8%2bSJXr6xy5fIKVy6v8vLFE25cu0C14ePlTMyURtKZQvMTqmx4SXQ/iZHRiV01EM8sxGOLwRcuQ6/8yK/XYYSvwqgufXmdYmjDQsTvuIx8n2Hk12mGv0wRv%2b8Sv%2bnsJ%2bDrkJFfpYn/kGFiwyUTmOiORTqbUWGdSqV2ZEA2m6FQKGBZJranKZJsxySXz5PNZDAyKbRqAd1zsOwkJ47N46YCwnSowl6Oz2azajtIe8%2bfPuThvQ1anTR%2bwcLyTHLZHLlsFiv0lS0jHWCkNIbXHYbveUqOvA6VTyPfZYg/8KJFvens%2biJ9jt9xEdLRkd%2bko4Zv06qs8F0mwm8ykf7rkOHv04zfcPE9g6TnUixX6HV7tFptDh2aptPpqsNL6nzfV6vvpgxsx6LRaFKvVNHzmei8SfnYrsbxIzNM2dIxT50T1VqNWr1Ou91WW%2bHRwzs8frClCPDypiKgVq3TrDew0iHJZgUjl1FRMLzpRAu45aho3nV0y2Zo1WTogqEi4U0Cvksz/E24i/h9L2LrVaCcl7qIgAxjaw5%2boOGm5GQMFcq6lSQhw9rS0M0kmpFQZem8F8pIkD%2btuoLlyq1ioJnR1lg%2beZTFw7MszM9Sq5aZnZlmbnaGo0cXWTq6yKsXT3j68Ca9QzmCooUZ6Oi2RtJOYPg6hjyvPB09ozN8zSb%2byIui95HH8BdRuCv5ameb72wBuR3im/aBCPj1zur3nZYrL9najYAMY9cdsnmbTMUhKNmkqx6poomb0wmyFrYMeV/DdBOYbhIn0HFTOm5o4KVNVTfcBJo9iWZOcvbUUV48vc3zp7e5f2%2bTTz99wPMXD3jyZJuHD9Z5/cVzXjy9w9xsgaBgYucM/IKJkUpiSMcDI5Jpjfglk/gzn%2bEnfkTEXTcKfQm5qDI67u7gocfQJUMSEJ0BipE7UfioPXMrCiPZLssjMjp%2biAjI5BzSFY902aNQT1FuhWRrPmHOUSvuhEYU%2bl5SkWFJGWg4KQPL1yPn7Umm9PeY7hY4dqzDkaMtjr3fY%2bFwnd50kWY7TbMdcmP9PF9%2b9oTFhSp%2bwVAEuDkDw9XQLIukpaNZNro8AzZ3zi0ZvS%2bD6GxTCxpGB7kMf7mt5UL/NqOIEWq/yBWXJ6NkZtPeJWL4qR%2bx99CLwubXaUav2IQ5m7Dikan6lFppKt0c2XoKL2MRZBxSWQl7F0HWxs9IGbWpKHCmSJqT1JuhcrTRDKnWfRqtNK1OVqHby3L5k1N8/eULji%2b11cpbOQMrq6O7SRKeTdI1mXRMjFBneMMhLud822X40yDy6%2bs9p7/cCnIhv4qiPX7LQcQ3bEae%2bYz%2bKh1BMvZFihHZ6cvUT3pp7InH2IpFWHDINwLKrQy1Xp5ar0Cpndtd%2bVTGJpW2Iykd35F9XRBaWE6CpDZOvZGi283S6WRotzOq3OvlONTLszBbZOX8MV6/fMQHxzv4OQM7o2NmkuhOAkM3SFompm6ghxoj8gy4aRO/ZjHyxI98kVtYbu8XgfJrVK7%2bNyGj8hC86yJi53UG73rEXobEnqeIvUgx%2bCQg9jiI6s9TDD4LGHwRIO67DJ23yLUz1A5XaBypK9QXa9QWa7glHyNjYRdcnIKLW/BwCy5e0VOQda/k45d9pddTOvVDOdpzBZozOVpzBboLJXqLFaaPVJlZrPDxxSW%2b/PoZx07P4JQt9KJFsqiTSOkkA4%2bpTEDSc0hkDQav2Qw8Dxh45DH4xGfweaCg/JA%2bSDzfkS8DhlYNxOh6Hnu9h36hhrnaRL9Ux/qkpaSx0lDwrx/Cv3YIf2Oa4HyXyrEZ6icXfsKJeWon5iksHiI33yG30CV/uEvhcG8X%2bR0UFn%2bC7Fs/Pkvjg1ka78/Q/GCW1ol5OicX6Hx4mM6HC8x9dJzTa5fonT5CfrFDbrFLdrFDZq5NbnGGcL5HONslu9DBv9jFvzGNv3YomvMOpF/SJ/tKG/9aj%2bByF39zlpEbOcTwSo5TJ06zfukql5bPs756nfMnz7Kxep31lWtcPb9Ku1SnU2ootCsNmrUGTflbfACteoP2Dlq/I5StWn1XNqr7Ua/UqBTLqrzXfrve3FOO6p1KNMfduZYadCtNVs6c59wHy5yYX6LV7lE/fJhWs8v45SIivpJl%2bdLHfPrpcx4%2bfsjT50/55MonrG%2buc%2bfeHTZubtBsN%2bn0OrQlum063c7b0Wn//niXrT3o9rrvsL9fJ%2bfW7kWQ8%2b1Nt5mZ63L9xmVu3t7g6pVLdN6fo3nxBO2FacauFBEjn%2bQxfPnPSf5nl/%2brDQzDQdPlf24bw3Rw3ADb9v7kMDbuMxT3EMJACB0hTOLDPvFBB91PM3I5hxAfhyTMGK4pGBsVTIwLxkejssKIYGpCYBoCU/8TwJ553t0SfP%2bV4DdfCr5%2bKfj1F4JffS74/ktBuT6IqPiSgDReOoZlDLO8fIKlo7MsLx/no7MnOLP8Ph%2bf%2b5BGo0A8LgkZYHSHmNERebtyAO/SjQhGJIZ35B8R8lnD8jnDgn/7ZwFEeHpP8O//%2blN9bS2OmJIEnA0xvRgT43GuXd/go3OXOPfxCisra1y8dJ3LVzap1jo7FwkD77xg%2bP%2bIv//ryNm/%2bguBlhTcWhfwX4L/%2bQ/BxZUhhCG3x/k0dhBnJC5o1gQLM4JMKAg8QbkgKOUFviuolAQzPUGtIug0BemUoFIUTHcE011Bsy4oFQTFfIRqWdCoCrotwUxXMDnxf0/AP/2dgP8W5NKCQk4wNCT4m7%2bMSLm4OoSwJAEfBNhBTO3zfFZQLgpSfuSwdLaQjQiQTmXTETnScc8V1CuRo9VS1C8MBMVc1Fc%2bUJZzmahPMiGIxQTDcaG20x8Lyv6QIDYo%2bJd/EPzj30aLuHwyWuDHdwT8p%2bD8xRhCcxGD50Im9DECdxDLHFKwrUiaRiQdO5J9SL1jRbKPveMOQra7zhCBN4S/g6gcU9ir/10g%2b6f8OIHCUIR9diOUC0MU80NUy0OUi0PUykOUCkNUi4MkrTHG0wFi/GqR5vQ0zXqbVquj0NyR76rv1b2t7W1oNg%2biS60mb4ybqvxm%2b7vQpdFoUy7XqFQauzYajTf71mr7Ic%2byWr1DtdKmeWgarZxFjK8WaE53aDfrtNoNhfaOPAilb0k0qdVrHDt%2bjMdPHjM3P0e9XqPZav5ekDbqjXpUbzYitJrK/sG%2bSteU82ixfWube/fvsbq6wtbNLW7e3FL6/vi9Y95qS/brdTCLGUTsSplyvUul0KBSalIqRCjvoLQX%2bSbVUv%2bVtUa32ebw3DydRkvVo1fan0H/1bnWoFauUMoXdl6Lo1ddeW1WK1eVPfkavBf9sQszc7x/dInD8/Mszi%2bwuLCgXoX7z5C2%2blLZPjCHlpxrp40uCWhdszn2SZHjl3IKp67mOH0tkqeu7a%2bfWcsxd7ZA6lCD9EyD1KE6frdKOF2P6tN1UodqhDMNwmmJ%2bm5bZiYao8qzTSVl2%2byZD/A7dbxmFadepnZsjs6JeUoLbWpHetSO9qge7VFZ6pFdaOLP1PB6FaxmEadRwW1WInmoit%2bpkerUCdo/Sb9VJejU8XsN/J6Ucs51/JkWiWwKcWdN8PjRALdvDyj5w3cD/PhnA3z6YoBLKwNsbQ3wzVcD/Pb7Af78xwE2NuPYOY9UxccveQTy723RU5B/ee28g5WzsXM2bt7BLTj4JZew4isEJdnPxclbhJUU19dWsTMpdbObcB0arSJHlprMzFdZWKyzcLTO7JEqs0s1itMZ7IpNuuZjpi30dAq9nFNjpzI6di5NfW5uF6Vej8rMNJafwtIcLNPFMiLYhoee0BFrVwSPbwu2rglurQm%2beSn49pXg5SPBo23B8/uCz58Kvnwm%2bOG14OrFQRzPJJWx9l12hBknQtZRF6bRnWACN9BV31D1sZmcHEfXkkxMjOP5BlcvnUN3bLRChmTKp1EMObZQY36uzMJ8mbm5ErOzRWbnStSaKYKcSb7g4NhJjFSAXi1g%2bR4JL0HB1DgduiynPSVPpV3OBC7Vhs34CYfEEZupozZTSzZTJ12mshri9obg2YPoffm719Hbkvyt/OYzwfMHgoe3o7ZvPxc8uy%2b4uhrDS8trMYcg55LKu4QSOYeUrOdcAnk3mLFU0sKUN8hpS/WT/cfGR1Uic2x8HMNJcG75GGEmxLai5GitmuGYXPn5MrNzRebmS8zOlJiZL9PoZkgVbHJFB8vXMORtkCMTsSbvhTqHnSR3nUm2nUnue1M8DhM8TEzw/gUH8WPI0LrJ4LbF4KbJ0I9pxhdNxEenBKvnB9i%2bEeHc8gArHw%2bwcTWSF84OcGt9gK3rA1y9JDj5fgzLNXADAycwsH0pTSVtT9%2bBvAjV1bW3bifQrCl0J4kpda6GbiWUXmaQjh7ucfnSR3SaRWrlNM1qhmY9Q6OeptHIUKunqdXStNoF8mUfy0/iBTqalyDhJ9CCKDM06SVIaVPMOzrTlsasrTPr6CyaOvmiwdi8yeS0ycSMycQhk4k5i4kggdC0JK7bT1mbeK6J40RlKSUMQ1ewbQNzJ4XdT2WrTOtOvY9d3YH2vpTZ3r39Zf5PPX8nSbprYyeH2NcpG3ueu%2b%2bZhkFSpvQtm6RlkTAtpiRkat1w8DQHV9%2bB5uAnHYykLgmQKecomysnImW/LNPNMsMj01QyfS37SbkXMnvTT2/3%2b/R1ErK8t39f1x%2bzV%2b4tH7Sx/xk7dg/MRxJRLpVU2qyQz6tyPpeLssky%2byTT9raF6TmY2RBN1/oEyAdZb0CulOs4%2bL63%2b2HC3g8c9spfoutHwLt0ci4/Z6MfVfJ7hG63q1Jr8sZIyt1vDCR5coEDD6NWVFnqXQL2frjQh9RJ9mQEHGw7uGLv0v1c%2bx/SRpSCTyrIch8Ht6iCaaq2nyLAekcEqFy9d2ACEVnRVyB98t7U7W%2bPxh3U/SFs9MdJhGGostV7Ib892Ac/IAzkNZ%2b9NwL27//%2bROQZINPVB/eg3OtvrsS793S/7W26P5QNOU/5hYnMUEuobPNbUKnXqLSbZDPZiADXkQYsnB125ecne2EY8iSXoWPulvs4WD%2bo%2b7n2X2xD/SpEkFv1%2bPHjLC0tsbCwQKlU2odiqUS5UCSc6eAdnyNMpxHnZwa5diTG6kKMq4sx7pyM8Wg5xsMdPDoT497JGNsrMe7cjHFnM8at9UFub8TYXh/kwXaM7RuD3FqPvaGTUOWd/rLPXp209UttRLpB7m7FKBTku4P81yj/BbZ2P7jah3KZQqtBYbqjCBMXZwVXDwtW5yN594TgybLg8ekIsvzgpODWquDetuDelkC%2bPd7djOTDW9Hb49t0ErK8t22fbsfWL7KxKbizIbh3U5BKOaTCNGEY7X15%2br8VYUg2TKvz7X8BodkL03PHFr8AAAAASUVORK5CYII=' /%3e%3c/svg%3e)
softwareupdate - Navigate to Setup > Diagnose and verify that all modules are communicating before proceeding.

Boot USB Update
A boot software update should be used if the 20|20 monitor is in a state where the software update page cannot be accessed.
-
On your computer, download the lates 20|20 boot software and copy the software downloaded to the root of your USB drive. It is important that the file says '2020Gen3-full.img' otherwise the update will not work.
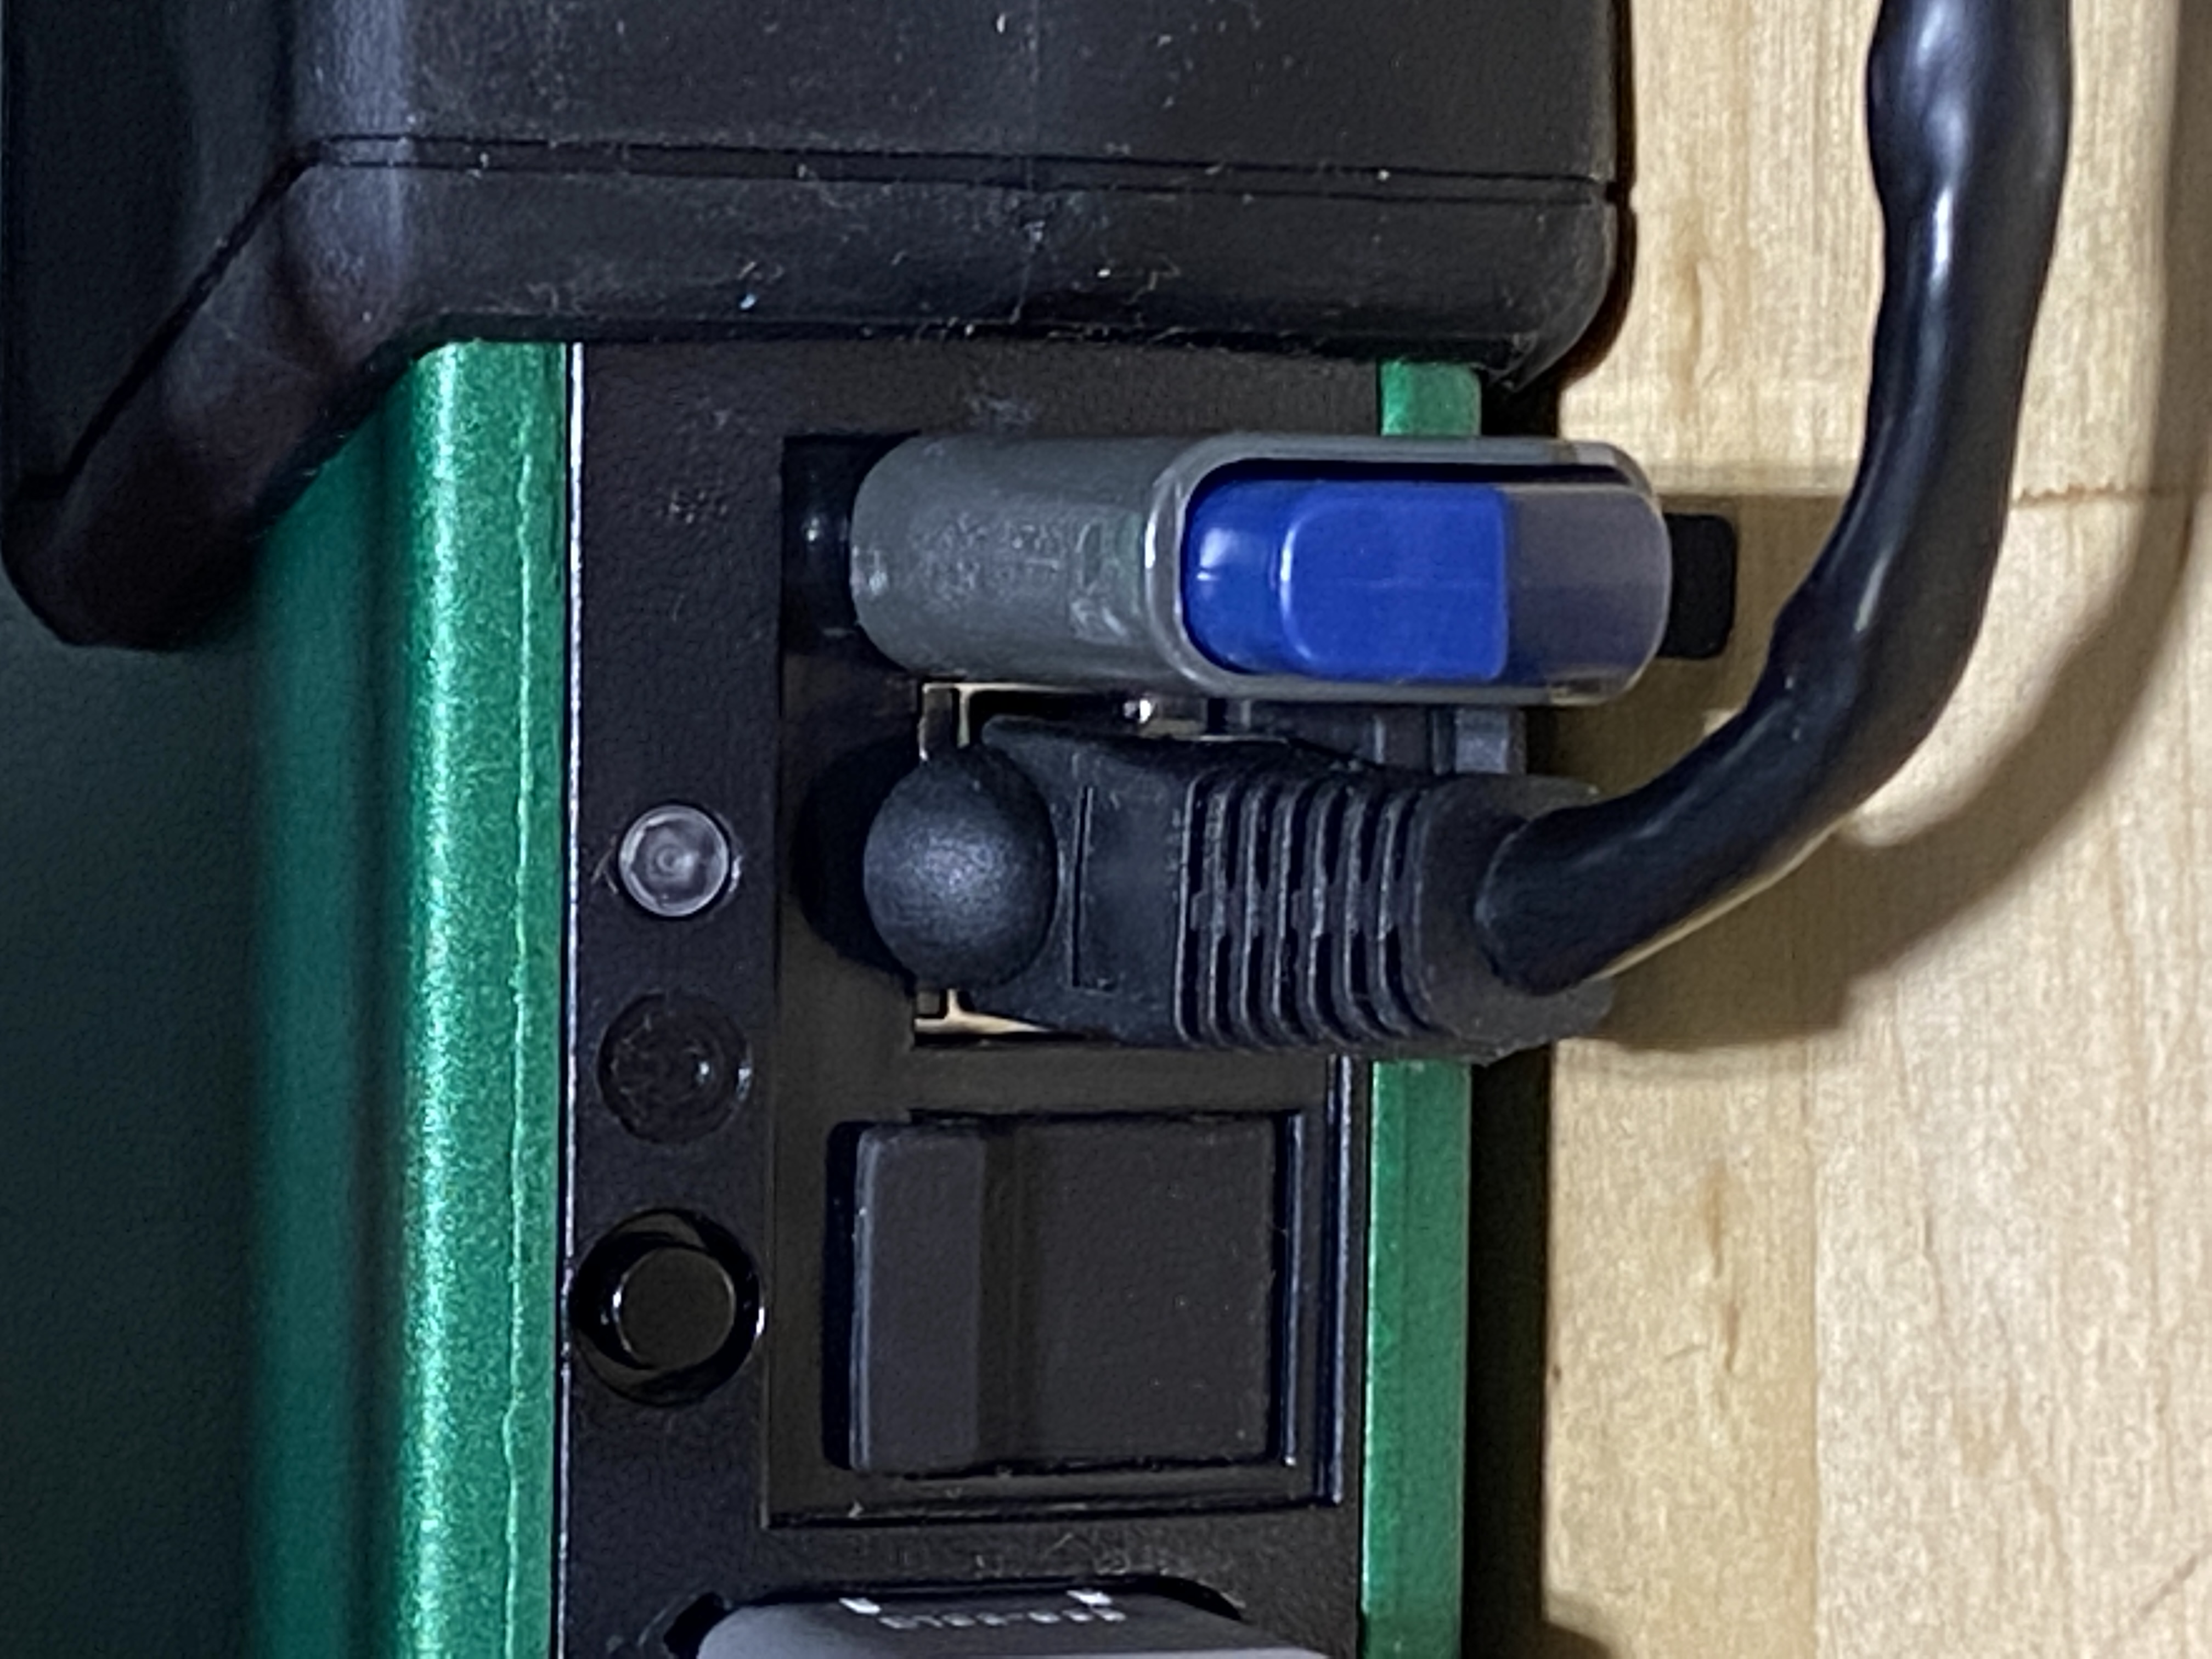
softwareupdate - Locate the Display Base Module (DBM) and the USB port on it.
- Using the power button on the DBM, power the DBM off and ensure that the LED light is turned off.
-
Once the DBM is powered off, insert the USB drive into the USB port on the DBM.
' width='2560' height='3414' xlink:href='data:image/png%3bbase64%2c/9j/2wBDAAYEBQYFBAYGBQYHBwYIChAKCgkJChQODwwQFxQYGBcUFhYaHSUfGhsjHBYWICwgIyYnKSopGR8tMC0oMCUoKSj/2wBDAQcHBwoIChMKChMoGhYaKCgoKCgoKCgoKCgoKCgoKCgoKCgoKCgoKCgoKCgoKCgoKCgoKCgoKCgoKCgoKCgoKCj/wAARCABVAEADASIAAhEBAxEB/8QAHAAAAAcBAQAAAAAAAAAAAAAAAAIDBAUGBwgB/8QAOxAAAgEDAgMEBwYDCQAAAAAAAQIDAAQRBSEGEjETQVFhBxQVInGhsSMyYoGR0VKC8BZCQ0RTcnOSwf/EABkBAAIDAQAAAAAAAAAAAAAAAAEEAgMFAP/EACcRAAICAQMCBQUAAAAAAAAAAAABAgMEESExEkEFE2Gh0RUiI0Kx/9oADAMBAAIRAxEAPwDnpTSgNP8A2eo62l0P5DXosk/0LgfymmOgyVlwYwBHjR1bBp56lCOsUw/lND1aAH7k3/U0VE55UV2Yg9yYreRwd1UkHzxVeV%2b2fLgtIT97Oc/GrT6vblSrJNg/hNR8tjDAS9qH5v4GU4P7UHFltOXXro0yPaB1PK0DKeuMUFiY9EbPwqf0mCXUU5TKI1BwUxlgfz6VIrw3csXBulGGwC2N6Ki3wONljXjZeU5vr382NB%2bPoEbDX95jrnBIA89vnVH1a2is9TurWCZpYo5Cqu43xjODjvH/AJUcsYzIRLEeboC%2bPL9K6VrWxlLwLEfZmpHjSMdNSmx13AwflRxxeHIC3zt3jKqT9KzOGEMqrzhuUY92n2l6tHoV4s06c3uFR458qKt15A/AcX19vgv/APa%2bIf58fmkf7UZeLULBVvoPiyRftWXSX0c7yTZ2ZixCjYZNHivIcKSSFY4Bwevh86PmMj9CxfX2%2bCx8QX/tDWZLjtIpGESKWiCgHr/DtmmMErDILAczknao%2bMgXcoz1C05AOSfxH61HXuatVUaoKuPCEtRZjeSO5yAVHTu5M/vXoltj/hxY84V/anGrZeebKKvJJ2QwMcwCnc%2bJzt%2bVECnHT5VU2%2bxfoJq8bzfYRxqwRiSsYXPTAyBT3T7LSJdXvfac6NHFlUaQbHA2x5U0A5ZB/sb6Ue3iR1MjE8gUD7oOKnXvLVkZ8aDDS7Kzn1EqnN2JbmRD0cAjI%2bG9XPiDS7T2WCbeJWAHKVjVSCOh2qC0dbd9YaV2YC1HKAF90jGWzjvJIAHxq067cQXOnxrGXR5ldo1YAh8dQME4Ox2OKvjVNxlNLZFMppSSbKAARqXJnfGTUjBEzx5XfLN9TUZL7uqMR1VBT23mIXGcbnp8aXTLmib9ltdoXmnHO7F25Y8jOT5%2bdJnh0KfdnfH/AB1omiega0m0%2bB9R1LUILthmSOEIVU%2bAzTuT0BWQP2Wv6io/FGv70msuK4K3iZLe1nsjLn0hIFZzI7EKce6RUYkghgkSRsEgYycZrWb70IW9jay3Y4jviIFMmGhBBxvv71Y5rMUouX3HJKMpkeHd/XjTFN6m9iUabK4/keo40QAXdwxbJkzlW6bEYNTcrNPLZh%2bzDCTlUhQu3I3XA3qH05riS2jCSKsKpmNAoyDn3gT8c1buG%2bGbviDUrKwhMkUk7gNMq57FSrAvjbpmtajPqrxJ1vl6/wAF7cac7VNFJuYTFrF3G%2bMqFGR06CvY0PKKvOu%2biviPQNWnt2s77U4ubEd/bwtIsw7iwBJVvEH9TTBOCeJMBfYWqc3ePVJNvlWN5sX3HY1zSSluzqxLaZT7kXzFK9hcucY5fIFad4IB76NErYHO3IO/pWaq0OOTILVdNd9Lu4uR3LxsMM2e6uXdZ0p5WeznjeGYN7nMuCrdBt4HpXYBSMjALE%2bNZt6U%2bDn1ALq2lx5u4h9oidXA7x5ipxXQ9URb6tmcwyRSWfrFld2xLcxWSJiUcN0OD/XdWoegdNOsuKi4uXtpZISjR3kgUjfpvirDJp/DvHsccetyHSuIUURC6VQVuMbDnU9T3dxqJ1f0Ja/A6rZX%2bm3yMCVBcoSB5MCO/wAaac4Wr7tipRlB7bm9m3hmfMTB0B27P3h%2booyzRB%2bxW4XtOgTmUt%2bmc1zG3AHFOhOXm4ekuIiMN6u8hU%2beYnzTS0tDYMO14TEjZPOJTISc/EcwI8c5qMMWt/uF3SXY65bIk5Qduo8qI7MuATkN8qFCly0TZyp2J%2blBmG%2bQTgZ3Y0KFEBVtf4G0nXS9xyGzuTkmSHvPmOhrPtW1TXOF51todVa5iiJCiWIbbfGhQoaBTGh9JGuMMH1fmH97k3%2btKL6U9agH2sVvLjfO6n60KFSUUcf/2Q==' /%3e%3c/svg%3e)
softwareupdate - Press the power button on the DBM to turn the DBM back on.
- During the update process it is important to keep the 20|20 powered and not turn it off. Turning it off could result in data corruption.
- The DBM will automatically check to verify that there is boot software on the USB drive.
- Once the DBM finds the software on the USB drive, a flashing yellow light will occur on the DBM which indicates that software is being installed.
-
Once the 20|20 monitor turns back on you will see a popup that says 'DBM system software updated successfully'.
softwareupdate - Navigate to Setup > Diagnose and verify that all modules are communicating before proceeding.
USB Requirements
For the best experience of updating software these are the requirements for the USB drive being used:
Connectivity Speed
- USB 2.0 or higher.
Memory
- 4 GB or more.
Format
- FAT
- FAT32
- EXFAT
Over the Air (OTA) Updating
Over the Air (OTA) updates can occur when you are connected to a WiFi network. For more information about how to connect to a WiFi network click here.
-
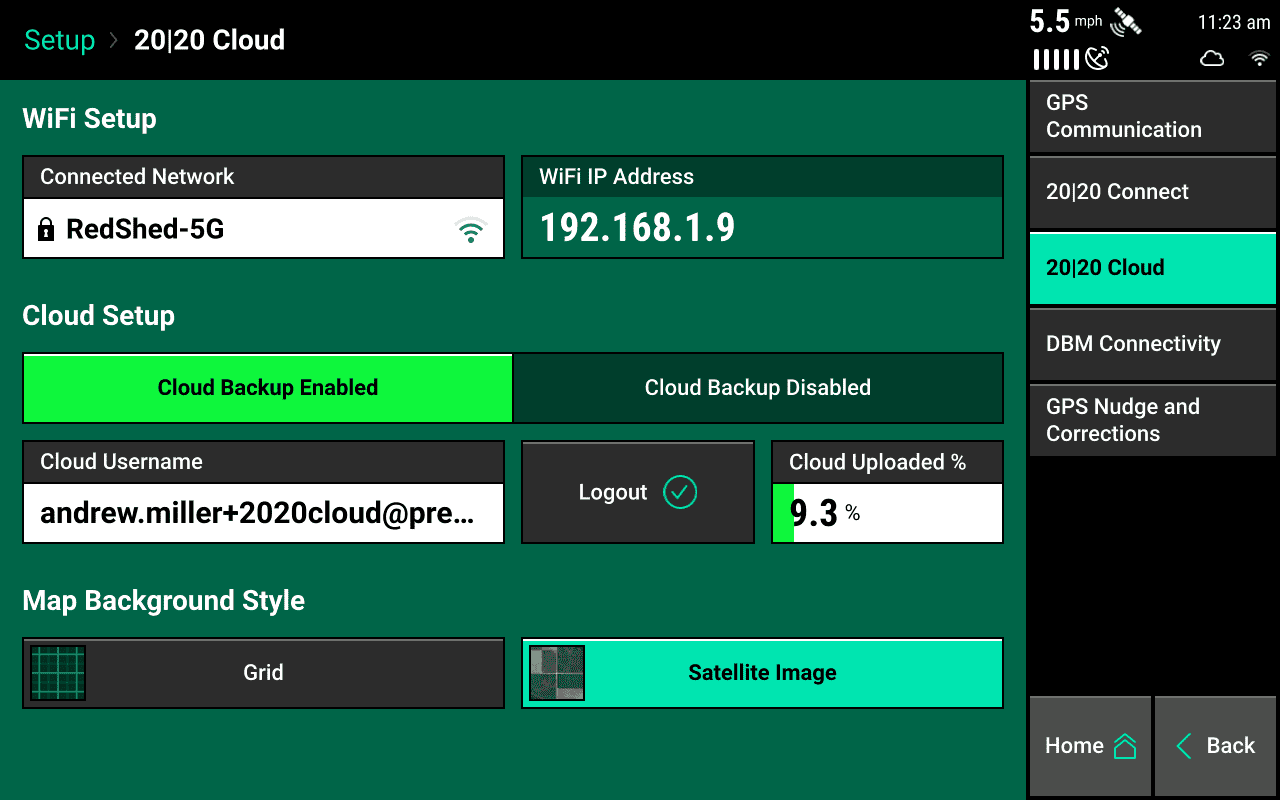
Before starting, verify that you are connected to a WiFi Network by navigating to Setup > 20|20 Cloud.
' width='1280' height='800' xlink:href='data:image/png%3bbase64%2ciVBORw0KGgoAAAANSUhEUgAAAEAAAAAoCAYAAABOzvzpAAAACXBIWXMAAA9hAAAPYQGoP6dpAAARIklEQVRogdWaCZhU1ZWAb/UGAt1sDSbs9F5rV%2b9LLV3d1VXVXdU7vdDd1fuKsmOgBYMmJhoVBXV0DDGZJAMjTFg0YgiTGRwECSgYTRTMYNQ4xCgRUFQ0M9/kz3fvq2qWCAGcfEn6%2b/7vnHvfea/fO/e%2be885r4QQgr93dDqdknq9nsLCQsxmM6NHj2b69Omkp6dfYDd58mSmTp1KfHw8cXFxsl8gkqYhDLMQCVMQX5yI0AkmxsdTUVFBkctFqcdDXl4eLpdLyZycHGbOmnXBP/9bcEBCQoK6v9TUVOWAlJQUqquriYqKGrabMGECs2bNUrYTJ04MOUA%2buDUZYU5ApM5QxvETJlLm9eEuLsFVVER2Zhb2QhvlZWV4PR6mTpmiXfRvYQaEZMLs2VRWVlJSUkJubi5TQvd4PnL0pYyNjWX8%2bPEIER2pLhC%2biC5Chy4mGhF5BSMbE4U8/6%2bNul8hSElNVSPudDrV1JevgOyPjo4mMjKSmJgYEhMTGTNmDGPHjlUI0VGKaHUigkWIjhJNNts1gi50XR4iurxK6rq8SpeITg%2biw406/28CN%2bPSU3DkFeAPBNRrmpaWhtVqxWKxDGMwGJSUDkpMTEToBvyU338LHf%2b0BttdSyleswLvupW47x3C8pV56PrLEX1ln4/%2bz3n%2bn72%2bvEcfk/PMNNTUEmxvo7S0FKPRqB5ULopSygc3mUyqX/YlKgf0lZHzjcU47lvBtJUd5N69lKK1Q/gfvg3n2iHEPD9iXkBj0I8YKL86BkMOHChHp84PMehXbY1rvPYwfkSvl0m5Jqr9AZpbWmhvb6ejo4Pe3l46OzsZGBhQMisra3gWJEoHiF4foioP4ctAlGUiPOmIUotGeRY6fw4RgVxFdFUB19U5ro5aB7p2N6LRgajORdQVIOoKEbX5WltSlaO1G%2byI%2bqvgfPsON/G5JqwGE%2bmhaS9HXSJfg/AMkKMvt0spZ8%2bejRBdHhIsRmorKqmuqqK%2bro66mhpqq6ppmFNP89y51NXWKsp8PpISE0lNSdFIvgzDx5OJDuQR6bLgvrET57wglrZqhW2gBcdgkLyeRmbWuhGFenQ2g5JXRUEaosHGpHyLcoDJbFZTXSIfVq4F4YcOI48lJCRoDrAWFdI6t5nWYJDW1lba2trUFGpoaCAYDCpd9lXX1GC323E4HJfFHpJFTqeyH1VrR3gzmNLsY3y9i9HVNsbWFTG9zc/UYDkz2yuY2FCCKLEgXEZlKzxXiLQttaoZNjHPxNyGRuYvXsTADfNoammmu6%2bXju4u%2bufNo9TnJc1owCTXBauVxORkhOjxsnP/Ht47cYLXfvUr3n77bV5/4w2OHD3KiRMn%2bO/jx3n99dc59toxTp46yYcffcSHH354eT76kA/OnOHE%2b6c4efoU5mUdiGYnCTd3kv3V%2bei/3Efc/FoSVnRgXj3A9UuaiF/UwPVL52K5bR6i24N6Na%2bULo/asSZZ08ickUhmip6MpFQss5PITjUMY56dhGH6LAwzZmOamUDCF6YgYgYr%2bMGPd7Dpnzfw1I4dPLZxI9/8x0d49JvreWzDRrZv3cq%2bZ/by6Ppv8eH7H3A1fwdPvMn//uH/yBrqRbQ4CTx0G7c%2buYGFmx9h9soubnni%2b3z72V00fetO8r%2bxhOJ7V9C/4QHtoeTKfiUMhBbZBhvxLWUYl/eRsrST1GVdpC7rVnrKEkkHaUs6SVvapaRheS%2bzWisRuh4fj2zfxL7nD3LwFy/y7M8Osf/Fw0rfe/g5pR8%2b8rKSz7/yc1549ZUr5tmXX%2bS5l18idXEroi6f6A4P0e0exvdXKn1kl4/Y3gCju8uJ6fAyotNLZJsb0epCBIsRrVeAtGsrQfiz0a3/ElEf/QdRr28h6q3tRB1/XOOdJ4l6dwdRp3cReerHRJ7cSdTZ3UQ%2b/aC2C0T0ljFyXiUx/QFiBgJE9/uVHDlYwYiBAJG9Zaovqrdc6VdKdJ9mr0a026tN1S4taFF6Zymi063JrjAezfaK8WgzYE4h4uEliN0PIO5fhPj2EGLL1xCPDiG%2bczPi4HrEb59AvLUV8eutiBM7EE/dE9oG5VTqlFGgE9Hl1m64rQjRLnFd3fv4WXxm4BIKkNRU/pyBkIxRGmyIBxYiPtiFeHML4vh2jfAD/%2bbxc7y1DfG7pxA/WoOIGgjgvm%2bI%2bkduV1JGgZX/cCvBb9%2bNb91KCu9agq6/7NoZkDfpQ/R8TideCnld6YRON%2bMCNmbU%2bfhCVTFTa0uZWlPKtDqPItyWzKwvY3ZTgC%2bWFiIi%2bsuZurQN06obyLx1IYnLe5h1UxfWL88n%2b7ZFZKxegAh6EO1yVngvj7S5GNnfLUdJi/7%2bYshQONNAWb6dOYFKSm0OPDYnjuxcnNl5uPIKcBfaKc4vxJyUQnpyKknTZ2rbYNwqHxO%2bUc7Yr/uYcGc5E%2b/0M%2b7rPsbdUcb4u8qZcm81U%2b6rZsraak0Pc99F3HMhX7y7iqnrahi7pBQRyEXUyOjvImQUWpl7Toa5uF2Ro/VdfH6YtmIVCNVVVTM4/0bmNDTQ2DyXts4Ounq6Cba30xIM0tPXS3pGBkaLmcSkJIRcRMYftnE9LiZ/4mLyp0Uav5ftIib9zk78Bw7i37MT/66N%2bNN24k/ZiT/jIP6EjfiTdk3%2bzkb8J07iPy0KSSfxHzmZTDFjNmQiLCkI%2b59GcSNdVkYVZzCiKJ3Y0mzVvq44gyiHiVElmYxwpSsZ58lRNirquzgSzE9D1GuRYFpCkirWyDg/KSlJybAuIz9ZLLkwEuz2ct3hPGKxMeasjTGfhvgfO6Pfy2fkVj0jt%2bkZ%2bSMjI76fwsgnDIx4LFW1w/qIjanKZszHhYz5/XnX%2bNhGLA5G/EsGIsuAKDYjikwaThO6IjOW7jl4lvXjWtRF6dJefDcNULKkh9Klfdjmt%2bNY0EHF0HyqVy7E3FWHKEhB57Kcu47EYUQ02onPM1OYnaOqWDabTRVFJNnZ2WRkZCg9HB6fywW6vYz6aR5jf28n7n0bcWfsFyL7ThYSezrEqUJi3wvxvo3Y8LH3C4n9wHYhpwqJ%2b4Odkd%2bzIjL0iCKjdrP2sDQMOyKiyKz6pNQ5TUQXW5WUOYREF7KT9hcQvk6D5oCm2jkE29pUGC/D9/7%2bfpUFNjU1qcxQOkI6YDgdFjIOGHQgBvIQA/l/yqBGxHw7kQscGgtDhPUFl2C%2bdlzX4yCizk5kvZ2Iek2GiZijoQvJiDk2LbuTUr7zgezQOpCjrQPh9SC8NtQUaOe0lzA5z0J9VQ0tra0qh5EPLh0gHZGZmalGX2aE4fpAUngNmJFupry8EofLjcvtpbjUq%2bQwJR7SjBaSUvUkpxpIuojz%2b5LTzsdIUoqeEZU2EvIzMGdaMWZlYJJkZ2LKztDamVZMGVaM2RkqlZ3izuM6bzY2uw1PVQWFJUWU%2bMtw%2b8so8nnwVAaULC73YcnJItGoJ6LBwdhsPabkVDIyM1XeLx9aIkddjrac8mHk%2bz9V1Qe7PCRmmKirrqaxsYGG%2bnqqKiuZ29Sk9LlNjSolzsrMwKBPw2I2Kcwy3ZSLidGAQa9XUraNBgNGg15JU0gfWVlAQroRS5rWZ0jTk5aSgj41DbPegCErA31OFka9gfRUPVPsmYwqzqTU5iTYGmRuY5NK09uDmt7Z3kFzUxP%2bsnLyc/PUtWIaixCJX7iGomq3l29u2sDPDr/A3n37%2bM89e/jpgQMcOHCAZ/fvZ8%2bePex%2b%2bmmeP3RIsXfvXvY88wx79%2b1VdgcPHuTFF1/k4HPPceDgQQ4dOsQLL7ygbKW%2bf/9%2bUm5sYpopFYvRhCU9nbb2dvU%2bStw%2bLzP9LpIr3RjSLVgMBqZlZSFuzcT9kyb2/Psedu76MXue2aP%2bp5TyHsP3cODgAfbt28e0BY2IGfFacfeqSvU9Xg4e/QV7dj/N5n/dzKZNm9ixYwe7du1SD7tt2zYefughtm/fzvPPP8%2bGDRvYuHGjspO6PL57927Wr1/Pli1blN3mzZs5fPjwcFaYuaKHKfpkrCatUCFX42KXi/z8fNIt6aTa80iz52E0mUg3GplmzkR814Z%2bj5sDP9nPUzuf4rXXXrts5pmyvAMxfcI1OKDby08OPst/HX2Vl156iSNHjvDKK6/w8ssvK/3YsWNKymOyViCPHT16lFdffVXp4WNytJ/dt0/NGDkjXjlyhHfffZczZ85gWdbBlLQkLAajqsfJCo38aCH3ZLUlpaZhTEvDIIuVBj3T0jMR67Ipe6uHX/78lxw6fIjTp0/z8ccfc/bsWc5K%2bfFZ1f70k084feo0icuCiOkTQw64mleg18eMhU2kr%2brDdHPPMOaQNA51Y7q5G/PKHvTLOzENdau%2bMIYVXRhvljY9mFb2Yl7Vi/HmHtWfclM7iUtaiZFZZL2DmDkhpF7v1ORwO8QcO1FNxYj%2bYsbdFMC4ohvDUDfJy9pIWtpK0pKLWNpK4uIWogcCiFmTtYe6WgeIoB0xtwARdCCaCxCtNkRLiFb7uba0aykMYUN0uBBdJVomqSgOEWrLzLI7lF2GK8RXUkWWsrccob4/nHetyyHPmXX91TsgejBAyZoV%2bNauxLi6n7K1q8i%2bfT6ue75E4Z1LyLp9PplfvZHcry2k4I7FFN%2bzXB0ruvsmxi6oU9lYRF85EX1ll0SEawIXUHZ5%2brRsUiZrf5a%2bUGn8WhwQ2e/Hdd8Qwe%2buwffgatzrVlL24Go896%2bi8/trKVm3UuneB24h/66lFNy9jKZH76Li4duYsKxJ1eOV91VufwmUE7yIHs9fBlkUudYZIORozClAVOepSEzV7WV1pa4AXaNTq73LtqTepslQX9RcFyNb3IxsKbkkI5pLiOjyMKKvgjHzaoi9oZa4G2o%2bm3nVxM0L66H2YIhLnSMZrFYz4ZocENElv6iYGWezEFdoJsVqJtOagTXDSro1XUVm1oswWyzquNzTL4s1HYvJRESDC%2bv9CwncEsQ8v5L4f1tH7PEnGfurrcS9vk1D6r9%2bgrg3H9fav35c4zdPEnf8h%2bfszkee88Z24l7dTMTiOsSMSdouEHEV22Bkl5dR%2bcbQF6F0ppnT1E0b5De0CzBiMpsItgXpH%2bjH4XSQJiNA88V252E2YdLrEY3FZHytndpgPpbKNGJ23IE4vRNxfJtWtjr5FGLnGsRDS7X63YNLEFtuR2z%2bCuJbyxE/uB3x9uOfzTtPIN74AWJJHWKa%2bt5/dUR2eYnLSCWiQE9kgZ5ZqclYU/SYZZiaqr%2bINHIsVvIzs7DqjZhTPsvmHBYpE5OJaXITe1MNBW25VC71MW73OsTJnehkfe7tJxDv/FCr4x3ZiPjlYxrHNiGObUYc/g7i599DvPOkZvvbH55Dnfsk4s2tiEU1jEqbyeTxE4mfPIlJkyYRPyleSfk7APljiPhJWn%2bYcePGyUjQx6jyPMZ4chjtzSHOm8s4X94lkYUJWbgY%2b2fswki7iNYSxPImIoeaGX1LkIg7ehH3DCLuHjjHmkHEfTec4955GuvmI9beeKHt%2bdwziO6ufrUQpngd1AQqKff78fv9VAQC1FRUUlRUpH7YIXMc2V9eXq5%2bSOFwOBBaVdV/5dwgCVydvdwJ5ErdfV5ZvL3kT2k7j%2bG%2bUN2//dLoVJndTYrPQdvcZubU16vvmv66GrytjRQ5HHj95ZTX1dAyt5nGxkZVH7Db7aFdoOcvzMWl8Sv96nOFyN84KAd4HSxbsIgvrVjBqhVDBAa6KFjcg9PhxF1dQUlzPUsWLmT1ratZuHChqhppM%2bDvmV4fOhkIdblJ9Tmpq6wiUFGhfuBVWVVFdV2t%2bnGXv9yvPu7KqS8J/5RG/NUf4P/FAdorNsOZQ4ndic2hfcGWU1yOviyIFBQUDPepfqdTbel/BDDtlq9%2bYYTGAAAAAElFTkSuQmCC' /%3e%3c/svg%3e)
softwareupdate -
Navigate to Setup > Data > Software Update and click on any of the '20|20 Gen3 v..' buttons to start the downloading process.
softwareupdate - Once a software update is selected, the update will begin to install on the 20|20 Display Base Module (DBM).
- When the software is installed to the DBM a popup will occur then press 'OK'. The software will begin the process of updating and will automatically power cycle during the update.
- During the update process it is important to keep the 20|20 powered and not turn it off. Turning it off could result in data corruption.
-
Once the 20|20 monitor turns back on you will see a popup that says 'DBM system software updated successfully'.
softwareupdate - Navigate to Setup > Diagnose and verify that all modules are communicating before proceeding.